


 本教程介绍如何使用Visual Basic Express开发Inventor插件,涵盖从创建项目到添加Inventor API代码的全过程。讲解了代码编译、调试等关键步骤。
在课程1我们做了一个简单的例子,初步知道程序大概会是什么样子,如何用一个按钮实现我们的设计意图。所谓知其然需知其所以然,我们需要走到代码背后,解读其基本的元素,为进一步的学习做好准备。不要紧张,本课程在内容上考虑到了初学者,甚至.NET的初学者情况,在描述上尽量的不涉及到很复杂的原理以及知识点。当然,如果你想在有关方面有综合而深入的了解,可以参考.NET的教程。
课程2使用的代码工程如下:
| lesson2_vb-net.zip(zip - 19Kb) | |
| lesson2_c-sharp.zip(zip - 23Kb) |
What does it mean to “build” code?
The code that you typed in to Visual Basic Express in Lesson 1 was a set of human-readable instructions (source code) that needed to be converted into code that could be understood and executed by the computer. The “build” you performed did just that: it packaged up the resulting executable code inside a standard Windows EXE file. It’s also possible to create a DLL (Dynamic-Link Library) that can be loaded into Autodesk Inventor, but that’s a more advanced topic not covered by this guide.
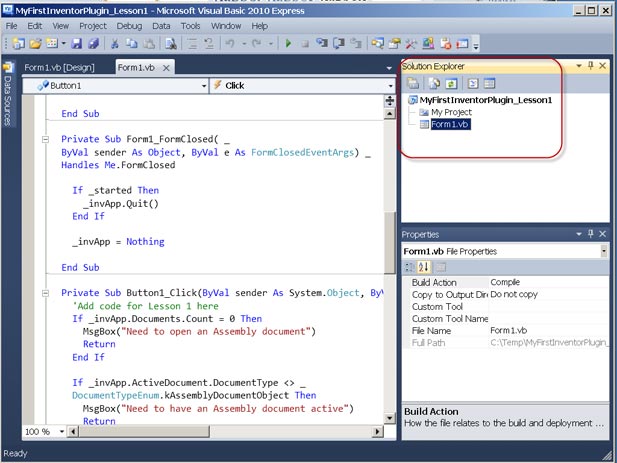
The following screenshot shows the output EXE along with the associated program debug database (which provides additional information when troubleshooting the EXE), once you have built the solution in Lesson 1 using Visual Basic Express. The path to which the EXE gets compiled is specified in the Visual Basic Express project settings and is set, by default, to the bin sub-folder of the Visual Basic Express project folder.
在课程1,我们首先打开了一个工程,所谓工程简单讲就是设计应用程序的一组文件,包括源代码,配置文件,资源文件等。为了让程序运行,有一步是在Visual Basic环境中,点击【调试】>>【编译 MyFirstInventorPlugin_Lesson1】。什么叫做“编译”?一句话,就是让代码能够让计算机看得懂,能执行。课程1最终产生一个EXE程序,类似我们平时运行的林林种种的软件。也可设计为DLL(动态链接库),这种方式作为Inventor插件加载。我们暂时不会介绍。
下图就是课程1产生的几个文件:EXE是执行文件,PDB是供调试用的。EXE一般在什么地方?通过代码工程属性>>编译选项>>输出目录里设置。

Choosing a Programming Language and Development Tool
Just as humans use different languages to communicate, you have various language options available to you when creating an Inventor plug-in: for the purposes of this guide we have chosen Visual Basic .NET (VB.NET), a strong general-purpose programming language that is popular with Inventor developers.
There are a number of tools available for developing VB.NET code. They range from open source tools such as SharpDevelop to Microsoft’s flagship, professional development environment, Visual Studio. In your case you will be using Visual Basic Express, a free version of Visual Studio focused on building VB.NET applications.
Visual Basic Express is an Integrated Development Environment (IDE) because it is composed of various tools, menus and toolbars which ease the creation and management of your code.
The project system in Visual Basic Express comprises Solution and Project files as well as Project Items, the individual files belonging to projects. A solution is a container for one or more projects. Each project can in turn be considered a container for project items – such as source files, icons, etc. – most of which get compiled into the resultant executable file (EXE or DLL). Visual Basic Express provides a Solution Explorer that organizes and displays the contents of the loaded solution in a tree-view format:
这是关于开发语言的选用。由于Inventor是COM API,可选的语言很多。本课程的是比较广泛使用的VB.NET。而开发工具,最权威的当属微软的Visual Studio。本课程使用免费的Visual Basic Express。这样在开发上你可以省去一笔费用。
Visual Basic Express是一个集成开发环境,包括了代码的编写,调试,工程设置管理,工具等很多内容。在课程1,我们首先打开了一个工程,所谓工程简单讲就是设计应用程序的一组文件,包括源代码,配置文件,资源文件等。最终产生的是dll或者EXE。
The Visual Basic Express interface also contains a text editor and an interface designer. These are displayed in the main window depending on the type of file being edited. The text editor is where you will enter the Visual Basic code for your Inventor plug-in. This editor provides advanced features such as IntelliSense and collapsible code sections along with the more classic text-editing features such as bookmarks and the display of line numbers.
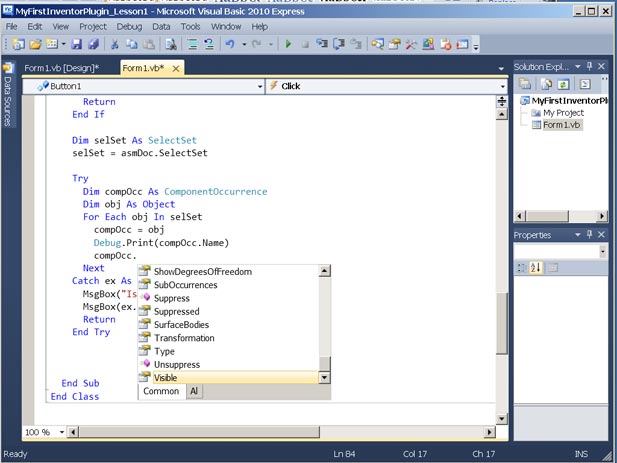
IntelliSense is an extremely valuable feature of the Visual Studio family that greatly improves programmer productivity: it automatically provides suggestions for the code being written based on the objects available and the letters that are being typed. IntelliSense showing the methods and properties for a ComponentOccurrence:
工程里不同的文件类型会有不同的编辑环境。例如在课程中有Form1.vb,双击它进入了对话框编辑界面,能直接添加布置控件,例如按钮,单选多选控件等,而打开Form1.vb的源代码,就可以在编辑界面中进行具体编写。
代码窗口中,可以看到诸如Dim xxx As xxxx 形式的代码,这是在定义变量。我们会使用它去操作对应的API。而Visual Basic里自带了IntelliSense工具,当变量后输入“点”号,就会出现其支持的方法,属性等内容,并包括方法的参数,属性的返回值类型等。而不用你来回的翻阅帮助文档,从而极大的提高设计效率。
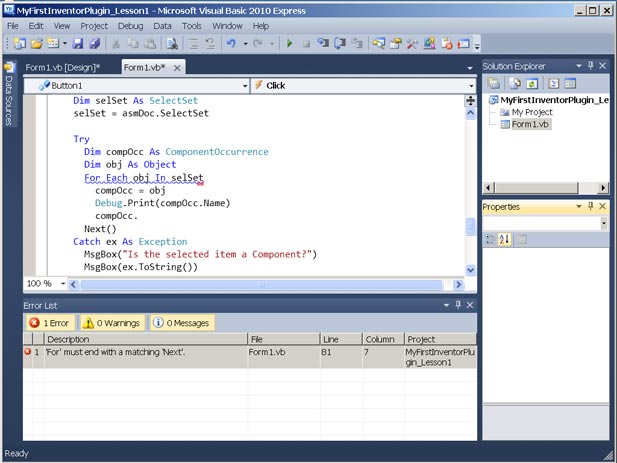
Clearly one of the key features of Visual Basic Express is its ability to build VB.NET code into an executable file. During the build process, the language compiler performs various checks and analyses on the code. One such check is to ensure the code conforms to the syntactical rules of the Visual Basic language. The compiler also performs various other checks, such as whether a variable has been appropriately defined or not. Detected errors are reported via the Error List Window, typically found at the bottom of the main window. The Error List can be displayed by selecting Error List from the View menu > Other Windows.
毫无疑问,Visual Basic会将代码编译为可执行的EXE程序。而这个过程包含了代码错误检查。所有错误会在【错误列表】中显示。你可以通过主菜单的【视图】>>【其它窗口】>>【错误列表】打开这个窗口。修改错误是代码调试经常做的工作。
The Visual in Visual Basic Express
One of the main strengths of Visual Basic Express is its set of tools for creating a User Interface. When you create a new project you can select a Windows Forms Application. When this template is used, the main window for the application is automatically created. This window is called a form and you can place user interface elements (called controls), such as a command buttons, on it. You add an element simply by selecting it in the Toolbox and then clicking and dragging it onto the Form. The Toolbox can be displayed using the View menu > Other Windows > Toolbox. Much of the code to make these elements work correctly gets added automatically to the project, greatly reducing the effort needed to get your application up and running.
设计可视化的界面也是Visual Basic很大的特色。你可以创建Form,Dialog,在其中添加各种控件。通过【视图】>>【其它窗口】>>【工具箱】可以打开控件的列表。
Reviewing your use of Visual Basic Express
In this section, you will create a blank project similar to the one you were provided in Lesson 1. This project will be the starting point for Lesson 3.
- Create a Windows Forms Application:
Close the project from Lesson 1, if it is still open in Visual Basic Express, and then on the File menu, click New and then select New Project.
This will open up a new dialog called New Project in which you have the option to select the template that will be used to create the plug-in application.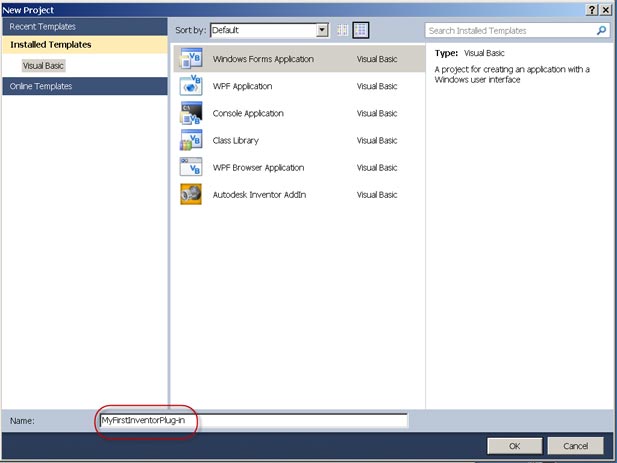
As you are working with Visual Basic Express, your installed templates are under the Visual Basic category.
In the center of the dialog, you can see various application templates that are available to you, the choice of which depends on the type of application you wish to create. As you’re creating a simple, standalone EXE with a dialog-based user interface, select the “Windows Forms Application” template.
You now need to select a name for your project. Enter MyFirstInventorPlug-in in the box near the bottom of the New Project dialog and select OK: The basic solution containing your project should now be created and loaded into the Visual Basic Express editor.
重新打开Visual Basic Express。点击【文件】>>【新建】>>选择【Windows Forms Application】。并输入工程名。
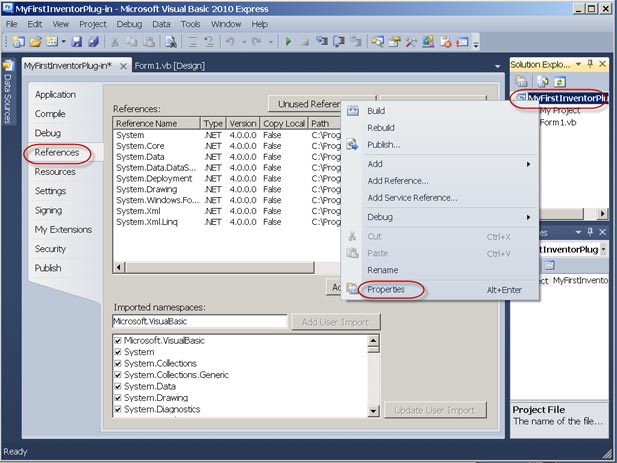
2. View the references:
By default your blank project was created containing a few standard project references to core .NET components. You can see these references by right-clicking the
project in the Solution Explorer and selecting Properties. In the Properties window select References.
Along with the standard references, a blank VB form is created and added to the project. It’s this form that gets displayed in the text editor window, Form1.vb. Forms have two views, Design and Code: you can switch between the two views by right-clicking on Form1.vb in the Solution Explorer and selecting View Code or View Designer.
工程建立后,到工程属性管理界面,点击【引用】,如下图。缺省的,已经有多个.NET方面的引用。
3. Add references:
So far you have created a blank Windows Forms Application project using Visual Basic Express.
This blank Windows Forms Application project, as created by Visual Basic Express, does not automatically make use of the Inventor API. For it to do so, you need to add a project reference to the interface DLL in Inventor describing its API, Autodesk.Inventor.Interop.dll.
In the Solution Explorer, right-click the project and choose Add Reference. Click the Browse tab in the Add Reference dialog and navigate to a location such as this beneath the installed location of Inventor on your system:
- C:\Program Files\Autodesk\Inventor 201x\Bin\Public Assemblies
Select Autodesk.Inventor.Interop.dll and then OK.
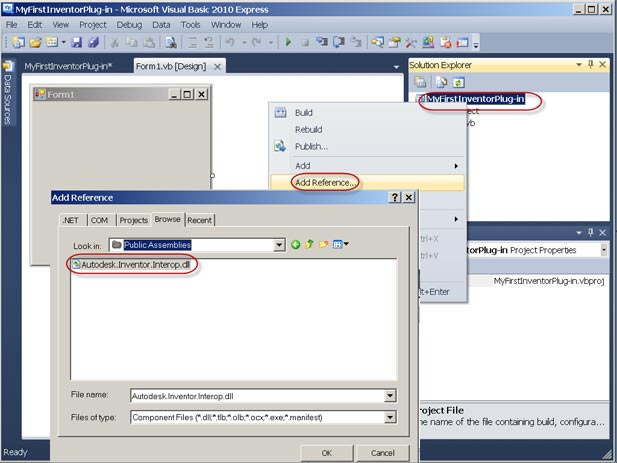
The Inventor API has now been referenced into your project.
在属性管理【引用】>>【添加引用】, 浏览到文件夹C:\Program Files\Autodesk\Inventor 201x\Bin\Public Assemblies,选择t Autodesk.Inventor.Interop.dll,OK。这就是Inventor API库文件。有了它,就能访问到Inventor API所有对象
4View Object Browser:
Before proceeding further, let’s use the Object Browser in Visual Basic Express. The object browser is a tool that can help you understand how to use the objects in the Inventor API. Once you have referenced the Inventor API (Autodesk.Inventor.Interop.dll) in your project its objects can be displayed in the Object Browser. The Object Browser is a dialog containing a tree showing how various components’ objects are organized. As well as using the tree to browse the hierarchy, you can also search on the name of an object to access it directly. Once you have the object displayed and selected in the left pane of the tree view, you can see its methods and properties in the right pane. In the screenshot below, the Application object is selected in the left pane and its ActiveDocument property is selected in the right from among the object’s various properties and methods. Try selecting other properties to see their details.
Note: To display the Object Browser go to the View menu and select it. If “Object Browser” is not available on the View Menu then go to the Tools Menu, click on “Settings” and then select “Expert Settings”. Also by default the function key “F2” will display the Object Browser. (In both Expert and Basic settings).
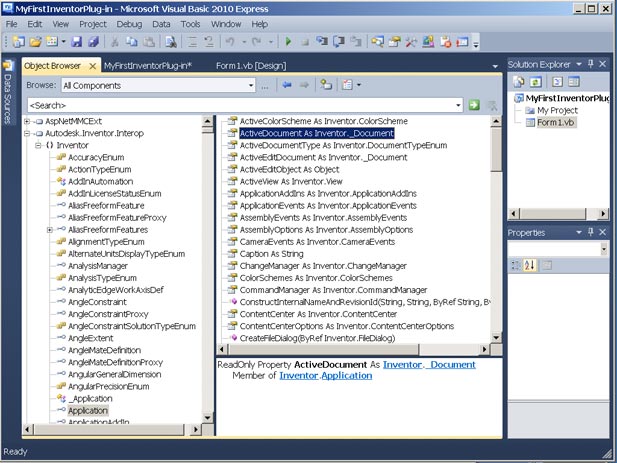
在菜单【视图】>>【对象查看器】,找到Autodesk.Inventor.Interop(如下图),展开它,找到Application,在右面的列表中,可以看到Application的所有成员属性和方法。其中有个ActiveDocument。有点属性吧?对!它就是在课程1里使用到的当前打开的文档。就是通过Application访问到的。
5. Ready to add Inventor API code:
You’re now ready to use the Inventor API by entering code in Visual Basic Express. In other words, to provide instructions telling Inventor how to perform certain tasks.
可以说到现在就是万事俱备了,只欠你自己想做的代码了。
6. Build the project:
While developing code, it’s a good idea to build the solution, from time to time, to check whether errors have been introduced in the code. The code does not necessarily have to be complete or functional when building the solution. This approach can help avoid potentially lengthy troubleshooting once the code is complete, and has the side benefit of automatically saving any edited source files before the build starts.
To build a solution inside Visual Basic Express, select Build <ProjectName> from the Debug pull-down menu.
这开始个空白的工程,不过你可以编译一下,看看有无什么错误。编译的快捷键是F6

Tip: As a shortcut, you can use the Function key ‘F6’ to directly build the solution without accessing the menu.
If the build was successful, you will see Build Succeeded in the status bar at the bottom-left corner of the Visual Basic Express interface.
7. Save the file:
On the File menu, click Save All. Saving the solution creates physical files representing the contents of your class library project on your computer’s hard drive, allowing you to open and edit it at another time in the future.
A quick recap: in this lesson you took a brief look at what happens when you build a project, as well as some background information on VB.NET and Visual Basic Express. You then spent some time creating a brand new Windows Forms Application project in Visual Basic Express, adding the required project reference for it to be able to use the Inventor API.
养成良好习惯,记住保存工程。
Additional Topics
Visual Basic Express vs. Visual Studio Professional
In this guide, you are using Visual Basic Express. This is a free version of Visual Studio and a great tool to help you start writing and managing Visual Basic code for your Inventor plug-in without the need for an additional software investment. Microsoft has targeted the Express editions of Visual Studio at students, hobbyists and other part-time programmers. While they provide most of the features of Visual Studio Professional, such as IntelliSense, they do have certain limitations. For instance, Visual Basic Express contains fewer project templates and has limited options for debugging and troubleshooting your code. If you are serious about plug-in development beyond this introductory guide, we recommend investing in one of the more fully-featured members of the Visual Studio product family.
这里谈到Visual Basic Express 和. Visual Studio Professional的区别。最大区别是Express (速成版)是免费的。它面向学生,开发爱好者或兼职的程序员。而Visual Studio Professional面向专职的程序员,有更多的工程模板,更多的编译选项和错误检查。
What is COM?
“Microsoft COM (Component Object Model) technology in the Microsoft Windows-family of Operating Systems enables software components to communicate. COM is used by developers to create re-usable software components, link components together to build applications, and take advantage of Windows services. COM objects can be created with a variety of programming languages. Object-oriented languages, such as C++, provide programming mechanisms that simplify the implementation of COM objects.” Source: MSDN Library
COM is the underlying API technology used by older versions of Visual Basic, including Visual Basic for Applications (VBA). While some Windows application developers have exposed .NET interfaces to their software, others have continued to invest in their COM interfaces, as these can also be called from .NET applications (see below for further information).
我们多次提到了Inventor是COM API。那什么是COM?COM是组件对象模型的简称。它提供的机制能够让我们创建出可重用的组件, 组件接口供其它程序使用, 以及可利用到Windows服务。COM也是很早Basic版本(包括VBA)的后台机制。更多了解请访问MSDN Library
What is .NET?
The .NET Framework is a software framework that sits on top of the Microsoft® Windows® operating system* and provides the underlying platform, libraries and services for all .NET applications. The services generally include memory management, garbage collection, common type system, class libraries, etc.
* Subsets of .NET are also available on other operating systems, whether via the open source Mono project or via Microsoft® Silverlight®, but these are not topics for this guide: you will focus solely on the use of .NET in the context of Microsoft Windows.
什么是.NET呢?它是一种基于Windows 操作系统的软件程序框架,提供了基于框架的类库,服务等各种内容。服务一般包括内存管理,垃圾回收,状态系统等。
What does the .NET Framework Contain?
The framework contains two main components:
- Common Language Runtime (CLR) – This is the agent (or execution engine) in the .NET Framework responsible for managing the execution of code. Which is why code written to target this runtime is also known as managed code. All managed code runs under the supervision of the CLR, but what does this mean? The CLR manages code by providing core services such as memory management (which includes automatically releasing the computer’s memory for reuse on other tasks when it is no longer needed), error (or exception) handling, managing the use of multiple threads of execution and ensuring rules around the use of different types of object are adhered to. The CLR is really the foundation of the .NET Framework.
- .NET Framework Class Library – As the name suggests, this is a library or collection of object types that can be used from your own code when developing .NET applications. These .NET applications are targeted for Windows (whether command-prompt based or with a graphical user interface), the web or mobile devices. This library is available to all languages using the .NET Framework.
As mentioned above, the CLR improves code robustness by making sure the executing code conforms to a common type system (CTS). The CTS ensures that all .NET (or managed) code – irrespective of the language – uses a similar set of object types and can work together in the same environment. It is this feature that makes it possible for you to write applications in the development language of your choice and yet make use of components/code written by programmers using other .NET languages.
.NET框架包含两个主要内容。一是一般程序运行时(CLR)。我们写出的.NET代码将交由运行时执行,所以.NET代码也叫做叫做托管代码。CLR是整个.NET的基础。二是框架类库。类库是对象集合。包含了不同种类的功能。例如System.Windows.Forms包含了对话框设计中需要的类和支持。
Building Executables
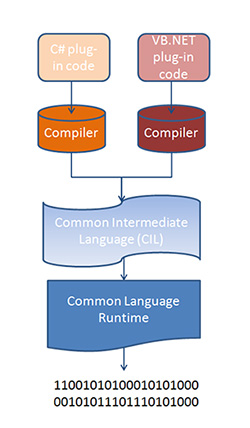
When you built your code into an EXE, it was compiled into Common Intermediate Language (CIL – also known as MSIL) code using the language-specific compiler. CIL is a CPU-independent set of instruction that can be executed by the CLR on Windows operating systems. CIL is typically portable across 32- and 64-bit systems and even – to some extent – to non-Windows operating systems. The CIL code generated from your VB source code was then packaged into a .NET assembly. Such an assembly is a library of CIL code stored in Portable Executable (PE) format (which contains both the CIL and its associated metadata). Assemblies can either be process assemblies (EXEs) or library assemblies (DLLs).
During the course of this guide, you will focus on developing a particular type of Inventor plug-in: a process assembly (EXE) which communicates with Inventor. Because of the overhead associated with developing them, you will not spend time looking at Inventor AddIns, which are usually library assemblies (DLLs) that get loaded into and executed within the memory space of Inventor. One reason that implementing an EXE to work with Inventor is simpler than developing an AddIn is related to its user interface: Executables do not need to integrate seamlessly with the Inventor user interface by adding ribbon buttons (for instance).
当我们编译代码为EXE。它将被编译到一般即时语言CIL。这是一种不依赖任何CPU的指令集合,可以由CLR得到执行。本课程系列以EXE形式和Inventor进行通信。我们将不介绍另外一种形式Dll(插件)。前者是自己独立的运行进程,而后者是运行在Inventor进程中。前面提到过,通过EXE,更方便初学者了解和使用Inventor API。
Running Executables
 | During execution of a .NET assembly, CIL (residing in the assembly) is passed through the CLR’s just-in-time (JIT) compiler to generate native (or machine) code. JIT compilation of the CIL to native code occurs when the application is executed. As not all of the code is required during execution, the JIT compiler only converts the CIL when it is needed, thus saving time and memory. It also stores any generated code in memory, making it available for subsequent use without the need to recompile. In the last step of this process, the native code gets executed by the computer’s processor. If you would like more details on the process of building .NET applications
这张图表示了代码执行的过程。编译器对原代码处理为CIL语言,然后交由CLR进行执行,最终其实都是二进制的指令序列。CPU按照指令进行执行。更多内容,参考MSDN Library.
|


 5万+
5万+

 被折叠的 条评论
为什么被折叠?
被折叠的 条评论
为什么被折叠?
 到【灌水乐园】发言


