


目录
一介绍
- CSS(Cascading Style Sheet,层叠样式表)定义如何显示HTML元素,给HTML设置样式,让它更加美观。
二语法结构
    div{
            color:green;
            background-color: black;
        }

/*选择器{css样式:样式对应的值}*/
css引入方式
/*方式1:内部样式
head标签中写以下内容:*/
    <style>
        div{
        color:green;
        background-color: black;
        }
    </style>
/*方式2:行内样式(内敛样式)*/
    <div style="color:yellow;background-color: black;">
        床前明月光,地上鞋三双
    </div>
/*方式3: (常用)  外部样式*/
    /*第一步:创建一个css文件*/
    /*第二步:在html文件中引入:*/<link rel="stylesheet" href="test.css(路径)">  <!-- 引入css文件 -->
    /*第三步:css文件中样式的写法*/
    div{color:green;xx:xx;...}
三选择器
3.1基本选择器
/*元素选择器:(标签名)*/
        p {color: "red";}
/*id选择器:按照id属性来找到对应的标签
    #id属性对应的值{css属性:属性值}
    示例:*/
        <div id="d2" class="c1">
                    床上狗男女,其中就有你1
        </div>
                #d1{color:red;}
/*类选择器:
    .class属性对应的值{css属性:属性值}
    示例:*/
        <div id="d2" class="c1">
            床上狗男女,其中就有你1
        </div>
        .c1{color:red;}
3.2组合选择器
3.2.1后代选择器
/*选择器 空格 选择器*/
.c1 a{
    color:green;
}
/*示例:*/
    <p>贵人肾宝</p>
    <div class="c1">
        <a href="">葫芦娃</a>
        <div>
            <a href="">太白</a>
            <div>
                <a href="">李业</a>
            </div>
        </div>
    </div>
    <p>你好</p>
    <p>他也好</p>
    <div class="c2">
        <a href="">葫芦娃2</a>
    </div>
    <p>大家好</p>
3.2.2儿子选择器
.c1>a{
    color:green;
}
/*示例:同上*/
3.2.3毗邻选择器
.c1+p{
    color:green;
}
/*找的是紧挨着class属性为c1的标签的下面的标签
示例:同上*/
3.2.4弟弟选择器
.c1~p{
    color:green;
}
/*示例:同上*/
3.3属性选择器
/*通过标签属性来找到对应的标签
通过属性来找写法:*/
    [xxx]{color:red;}/* 找到有xxx属性的所有标签*/
    [xxx='p2']{color:red;} /*找到有xxx属性的并且属性值为p2的所有标签*/
    p[title]{xx:xx;}  /*找到所有有title属性的p标签*/
    p[title='p2']{xx:xx;} /*找到所有有title属性的并且属性值为p2的p标签
    示例:*/
           <!DOCTYPE html>
            <html lang="en">
            <head>
                <meta charset="UTF-8">
                <title>Title</title>
                <style>
                    p[xxx='p2']{
                        color:red;
                    }
                </style>

            </head>
            <body>
                <p>p1</p>
                <p xxx="p2">p2</p>
                <p xxx="p3">p3</p>
            </body>
            </html>
3.4组合选择器
/*写法:*/
    div,p{
        color:red;
    }
/*解释:div选择器和p选择器找到的所有标签设置共同的样式.
示例:*/
<!DOCTYPE html>
<html lang="en">
<head>
    <meta charset="UTF-8">
    <title>Title</title>

    <style>
        /*div{*/
        /*    color:red;*/
        /*}*/
        /*p{*/
        /*    color:red;*/
        /*}*/
        div,p{
            color:red;
        }
    </style>
</head>
<body>
    <div>div1</div>
    <p>p1</p>
</body>
</html>
3.5伪类选择器
/*示例代码:*/
<!DOCTYPE html>
<html lang="en">
<head>
    <meta charset="UTF-8">
    <title>Title</title>
    <style>
        a:link{  /* a标签访问前设置样式 */
            color:red;
        }
        a:active{  /* a标签鼠标点下去显示样式 */
            color: green;
        }
        a:visited{ /* a标签访问后显示样式 */
            color: pink;
        }
        a:hover{ /* 鼠标悬浮到a标签时显示样式 */
            color:purple;
        }
        div:hover{   /* 鼠标悬浮到div标签时显示样式 */
            background-color: green;
        }
        input:focus{ /* input标签捕获光标时的样式显示 */
            background-color: orange;
        }
    </style>
</head>

<body>

    <a href="http://www.92py.com/">校草网</a>

    <div>

    </div>
    <input type="text">

</body>
</html>
3.6伪元素选择器
irst-letter示例: 文本内容首字母设置
<!DOCTYPE html>
<html lang="en">
<head>
    <meta charset="UTF-8">
    <title>Title</title>
    <style>
        div:first-letter{
            color:red;
            font-size: 40px;
        }
    </style>
</head>
<body>
    <div>
        鹅鹅鹅,曲项向天歌
    </div>

</body>
</html>
before 示例:
<!DOCTYPE html>
<html lang="en">
<head>
    <meta charset="UTF-8">
    <title>Title</title>
    <style>
        div:before{
            content: '?';
            color:red;
        }
    </style>
</head>
<body>

<div>
    鹅鹅鹅,曲项向天歌
</div>
</body>
</html>
after示例:
<!DOCTYPE html>
<html lang="en">
<head>
    <meta charset="UTF-8">
    <title>Title</title>
    <style>
        div:after{
            content: '?';
            color:red;
        }
    </style>
</head>
<body>
    <div>
        鹅鹅鹅,曲项向天歌
    </div>
</body>
</html>
四CSS权重
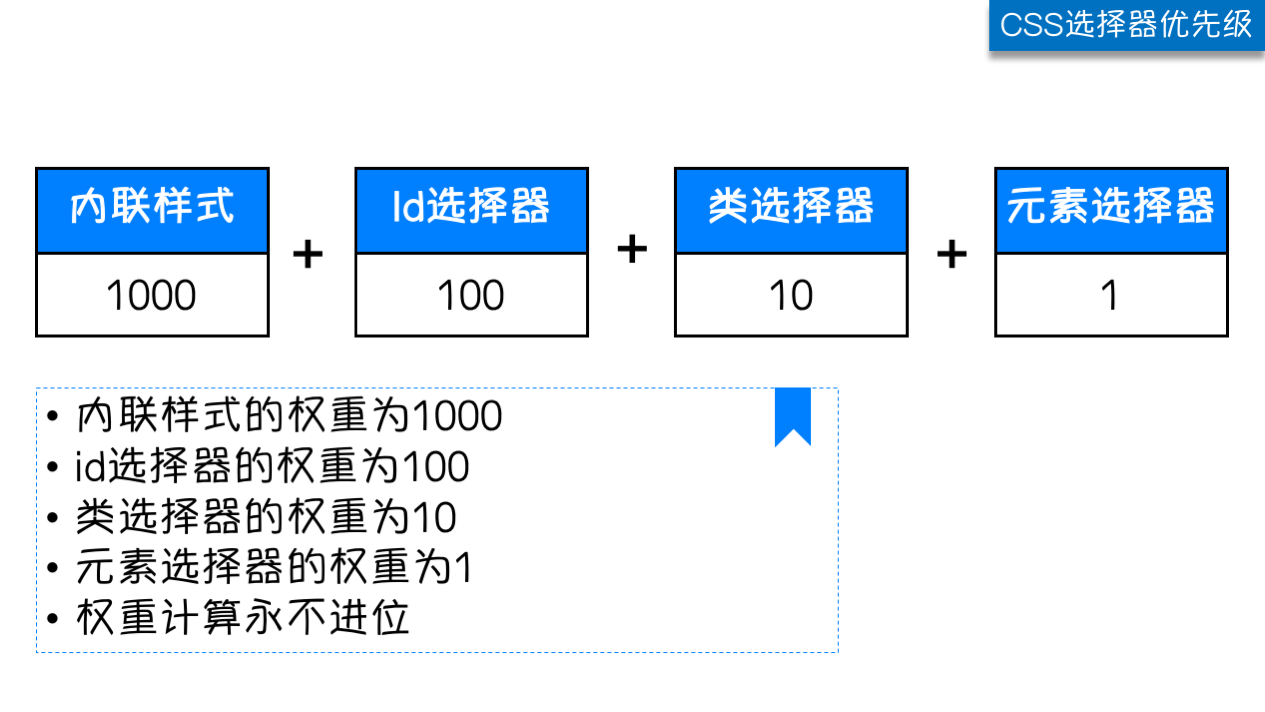
/*权重越高,对应选择器的样式会被优先显示
组合选择器,各选择器的权重相加
权重不进位,11类选择器组合到一起,也没有一个id选择器的优先级大,小就是小
默认css样式是可以继承的,继承的权重为0
权重相同的选择器,谁后写的,用谁的*/
示例代码:
<!DOCTYPE html>
<html lang="en">
<head>
    <meta charset="UTF-8">
    <title>Title</title>
    <style>

        div .c1{
            color:red;
        }

        .c1 .c2 .c3{
            color:green;
        }

        #d1{
            color:yellow;
        }

        div{
            color:green;
        }

        .c2{
            color:red;
        }

    </style>
</head>
<body>

<div class="c2">
    霜叶红于二月花
    <div class="c1" id="d1" style="color:blue;">
<!--    <div class="c1">-->
        停车坐爱枫林晚
    </div>
</div>

</body>
</html>
a标签设置样式,需要选中设置,不能继承父级标签的样式
示例:
.c3 a{
    color:red;
}

<div class="c3">
    <a href="">百度</a>
</div>
五css样式
5.1高度宽度
/*width宽度
height高度
    块级标签能设置高度宽度,内联标签不能设置高度宽度,内敛标签的高度宽度由标签内部的内容来决定.
示例*/
<!DOCTYPE html>
<html lang="en">
<head>
    <meta charset="UTF-8">
    <title>Title</title>
    <style>

        div{
            height: 100px;
            width: 200px;
            background-color: purple;
        }
        span{
            height: 100px;
            width: 200px;
            background-color: yellow;
        }
    </style>
</head>
<body>
<div>div1</div>
<span>span1</span>
</body>
</html>
5.2字体属性
/*字体*/
font-family:'宋体','楷体'...
/*字体大小*/
font-family: '楷体','黑体';  /* 字体,从左往右找浏览器能够支持的字体 */
font-size: 10px;           /* 设置字体大小,默认字体大小是16px */
/*字重*/
font-weight:bold;/*加粗*/
/*字体颜色*/
/*color:red;*/
/*color: #668B8B;  */
/*color: rgb(255, 170, 205);*/
字重设置的值
font-weight用来设置字体的字重(粗细)
| 值 | 描述 |
|---|---|
| normal | 默认值,标准粗细 |
| bold | 粗体 |
| bolder | 更粗 |
| lighter | 更细 |
| 100~900 | 设置具体粗细,400等同于normal,而700等同于bold |
| inherit | 继承父元素字体的粗细值 |
5.3文字属性
文字对齐(水平方向对齐)
text-align: center;
text-align: right;
text-align: left;
text-align 属性规定元素中的文本的水平对齐方式。(letter-spacing)
| 值 | 描述 |
|---|---|
| left | 左边对齐 默认值 |
| right | 右对齐 |
| center | 居中对齐 |
垂直对齐
<!DOCTYPE html>
<html lang="en">
<head>
    <meta charset="UTF-8">
    <title>Title</title>
    <style>
        div{
            width: 200px;
            height: 200px;
            border: 1px solid red;
            text-align: center;
            line-height:200px;
        }
    </style>
</head>
<body>
<div>
    <span>
        xxxxx
    </span>
</div>
</body>
</html>
文字装饰
text-decoration: none;
text-decoration: overline;
<a href="">百度</a>
/*示例*/
a{
    text-decoration: none;
}
text-decoration 属性用来给文字添加特殊效果。
| 值 | 描述 |
|---|---|
| none | 默认。定义标准的文本。 |
| underline | 定义文本下的一条线。 |
| overline | 定义文本上的一条线。 |
| line-through | 定义穿过文本下的一条线。 |
| inherit | 继承父元素的text-decoration属性的值。 |
首行缩进
p{
    text-indent: 32px;
}
示例
<p>
    唧唧复唧唧,木兰当户织.唧唧复唧唧,木兰当户织.唧唧复唧唧,木兰当户织.唧唧复唧唧,木兰当户织.唧唧复唧唧,木兰当户织.唧唧复唧唧,木兰当户织.唧唧复唧唧,木兰当户织.唧唧复唧唧,木兰当户织.唧唧复唧唧,木兰当户织.唧唧复唧唧,木兰当户织.唧唧复唧唧,木兰当户织.唧唧复唧唧,木兰当户织.唧唧复唧唧,木兰当户织.唧唧复唧唧,木兰当户织.唧唧复唧唧,木兰当户织.
</p>
背景属性
/*background-color: blue;*/ /* 设置背景颜色 */
background-image: url("meinv.jpg");  /* 背景图片,url属性值为图片路径 */
background-repeat: no-repeat; /* 图片是否平铺,默认是平铺的,占满整个标签 */
/*background-position: right bottom; !* 图片位置 *!*/
/*background-position: 100px 50px; !* 图片位置,100px是距离左边的距离,50px是距离上面的距离 *!*/
简写方式
background: yellow url("meinv.jpg") no-repeat 100px 50px;
/*背景颜色 背景图片路径 是否平铺 图片位置*/
边框属性
/*border-style: dotted;*/  /*样式*/
/*border-color: red;*/   /*颜色*/
/*border-width: 10px;*/  /*宽度
简写形式:*/
    /*border: 10px solid yellow;*/

/*四个边框可以单独设置:*/
    border-left:10px solid yellow ;
    border-right:10px dashed red ;
/*设置圆角*/
    border-radius: 5%;  /* 设置圆角 */

/*示例:*/
<!DOCTYPE html>
<html lang="en">
<head>
    <meta charset="UTF-8">
    <title>Title</title>
    <style>
        div{
            /*border-style: dotted;*/
            /*border-color: red;*/
            /*border-width: 10px;*/
            /*border: 10px solid yellow;*/
            border-left:10px solid yellow ;
            border-right:10px dashed red ;
            border-radius: 5%;
            width: 200px;
            height: 200px;
        }
    </style>
</head>
<body>
<div></div>
</body>
</html>
边框样式的值
| 值 | 描述 |
|---|---|
| none | 无边框。 |
| dotted | 点状虚线边框。 |
| dashed | 矩形虚线边框。 |
| solid | 实线边框。 |
display
| 值 | 意义 |
|---|---|
| display:"none" | HTML文档中元素存在,但是在浏览器中不显示。一般用于配合JavaScript代码使用。 |
| display:"block" | 默认占满整个页面宽度,如果设置了指定宽度,则会用margin填充剩下的部分。 |
| display:"inline" | 按行内元素显示,此时再设置元素的width、height、margin-top、margin-bottom和float属性都不会有什么影响。 |
| display:"inline-block" | 使元素同时具有行内元素和块级元素的特点。 |
 示例
 <!DOCTYPE html>
<html lang="en">
<head>
    <meta charset="UTF-8">
    <title>Title</title>
    <style>

        div{
            height: 200px;
            width: 200px;
            border: 1px solid red;
            /*display: inline;*/
            /*display: inline-block;*/
            display: none; /* 隐藏标签 */
        }

        span{
            height: 200px;
            width: 200px;
            border: 1px solid green;
            /*display: block;*/

        }
        p{
            height: 200px;
            width: 200px;
            border: 1px solid yellow;
            display: inline;

        }

    </style>
</head>
<body>
<div>xxxxxxx</div>
<span>span1111</span>
</body>
</html>
隐藏标签
/*display: none;*/   /* 隐藏标签,不占原来的位置 */
visibility: hidden;  /* 原来的位置还占着 */
盒子模型
content:内容  width和height 是内容的高度宽度
padding:内边距 内容和边框之间的距离
border:边框
margin:外边距 标签之间的距离,如果两个标签都设置了margin,选最大的值,作为双方之间的距离
占用空间大小:content+padding+border
示例
<!DOCTYPE html>
<html lang="en">
<head>
    <meta charset="UTF-8">
    <title>Title</title>
    <style>
        .c1{
            width: 100px;
            height: 100px;
            border: 10px solid red;
            /*padding: 20px 20px; !* 内边距,内容和边框之间的距离 *!*/
            padding: 8px 2px 3px 6px; /* 上右下左 */
            margin: 20px 10px;

        }
        .c2{
            width: 100px;
            height: 100px;
            border: 10px solid green;
            margin: 10px 2px 6px 8px; /* 外边距,与其他标签的距离,如果旁边没有标签,按照父级标签的位置进行移动 */
        }
        .c3{
            width: 100px;
            height: 100px;
            border: 1px solid blue;
        }
    </style>
</head>
<body>
<div class="c1">
    div1
</div>
<div class="c2">
    div2
</div>
<div class="c3">
    div3
</div>
</body>
</html>
四个方向单独设置padding
padding-left: 10px;
padding-top: 8px;
padding-right: 5px;
padding-bottom: 5px;
四个方向单独设置margin
margin-top: 10px;
margin-left: 100px;
margin-bottom: 50px;
margin-right: 200px;
float浮动
一般用来进行页面布局
/*浮动会脱离正常文档流
会造成父级标签塌陷问题*/
清除浮动(解决塌陷问题)
clear: both; /* clear清除浮动 */ left\right

方式1:
    1.父级标签设置高度
    2.通过伪元素选择器来进行清楚浮动:写法如下
        .clearfix:after{
            content:'';
            display: block;
            clear: both;
        }
     示例:
        <!DOCTYPE html>
<html lang="en">
<head>
    <meta charset="UTF-8">
    <title>Title</title>

    <style>

        .c1{
            width: 100px;
            height: 100px;
            background-color: red;
            float: left;
        }
        .c2{
            width: 100px;
            height: 100px;
            background-color: green;
            float: right;
        }
        .c3{
            /*width: 100px;*/
            height: 100px;
            background-color: pink;
            /*clear: both; !* clear清除浮动 *!*/
        }

        .clearfix:after{
            content:'';
            display: block;
            clear: both;
        }

        /* 浮动,会造成父级标签塌陷问题 */
        /* 解决父级标签塌陷问题方式1 */
        /*.cc{*/
        /*    height: 100px;*/
        /*}*/
    </style>

</head>
<body>

<!--ajsdfja;sdjfo;asjdfo-->
<div class="cc clearfix">
    <div class="c1">div1</div>
    <div class="c2">div2</div>
</div>
<div class="c3">div3</div>

</body>
</html>
clear清楚浮动
clear
clear属性规定元素的哪一侧不允许其他浮动元素。
| 值 | 描述 |
|---|---|
| left | 在左侧不允许浮动元素。 |
| right | 在右侧不允许浮动元素。 |
| both | 在左右两侧均不允许浮动元素。 |
| none | 默认值。允许浮动元素出现在两侧。 |
| inherit | 规定应该从父元素继承 clear 属性的值。 |
overflow溢出
| 值 | 描述 |
|---|---|
| visible | 默认值。内容不会被修剪,会呈现在元素框之外。 |
| hidden | 内容会被修剪,并且其余内容是不可见的。 |
| scroll | 内容会被修剪,但是浏览器会显示滚动条以便查看其余的内容。 |
| auto | 如果内容被修剪,则浏览器会显示滚动条以便查看其余的内容。 |
| inherit | 规定应该从父元素继承 overflow 属性的值。 |
圆形头像
<!DOCTYPE html>
<html lang="en">
<head>
    <meta charset="UTF-8">
    <title>Title</title>
    <style>
        .c1{
            width: 100px;
            height: 100px;
            border-radius: 50%;
            border:1px solid red;
            overflow: hidden;
        }

        div img{
            width: 100%;
            /*height: 100%;*/
        }
    </style>
</head>
<body>
<div class="c1">
    <img src="2.jpg" alt="">
</div>

</body>
</html>
定位
static定位(无定位)
相对定位
/*position: relative;  !* 相对于自己自己原来的位置进行移动,原来的空间还占着 *!*/
绝对定位
position: absolute; /* 不占用自己原来的位置,移动的时候如果父级标签以及祖先辈标签如果设置了相对定位,父级标签或者祖先标签进行移动 ,如果父级标签都没有设置相对定位,那么就按照整个文档进行移动 */
固定定位
    position: fixed;
    按照浏览器窗口的位置进行移动
所有定位的元素移动,都是通过top,left,right,bottom两个方向的值来移动.
回到顶部示例
<!DOCTYPE html>
<html lang="en">
<head>
    <meta charset="UTF-8">
    <title>Title</title>
    <style>
        .c1,.c3{
            background-color: red;
            height: 500px;
            width: 600px;
        }
        .c2{
            background-color: green;
            height: 500px;
            width: 600px;
        }
        #back_top{
            height: 40px;
            width: 80px;

            position: fixed;
            right: 40px;
            bottom: 40px;
            background-color: black;

            text-align: center;
            line-height: 40px;
        }
        #back_top a{
            color:white;
            text-decoration: none;
        }
    </style>
</head>
<body>

<a name="xxx">这是顶部位置</a>

<div class="c1"></div>
<div class="c2"></div>
<div class="c3"></div>

<span id="back_top">
    <a href="#xxx">回到顶部</a>
</span>
</body>
</html>
六z-index 设置层级
模态对话框示例:
<!DOCTYPE html>
<html lang="en">
<head>
    <meta charset="UTF-8">
    <title>Title</title>


    <style>
        .shadow{
            background-color: rgba(0,0,0,0.7); /* rgba可以设置透明度,0-1之间的数字 */
            position: fixed;
            top:0;
            left: 0;
            right: 0;
            bottom: 0;
            z-index: 90;

        }


        .mode{
            width: 440px;
            height: 480px;
            background-color: white;
            position:fixed;
            top:50%;
            left: 50%;
            z-index: 100;
            margin-left: -220px;
            margin-top: -240px;

        }

        .mode h2,.mode h3{
            text-align: center;
        }
        .xxx{
            text-align: right;
        }
        .xxx span{

        }
        .xxx span:hover{
            cursor: pointer;
        }


    </style>

</head>
<body>
<h1>24期皇家spa会所</h1>

<div>金牌技师李业和陈硕,30年捏脚经验,技师一流,服务到位,倒贴200</div>


<div>
    30年捏脚经验,技师一流,服务到位

    <img src="cs.png" alt="" width="400" height="400">
</div>
<div class="mode">
    <div class="xxx">
        <span>x</span>
    </div>
    <h2>不正经的24期会所入口</h2>
    <h3>会员登录</h3>
    <div class="iii">
        <div>
            <label>
                用户名:<input type="text">
            </label>
        </div>

        <div>
            <label>
                密码:<input type="text">
            </label>
        </div>


    </div>
</div>  <!-- 对话框白框 -->

<div class="shadow"></div>  <!-- 黑色阴影遮罩层 -->


</body>
</html>
z-index注意点
1.z-index 值表示谁压着谁,数值大的压盖住数值小的,
2.只有定位了的元素,才能有z-index,也就是说,不管相对定位,绝对定位,固定定位,都可以使用z-index,而浮动元素float不能使用z-index
3.z-index值没有单位,就是一个正整数,默认的z-index值为0如果大家都没有z-index值,或者z-index值一样,那么谁写在HTML后面,谁在上面压着别人,定位了元素,永远压住没有定位的元素。
4.从父现象:父亲怂了,儿子再牛逼也没用
opacity透明度和rgba透明度的区别
opactiy是整个标签的透明度
rgba是单独给某个属性设置透明度
/*示例:*/
<!DOCTYPE html>
<html lang="en">
<head>
<meta charset="UTF-8">
<title>Title</title>
<style>
.c1{
width: 100px;
height: 100px;
background-color: rgba(255,0,0,0.3);
}
.c2{
width: 100px;
height: 100px;
/*background-color: rgba(255,0,0,0.3);*/
background-color: rgb(255,0,0);
opacity: 0.3; /* 0-1之间的数字,这是设置整个标签的透明底 */
}
</style>
</head>
<body>
<div class="c1">
div1
</div>
<hr>
<div class="c2">
div2
</div>
</body>
</html>


 被折叠的 条评论
为什么被折叠?
被折叠的 条评论
为什么被折叠?
 到【灌水乐园】发言


