


前言
Mybatis:一个流行的半自动ORM框架。
Mybatis-Plus:一个Mybatis的增强工具,在Mybatis的基础上只做增强不做改变,为简化开发、提高效率而生。
本文使用的版本:mybatis-plus 3.0.5
本文使用的环境:Spring Boot(在其他环境下使用请参考官方文档)、SQLServer 2008
官方文档:http://mp.baomidou.com
我的例子:https://gitee.com/Louisyzh/MyBatis-Plus-Demos.git
建议数据库结构:无外键,主键为同名自增id、或同名的长字符列并由MP生成唯一主键(这是当前的一种流行做法,也比较容易和mp集成,如果表结构太复杂,有些地方会有坑)
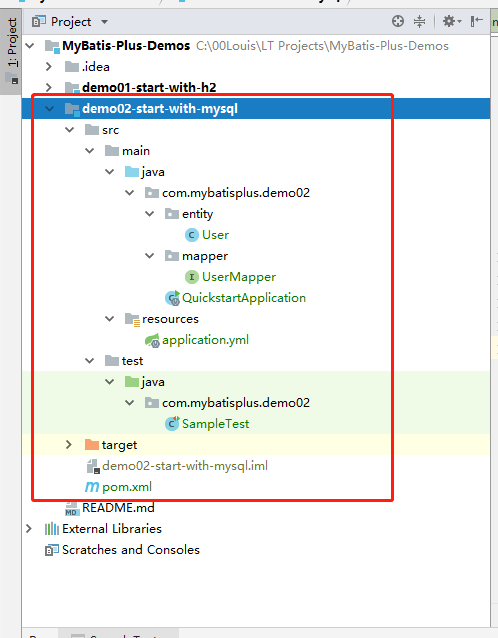
一、Spring Boot下最简洁例子
项目结构
1.1、通过Maven加载依赖
Pom文件内包含的依赖和插件解释如下:
- Spring Boot自带依赖和插件(使用Spring Boot初始化器创建项目的话会自带的依赖)
- spring-boot-starter-parent
- spring-boot-starter
- spring-boot-starter-test
- spring-boot-maven-plugin
- 代码简化依赖(可有可无,只是个人习惯)
- lombok
- mybatis-plus依赖
- mybatis-plus-boot-starter
- mysql依赖
- mysql-connector-java


<?xml version="1.0" encoding="UTF-8"?>
<project xmlns="http://maven.apache.org/POM/4.0.0"
         xmlns:xsi="http://www.w3.org/2001/XMLSchema-instance"
         xsi:schemaLocation="http://maven.apache.org/POM/4.0.0 http://maven.apache.org/xsd/maven-4.0.0.xsd">
    <modelVersion>4.0.0</modelVersion>

    <groupId>com.louistech</groupId>
    <artifactId>demo02-start-with-mysql</artifactId>
    <version>1.0-SNAPSHOT</version>


    <parent>
        <groupId>org.springframework.boot</groupId>
        <artifactId>spring-boot-starter-parent</artifactId>
        <version>2.0.4.RELEASE</version>
        <relativePath/> <!-- lookup parent from repository -->
    </parent>

    <dependencies>
        <dependency>
            <groupId>org.springframework.boot</groupId>
            <artifactId>spring-boot-starter</artifactId>
        </dependency>
        <dependency>
            <groupId>org.springframework.boot</groupId>
            <artifactId>spring-boot-starter-test</artifactId>
            <scope>test</scope>
        </dependency>
        <dependency>
            <groupId>org.projectlombok</groupId>
            <artifactId>lombok</artifactId>
            <scope>provided</scope>
        </dependency>
        <!--MySQL依赖-->
        <dependency>
            <groupId>mysql</groupId>
            <artifactId>mysql-connector-java</artifactId>
            <version>5.1.46</version>
        </dependency>
        <dependency>
            <groupId>com.baomidou</groupId>
            <artifactId>mybatis-plus-boot-starter</artifactId>
            <version>3.0.5</version>
        </dependency>
    </dependencies>

    <build>
        <plugins>
            <plugin>
                <groupId>org.springframework.boot</groupId>
                <artifactId>spring-boot-maven-plugin</artifactId>
            </plugin>
        </plugins>
    </build>


</project>
1.2、创建实体
package com.mybatisplus.demo02.entity;
import lombok.Data;
@Data
public class User {
    private Long id;
    private String name;
    private Integer age;
    private String email;
}
1.3、创建mapper接口
package com.mybatisplus.demo02.mapper;
import com.baomidou.mybatisplus.core.mapper.BaseMapper;
import com.mybatisplus.demo02.entity.User;
public interface UserMapper extends BaseMapper<User> {
}
1.3、主程序上增加mapper的扫描位置
@SpringBootApplication
@MapperScan("com.mybatisplus.demo02.mapper")
public class Demo02Application {
    public static void main(String[] args) {
        SpringApplication.run(Demo02Application.class, args);
    }
}
1.4、配置application.yml文件
配置一个datasource,供mysql连接器与数据库进行连接
spring:
  datasource:
    driver-class-name: com.mysql.jdbc.Driver
    url: jdbc:mysql://localhost:3306/test?useSSL=false&useUnicode=true&characterEncoding=utf8&characterSetResults=utf8
    username: root
    password:
1.5、创建测试代码,访问数据库读取数据
@RunWith(SpringRunner.class)
@SpringBootTest
public class SampleTest {
    @Autowired
    private UserMapper userMapper;
    @Test
    public void testSelect() {
        System.out.println(("----- selectAll method test ------"));
        List<User> userList = userMapper.selectList(null);
        userList.forEach(System.out::println);
    }
}
二、MyBatis Plus配置
对MP进行配置可以分为3个角度去看
- application.yml配置
- MyBatis原生配置
- Java Bean配置
2.1、application.yml配置
来源:在Spring Boot下,MP带来的mybatis-plus-boot-starter起步依赖中所支持在application.yml中选择的配置
具体:可以查看官方文档
注意:其中一些枚举值,可以Ctrl+左键,进去源码查看具体可选的值
一个最详尽带注解application.yml配置:
# DataSource Config
spring:
  datasource:
    driver-class-name: com.mysql.jdbc.Driver
    url: jdbc:mysql://localhost:3306/test?useSSL=false&useUnicode=true&characterEncoding=utf8&characterSetResults=utf8
    username: root
    password:

# Logger Config
logging:
  level:
    com.mybatisplus.demo03: debug

#MP所支持的application.yml设置 具体参考官方文档https://jobob.gitee.io/mp3doc/中设置部分
mybatis-plus:
#  config-location: classpath:mybatis/mybatis-config.xml #如果需要使用原生mybatis设置文件,则这里需要指明具体路径
#  mapper-locations: classpath:/mybatis/mapper/*DAO.xml #在resource目录下的写法
#  mapper-locations: classpath:/com/mpspringboot/mapper/xml/*Mapper.xml #在src/main/java下的写法(同时配置POM文件中source属性)
#  mapper-locations: classpath*:/mybatis/mapper/*DAO.xml #Maven多项目模块下使用classpath*写法
#  type-aliases-package: com.XX.entity #设置类名别名扫描位置,设置后可使用类名替代全限定类名,多个package用逗号或者分号分隔
#  type-aliases-super-type: java.lang.Object #请和typeAliasesPackage一起使用,设置后仅会扫描路径下以该类作为父类的域对象 。
#  type-handlers-package: com.XX.handler #设置类型转换类所在的包位置
#  type-enums-package: com.XX.enums #枚举字段扫描,支持实体的枚举字段
#  check-config-location: false #启动时是否检查 MyBatis XML 文件的存在,默认不检查。
#  executor-type: simple #通过该属性可指定 MyBatis 的执行器,默认值为SIMPLE,MyBatis 的执行器总共有三种:
#                         ExecutorType.SIMPLE:该执行器类型不做特殊的事情,为每个语句的执行创建一个新的预处理语句(PreparedStatement)
#                         ExecutorType.REUSE:该执行器类型会复用预处理语句(PreparedStatement)
#                         ExecutorType.BATCH:该执行器类型会批量执行所有的更新语句
#  configuration-properties: classpath:mybatis/config.properties #指定外部化 MyBatis Properties 配置,通过该配置可以抽离配置,实现不同环境的配置部署。

  #MyBatis-Plus 全局策略配置
  global-config:
    refresh: true #启动后,修改Target中的XML即可更新对应Mapper的逻辑,用于调试;生产中不要启动
#    sql-parser-cache: true #是否缓存 Sql 解析,默认不缓存。
#    sql-session: com.xxx.SqlSession #单例重用 SqlSession
#    sql-session-factory: com.xxx.SqlSessionFactory #

    #全局配置中关于DB的设置
    db-config:
      db-type: MYSQL #数据库类型
      capital-mode: true #是否开启大写命名,开启后生成SQL语句都为大写;默认不开启。
#      table-prefix: sys #生成的SQL会在表名上增加此前缀
      table-underline: true #生成的SQL语句中,表名是否自动加入驼峰转下划线(如SystemUser=>system_user)
      field-strategy: NOT_NULL #字段更新插入策略  0:"忽略判断",1:"非 NULL 判断"),2:"非空判断"
#                               IGNORED:所有字段都更新和插入
#                               NOT_NULL:只更新和插入非NULL值
#                               NOT_EMPTY:只更新和插入非NULL值且非空字符串
#                               DEFAULT:默认NOT_NULL
      id-type: UUID #主键类型  0:"数据库ID自增", 1:"用户输入ID",2:"全局唯一ID (数字类型唯一ID)", 3:"全局唯一ID UUID";
#                               AUTO(0):MP自动决定
#                               NONE(1):生成语句插入null,需要数据库自增时可以使用
#                               INPUT(2):根据用户输入值
#                               ID_WORKER(3):全局唯一ID (数字类型唯一ID)
#                               UUID(4):全局唯一ID UUID
#                               ID_WORKER_STR(5):全局唯一ID (字符型类型唯一ID)
      column-like: false #逻辑删除字段表示未删除的值
      logic-delete-value: 1 #逻辑删除字段表示删除的值
      logic-not-delete-value: 0 #逻辑删除字段表示未删除的值


  #一部分对原生MyBatis所支持的配置,我建议使用config-location加mybatis-config.xml实现比较清晰,不要在这里使用
#  configuration:
#    mapUnderscoreToCamelCase: true #默认true,是否开启自动驼峰命名规则(camel case)映射,即从经典数据库列名 A_COLUMN 到经典 Java 属性名 aColumn 的类似映射。
#    aggressive-lazy-loading: true #当设置为 true 的时候,懒加载的对象可能被任何懒属性全部加载,否则,每个属性都按需加载。需要和 lazyLoadingEnabled 一起使用。
#    auto-mapping-unknown-column-behavior: none #MyBatis 自动映射策略,通过该配置可指定 MyBatis 是否并且如何来自动映射数据表字段与对象的属性,总共有 3 种可选值:
#                                               AutoMappingBehavior.NONE:不启用自动映射
#                                               AutoMappingBehavior.PARTIAL:只对非嵌套的 resultMap 进行自动映射
#                                               AutoMappingBehavior.FULL:对所有的 resultMap 都进行自动映射
#    auto-mapping-behavior: partial #MyBatis 自动映射时未知列或未知属性处理策略,通过该配置可指定 MyBatis 在自动映射过程中遇到未知列或者未知属性时如何处理,总共有 3 种可选值:
#                                  AutoMappingUnknownColumnBehavior.NONE:不做任何处理 (默认值)
#                                  AutoMappingUnknownColumnBehavior.WARNING:以日志的形式打印相关警告信息
#                                  AutoMappingUnknownColumnBehavior.FAILING:当作映射失败处理,并抛出异常和详细信息
#    cache-enabled: true #全局地开启或关闭配置文件中的所有映射器已经配置的任何缓存,默认为 true。
#    call-setters-on-nulls: false #指定当结果集中值为 null 的时候是否调用映射对象的 Setter(Map 对象时为 put)方法,通常运用于有 Map.keySet() 依赖或 null 值初始化的情况。
#                                  通俗的讲,即 MyBatis 在使用 resultMap 来映射查询结果中的列,如果查询结果中包含空值的列,则 MyBatis 在映射的时候,不会映射这个字段,这就导致在调用到该字段的时候由于没有映射,取不到而报空指针异常。
#                                  当您遇到类似的情况,请针对该属性进行相关配置以解决以上问题。
#                                  WARNING
#                                  基本类型(int、boolean 等)是不能设置成 null 的。
#    configuration-factory: com.xxx.SampleConfigurationFactory #指定一个提供 Configuration 实例的工厂类。
                                    #该工厂生产的实例将用来加载已经被反序列化对象的懒加载属性值,其必须包含一个签名方法static Configuration getConfiguration()。(从 3.2.3 版本开始)
2.2、MyBatis原生配置
原生MyBatis可以通过一个XML进行属性的配置,而使用MyBatis-Plus后,可以在application.yml中通过 mybatis-plus config-location 来进行设置
具体原生的XML应该怎么写,这里就不介绍了,可以查看官方文档http://www.mybatis.org/mybatis-3/zh/configuration.html
2.3、Java Bean配置
MyBatis-Plus中有一些功能,可以/需要使用Java Bean配置。
具体在下面的一些例子中能够体现,或者查看官方文档http://mp.baomidou.com/guide/
三、分页插件
需求分析:需要查询一个关联表,分页查询其关联结果,并能传入参数过滤
1、注入分页插件Bean
在一个@Configuration配置类下或主程序下,创建一个分页插件Bean
package com.louistech.inventory.config.mybatis;

import com.baomidou.mybatisplus.extension.plugins.PaginationInterceptor;
import org.springframework.context.annotation.Bean;
import org.springframework.context.annotation.Configuration;

@Configuration
public class MybatisPlusConfig {
    @Bean
    public PaginationInterceptor paginationInterceptor() {
        PaginationInterceptor paginationInterceptor = new PaginationInterceptor();
        return paginationInterceptor;
    }
}
2、
-------------以下内容未整理----------------
pom文件加入依赖
<dependency>
    <groupId>com.baomidou</groupId>
    <artifactId>mybatis-plus-boot-starter</artifactId>
    <version>3.0-RC</version>
</dependency>
<!--数据库驱动,对应自己使用的数据库即可-->
<dependency>
    <groupId>com.microsoft.sqlserver</groupId>
    <artifactId>sqljdbc4</artifactId>
    <version>4.0</version>
</dependency>
<!--如果生成时设置使用lombok插件,则需要加入插件依赖-->
<dependency>
    <groupId>org.projectlombok</groupId>
    <artifactId>lombok</artifactId>
    <version>1.16.14</version>
    <scope>provided</scope>
</dependency>
如果mapper.xml文件放在java文件夹下而非resources文件夹下,还需要在POM文件增加
<build>
    <resources>
        <resource>
            <directory>src/main/java</directory>
            <includes>
                <include>**/mapper/**/*.xml</include>
            </includes>
        </resource>
    </resources>
</build>
application.yml配置文件设置
spring:
  datasource:
    driver-class-name: com.microsoft.sqlserver.jdbc.SQLServerDriver
    url: jdbc:sqlserver://127.0.0.1;database=dbname
    username: sa
    password: sa
mybatis-plus:
#  mapper-locations: classpath:/com/mpspringboot/mapper/xml/*Mapper.xml #在src/main/java下的写法(同时配置POM文件中source属性)
  mapper-locations: classpath:/mybatis/mapper/*Mapper.xml #在resource目录下的写法
  typeAliasesPackage: com.ltmicro.services.material.entity #实体扫描,多个package用逗号或者分号分隔
#  typeEnumsPackage: com.baomidou.springboot.entity.enums #枚举字段扫描,支持实体的枚举字段(看官网Spring Boot实例)
  global-config:
    db-config:
      #已经过测试
      db-type: SQL_SERVER #数据库类型
      column-underline: false #生成的SQL语句中,字段是否自动加入下划线

      #未经过测试
      id-type: id_worker #主键类型  0:"数据库ID自增", 1:"用户输入ID",2:"全局唯一ID (数字类型唯一ID)", 3:"全局唯一ID UUID";
      field-strategy: not_empty #字段策略 0:"忽略判断",1:"非 NULL 判断"),2:"非空判断"
      capital-mode: true
      logic-delete-value: 0
      logic-not-delete-value: 1
    refresh: true #启动后,修改Target中的XML即可马上更新,用于调试;生产中不要启动
  configuration:
    map-underscore-to-camel-case: true
    cache-enabled: false
创建配置类,添加Mapper扫描注解(包括项目的mapper接口和"com.baomidou.mybatisplus.core.mapper"(用于生成的Service层)),以及添加分页插件Bean
@Configuration
@MapperScan({"com.mpspringboot.mapper","com.baomidou.mybatisplus.core.mapper"})
public class MybatisPlusConfig {
    @Bean
    public PaginationInterceptor paginationInterceptor() {
        PaginationInterceptor paginationInterceptor = new PaginationInterceptor();
        return paginationInterceptor;
    }
}
三、API使用
根据自己创建或者是代码生成器生成,代码中最少有Entity类、Mapper接口2种类,另外还可以生成Service接口和Service实现,以及XML文件。
Mapper和Service接口预设了很多API用于操作数据库,在下面介绍。
复杂实例
1、创建一个XML,支持分页,排序,自定义条件过滤,别名排序,别名字段过滤
这个例子中,以下几点稍微解释以下
- 使用IPage参数传入分页信息即可分页
- 使用Wrapper编写过滤条件、排序,与XML中and ${ew.sqlSegment}对应,即可传入过滤条件、排序
- XML中给了一个默认的orderby,我使用的mybatis-plus(3.0-RC)和JSqlPraser(1.3-SNAPSHOT)版本下,竟然会在Wrapper传入排序条件时,自动屏蔽这个默认orderby,这个我很高兴
XML:
<select id="selectByConditions" resultType="java.util.Map">
    select
    isnull(A.Code,'') as CodeZ,
    A.Name as PName,
    isnull(A.Size,'') as Size
    from
    Product A
    left join
    ProductType B on A.TypeId = B.TypeId
    <where>
        <bind name="searchText" value="conditions.get('searchtext')"/>
        <if test="searchText != null and searchText != ''">
            and
            (
            A.Code like '%'+#{searchText}+'%' or
            A.Size like '%'+#{searchText}+'%'
            )
        </if>
        <bind name="typeFullId" value="conditions.get('typefullid')"/>
        <if test="typeFullId != null and typeFullId != ''">
            and (B.FullRowId = #{typeFullId} or B.FullRowId like
            #{typeFullId}+'.%')
        </if>
        and ${ew.sqlSegment}
    </where>
    order by code
</select>
mapper接口:
List<Map<String, Object>> selectByConditions(IPage page, @Param("ew") Wrapper wrapper, @Param("conditions") Map<String, Object> conditions);
调用:
Map<String, Object> conditions = new HashMap<String, Object>();
//测试【非字段条件】
conditions.put("searchtext", "百威狮 手动钉枪");

QueryWrapper<Product> wrapper = new QueryWrapper<Product>();
wrapper.and(
        (x) -> x
                .like("PName", "百威狮 手动钉枪")
                //【前台字段搜索】【公式字段搜索】
                .like("CodeZ", "227")
);
//【前台排序】
wrapper.orderByDesc("PName");
//【公式字段排序】
wrapper.orderByDesc("CodeZ");

List<Map<String, Object>> pageResult = productMapper.selectByConditions(
        new Page(1, 2),
        wrapper,
        conditions);
实践问题处理
1、支持别名条件查询和别名排序
思路:在SQL执行前,把order by和where语句中的使用别名的字段转换成表字段
方案:通过分页配置器,注入SQL解析器
创建一个SQL解析器:
package com.mpspringboot.Config;

import com.baomidou.mybatisplus.core.parser.AbstractJsqlParser;
import net.sf.jsqlparser.expression.BinaryExpression;
import net.sf.jsqlparser.expression.Expression;
import net.sf.jsqlparser.expression.Parenthesis;
import net.sf.jsqlparser.schema.Column;
import net.sf.jsqlparser.statement.delete.Delete;
import net.sf.jsqlparser.statement.insert.Insert;
import net.sf.jsqlparser.statement.select.*;
import net.sf.jsqlparser.statement.update.Update;

import java.util.HashMap;
import java.util.List;
import java.util.Map;

public class AliasSqlParser extends AbstractJsqlParser {

    @Override
    public void processSelectBody(SelectBody selectBody) {
        if (selectBody instanceof PlainSelect) {
            PlainSelect select = (PlainSelect) selectBody;

            //先找出所有有别名的字段,其真实字段可能是
            // Column(如A.Code as ACode)
            // 或者是Function(如isnull(Code,'') as ACode)
            Map<String, Expression> aliasMap = GetAliasColumns(select);

            //如果Order语句中使用了别名,则从字段中,找到真实字段(字段或公式)并替换
            UpdateOrderByColumnName(aliasMap, select);
            //如果Where语句中使用别名,则从字段中,找到真实字段(字段或公式)并替换
            UpdateWhereColumnName(aliasMap, select, select.getWhere(), select.getWhere(), "");
        }
    }

    //先找出所有有别名的字段,其真实字段可能是
    // Column(如A.Code as ACode)
    // 或者是Function(如isnull(Code,'') as ACode)
    private Map<String, Expression> GetAliasColumns(PlainSelect select) {
        Map<String, Expression> map = new HashMap<String, Expression>();
        List<SelectItem> items = select.getSelectItems();
        for (int i = 0; i < items.size(); i++) {
            SelectItem item = items.get(i);
            if (item instanceof SelectExpressionItem) {
                SelectExpressionItem selectItem = (SelectExpressionItem) item;
                if (null != selectItem.getAlias()) {
                    String alias = selectItem.getAlias().getName();
                    Expression realCol = selectItem.getExpression();
                    map.put(alias, realCol);
                }
            }
        }
        return map;
    }

    //如果Order语句中使用了别名,则从字段中,找到真实字段(字段或公式)并替换
    private void UpdateOrderByColumnName(Map<String, Expression> aliasMap, PlainSelect select) {
        List<OrderByElement> orderbys = select.getOrderByElements();
        if (null == orderbys) return;
        for (int i = 0; i < orderbys.size(); i++) {
            OrderByElement orderby = orderbys.get(i);
            Expression ex = orderby.getExpression();
            if (ex instanceof Column) {
                String orderColumnName = ((Column) ex).getColumnName();
                Expression realCol = aliasMap.get(orderColumnName);
                if (null != realCol)
                    orderby.setExpression(realCol);
            }
        }
    }

    //如果Where语句中使用别名,则从字段中,找到真实字段(字段或公式)并替换
    private void UpdateWhereColumnName(Map<String, Expression> aliasMap, PlainSelect select, Expression exParent, Expression ex, String type) {
        if (ex instanceof Parenthesis) {
            UpdateWhereColumnName(aliasMap, select, ex, ((Parenthesis) ex).getExpression(), "P");
        }
        if (ex instanceof BinaryExpression) {
            UpdateWhereColumnName(aliasMap, select, ex, ((BinaryExpression) ex).getLeftExpression(), "L");
            UpdateWhereColumnName(aliasMap, select, ex, ((BinaryExpression) ex).getRightExpression(), "R");
        }
        if (ex instanceof Column) {
            String orderColumnName = ((Column) ex).getColumnName();
            Expression realCol = aliasMap.get(orderColumnName);
            if (null != realCol) {
                if (type.equals("P"))
                    ((Parenthesis) exParent).setExpression(realCol);
                if (type.equals("L"))
                    ((BinaryExpression) exParent).setLeftExpression(realCol);
                if (type.equals("R"))
                    ((BinaryExpression) exParent).setRightExpression(realCol);
            }
        }
    }

    @Override
    public void processInsert(Insert insert) {
    }

    @Override
    public void processUpdate(Update update) {
    }

    @Override
    public void processDelete(Delete delete) {
    }

}
加载SQL解析器:
@Configuration
@MapperScan({"com.mpspringboot.mapper","com.baomidou.mybatisplus.core.mapper"})
public class MybatisPlusConfig {
    @Bean
    public PaginationInterceptor paginationInterceptor() {
        PaginationInterceptor paginationInterceptor = new PaginationInterceptor();

        // 加载解析器
        List<ISqlParser> sqlParserList = new ArrayList<>();
        sqlParserList.add(new AliasSqlParser());
        paginationInterceptor.setSqlParserList(sqlParserList);

        return paginationInterceptor;
    }
}
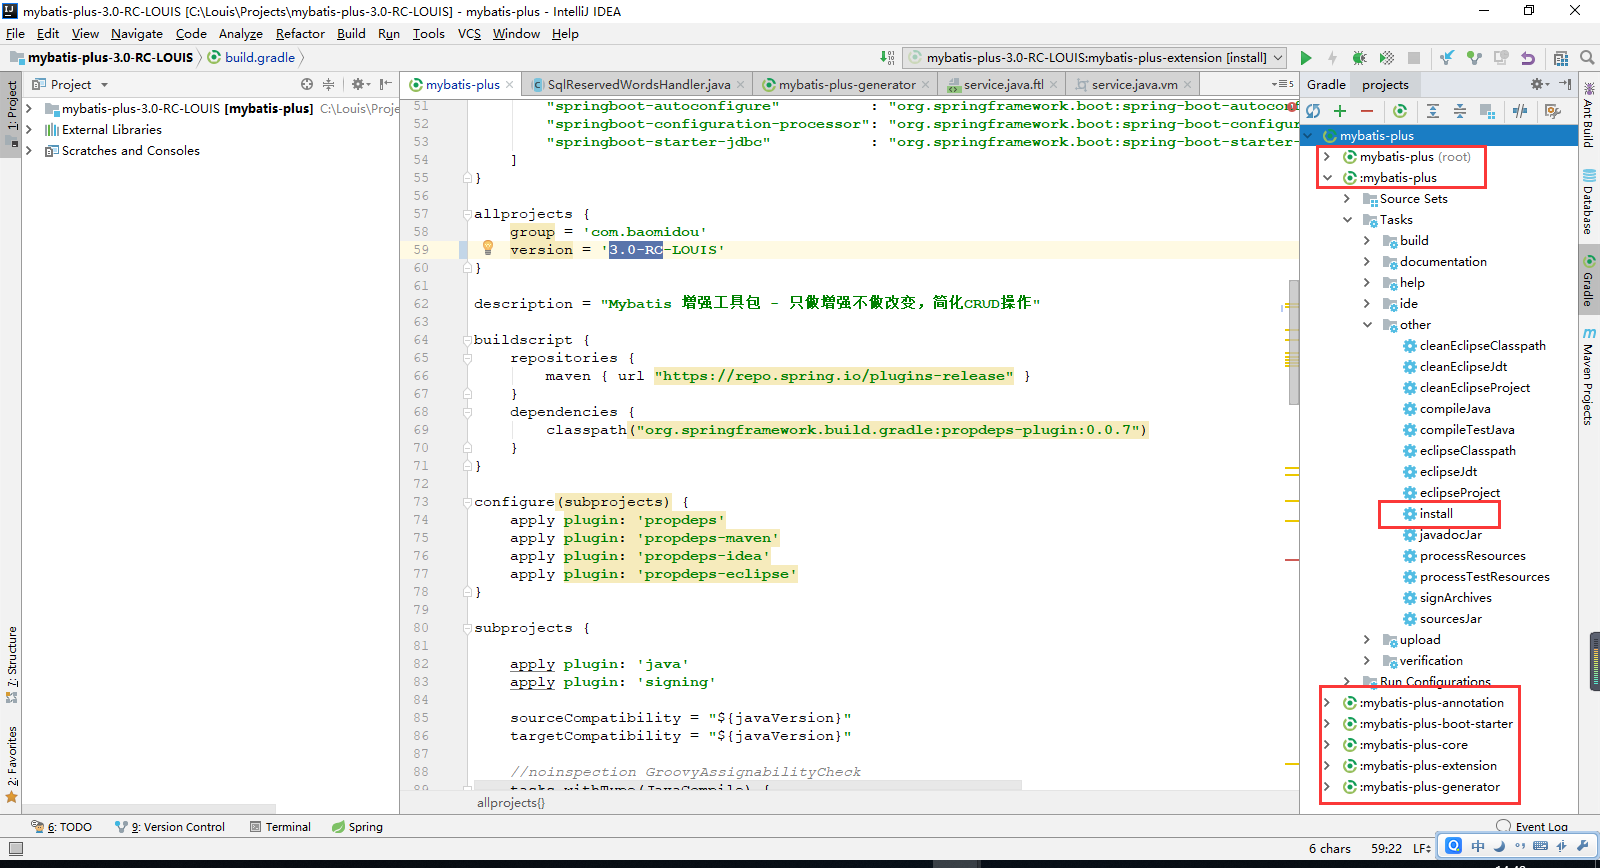
2、下载源码,修改后安装到本地Maven仓库
使用Idea,用Gradle插件中的Install安装即可,建议所有组件都安装一次
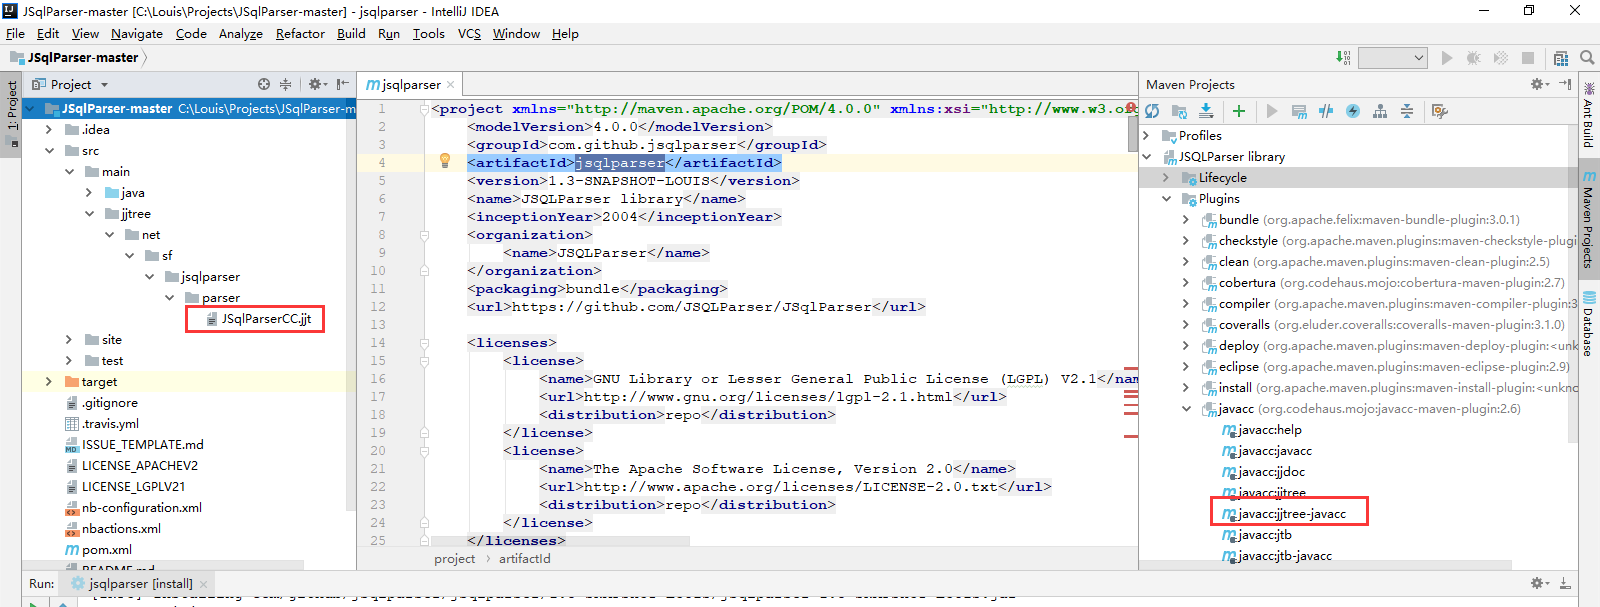
3、更改jsqlparser源码,应用到mybatis-plus中
mybatis-plus中使用jsqlparser1.2版本,在分页插件使用sql解析器时,并且在使用SQLSERVER数据库下,XMLmapper使用isnull函数时,会报错
所以我们需要替换jsqlparser版本,而这个组件的源码比较奇葩,需要以下步骤才能进行maven install
我下载的是1.3-SNAPSHOT版本,直接install后即可解决该问题,不需要修改源码
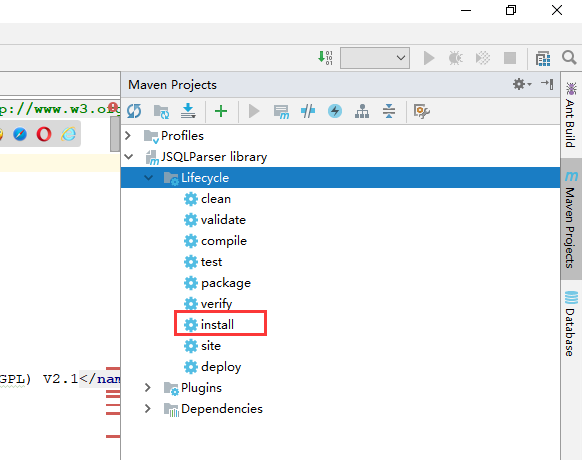
3.1、先执行jjtree-javacc,让jsqlparser从JSqlParserCC.jjt中,生成几个类(这也是一种定制方式,可以自行修改这个文件,从而定制化)
3.2、运行maven-install即可


 被折叠的 条评论
为什么被折叠?
被折叠的 条评论
为什么被折叠?
 到【灌水乐园】发言


