Win11+WLS Ubuntu 鸿蒙开发环境搭建(二)

win11的WSL安装以及linux各种环境配置 wsl2的环境配置,安装JDK,python,c++,mysql,redis 阅读详情

参考文章

penHarmony南向开发笔记(一)开发环境搭建

OpenHarmony(鸿蒙南向开发)——标准系统移植指南(一)

OpenHarmony(鸿蒙南向开发)——小型系统芯片移植指南(二)

续接上篇

一,设置和windows共享目录

在windows文件浏览器地址栏输入\\wsl$,然后回车,可以看到

可以进入到Ubuntu-20.04\home\user_name目录下,user_name目录下的文件可以修改,但其他目录下文件不行。然后双击此电脑打开后,右键点击添加一个网络位置,在打开的网络向导中点击下一步到如下界面,并把前面到user_name(例如\\wsl.localhost\Ubuntu-20.04\home\aping)的地址粘贴进去

让后按下一步完成操作。

二,配置Ubuntu环境

1,将shell 环境由dash改为bash,执行如下指令

sudo dpkg-reconfigure dash

进入如下界面,按左右箭头选择No,然后回车

2,替换Ubuntu软件源

在LUG's repo file generator中下载最新源

deb https://mirrors.ustc.edu.cn/ubuntu/ focal main restricted universe multiverse
deb-src https://mirrors.ustc.edu.cn/ubuntu/ focal main restricted universe multiverse

deb https://mirrors.ustc.edu.cn/ubuntu/ focal-security main restricted universe multiverse
deb-src https://mirrors.ustc.edu.cn/ubuntu/ focal-security main restricted universe multiverse

deb https://mirrors.ustc.edu.cn/ubuntu/ focal-updates main restricted universe multiverse
deb-src https://mirrors.ustc.edu.cn/ubuntu/ focal-updates main restricted universe multiverse

deb https://mirrors.ustc.edu.cn/ubuntu/ focal-backports main restricted universe multiverse
deb-src https://mirrors.ustc.edu.cn/ubuntu/ focal-backports main restricted universe multiverse

## Not recommended
# deb https://mirrors.ustc.edu.cn/ubuntu/ focal-proposed main restricted universe multiverse
# deb-src https://mirrors.ustc.edu.cn/ubuntu/ focal-proposed main restricted universe multiverse

 将下载好sources.list文件通过上面设置的共享存放到用户名aping目录下。

因为之前做测试,使用的源为阿里云的源,现将其备份

sudo cp /etc/apt/sources.list /etc/apt/sources.list.bakaliyun

将下载的sources.list移动到/etc/apt目录下

sudo mv -f sources.list /etc/apt/

更新软件包索引

sudo apt update

更新完升级软件包

sudo apt upgrade

3,安装必要的库和工具

请注意,这里比较重要,参考其他人的文档和官网文档用一步进行安装,会出现问题,导致安装不完整,从而导致后期编译出现“3000”和“4000”错误。

使用如下apt-get命令安装后续操作所需的库和工具:下面每一步都需要用户确认Y/n,需要依次安装

【1】

sudo apt-get install binutils binutils-dev git git-lfs gnupg flex bison gperf

【2】 

sudo apt-get install build-essential zip curl zlib1g-dev libc6-dev-i386 lib32ncurses5-dev x11proto-core-dev libx11-dev lib32z1-dev ccache libgl1-mesa-dev libxml2-utils xsltproc

【3】 

sudo apt-get install unzip m4 bc gnutls-bin python3.8 python3-pip ruby genext2fs device-tree-compiler

【4】 

sudo apt-get install make libffi-dev e2fsprogs pkg-config perl openssl libssl-dev libelf-dev libdwarf-dev u-boot-tools mtd-utils cpio doxygen liblz4-tool openjdk-8-jre gcc g++ texinfo

【5】 

sudo apt-get install dosfstools mtools default-jre default-jdk libncurses5 apt-utils wget scons

【6】 

sudo apt-get install python3.8-distutils tar rsync git-core libxml2-dev lib32z-dev grsync xxd

【7】 

sudo apt-get install libglib2.0-dev libpixman-1-dev kmod jfsutils reiserfsprogs xfsprogs squashfs-tools pcmciautils quota ppp libtinfo-dev libtinfo5 libncurses5-dev libncursesw5

【8】 

sudo apt-get install libstdc++6 gcc-arm-none-eabi vim ssh locales libxinerama-dev libxcursor-dev

【9】 

sudo apt-get install libxrandr-dev libxi-dev

【10】 这部分最后安装

sudo apt-get install gcc-arm-linux-gnueabi gcc-9-arm-linux-gnueabi

4,将Python 3.8设置为默认Python版本。

先查看下Python 3.8安装位置

which python3.8

安装位置:/usr/bin/python3.8

将 Python和 Python3切换 为 Python 3. 8 :(下面指令参数最后面数字 1 表示优先级)

sudo update-alternatives --install /usr/bin/python python /usr/bin/python3.8 1

 响应信息:update-alternatives: using /usr/bin/python3.8 to provide /usr/bin/python (python) in auto mode

sudo update-alternatives --install /usr/bin/python3 python3 /usr/bin/python3.8 1

响应信息:update-alternatives: using /usr/bin/python3.8 to provide /usr/bin/python3 (python3) in auto mode

三,注册码云账号并添加码云SSH公钥,为获取源码做准备

首先需要再码云(gitee)注册账号,然后在本地Ubuntu生成公钥,添加到码云用户账号下,参考官方怎样生成公钥

1,首先,您需要在客户端机器上生成一个SSH密钥对。使用ssh-keygen命令来生成密钥对。  

ssh-keygen -t ed25519 -C "your_email@example.com" 

-t ed25519 :指定密钥类型为ed25519。 

-C “your_email@example.com”:添加注释(通常是您的电子邮件地址),这有助于识别密钥。 

执行上述命令后,系统会提示您输入文件名以保存密钥(默认情况下保存在~/.ssh/id_rsa中),以及是否设置密码短语。设置密码短语可以增加额外的安全层,但也可以留空以便免密码连接。

aping@HUAWEI-G540:~$ ssh-keygen -t ed25519 -C "aping@HUAWEI-G540"
Generating public/private ed25519 key pair.
Enter file in which to save the key (/home/aping/.ssh/id_ed25519):
Created directory '/home/aping/.ssh'.
Enter passphrase (empty for no passphrase):
Enter same passphrase again:
Your identification has been saved in /home/aping/.ssh/id_ed25519
Your public key has been saved in /home/aping/.ssh/id_ed25519.pub
The key fingerprint is:
SHA256:2y7cORieeCCFfM0KVgQArz9cgay1tLPe37rJwhuFww4 aping@HUAWEI-G540
The key's randomart image is:
+--[ED25519 256]--+
|.....o.          |
| o .  .          |
|  *..o o         |
| = +=oo o        |
|o E.=+..S        |
| o *.oo .o       |
|  =.o. =.=..     |
| . ooo.oB.+      |
|  . o+*+....     |
+----[SHA256]-----+
aping@HUAWEI-G540:~$

2,查看生成的密钥文件 

生成密钥对后,您的SSH目录(通常是~/.ssh)中将包含以下两个文件: 

 id_rsa:私钥文件。 

id_rsa.pub:公钥文件。

aping@HUAWEI-G540:~$ ls ~/.ssh/
id_ed25519  id_ed25519.pub
aping@HUAWEI-G540:~$

3,读取公钥文件 ~/.ssh/id_ed25519.pub:

cat ~/.ssh/id_ed25519.pub
ssh-ed25519 AAA*********************************FYg0xsQ aping@HUAWEI-G540

复制终端输出的公钥。然后用户可以通过主页右上角 「个人设置」->「安全设置」->「SSH 公钥」->「添加公钥」 ,添加生成的 public key 添加到当前账户

4,验证,通过 ssh -T 测试时,输出 SSH Key 绑定的用户名:

aping@HUAWEI-G540:~$ ssh -T git@gitee.com
The authenticity of host 'gitee.com (180.76.199.13)' can't be established.
ECDSA key fingerprint is SHA256:FQGC9Kn/eye****************************.
Are you sure you want to continue connecting (yes/no/[fingerprint])? yes
Warning: Permanently added 'gitee.com,180.76.199.13' (ECDSA) to the list of known hosts.
Hi apinggitee(@pathbreaker)! You've successfully authenticated, but GITEE.COM does not provide shell access.
aping@HUAWEI-G540:~$

5,安装git客户端和git-lfs

sudo apt-get update
sudo apt-get install git
sudo apt-get install git-lfs

6,执行如下命令安装码云repo工具

参考curl下载repo工具 报错,提供的方法,使用curl命令从码云获取repo脚本将repo脚本下载到/usr/local/bin/repo路径下。

aping@HUAWEI-G540:~$ su
Password:
root@HUAWEI-G540:/home/aping#

 输入正确的root用户密码,看到命令行开头为"root@",表示切换成功。如果遇到“Permission denied”错误,需要

sudo passwd root

输入两遍密码以后,看到“password updated successfully”的提示信息,表示设置成功。 

为root用户下载"curl"工具

root@HUAWEI-G540:/home/aping# apt-get install curl
Reading package lists... Done
Building dependency tree
Reading state information... Done
curl is already the newest version (7.68.0-1ubuntu2.25).
0 upgraded, 0 newly installed, 0 to remove and 0 not upgraded.
root@HUAWEI-G540:/home/aping#

运行命令

curl https://gitee.com/oschina/repo/raw/fork_flow/repo-py3 > /usr/local/bin/repo
root@HUAWEI-G540:/home/aping# curl https://gitee.com/oschina/repo/raw/fork_flow/repo-py3 > /usr/local/bin/repo
  % Total    % Received % Xferd  Average Speed   Time    Time     Time  Current
                                 Dload  Upload   Total   Spent    Left  Speed
100 36173    0 36173    0     0  75834      0 --:--:-- --:--:-- --:--:-- 75834
root@HUAWEI-G540:/home/aping#

 为下载的repo工具文件设置权限

chmod 777 /usr/local/bin/repo

为repo工具文件设置权限,本条命令是给所有用户和所有组完全控制的权限,你也可以根据自己需要自己修改相应的权限。如果添加执行权限可以执行

chmod a+x /usr/local/bin/repo

切换回原用户,继续操作。(这里的user对应的是你的用户名)

su user

输入命令以后,看到命令行开头为"user@",表示切换成功。

root@HUAWEI-G540:/home/aping# su aping
aping@HUAWEI-G540:~$

测试连接情况

pip3 install -i https://repo.huaweicloud.com/repository/pypi/simple requests
aping@HUAWEI-G540:~$ pip3 install -i https://repo.huaweicloud.com/repository/pypi/simple requests
Looking in indexes: https://repo.huaweicloud.com/repository/pypi/simple
Requirement already satisfied: requests in /usr/lib/python3/dist-packages (2.22.0)
aping@HUAWEI-G540:~$

另外两个辅助工具

sudo apt-get install tree
sudo apt-get install htop

7,在需要存放源码的根目录下配置用户信息

#以下操作需要再源码目录下进行
#建立源码目录

# 配置本地git环境
git config --global user.name "username"
git config --global user.email "your email"
git config --global credential.helper store

##使用repo工具初始化源码
repo init -u git@gitee.com:openharmony/manifest.git -b OpenHarmony-4.0-Release --no-repo-verify
#同步代码
repo sync -c -j8
#拉取静态大文件
repo forall -c 'git lfs pull'

(可选)#在源码根目录运行如下命令安装hb并更新至最新版本。这个命令会安装openharmony项目中带的hb。不同版本的openharmony使用的hb版本不同。所以必须使用下面这个命令。这样安装的hb命令只会在当前的项目中可用
python3 -m pip install --user build/hb

#设置环境变量,可选。
sudo vim ~/.bashrc
#将以下命令拷贝到.bashrc文件的最后一行,保存并退出。
export PATH=~/.local/bin:$PATH
#执行如下命令更新环境变量。
source ~/.bashrc
#在源码目录执行"hb help",显示help信息即表示安装成功

# 编译步骤
bash build/prebuilts_download.sh
./build.sh --product-name rk3568 --ccache

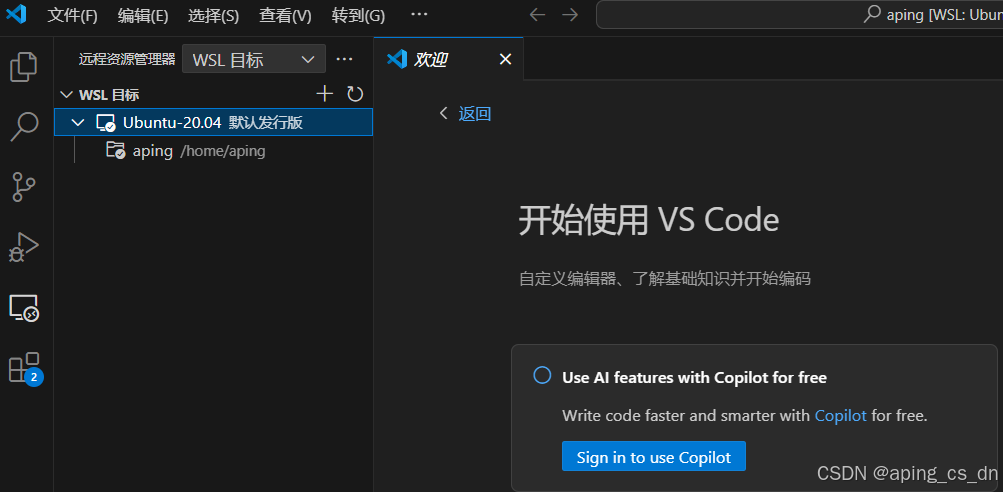
8,安装vscode,请自行安装,安装完毕后,打开vscode,在扩展栏搜索chinese 选择安装中文简体,安装后重启,接着在扩展栏搜索wls,安装wls 插件,因为系统已经安装wls ubuntu 20.04,vscode 会自动检测到,在远程资源管理器中能看到,点击连接即可。
Win11+WLS Ubuntu 鸿蒙开发环境搭建(一) 2,搜索“启用或关闭Windows功能”,启用“Hyper-V”、“Windows虚拟机监控程序平台”、“适用于Linux的Windows子系统”、“虚拟机平台”5,安装ubuntu,在Microsoft Store搜索Ubuntu,选择“Ubuntu20.04.6”导入完成后,可以在PowerShell中运行命令wsl -l -v,此时可以看到已经安装的子系统包。在扩容之前, 先看下当前磁盘空间情况,sdb的256G空间需要扩容到600G,7,将WSL转移到非C盘,备份Ubuntu,到指定盘F。 阅读详情

相关推荐

Windows系统WLS安装Linux子系统(ubuntu)

1、默认安装 Linux 时是第一代 WSL,要在以后安装 Linux 的时候默认启用 WSL2,在Windows PowerShell中运行命令:wsl --set-default-version 2。wsl --set-version Ubuntu 2 #升级到WSL2,其中 Ubuntu 是已经安装的Linux名称,命令格式:wsl --set-version linux 用户名建议符合[a-z_][a-z0-9_-]*[$]正则表达式,并且长度不超过 32 位。

qq_48150274的博客 2697

WIN11系统下wls2+Ubuntu20.04的详细安装过程(非系统盘)

WSL2是的简称,是微软在Windows 10/11操作系统中提供的一种功能,用于在Windows系统上运行Linux环境,与主机Windows系统共用同一套硬件资源。它允许用户在Windows操作系统中使用本机的Linux内核,而不需要使用虚拟机或双启动等方式,开发者和用户可以在Windows环境中轻松地访问和运行Linux命令行工具和应用程序。

BQ Blog 1万+

【Open Harmony开发】Win11 + WLS2 实现Open Harmony代码环境搭建+编译

OH环境搭建

主要在学习,偶尔会总结 1294

windows11中WLS2安装ubuntu(VScode)

必须运行 Windows 10 版本 2004 及更高版本(内部版本 19041 及更高版本)或 Windows 11Tips:若要检查 Windows 版本及内部版本号,选择 Windows 徽标键 + R,然后键入“winver”,选择“确定”。

weixin_47603083的博客 3440

Windows10安装wls、ubuntu22.04教程以及解决无法访问互联网的问题

Windows10安装wls、ubuntu22.04以及解决无法访问互联网的问题。

5412

DataWorks数据安全治理最佳实践

DataWorks基于数据安全治理的常见思路,针对资产梳理、技术体系建设和运营体系建设,提供了一系列数据安全产品能力,您可通过“基础防护建设、数据安全防护措施及策略增强建设、数据安全持续运营”三个阶段在DataWorks上落地数据安全治理项目。参考本文启动数据安全治理项目前,建议您先了解DataWorks数据安全产品相关能力了解DataWorks数据安全产品能力后,您可参考如下三个阶段在DataWorks上落地数据安全治理项目。

soso1968的博客 1438

windows11安装wsl2(linux)+VScode+ miniconda+TVM+python环境部署

本人在读穷学生,受设备限制,只能在自己的笔记本上的wsl下配置TVM环境,尝试跑一些demo。配置历时好几天,全程没有熟手帮忙,期望给其他小伙伴避坑,建议不要一上来就照着blog配置,多浏览几篇博客,再下手。

Emily_Buffy的博客 4155

SAP ABAP开发避坑:BAPI_MATVAL_PRICE_CHANGE调用报‘估价未维护’的完整解决流程

本文深入解析SAP ABAP开发中调用BAPI_MATVAL_PRICE_CHANGE函数时遇到的'估价未维护'错误,提供从基础配置检查到CKML_PRICE_SEND表维护的完整解决方案。通过实战案例和代码示例,帮助开发者快速定位问题并实现批量价格更新的自动化处理,提升开发效率。

weixin_28705087的博客 427

Windows11安装linux子系统

1、打开开发人员模式win+i打开设置,勾选开发人员模式2、开启“适用于Linux的Windows子系统”、虚拟机平台、Hyper-V找到 控制面板-程序和功能-启用或关闭Windows功能,选中“适用于Linux的Windows子系统”,然后点击确定3、安装WLS在管理员模式下打开 PowerShell 或 Windows 命令提示符,方法是右键单击并选择“以管理员身份运行”,输入 wsl --install 命令,然后重启计算机。更新WLS(如果出现如下错误,请更新WLS)

m0_60304650的博客 5842

word 2013 长篇文档排版案例教程

office 2013 制作长文格式模板

1万+

AD2428与SigmaStudio:从节点自动配置与EEPROM存储实战

本文详细介绍了AD2428 A2B收发器与SigmaStudio开发环境的集成应用,重点讲解从节点自动配置与EEPROM存储的实战流程。通过硬件连接、属性配置、数据导出及嵌入式系统集成等步骤,实现设备上电自启动,提升汽车音频系统的可靠性与部署效率。

g8f9d0s1a2的博客 650

Windows11 安装WSL+Linux的Windows子系统+可视化界面配置

本文详细介绍了Windows系统下WSL的安装与配置过程:首先通过启用Windows功能组件并安装WSL2;其次在微软商店下载Ubuntu系统;然后进行基础配置和图形界面设置(包括安装Gnome编辑器、GIMP等应用);最后提供两种可视化方案(X11远程桌面和xUbuntu桌面)。文章还包含Windows与Ubuntu共享文件夹的设置方法,并针对安装过程中的常见问题给出解决方案。

m0_55260921的博客 1万+

RocketMQ5.3.0-control-多 Master 多 Salve-异步复制-集群搭建

RocketMQ5.3.0-control-多 Master 多 Salve-异步复制-集群搭建(详细文档)

m0_52369979的博客 731

win10搭建Ubuntu子系统(wls)

系统设置 -> 应用 -> 右侧的程序和功能 -> 启动或关闭windows功能 -> 勾选适用于 Linux 的 Windows 子系统,然后确认并重启。a:打开 Windows 应用市场,输入 linux 搜索,选择你自己想要的系统版本,我选择的是 Ubuntu 18.04 LTS ,然后下载安装。b:下载后点击【启动】会弹出一个小黑框,等待安装成功后输入名字密码,密码需要输入两次(屏幕不会显示密码,输入完回车就行)4:Ubuntu向win粘贴文本,鼠标选中需要复制的文本,同样鼠标右键完成复制。

weixin_41863631的博客 2296

XC95144XL-10TQG144I Xilinx XC9500XL 高性能 CPLD

XC95144XL-10TQG144I 属于 Xilinx 的 XC9500XL 高性能 CPLD 家族,是一颗面向 3.3V 低电压系统的可编程逻辑器件。该器件以小封装、高速响应和良好的系统兼容性为设计目标,常用作系统控制/ glue-logic、I/O 缓冲、状态机、总线桥接与接口协议前端等场景中的可重编程逻辑单元。产品支持现场(in-system)编程与 IEEE-1149.1 JTAG 边界扫描,能在系统板上直接更新逻辑。

2403_90082736的博客 1060

【Unity】【2D】用连续图片生成动画Animation的简明步骤

本文介绍了Unity中使用2D连续图片制作2D动画Animation的简明步骤。

O青草O的博客 Unity和游戏制作知识分享 718

Windows上安装wls

Windows搜索栏中输入功能 找到“启动或关闭Windows功能”=>适用于Linux的Windows子系统 和 虚拟机平台(后续需要若不使用虚拟机请无视) 前打勾 =>确定 =>立即重启。如果起来了指向了一个url地址,你可以直接点击打开这个后端网站,通常是https://localhost:8000, 如果你刚才是点击的这个链接,会直接打开浏览器你能看到这个后端网站。*无法正常打开,无法输入内容,不管按什么都是直接退出(此问题主要集中在微软商店下载的版本中,问题原因是文件缺失)

tillytian的博客 3098

华为od机试|华为od机试真题2025|华为od题库|华为od机考|2025C卷B卷

华为od机试|华为od机试真题2025|华为od题库|华为od机考|华为od机试|华为od机试真题2025|华为od题库|华为od机考|华为od机试|华为od机试真题2025|华为od题库|华为od机考|华为od机试|华为od机试真题2025|华为od题库|华为od机考|B卷C卷

u014481728的博客 10万+

The authenticity of host ‘gitee.com (180.76.199.13)‘ can‘t be established

这是我遇到的问题,问题出在通过 SSH 连接到 Gitee(码云)时,连接中断导致无法推送代码。如果还有其他问题,请随时告诉我!

weixin_45872608的博客 2255

深度学习工具包 DeepLearningToolbox

深度学习工具包Deprecation notice.-----This toolbox is outdated and no longer maintained.There are much better tools available for deep learning than this toolbox, e.g. [Theano](http://deeplearning.net/software/theano/), [torch](http://torch.ch/) or [tensorflow](http://www.tensorflow.org/)I would suggest you use one of the tools mentioned above rather than use this toolbox.Best, Rasmus.DeepLearnToolbox================A Matlab toolbox for Deep Learning.Deep Learning is a new subfield of machine learning that focuses on learning deep hierarchical models of data.It is inspired by the human brain's apparent deep (layered, hierarchical) architecture.A good overview of the theory of Deep Learning theory is[Learning Deep Architectures for AI](http://www.iro.umontreal.ca/~bengioy/papers/ftml_book.pdf)For a more informal introduction, see the following videos by Geoffrey Hinton and Andrew Ng.* [The Next Generation of Neural Networks](http://www.youtube.com/watch?v=AyzOUbkUf3M) (Hinton, 2007)* [Recent Developments in Deep Learning](http://www.youtube.com/watch?v=VdIURAu1-aU) (Hinton, 2010)* [Unsupervised Feature Learning and Deep Learning](http://www.youtube.com/watch?v=ZmNOAtZIgIk) (Ng, 2011)If you use this toolbox in your research please cite [Prediction as a candidate for learning deep hierarchical models of data](http://www2.imm.dtu.dk/pubdb/views/publication_details.php?id=6284)```@MASTERSTHESIS\{IMM2012-06284, author = "R. B. Palm", title = "Prediction as a candidate for learning deep hierarchical models of data", year = "2012",}```Contact: rasmusbergpalm at gmail dot comDirectories included in the toolbox-----------------------------------`NN/` - A library for Feedforward Backpropagation Neural Networks`CNN/` - A library for Convolutional Neural Networks`DBN/` - A library for Deep Belief Networks`SAE/` - A library for Stacked Auto-Encoders`CAE/` - A library for Convolutional Auto-Encoders`util/` - Utility functions used by the libraries`data/` - Data used by the examples`tests/` - unit tests to verify toolbox is workingFor references on each library check REFS.mdSetup-----1. Download.2. addpath(genpath('DeepLearnToolbox'));Example: Deep Belief Network---------------------```matlabfunction test_example_DBNload mnist_uint8;train_x = double(train_x) / 255;test_x = double(test_x) / 255;train_y = double(train_y);test_y = double(test_y);%% ex1 train a 100 hidden unit RBM and visualize its weightsrand('state',0)dbn.sizes = [100];opts.numepochs = 1;opts.batchsize = 100;opts.momentum = 0;opts.alpha = 1;dbn = dbnsetup(dbn, train_x, opts);dbn = dbntrain(dbn, train_x, opts);figure; visualize(dbn.rbm{1}.W'); % Visualize the RBM weights%% ex2 train a 100-100 hidden unit DBN and use its weights to initialize a NNrand('state',0)%train dbndbn.sizes = [100 100];opts.numepochs = 1;opts.batchsize = 100;opts.momentum = 0;opts.alpha = 1;dbn = dbnsetup(dbn, train_x, opts);dbn = dbntrain(dbn, train_x, opts);%unfold dbn to nnnn = dbnunfoldtonn(dbn, 10);nn.activation_function = 'sigm';%train nnopts.numepochs = 1;opts.batchsize = 100;nn = nntrain(nn, train_x, train_y, opts);[er, bad] = nntest(nn, test_x, test_y);assert(er < 0.10, 'Too big error');```Example: Stacked Auto-Encoders---------------------```matlabfunction test_example_SAEload mnist_uint8;train_x = double(train_x)/255;test_x = double(test_x)/255;train_y = double(train_y);test_y = double(test_y);%% ex1 train a 100 hidden unit SDAE and use it to initialize a FFNN% Setup and train a stacked denoising autoencoder (SDAE)rand('state',0)sae = saesetup([784 100]);sae.ae{1}.activation_function = 'sigm';sae.ae{1}.learningRate = 1;sae.ae{1}.inputZeroMaskedFraction = 0.5;opts.numepochs = 1;opts.batchsize = 100;sae = saetrain(sae, train_x, opts);visualize(sae.ae{1}.W{1}(:,2:end)')% Use the SDAE to initialize a FFNNnn = nnsetup([784 100 10]);nn.activation_function = 'sigm';nn.learningRate = 1;nn.W{1} = sae.ae{1}.W{1};% Train the FFNNopts.numepochs = 1;opts.batchsize = 100;nn = nntrain(nn, train_x, train_y, opts);[er, bad] = nntest(nn, test_x, test_y);assert(er < 0.16, 'Too big error');```Example: Convolutional Neural Nets---------------------```matlabfunction test_example_CNNload mnist_uint8;train_x = double(reshape(train_x',28,28,60000))/255;test_x = double(reshape(test_x',28,28,10000))/255;train_y = double(train_y');test_y = double(test_y');%% ex1 Train a 6c-2s-12c-2s Convolutional neural network %will run 1 epoch in about 200 second and get around 11% error. %With 100 epochs you'll get around 1.2% errorrand('state',0)cnn.layers = { struct('type', 'i') %input layer struct('type', 'c', 'outputmaps', 6, 'kernelsize', 5) %convolution layer struct('type', 's', 'scale', 2) %sub sampling layer struct('type', 'c', 'outputmaps', 12, 'kernelsize', 5) %convolution layer struct('type', 's', 'scale', 2) %subsampling layer};cnn = cnnsetup(cnn, train_x, train_y);opts.alpha = 1;opts.batchsize = 50;opts.numepochs = 1;cnn = cnntrain(cnn, train_x, train_y, opts);[er, bad] = cnntest(cnn, test_x, test_y);%plot mean squared errorfigure; plot(cnn.rL);assert(er<0.12, 'Too big error');```Example: Neural Networks---------------------```matlabfunction test_example_NNload mnist_uint8;train_x = double(train_x) / 255;test_x = double(test_x) / 255;train_y = double(train_y);test_y = double(test_y);% normalize[train_x, mu, sigma] = zscore(train_x);test_x = normalize(test_x, mu, sigma);%% ex1 vanilla neural netrand('state',0)nn = nnsetup([784 100 10]);opts.numepochs = 1; % Number of full sweeps through dataopts.batchsize = 100; % Take a mean gradient step over this many samples[nn, L] = nntrain(nn, train_x, train_y, opts);[er, bad] = nntest(nn, test_x, test_y);assert(er < 0.08, 'Too big error');%% ex2 neural net with L2 weight decayrand('state',0)nn = nnsetup([784 100 10]);nn.weightPenaltyL2 = 1e-4; % L2 weight decayopts.numepochs = 1; % Number of full sweeps through dataopts.batchsize = 100; % Take a mean gradient step over this many samplesnn = nntrain(nn, train_x, train_y, opts);[er, bad] = nntest(nn, test_x, test_y);assert(er < 0.1, 'Too big error');%% ex3 neural net with dropoutrand('state',0)nn = nnsetup([784 100 10]);nn.dropoutFraction = 0.5; % Dropout fraction opts.numepochs = 1; % Number of full sweeps through dataopts.batchsize = 100; % Take a mean gradient step over this many samplesnn = nntrain(nn, train_x, train_y, opts);[er, bad] = nntest(nn, test_x, test_y);assert(er < 0.1, 'Too big error');%% ex4 neural net with sigmoid activation functionrand('state',0)nn = nnsetup([784 100 10]);nn.activation_function = 'sigm'; % Sigmoid activation functionnn.learningRate = 1; % Sigm require a lower learning rateopts.numepochs = 1; % Number of full sweeps through dataopts.batchsize = 100; % Take a mean gradient step over this many samplesnn = nntrain(nn, train_x, train_y, opts);[er, bad] = nntest(nn, test_x, test_y);assert(er < 0.1, 'Too big error');%% ex5 plotting functionalityrand('state',0)nn = nnsetup([784 20 10]);opts.numepochs = 5; % Number of full sweeps through datann.output = 'softmax'; % use softmax outputopts.batchsize = 1000; % Take a mean gradient step over this many samplesopts.plot = 1; % enable plottingnn = nntrain(nn, train_x, train_y, opts);[er, bad] = nntest(nn, test_x, test_y);assert(er < 0.1, 'Too big error');%% ex6 neural net with sigmoid activation and plotting of validation and training error% split training data into training and validation datavx = train_x(1:10000,:);tx = train_x(10001:end,:);vy = train_y(1:10000,:);ty = train_y(10001:end,:);rand('state',0)nn = nnsetup([784 20 10]); nn.output = 'softmax'; % use softmax outputopts.numepochs = 5; % Number of full sweeps through dataopts.batchsize = 1000; % Take a mean gradient step over this many samplesopts.plot = 1; % enable plottingnn = nntrain(nn, tx, ty, opts, vx, vy); % nntrain takes validation set as last two arguments (optionally)[er, bad] = nntest(nn, test_x, test_y);assert(er < 0.1, 'Too big error');```[![Bitdeli Badge](https://d2weczhvl823v0.cloudfront.net/rasmusbergpalm/deeplearntoolbox/trend.png)](https://bitdeli.com/free "Bitdeli Badge")

VB摄像头监控

该VB模块可对摄像头捕获的画面进行录像等,可在创建的窗口进行控制

WS2 安装ubuntu +迁移+vscode

microsoftstore下载windowsterminal(win11需要先卸载再安装,原因是自带的版本太低,设置界面直接没了)控制面板>程序>启用或关闭Windows功能>适用于Linux的Windows子系统。从开始菜单找到并打开设置,打开开发者模式。在解压目录打开PowerShell。...

Lim的博客 1743

C# WinForm 基于DirectShow.dll编写的程序,可边预览边保存视频,音频和图片

基于微软的DirectShow.dll的二次开发1.自动识别连接的摄像头跟麦克风且可以对其进行选择(默认选中第一个)2.可录制wmv和avi两种格式的视频并且都带有音频,avi可以录制的分辨率和帧数进行选择,wmv默认进行了淸晰度优化如不喜欢可去除代码中有相关提示3.可在预览点开之后进行拍照,也可边录制视频边拍照4.添加了视频和音频的压缩功能(酌情使用)这次二次开发发现C#对DirectShow的相关信息太少,这次做完也不敢藏私共享出来,还望大家指正

Win10安装wls2 Ubuntu22.04及开发环境配置

记录从0安装Win10安装wls2 Ubuntu22.04及开发环境配置(数据库和微服务工具)过程

瀚海拾贝 3254

LinePhone3.2.7(android端最新版本) sip客户端

SIP客户端For android:LinePhone3.2.7(最新版本),官网地址:http://www.linphone.org/

windows11 安装WSL2全流程

本文介绍了win11安装wsl做开发环境

dddeee的专栏 22万+

鸿蒙环境准备ubuntu篇(一)ubuntu配置

ubuntu环境配置

pjie131_的博客 1838

已经配置gitee密钥但下载报错问题The authenticity of host ‘gitee.com (180.76.199.13)‘ can‘t be established. ECDSA k

这是SSH主机密钥验证的问题。当你第一次连接到一个Git服务器时,SSH会要求你确认服务器的指纹。

她的吻让他 517

人工智能-WLS-Ubuntu22.04本地部署DeepSeek-R1

我是在WSL下的Ubuntu22.04.5系统中进行操作的,系统安装后默认已经安装了NVIDIA的驱动,跟Windows下的驱动版本一致。如果没有安装的可以从NVIDIA的官网 (https://www.nvidia.cn/) 下载相应的驱动进行安装。由于网络问题,我们通常是无法访问Huggingface官网( https://huggingface.co )的,我们可以从 https://hf-mirror.com ,或者魔搭社区( https://modelscope.cn )中获取预训练模型。

分享技术,传播知识! 3296

OpenHarmony模块化编译

OpenHarmony 4.0 hb安装配置和常见模块编译

mart!nhu的博客 5170
上一篇: Win11+WLS Ubuntu 鸿蒙开发环境搭建(一)
aping_cs_dn
博客等级 码龄19年 188粉丝 50原创
评论
成就一亿技术人!
拼手气红包6.0元
还能输入1000个字符
 
 条评论被折叠 查看
添加红包

请填写红包祝福语或标题

个

红包个数最小为10个

元

红包金额最低5元

当前余额3.43元 前往充值 >
需支付:10.00元
成就一亿技术人!
领取后你会自动成为博主和红包主的粉丝 规则
hope_wisdom
发出的红包

打赏作者

aping_cs_dn

你的鼓励将是我创作的最大动力

¥1 ¥2 ¥4 ¥6 ¥10 ¥20
扫码支付:¥1
获取中
扫码支付

您的余额不足,请更换扫码支付或充值

打赏作者

实付元
使用余额支付
点击重新获取
扫码支付
钱包余额 0

抵扣说明:

1.余额是钱包充值的虚拟货币,按照1:1的比例进行支付金额的抵扣。
2.余额无法直接购买下载,可以购买VIP、付费专栏及课程。

余额充值