


 本文通过实例解析Vue.js的生命周期,包括beforeCreate、created、beforeMount、mounted等各个阶段,展示了各阶段中Vue实例的状态。同时,文章探讨了如何在不同生命周期钩子中进行初始化操作、发起请求以及组件销毁等实践应用。最后,作者强调了实践在理解Vue生命周期中的重要性。
前言
生命周期听着并不陌生,但不太会用。。。
所以今天来啃啃这个硬骨头。
开始
vue.js生命周期官方文档:https://cn.vuejs.org/v2/guide/instance.html
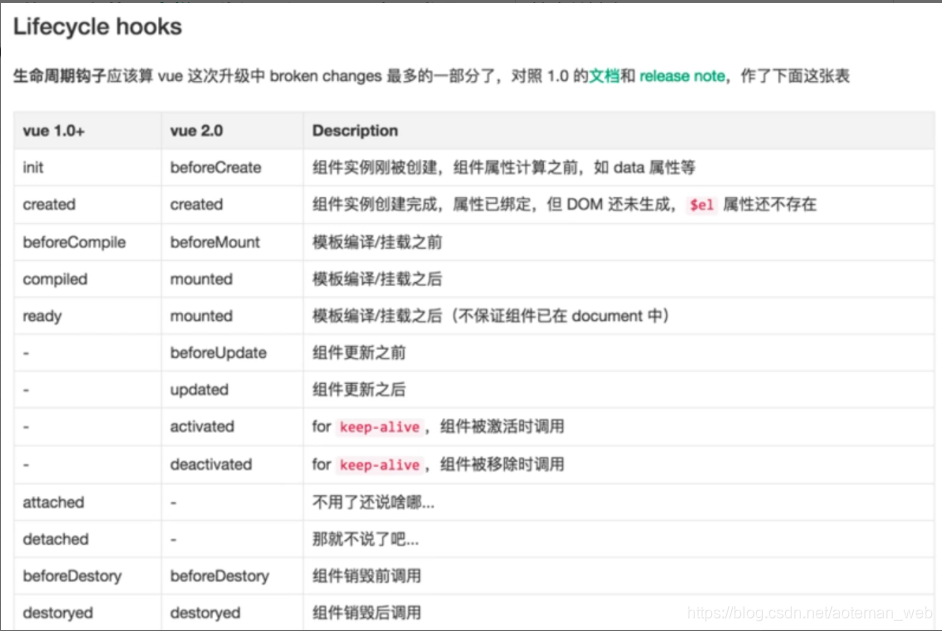
生命周期图示:

这样子看可能还不太理解,来看看实例:
<div id="app">
{{message}}
</div>
<script type="text/javascript">
var app = new Vue({
el: '#app',
data: {
message: 'hi,i am test'
},
beforeCreate: function () {
console.group('--------beforeCreate 创建前状态---------')
console.log("%c%s", "color:red", "el :" + this.$el)
console.log("%c%s", "color:red", "data :" + this.$data)
console.log("%c%s", "color:red", "message :" + this.message)
},
created: function () {
console.group('--------created 创建完毕状态---------')
console.log("%c%s", "color:red", "el :" + this.$el)
console.log("%c%s", "color:red", "data :" + this.$data)
console.log("%c%s", "color:red", "message :" + this.message)
},
beforeMount: function () {
console.group('--------beforeMount 挂载前状态---------')
console.log("%c%s", "color:red", "el :" + this.$el)
console.log(this.$el)
console.log("%c%s", "color:red", "data :" + this.$data)
console.log("%c%s", "color:red", "message :" + this.message)
},
mounted: function () {
console.group('--------mounted 挂载完成状态---------')
console.log("%c%s", "color:red", "el :" + this.$el)
console.log(this.$el)
console.log("%c%s", "color:red", "data :" + this.$data)
console.log("%c%s", "color:red", "message :" + this.message)
},
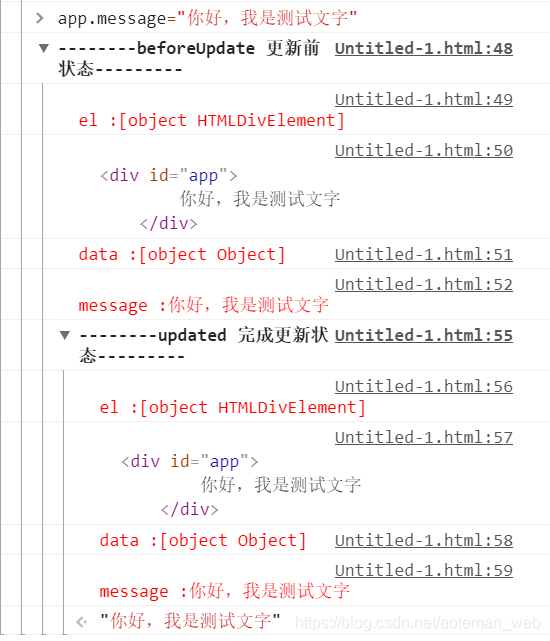
beforeUpdate: function () {
console.group('--------beforeUpdate 更新前状态---------')
console.log("%c%s", "color:red", "el :" + this.$el)
console.log(this.$el)
console.log("%c%s", "color:red", "data :" + this.$data)
console.log("%c%s", "color:red", "message :" + this.message)
},
updated: function () {
console.group('--------updated 完成更新状态---------')
console.log("%c%s", "color:red", "el :" + this.$el)
console.log(this.$el)
console.log("%c%s", "color:red", "data :" + this.$data)
console.log("%c%s", "color:red", "message :" + this.message)
},
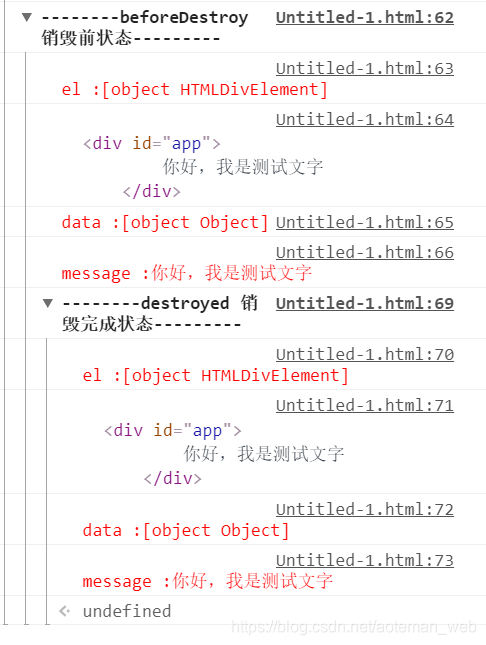
beforeDestroy: function () {
console.group('--------beforeDestroy 销毁前状态---------')
console.log("%c%s", "color:red", "el :" + this.$el)
console.log(this.$el)
console.log("%c%s", "color:red", "data :" + this.$data)
console.log("%c%s", "color:red", "message :" + this.message)
},
destroyed: function () {
console.group('--------destroyed 销毁完成状态---------')
console.log("%c%s", "color:red", "el :" + this.$el)
console.log(this.$el)
console.log("%c%s", "color:red", "data :" + this.$data)
console.log("%c%s", "color:red", "message :" + this.message)
}
})
</script>
在控制台显示出来的效果是怎么样的
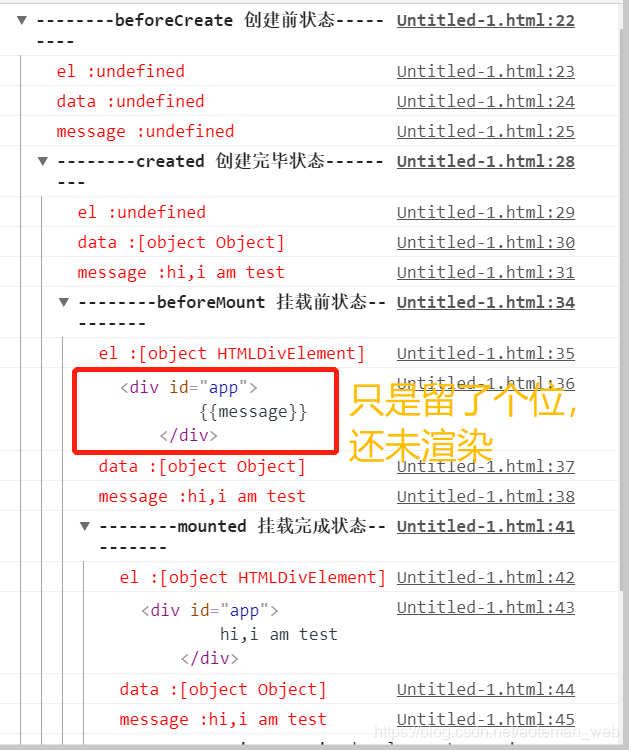
beforecreated:el 和 data 并未初始化
created:完成了 data 数据的初始化,el没有
beforeMount:完成了 el 和 data 初始化
mounted :完成挂载
测试beforeUpdate与updated
更改message观察更新前与更新后的变化
销毁vue实例观察销毁前与销毁后的变化
这么多钩子函数,看着有点乱欸
举个例子该怎么用吧:
比如created:做一些初始化,实现函数自执行
mounted:发起后端请求,拿回数据。
也还是懵懵懂懂,实践得真知,以后运用到实际项目中或许就会有更清楚的认识吧。
主要参考的是这位大佬的文章然后自己实践了一下:https://segmentfault.com/a/1190000008010666


 643
643

 被折叠的 条评论
为什么被折叠?
被折叠的 条评论
为什么被折叠?
 到【灌水乐园】发言


