


按照nagios安装与配置教程(详细版)【入门教程】2020-11-16_Eye to eye的博客-优快云博客_nagios安装与配置
安装好nagios服务端和客户端
安装完后服务器端后运行systemctl start nagios如果出现:Failed to start nagios.service: Unit not found.表示没有将服务添加至启动组,运行systemctl daemon-reload,重新加载
修改完配置后要记得用:# /usr/local/nagios/bin/nagios -v /usr/local/nagios/etc/nagios.cfg来验证所有配置文件有没有出错,如果出错那就将配置文件改回去,我一般是改一个配置文件就验证一次,验证通过了,再改下一个,不然出错了不知道是哪个配置文件出错了,验证结果为:
[root@localhost etc]# /usr/local/nagios/bin/nagios -v /usr/local/nagios/etc/nagios.cfg
Nagios Core 4.3.1
Copyright (c) 2009-present Nagios Core Development Team and Community Contributors
Copyright (c) 1999-2009 Ethan Galstad
Last Modified: 02-23-2017
License: GPL
Website: https://www.nagios.org
Reading configuration data...
Read main config file okay...
Read object config files okay...
Running pre-flight check on configuration data...
Checking objects...
Checked 15 services.
Checked 4 hosts.
Checked 2 host groups.
Checked 0 service groups.
Checked 1 contacts.
Checked 1 contact groups.
Checked 25 commands.
Checked 5 time periods.
Checked 0 host escalations.
Checked 0 service escalations.
Checking for circular paths...
Checked 4 hosts
Checked 0 service dependencies
Checked 0 host dependencies
Checked 5 timeperiods
Checking global event handlers...
Checking obsessive compulsive processor commands...
Checking misc settings...
Total Warnings: 0
Total Errors: 0
此处为两个0就是配置文件没有问题,那么我们就要重启http和nagios,命令为:
systemctl restart httpd
systemctl restart nagios
只要验证配置文件没有问题一般重启不会出现错误
二、检查监控端的nagios进程,ps -ef|grep nagios,会出nagios进程出来
检查被监控端的5666端口,netstat nltp|grep 5666,会有5666端口在监听,windows的话是:netstat -ano | findstr "5666"
三、监控端和被监控端都要安装Nagios-plugins插件和NRPE,安装差别就是被监控端的NRPE要多安装两步用于监控,而监控端安装NRPE只是安装好就可以了。
四、windows的话只需要安装一个插件NSClient++
插件下载页面为:NSClient++(Nagios监视系统客户端)下载V0.4.3.88 官方最新版-带教程西西软件下载
只要在安装时添加好允许监控的地址和把下面的勾选上就行了,然后在服务里面找到NSCclient++这个服务,在登录里面把允许桌面交互勾选上,再重启服务就可以了。=
五、添加windows主机可以用命令:cp windows.cfg winERP.cfg,然后在winERP.cfg里面更改相应的IP和需要用到的监听服务,然后在etc目录下的nagios.cfg里面添加一行:
cfg_file=/usr/local/nagios/etc/objects/winERP.cfg
而linux系统则是差不多如linux37.cfg,放在objects目录下:
define host{
use linux-server
host_name linux37
alias linux37
address 192.168.7.37
}
define service{
use generic-service
host_name linux37
service_description CHECK USERS
check_command check_nrpe!check_users
}
define service{
use generic-service
host_name linux37
service_description load
check_command check_nrpe!check_load
}
define service{
use generic-service
host_name linux37
service_description disk sda1
check_command check_nrpe!check_sda1
}
define service{
use generic-service
host_name linux37
service_description Zombile procs
check_command check_nrpe!check_zombie_procs
}
define service{
use generic-service
host_name linux37
service_description total procs
check_command check_nrpe!check_total_procs
}
并在nagios.cfg里面添加一行:cfg_file=/usr/local/nagios/etc/objects/linux37.cfg
六、在被监控端的nrpe.cfg里面添加监听命令后如:command[check_users]=/usr/local/nagios/libexec/check_users -w 5 -c 10
要重启nrpe才能生效:
1.输入 “ps -ef | grep nrpe”命令查找出nagios的进程id
2.输入“# kill -9 8516”命令杀掉进程,8516就是进程id
3.输入“/usr/local/nagios/bin/nrpe -n -c /usr/local/nagios/etc/nrpe.cfg -d”命令启动nrpe进程
七、nagios发送报警邮件
我用的是sendEmail
测试命令:sendEmail -f answanXXX@163.com -t wyp-4txl9XXX@dingtalk.com -s smtp.163.com -xu answanXXX -xp password -u "nagios test" -m "nagios test "
实际应用:
define command{
command_name notify-host-by-email
command_line /usr/local/bin/sendEmail -f answanXXX@163.com -t $CONTACTEMAIL$ -s smtp.163.com -u "** $NOTIFICATIONTYPE$ Host Alert: $HOSTNAME$ is $HOSTSTATE$ **" -xu answanXXX -xp password
}
# 'notify-service-by-email' command definition
define command{
command_name notify-service-by-email
command_line /usr/local/bin/sendEmail -f answanXXX@163.com -t $CONTACTEMAIL$ -s smtp.163.com -u "** $NOTIFICATIONTYPE$ Service Alert: $HOSTALIAS$/$SERVICEDESC$ is $SERVICESTATE$ **" -xu answanXXX -xp password
}
八、NRPE命令的关系图:

九、在具体主机的配置文件里面,一个名字只能定义一个主机组,如果别的主机配置文件再定义就会报错:重复的主机组定义
# Define a hostgroup for Windows machines
# All hosts that use the windows-server template will automatically be a member of this group
define hostgroup{
hostgroup_name windows-servers ; The name of the hostgroup
alias Windows Servers ; Long name of the group
}
十、关于nagios钉钉报警
1.配置好钉钉机器人后可以通过命令测试一下
[root@june ~]# curl 'https://oapi.dingtalk.com/robot/send?access_token=xxxxxxxxxxxxxxxxxxx' -H 'Content-Type: application/json' -d '{"msgtype": "text",
"text": {
"content": "钉钉机器人群消息测试"
}
}'
2.编写运行的shell脚本
[root@localhost libexec]# cat notify_dingtalk_rebot
#!/bin/bash
#define receive parameter values
#notifyToken=$1
notifyToken="****************************************************************************"
notifyActionType=$2
notifyHostAlias=$3
notifyServiceDesc=$4
notifyServiceState=$5
notifyType=$6
notifyService=$5
notifyHost=$3
notifyAddress=$9
notifyState=$6
notifyInfo=$7
#define dingtalk config
dingtalkUrl="https://oapi.dingtalk.com/robot/send"
#define notify msg template
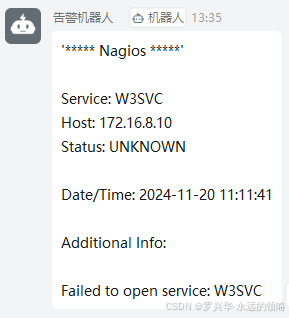
msgTopic="'***** Nagios *****'"
msgService="Service: ${notifyService}"
msgHost="Host: ${notifyHost}"
msgState="Status: ${notifyState}"
msgDate="Date/Time: `date '+%Y-%m-%d %H:%M:%S'`"
msgInfo="Additional Info:\\n\\n${notifyInfo}"
msgTemplate=${msgTopic}\\n\\n${msgService}\\n${msgHost}\\n${msgState}\\n\\n${msgDate}\\n\\n${msgInfo}
#define dingtalk send msg template
dingtalkMsgTemplate='{"msgtype": "text","text": {"content": "<DING_TALK_MSG_CONTENT>"}}'
#dingtalk rebot send group message
function dingtalkRebotSendMsg(){
notifyMsg=$1
sendMsg=${dingtalkMsgTemplate/<DING_TALK_MSG_CONTENT>/$notifyMsg}
sendUrl="${dingtalkUrl}?access_token=${notifyToken}"
curl $sendUrl -H 'Content-Type: application/json' -d "$sendMsg"
echo $sendUrl
}
dingtalkRebotSendMsg "$msgTemplate"
3.添加命令模版
[root@june objects]# vi commands.cfg
......
define command{
command_name notify-service-by-dingtalk-rebot
command_line $USER1$/notify_dingtalk_rebot "$CONTACTPAGER$" "$NOTIFICATIONTYPE$" "$HOSTALIAS$" "$HOSTADDRESS$" "$SERVICEDESC$" "$SERVICESTATE$" "$SERVICEOUTPUT$"
}
define command{
command_name notify-host-by-dingtalk-rebot
command_line $USER1$/notify_dingtalk_rebot "$CONTACTPAGER$" "$NOTIFICATIONTYPE$" "$HOSTALIAS$" "$HOSTADDRESS$" "down" "down" "down"
}
4.添加通用模版
[root@june objects]# vi templates.cfg
......
define contact{
name generic-contact
service_notification_period 24x7
host_notification_period 24x7
service_notification_options w,u,c,r,f,s
host_notification_options d,u,r,f,s
service_notification_commands notify-service-by-email,notify-service-by-dingtalk-rebot
host_notification_commands notify-host-by-email,notify-host-by-dingtalk-rebot
register 0
}
5.检查配置文件是否有误,并重启nagios
[root@bj-1-11 objects]# /usr/local/nagios/bin/nagios -v /usr/local/nagios/etc/nagios.cfg
[root@bj-1-11 objects]# systemctl restart nagios
nagios钉钉报警的原理可能是:调用contacts.cfg模版里面的generic-contact,而generic-contact属于templates.cfg里面的子项(上面的第4),这个子项有notify-service-by-dingtalk-rebot 和notify-host-by-dingtalk-rebot 这两个命令,会调用commands.cfg里面的相应的命令,并执行 notify_dingtalk_rebot 这个shell脚本向钉钉机器人推送消息,如果收不到消息可以测试 notify_dingtalk_rebot 这个脚本用 $USER1$/notify_dingtalk_rebot "$CONTACTPAGER$" "$NOTIFICATIONTYPE$" "$HOSTALIAS$" "$HOSTADDRESS$" "$SERVICEDESC$" "$SERVICESTATE$" "$SERVICEOUTPUT$"这个命令测试看是哪出问题了。


 2386
2386

 被折叠的 条评论
为什么被折叠?
被折叠的 条评论
为什么被折叠?
 到【灌水乐园】发言


