


 作者因面试常被问跨平台,遂了解RN并做简单Demo。介绍了登录页、tabbar集成页等界面,涉及导航栏标题修改、布局属性设置、组件使用等,如用createSwitchNavigator处理登录页,用Swiper做轮播图等,还给出了github地址。
因为面试的时候总是被问到有没有了解过跨平台,所以趁着有时间了解了一下rn,做了个简单的demo
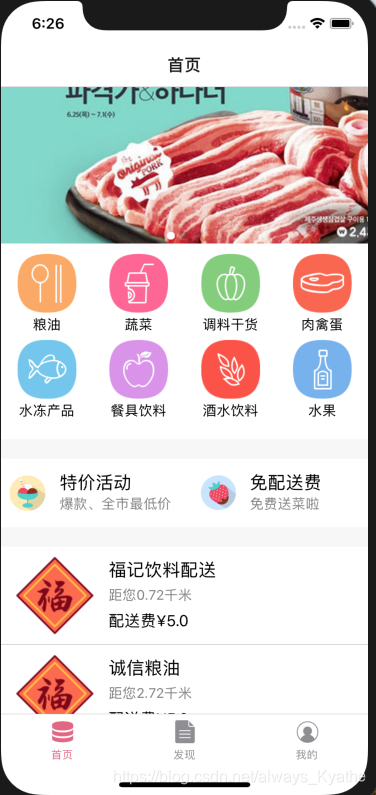
界面如下,首先是一个登陆页面,然后跳转到一个tabbar集成的界面中,我的界面点击退出登录,可以回到登录页面


tabbar集成的页面是FirstPage.js / SecondPage.js / ThirdPage.js 总的AppNavigator.js,用到了createStackNavigator 和集成tabbar的createBottomTabNavigator
const AppBottomNavigator=createBottomTabNavigator({
  FirstPage:{
    screen:FirstPage,
    navigationOptions: {
      title:'首页',
      tabBarLabel: '首页',
      tabBarIcon: ({tintColor, focused}) => {
        return <Image
            source={require('./pictures/ic_sheet_tab.png')}//自定义图片
            style={{width:26,height:26, tintColor: tintColor}}//选中后颜色变成tintcolor
        />
      }
    }
  },
  SecondPage:{
    screen:SecondPage,
    navigationOptions:{
      title:'发现',
      tabBarLabel:'发现',
      tabBarIcon:({tintColor,focused})=>{
        return <Image
              source={require('./pictures/ic_tab_document.png')}//自定义图片
              style={{width: 26,height:26,tintColor:tintColor}}//选中后颜色变成tintcolor
          />
      }
    }
  },
  ThirdPage:{
      screen:ThirdPage,
      navigationOptions:{
        title :'我的',
        tabBarLabel:'我的',
        tabBarIcon:({tintColor, focused})=>{
          return <Image
                  source={require('./pictures/ic_tab_me.png')}
                  style={{width:26,height:26,tintColor:tintColor}}
          />
        }
      }
  },
},{
  tabBarOptions:{
    activeTintColor:'#e36784'
  }
});

export const AppStackNavigator=createStackNavigator({
  // FirstPage:{
  //   screen:FirstPage,
  //   navigationOptions:({navigation})=>({
  //     // title: 'FirstPage',
  //     header:null
  //   }),
  //
  // },
  // SecondPage:{
  //   screen:SecondPage,
  //   navigationOptions:({navigation})=>({
  //     title:'SecondPage'
  //   }),
  // },
  // ThirdPage:{
  //   screen:ThirdPage,
  //   navigationOptions:({navigation})=>({
  //     title:'Third'
  //   })
  // },
  Bottom:{
    screen:AppBottomNavigator,
    navigationOptions:{
      title:'hh',
      // header:null,
      headerLeft:null,//隐藏左侧返回按键
    }
  },
});
想要让每个tab页的标题和底部tabbarlabel的标题一致,需要如下代码,从而实现可以对具体页的导航栏标题进行修改
AppBottomNavigator.navigationOptions=({navigation})=>{//可以对具体页的导航栏标题进行修改
  let {routeName} = navigation.state.routes[navigation.state.index];
  if (routeName ==='FirstPage'){
    return {
      headerTitle:'首页'
    // header:null
    }

  } else if (routeName==='SecondPage'){
    return {
      headerTitle:'发现'
    }
  } else if (routeName === 'ThirdPage'){
    return {
      headerTitle:'我的'
    }
  }
};
登陆页面是LoginPage.js
【这里要更正一下,一开始把loginpage也写进了createStackNavigator里面,后来发现,首页竟然能返回到登陆页面,这不是我们想要的。所以应该改用createSwitchNavigator,它的用途是一次只显示一个页面,默认情况下,不处理返回操作,适用于登陆界面,官网有createSwitchNavigator的示例
import React from 'react';
import {
  ActivityIndicator,
  AsyncStorage,
  Button,
  StatusBar,
  StyleSheet,
  View,
} from 'react-native';
import { createStackNavigator, createSwitchNavigator, createAppContainer } from 'react-navigation';

class SignInScreen extends React.Component {
  static navigationOptions = {
    title: 'Please sign in',
  };

  render() {
    return (
      <View style={styles.container}>
        <Button title="Sign in!" onPress={this._signInAsync} />
      </View>
    );
  }

  _signInAsync = async () => {
    await AsyncStorage.setItem('userToken', 'abc');
    this.props.navigation.navigate('App');
  };
}

class HomeScreen extends React.Component {
  static navigationOptions = {
    title: 'Welcome to the app!',
  };

  render() {
    return (
      <View style={styles.container}>
        <Button title="Show me more of the app" onPress={this._showMoreApp} />
        <Button title="Actually, sign me out :)" onPress={this._signOutAsync} />
      </View>
    );
  }

  _showMoreApp = () => {
    this.props.navigation.navigate('Other');
  };

  _signOutAsync = async () => {
    await AsyncStorage.clear();
    this.props.navigation.navigate('Auth');
  };
}

class OtherScreen extends React.Component {
  static navigationOptions = {
    title: 'Lots of features here',
  };

  render() {
    return (
      <View style={styles.container}>
        <Button title="I'm done, sign me out" onPress={this._signOutAsync} />
        <StatusBar barStyle="default" />
      </View>
    );
  }

  _signOutAsync = async () => {
    await AsyncStorage.clear();
    this.props.navigation.navigate('Auth');
  };
}

class AuthLoadingScreen extends React.Component {
  constructor() {
    super();
    this._bootstrapAsync();
  }

  // Fetch the token from storage then navigate to our appropriate place
  _bootstrapAsync = async () => {
    const userToken = await AsyncStorage.getItem('userToken');

    // This will switch to the App screen or Auth screen and this loading
    // screen will be unmounted and thrown away.
    this.props.navigation.navigate(userToken ? 'App' : 'Auth');
  };

  // Render any loading content that you like here
  render() {
    return (
      <View style={styles.container}>
        <ActivityIndicator />
        <StatusBar barStyle="default" />
      </View>
    );
  }
}

const styles = StyleSheet.create({
  container: {
    flex: 1,
    alignItems: 'center',
    justifyContent: 'center',
  },
});

const AppStack = createStackNavigator({ Home: HomeScreen, Other: OtherScreen });
const AuthStack = createStackNavigator({ SignIn: SignInScreen });

export default createAppContainer(createSwitchNavigator(
  {
    AuthLoading: AuthLoadingScreen,
    App: AppStack,
    Auth: AuthStack,
  },
  {
    initialRouteName: 'AuthLoading',
  }
));
】
注:可以通过
navigationOptions={
  header:null,//隐藏导航栏
};
隐藏导航栏
用StyleSheet声明样式
在render()函数中进行界面的布局,考虑到适配iPhone X,所以在布局前,先定义一个
<SafeAreaView style={{flex:1,backgroundColor:'#f5fcff'}}> </SafeAreaView> 所有的界面布局都写在safeAreaView里面。flex为1指定组件扩张以充满所有剩余的空间。
关于布局属性,比较常用的几个 :
flexDirection 表明主轴方向,即子元素沿哪个方向布局
alignItems表明子元素沿次轴方向的排列方式
alignSelf表明具体元素在次轴方向的排列方式,可以覆盖alignItems
justifyContent表明子元素沿着主轴方向的排列方式,是靠近主轴起始段还是末尾段,还是均匀分布...
所以登陆页面的背景view声明 flexDirection:'column'
头像居中,所以声明 alignSelf:'center'
无法登陆和新用户放置在一个view里,设置 justifyContent: 'space-between'//主轴两端对齐 所以这两个按键可以在左右两端
其他登陆方式和两个图标房子一个view里,设置 justifyContent:'flex-start', flexDirection:'row'//内部控件水平排列 所以这三个组件从界面的左边开始向右排列
为登陆按键添加点击事件,可以跳转到tabbar
<TouchableOpacity
                style={styles.button}
                onPress={()=>{
                  navigation.navigate('Bottom')
                }}
            >
              <Text style={styles.loginText}>登录</Text>
            </TouchableOpacity>
接下来是首页
可以通过
static navigationOptions ={
        headerLeft:null,//隐藏左侧返回按键
        // title:'首页'
    };
隐藏左侧的返回按键
界面的最上面部分是一个轮播图 ,用到的组件是Swiper 最下面是表格,用到的是Flatlist,因为可能界面一开始显示不完所有组件,所以用一个大的scrollview包裹所有组件
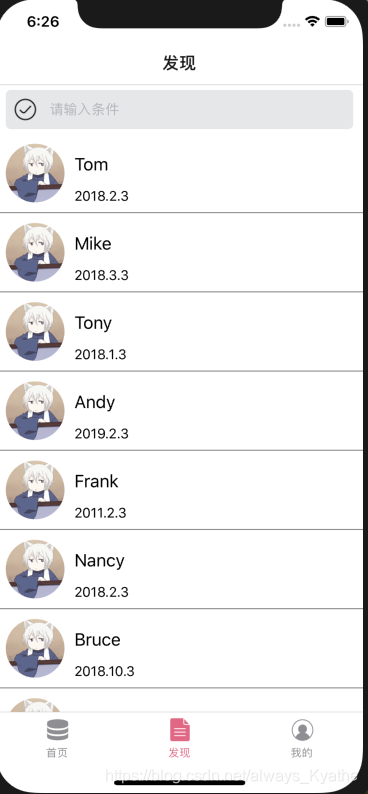
发现界面用的是Flatlist
export default class SecondPage extends Component<Props>{
    static navigationOptions ={
        headerLeft:null,//隐藏左侧返回按键
        title:'发现'
    };
    _flatList;
    _renderItem=(item)=>{//渲染数据
      return (
          <TouchableOpacity style={styles.itemView}>
              <Image
                    source={require('./pictures/bawei.png')}
                    style={styles.itemImg}
              />
              <View style={styles.itemTextView}>
                  <Text style={styles.itemText}>
                      {item.item.title}
                  </Text>
                  <Text style={styles.itemDetail}>
                      {item.item.detail}
                  </Text>
              </View>
          </TouchableOpacity>
      )
    };

    _separator=()=>{//分隔线
        return <View style={{height:1,backgroundColor:'gray'}}>
                </View>
    };
    render(){
        var data = [// 数据源
            {
                title:'Tom',
                detail:'2018.2.3'
            },{
                title:'Mike',
                detail:'2018.3.3'
            },{
                title:'Tony',
                detail:'2018.1.3'
            },
            {
                title:'Andy',
                detail:'2019.2.3'
            },{
                title:'Frank',
                detail:'2011.2.3'
            },{
                title:'Nancy',
                detail:'2018.2.3'
            },{
                title:'Bruce',
                detail:'2018.10.3'
            },{
                title:'Tom',
                detail:'2018.12.3'
            },{
                title:'Ann',
                detail:'2018.2.3'
            }
        ];
        return(
            <SafeAreaView style={{flex:1,backgroundColor:'white'}}>
                <View style={styles.container}>
                    <View style={styles.searchBgView}>
                        <Image
                            style={styles.searchImg}
                            source={require('./pictures/tick.png')}
                        />
                        <TextInput
                            style={styles.searchInputText}
                            // style={{marginLeft:10,paddingRight: 50}}// 距父控件右边界的距离用paddingright
                            placeholder='请输入条件'
                        />
                    </View>
                    <View ItemSeperatorComponent={this._separator}/>
                    <View style={{flex:1,marginTop:5}}>
                        {/*//加了flex之后会考虑底部安全距离*/}
                        <FlatList
                            ref = {(flatList)=>this._flatList = flatList}
                            ItemSeparatorComponent={this._separator}
                            renderItem={this._renderItem}
                            data={data}
                            keyExtractor={(item,index)=>index.toString()}
                                // 每个cell一个独一无二的key值,加上toString()后不警告
                        >
                        </FlatList>
                    </View>
                </View>
            </SafeAreaView>
        )
    }
}
接下来介绍个人中心界面

因为列表分为三个section,所以用Sectionlist组件,因为不同的section有不同的样式,所以在每个数组里分别为renderItem进行赋值
export default class ThirdPage extends Component<Props>{
    static navigationOptions ={
        headerLeft:null,//隐藏左侧返回按键
        title:'我的'
    };
    _renderItem=(item)=>{//渲染数据,第二个section
      return (
          <TouchableOpacity style={styles.itemView}>
              <Text style={{marginLeft: 15,fontSize: 16}}>
                  {item.item.title}
              </Text>
          </TouchableOpacity>
      )
    };

    _renderItem1=(item)=>{//渲染数据,第一个section
        return (
            <TouchableOpacity style={styles.imgView}>
                <Image
                    style={{marginLeft:15,width:90,height:90}}
                    source={require('./pictures/pic.png')}
                />
                <Text style={{marginLeft: 15,fontSize: 18}}>
                    {item.item.title}
                </Text>
            </TouchableOpacity>

        )
    };

    _renderItem2=(item)=>{//渲染数据,第三个section
        return (
            <TouchableOpacity style={styles.itemV}
                              onPress={()=>this.props.navigation.navigate('LoginPage')}
                                // 注册事件,退出登录,navigate回到起始登录页面
            >
                <Text style={{fontSize: 16}}>
                    {item.item.title}
                </Text>
            </TouchableOpacity>

        )
    };

    _sectionItem=(item)=>{
        return (
            <View style={{height:30,backgroundColor:'#f7f7f7'}}>
            </View>
        )
    };

    _separator=()=>{//分隔线
        return <View style={{height:0.2,backgroundColor:'gray'}}>
                </View>
    };

    render() {
        var sections = [// 数据源,因为不同的section有不同的样式,所以在每个数组里分别为renderItem进行赋值
            {key:'0',
                data:[{img:'./pic.png', title:'AD'}],
                renderItem:this._renderItem1
            },{key:'1',
                data:[{title:'我的收藏'},{title:'我的订单'},{title:'个人设置'},{title:'关于'}],
                renderItem:this._renderItem
            },{key:'2',
                data:[{title:'退出登录'}],
                renderItem:this._renderItem2
            }];
        return(
            <SafeAreaView style={{flex:1,backgroundColor:'#f7f7f7'}}>
                <View style={styles.container}>
                    <SectionList
                    renderSectionHeader={this._sectionItem}// 每个section的头
                    sections = {sections}
                    ItemSeparatorComponent={this._separator}// 分割线
                    keyExtractor={(item,index)=>index.toString()}
                    >
                    </SectionList>
                </View>
            </SafeAreaView>
        )
    }
}
现在修改了“发现”界面,因为想要实现
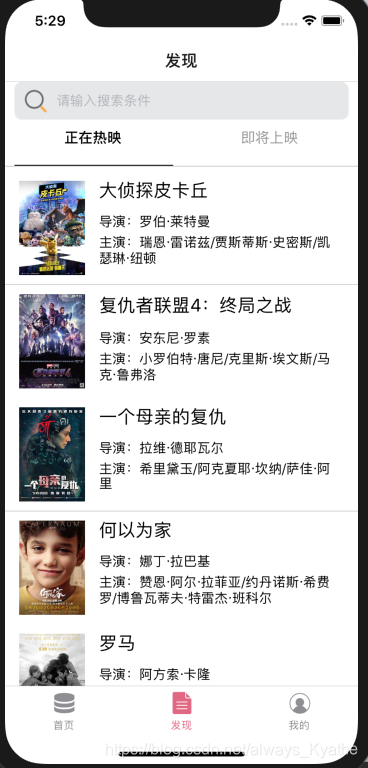
横向的滚动视图效果,百度后发现是要用react-native-scrollable-tab-view
首先添加react-native-scrollable-tab-view
npm install react-native-scrollable-tab-view --save然后需要import相应组件
import ScrollableTabView, {DefaultTabBar, } from 'react-native-scrollable-tab-view';相关代码如下
<ScrollableTabView
                        renderTabBar={() => <DefaultTabBar/>}// 系统提供
                        tabBarUnderlineStyle={{
                            backgroundColor: '#000',
                            height: 1,
                            width: '45%',
                            marginLeft: 10,
                            marginRight: 10,
                        }}
                        tabBarBackgroundColor='#ffffff'
                        tabBarActiveTextColor='#000'
                        tabBarInactiveTextColor='#959595'
                        tabBarTextStyle={{fontSize: 15, textAlignVertical: 'center'}}
                        locked={false}
                    >
                        {/*几个view就有几个滑动页面,tabLabel就是标题名*/}
                        <View tabLabel='正在热映'
                            style={{flex:1,marginTop:5}}>
                            {/*//加了flex之后会考虑底部安全距离*/}
                            <FlatList
                                ItemSeparatorComponent={this.separator}
                                data = {movies}
                                renderItem={this.renderItem}
                                handleMethod = {({viewableItems}) => this.handleViewableItemsChanged(viewableItems)}
                                keyExtractor={(item,index)=>index.toString()}
                                    // 每个cell一个独一无二的key值,加上toString()后不警告
                            >
                            </FlatList>
                        </View>
                        <View tabLabel='即将上映'
                            style={{flex:1,marginTop:5}}>
                            {/*//加了flex之后会考虑底部安全距离*/}
                            <FlatList
                                ItemSeparatorComponent={this.separator}
                                data = {comings}
                                renderItem={this.renderItem}
                                handleMethod = {({viewableItems}) => this.handleViewableItemsChanged(viewableItems)}
                                keyExtractor={(item,index)=>index.toString()}
                                // 每个cell一个独一无二的key值,加上toString()后不警告
                            >
                            </FlatList>
                        </View>
</ScrollableTabView>github地址:https://github.com/yathe/firstRNProject


 636
636

 被折叠的 条评论
为什么被折叠?
被折叠的 条评论
为什么被折叠?
 到【灌水乐园】发言


