 使用Servlet和JSP实现数据库分页显示


 本文档介绍了如何使用Servlet、JSP和MySQL数据库实现分页显示员工信息的应用程序。通过创建传输对象、数据库连接工厂、DAO以及使用JSTL和EL在JSP中展示数据,实现了非贪婪分页方法,限制了每次查询的记录数,提高性能。
项目描述
- 此示例说明如何使用 Servlet 和 JSP 编写应用程序,该应用程序使用分页来显示结果。
- 此应用程序使用一个表 Employee 并向用户显示员工详细信息。
- 我们使用 Eclipse IDE for Java EE Developers 和 Apache Tomcat 来运行 Servlet 和 JSP。
- 作为最佳实践,我们使用单例(用于建立数据库连接)、数据访问对象(DAO)、传输对象(TO)和模型视图控制器(MVC)模式。
使用环境
- JDK 6 (Java SE 6)
- 面向 Java EE 开发人员的 Eclipse Indigo IDE (3.7.1)
- Apache Tomcat 6.x(要安装 Tomcat,请参阅此页面)
- MySQL 5.5(要安装 MySQL,请参阅此页面)
- MySQL 连接器/J 5.1 JAR 文件
- JSTL JAR 文件 (jstl-1.2.jar)
- Java EE 5 API(Servlet 2.5、JSP 2.1、JSTL 1.2、表达式语言 (EL))
- Java 数据库连接 (JDBC) API
- [可选] 要监视和分析浏览器和 Web 服务器之间的 HTTP 标头,您可以使用 Firefox 的这些附加组件之一
- 实时 HTTP 标头
- HttpFox
搭建开发环境
如果您不熟悉使用 Tomcat 和 Eclipse 开发 Servlet,则可以在继续本示例之前阅读此页面。
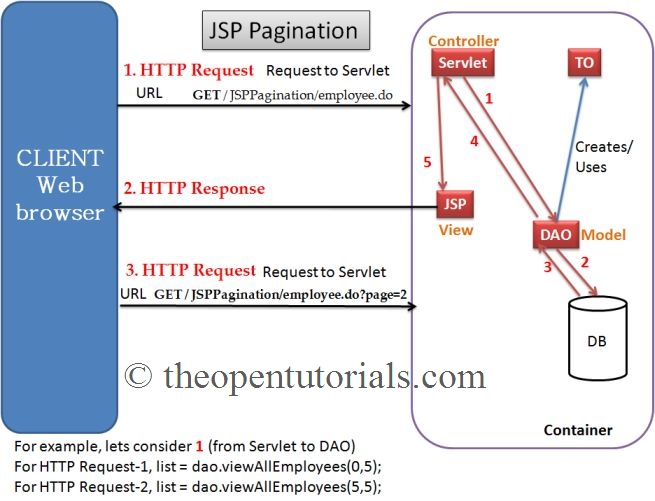
程序控制流程
什么是分页?
- 从数据库中获取数百万条记录几乎消耗了机器的所有 CPU 功率和内存。
- 因此,我们将数百万条记录分成小块,显示每页的记录数量有限(比如 20 或 30 条)。最好的例子是谷歌搜索分页,它允许用户按页码导航到下一页并浏览每页的有限记录。
如何实现分页?
分页逻辑可以通过多种方式实现,有些是
方法一:贪婪方法
- 一次获取所有记录并在缓存结果后将其显示给用户。这被称为贪婪方法。
- 这可以通过编写返回 List<Object> 的 DAO 来实现。每当用户需要结果时,可以从缓存列表中检索子列表,而不是在用户单击“下一步”链接时查询数据库以获取下一组结果。
- 这种方法的缺点是,由于数据被缓存,它变得陈旧。如果您的应用程序更改了结果集中的数据,您在选择此解决方案时可能必须考虑结果的准确性。
方法2:非贪婪方法
- 通过限制 ResultSet 中的行数,每次用户想要查看时获取记录范围。
- 如果您有超过数百万条记录会怎样?用户可能需要等待很长时间才能得到结果。在这里,我们将结果集限制为仅获取用户想要查看的记录数。
我们使用第二种方法来演示分页。
在 MYSQL 中创建数据库和表
本示例使用一张 Employee 表,该表的描述如下所示。
“员工”表
| FIELD | TYPE | KEY | EXTRA |
|---|---|---|---|
| emp_id | int | Primary Key | auto_increment |
| emp_name | varchar(255) | ||
| salary | double | ||
| dept_name | varchar(255) |
- 打开命令提示符 (Windows) 或终端 (Linux) 并键入
mysql -u [你的用户名] -p
然后按回车键并输入密码。
- 如果您使用的是 Windows,您还可以使用 MySQL 命令行客户端,该客户端将在所有程序菜单中可用。
- 要创建新数据库,请参阅此页面。在此示例中,数据库名称为“ exampledb ”。
- 创建数据库后,输入命令“use <database_name>;”
- 要创建新表,请参阅此页面。在这个例子中,表名是'员工'
- 在表中插入一些记录。请参阅此页面以使用 MySQL 插入行。

创建动态 WEB 项目
- 打开 Eclipse IDE
- 为了编写 Servlet 和 JSP,我们需要创建一个新的Dynamic Web 项目。创建这个项目并将其命名为“ JSPPagination ”。
下载 MYSQL 连接器
- 连接器可以从:http ://dev.mysql.com/downloads/connector/j/ 下载。
- 本教程使用 5.1 版本。将连接器解压缩到计算机上包含 MySQL Connector J JAR 的安全位置。
- 复制 MySQL Connector J JAR 并将其粘贴到项目的“lib”文件夹中。
下载 JSTL JAR 文件
- JSTL JAR 文件可从以下网址下载:http: //download.java.net/maven/1/jstl/jars/
- 本教程使用 jstl-1.2.jar 文件。
- 复制 JAR 文件并将其粘贴到项目的“lib”文件夹中。
编写传输对象类
- 在src文件夹中,创建一个新包并将其命名为 ' com.theopentutorials.to '。在这个包中创建新类,如下所示。
- Transfer Object封装了业务数据。为了实现这种模式,我们编写了一个具有定义表属性的属性的类。
Employee.java 类
|
1
2
3
4
5
6
7
8
9
10
11
12
13
14
15
16
17
18
19
20
21
22
23
24
25
26
27
28
29
30
31
32
33
|
package com.theopentutorials.to;
public class Employee {
private int employeeId;
private String employeeName;
private double salary;
private String deptName;
public int getEmployeeId() {
return employeeId;
}
public void setEmployeeId(int employeeId) {
this.employeeId = employeeId;
}
public String getEmployeeName() {
return employeeName;
}
public void setEmployeeName(String employeeName) {
this.employeeName = employeeName;
}
public double getSalary() {
return salary;
}
public void setSalary(double salary) {
this.salary = salary;
}
public String getDeptName() {
return deptName;
}
public void setDeptName(String deptName) {
this.deptName = deptName;
}
}
|
编写连接工厂类
在编写 DAO 类之前,让我们编写一个 ConnectionFactory 类,它具有数据库连接配置语句和连接数据库的方法。此类使用单例模式。
在 src 文件夹中创建一个新包并将其命名为com.theopentutorials.db并复制以下代码。
ConnectionFactory.java
|
1
2
3
4
5
6
7
8
9
10
11
12
13
14
15
16
17
18
19
20
21
22
23
24
25
26
27
28
29
30
31
32
33
34
35
|
package com.theopentutorials.db;
import java.sql.Connection;
import java.sql.DriverManager;
import java.sql.SQLException;
public class ConnectionFactory {
//static reference to itself
private static ConnectionFactory instance =
new ConnectionFactory();
String url = "jdbc:mysql://localhost/exampledb";
String user = "<YOUR_DATABASE_USERNAME>";
String password = "<YOUR_DATABASE_PASSWORD>";
String driverClass = "com.mysql.jdbc.Driver";
//private constructor
private ConnectionFactory() {
try {
Class.forName(driverClass);
} catch (ClassNotFoundException e) {
e.printStackTrace();
}
}
public static ConnectionFactory getInstance() {
return instance;
}
public Connection getConnection() throws SQLException,
ClassNotFoundException {
Connection connection =
DriverManager.getConnection(url, user, password);
return connection;
}
}
|
填写数据库的用户名和密码,并在 url 字符串中输入您的数据库名称。
编写 DAO 类
此类使用封装了对数据源的访问的数据访问对象 (DAO) 模式。
EmployeeDAO.java
|
1
2
3
4
5
6
7
8
9
10
11
12
13
14
15
16
17
18
19
20
21
22
23
24
25
26
27
28
29
30
31
32
33
34
35
36
37
38
39
40
41
42
43
44
45
46
47
48
49
50
51
52
53
54
55
56
57
58
59
60
61
62
63
64
65
66
67
68
69
70
71
72
73
74
|
package com.theopentutorials.dao;
import java.sql.Connection;
import java.sql.ResultSet;
import java.sql.SQLException;
import java.sql.Statement;
import java.util.ArrayList;
import java.util.List;
import com.theopentutorials.db.ConnectionFactory;
import com.theopentutorials.to.Employee;
public class EmployeeDAO {
Connection connection;
Statement stmt;
private int noOfRecords;
public EmployeeDAO() { }
private static Connection getConnection()
throws SQLException,
ClassNotFoundException
{
Connection con = ConnectionFactory.
getInstance().getConnection();
return con;
}
public List<Employee> viewAllEmployees(
int offset,
int noOfRecords)
{
String query = "select SQL_CALC_FOUND_ROWS * from employee limit "
+ offset + ", " + noOfRecords;
List<Employee> list = new ArrayList<Employee>();
Employee employee = null;
try {
connection = getConnection();
stmt = connection.createStatement();
ResultSet rs = stmt.executeQuery(query);
while (rs.next()) {
employee = new Employee();
employee.setEmployeeId(rs.getInt("emp_id"));
employee.setEmployeeName(rs.getString("emp_name"));
employee.setSalary(rs.getDouble("salary"));
employee.setDeptName(rs.getString("dept_name"));
list.add(employee);
}
rs.close();
rs = stmt.executeQuery("SELECT FOUND_ROWS()");
if(rs.next())
this.noOfRecords = rs.getInt(1);
} catch (SQLException e) {
e.printStackTrace();
} catch (ClassNotFoundException e) {
e.printStackTrace();
}finally
{
try {
if(stmt != null)
stmt.close();
if(connection != null)
connection.close();
} catch (SQLException e) {
e.printStackTrace();
}
}
return list;
}
public int getNoOfRecords() {
return noOfRecords;
}
}
|
一个 SELECT 语句可能包含一个LIMIT 子句来限制服务器返回给客户端的行数。这个 LIMIT 子句有两个参数;第一个参数指定要返回的第一行的偏移量,第二个参数指定要返回的最大行数。
在某些情况下,希望知道在没有 LIMIT 的情况下该语句将返回多少行,但无需再次运行该语句。要获取此行数,请在 SELECT 语句中包含SQL_CALC_FOUND_ROWS选项,然后调用FOUND_ROWS():
编写 SERVLET
|
1
2
3
4
5
6
7
8
9
10
11
12
13
14
15
16
17
18
19
20
21
22
23
24
25
26
27
28
29
30
31
32
33
34
35
36
37
38
39
40
41
|
package com.theopentutorials.servlets;
import java.io.IOException;
import java.util.List;
import javax.servlet.RequestDispatcher;
import javax.servlet.ServletException;
import javax.servlet.http.HttpServlet;
import javax.servlet.http.HttpServletRequest;
import javax.servlet.http.HttpServletResponse;
import com.theopentutorials.dao.EmployeeDAO;
import com.theopentutorials.to.Employee;
/**
* Servlet implementation class EmployeeServlet
*/
public class EmployeeServlet extends HttpServlet {
private static final long serialVersionUID = 1L;
public EmployeeServlet() {
super();
}
public void doGet(HttpServletRequest request,
HttpServletResponse response)
throws ServletException, IOException {
int page = 1;
int recordsPerPage = 5;
if(request.getParameter("page") != null)
page = Integer.parseInt(request.getParameter("page"));
EmployeeDAO dao = new EmployeeDAO();
List<Employee> list = dao.viewAllEmployees((page-1)*recordsPerPage,
recordsPerPage);
int noOfRecords = dao.getNoOfRecords();
int noOfPages = (int) Math.ceil(noOfRecords * 1.0 / recordsPerPage);
request.setAttribute("employeeList", list);
request.setAttribute("noOfPages", noOfPages);
request.setAttribute("currentPage", page);
RequestDispatcher view = request.getRequestDispatcher("displayEmployee.jsp");
view.forward(request, response);
}
}
|
- 在 Servlet 中,我们首先获取 'page' 参数的值并将其存储在 'page' 变量中。我们希望每页显示五 (5) 条记录,我们将其作为参数传递给 viewAllEmployees(offset, 5)。我们在请求范围内存储三个属性并将请求转发到 JSP 页面(displayEmployee.jsp);
- 'list' 变量中可用的员工列表
- “noOfPages”变量中可用的总页数
- 当前页面在“页面”变量中可用
编写 WEB.XML
|
1
2
3
4
5
6
7
8
9
10
11
12
13
14
15
16
|
<?xml version="1.0" encoding="UTF-8"?>
<web-app xmlns:xsi="http://www.w3.org/2001/XMLSchema-instance"
xsi:schemaLocation="Java EE: XML Schemas for Java EE Deployment Descriptors http://java.sun.com/xml/ns/javae
/web-app_2_5.xsd" id="WebApp_ID" version="2.5">
<display-name>JSPPagination</display-name>
<servlet>
<servlet-name>EmployeeServlet</servlet-name>
<servlet-class>com.theopentutorials.servlets.EmployeeServlet</servlet-class>
</servlet>
<servlet-mapping>
<servlet-name>EmployeeServlet</servlet-name>
<url-pattern>/employee.do</url-pattern>
</servlet-mapping>
</web-app>
|
编写 DISPLAYEMPLOYEE.JSP
此 JSP 页面使用 JSP 标准标记库 (JSTL) 以及表达式语言 (EL)。它从请求范围检索属性并显示结果。要使用 JSTL 库,您必须在 JSP 页面中包含 <taglib> 指令。
|
1
2
3
4
5
6
7
8
9
10
11
12
13
14
15
16
17
18
19
20
21
22
23
24
25
26
27
28
29
30
31
32
33
34
35
36
37
38
39
40
41
42
43
44
45
46
47
48
49
50
51
52
53
54
55
56
57
58
|
<%@ page language="java" contentType="text/html; charset=ISO-8859-1"
pageEncoding="ISO-8859-1"%>
<%@ taglib uri="Oracle Java Technologies | Oracle" prefix="c"%>
<!DOCTYPE html PUBLIC "-//W3C//DTD HTML 4.01 Transitional//EN"
<html>
<head>
<meta http-equiv="Content-Type" content="text/html; charset=ISO-8859-1">
<title>Employees</title>
</head>
<body>
<table border="1" cellpadding="5" cellspacing="5">
<tr>
<th>Emp ID</th>
<th>Emp Name</th>
<th>Salary</th>
<th>Dept Name</th>
</tr>
<c:forEach var="employee" items="${employeeList}">
<tr>
<td>${employee.employeeId}</td>
<td>${employee.employeeName}</td>
<td>${employee.salary}</td>
<td>${employee.deptName}</td>
</tr>
</c:forEach>
</table>
<%--For displaying Previous link except for the 1st page --%>
<c:if test="${currentPage != 1}">
<td><a href="employee.do?page=${currentPage - 1}">Previous</a></td>
</c:if>
<%--For displaying Page numbers.
The when condition does not display a link for the current page--%>
<table border="1" cellpadding="5" cellspacing="5">
<tr>
<c:forEach begin="1" end="${noOfPages}" var="i">
<c:choose>
<c:when test="${currentPage eq i}">
<td>${i}</td>
</c:when>
<c:otherwise>
<td><a href="employee.do?page=${i}">${i}</a></td>
</c:otherwise>
</c:choose>
</c:forEach>
</tr>
</table>
<%--For displaying Next link --%>
<c:if test="${currentPage lt noOfPages}">
<td><a href="employee.do?page=${currentPage + 1}">Next</a></td>
</c:if>
</body>
</html>
|
第一个“表”标签显示员工列表及其详细信息。第二个“表”标签显示页码。
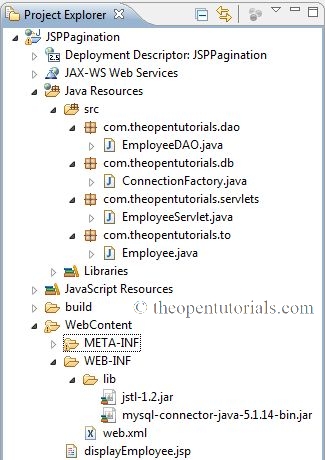
文件夹结构
此示例的完整文件夹结构如下所示。
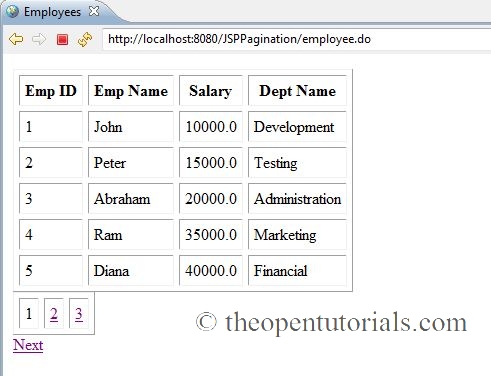
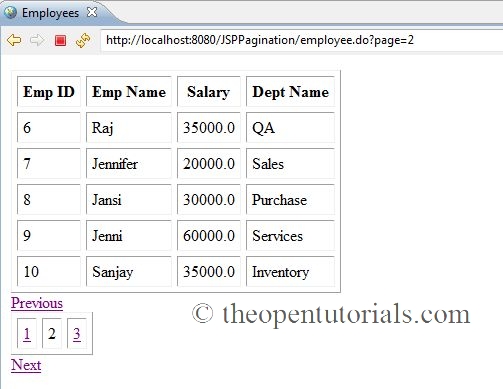
输出
在 Eclipse 中使用 Ctrl + F11 来运行 Servlet。请求 Servlet 的 URL 是
http://localhost:8080/JSPPagination/employee.do


 365
365

 被折叠的 条评论
为什么被折叠?
被折叠的 条评论
为什么被折叠?
 到【灌水乐园】发言


