


 本文详细介绍了SpringBoot中实现异步处理、使用ActiveMQ和RabbitMQ进行消息队列通信以及定时调度的配置和应用。包括配置线程池实现异步任务、集成ActiveMQ发送接收消息、使用RabbitMQ发送用户对象、使用@EnableScheduling和@Scheduled进行定时任务的设置。同时,简要提及了WebSocket的基础应用。
SpringBoot的其它重要内容
本小记学习目标
1、异步线程池
2、异步消息
3、定时调度
4、WebSocket应用简述
一、异步线程池
普通场景下,一个请求都是在一个线程中运行的。但有时候可能需要异步,一个请求会存在两个或以上的线程去完成任务。
我们来看一个报表生成的过程:
如果请求在同一个线中运行,那么结果如下
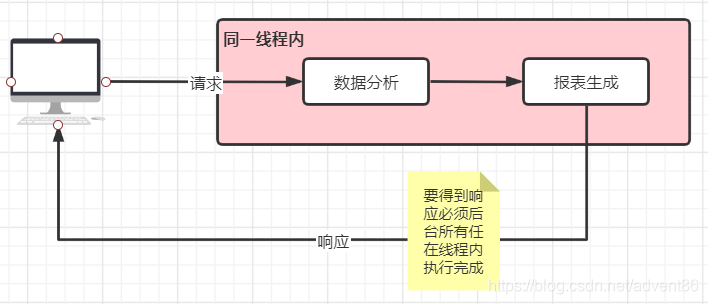
这个过程中会导致完成一项任务会耗费很长的时间,用户体验会很差
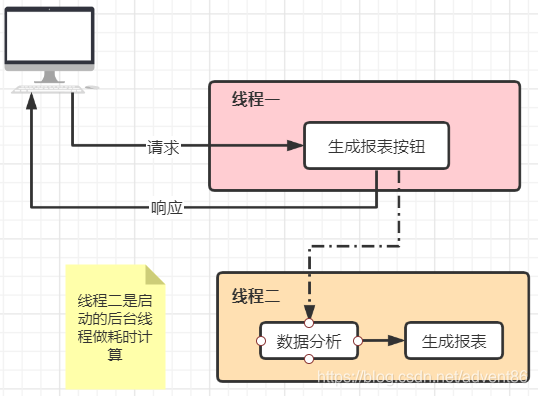
为了解决上面说的这个问题,可以在后台产生一个线程来完成耗时的计算,从面用户不必做长时间的等待响应
在Spring中存在一个AsyncConfigurer接口,它是一个可以配置异步一程池的接口,其源码如下:
package org.springframework.scheduling.annotation;
import java.util.concurrent.Executor;
import org.springframework.aop.interceptor.AsyncUncaughtExceptionHandler;
import org.springframework.lang.Nullable;
public interface AsyncConfigurer {
//获取线程池
@Nullable
default Executor getAsyncExecutor() {
return null;
}
//异步异常处理器
@Nullable
default AsyncUncaughtExceptionHandler getAsyncUncaughtExceptionHandler() {
return null;
}
}
对于上面源码的说明:
1、方法说明
getAsyncExcecutor方法:返回的是一个自定义线程池,这样在开启异步时,线程池就会提供空闲线程来执行异步任务。
getAsyncUncaughtExceptionHandler方法:对于异常的自定义处理
2、注意这两个方法都使用了default修饰
在程序中我们要定义线程池和启用异步,可以新增一个配置类com.xiaoxie.config.AsyncConfig
package com.xioxie.config;
import org.springframework.context.annotation.Configuration;
import org.springframework.scheduling.annotation.AsyncConfigurer;
import org.springframework.scheduling.annotation.EnableAsync;
import org.springframework.scheduling.concurrent.ThreadPoolTaskExecutor;
import java.util.concurrent.Executor;
/**线程池和启用异步*/
@Configuration
@EnableAsync
public class AsyncConfig implements AsyncConfigurer {
//定义线程池
@Override
public Executor getAsyncExecutor() {
//定义线程池
ThreadPoolTaskExecutor taskExecutor = new ThreadPoolTaskExecutor();
//核心线程数
taskExecutor.setCorePoolSize(10);
//最大线程数
taskExecutor.setMaxPoolSize(30);
//线程队列最大线程数
taskExecutor.setQueueCapacity(2000);
//初始化
taskExecutor.initialize();
return taskExecutor;
}
}
@EnableAsync表示开启Spring异步,这样的话便可以使用@Async驱动Spring使用异步
实现AsyncConfigurer接口中的getAsyncExecutor方法用来配置线程池
新增一个service接口:com.xiaoxie.service.AsyncService
package com.xioxie.service;
public interface AsyncService {
//分析数据生成报表方法
public void getReport();
}
新增service接口实现类:com.xiaoxie.service.impl.AsyncServiceImpl
package com.xioxie.service.impl;
import com.xioxie.service.AsyncService;
import org.springframework.scheduling.annotation.Async;
import org.springframework.stereotype.Service;
@Service
public class AsyncServiceImpl implements AsyncService {
@Override
@Async //这里启用异步
public void getReport() {
System.out.println("分析生成报表线程名称:" + Thread.currentThread().getName());
}
}
在这个Service中我们可以看到在getReport方法上使用了注解@Async来启用异步
新增一个controller:com.xiaoxie.controller.AsyncController
package com.xioxie.controller;
import com.xioxie.service.AsyncService;
import org.springframework.beans.factory.annotation.Autowired;
import org.springframework.stereotype.Controller;
import org.springframework.web.bind.annotation.GetMapping;
import org.springframework.web.bind.annotation.ResponseBody;
@Controller
public class AsyncController {
//注入service
@Autowired
private AsyncService asyncService = null;
@GetMapping("/getReport")
@ResponseBody
public String getReport(){
System.out.println("请求线程名称:" + Thread.currentThread().getName());
//调用service方法获取报表
asyncService.getReport();
return "async";
}
}
启动Spring Boot,访问:http://localhost:8080/getReport
可以看到控制台打印结果如下:
请求线程名称:http-nio-8080-exec-1
分析生成报表线程名称:ThreadPoolTaskExecutor-1
二、异步消息
当与其它系统集成时,需要发送消息给其它系统让它完成相应的功能。
为了给其它系统发送消息,Java引入了JMS(Java Message Service,Java消息服务)。
JMS按规范可以分为两类
点对点:将一个系统的消息指定发送到另一个系统,从而对应指定的系统就可以获取到消息
发布订阅:一个系统约定把消息发布到一个主题(Topic)中,然后其它系统通过订阅这个主题,根据发送过来的信息处理对应业务(这种方式常用)
JMS服务常用的有:ActiveMQ,分布式Kafka。
如果需要更加地安全可靠,还存在AMQP协议,它常用的是RabbitMQ
ActiveMQ
ActiveMQ安装过程:略
要使用ActiveMQ需要在POM.xml中添加如下依赖
<!--ActiveMQ依赖-->
<dependency>
<groupId>org.springframework.boot</groupId>
<artifactId>spring-boot-starter-activemq</artifactId>
</dependency>
<!--ActiveMQ连接池-->
<dependency>
<groupId>org.apache.activemq</groupId>
<artifactId>activemq-pool</artifactId>
</dependency>
在application.properties中添加关于ActiveMQ的相关配置信息
#ActiveMQ配置
#ActiveMQ地址
spring.activemq.broker-url=tcp://localhost:61616
#配置用户名和密码
spring.activemq.user=admin
spring.activemq.password=admin
#是否使用发布订阅模式,默认为false,表示默认是点对点的模式
spring.jms.pub-sub-domain=true
#默认目的地址
spring.jms.template.default-destination=activemq.default.destination
#是否启用连接池
spring.activemq.pool.enabled=true
#连接池最大连接数
spring.activemq.pool.max-connections=50
我们在Spring Boot中做了上面的配置后,会自动初始化很多关于ActiveMQ相关的对象,比如以下这些对象
JMS连接工厂
连接池
JmsTemplate对象
……
对于消息的发送与接收可以通过JmsTemplate处理,关于消息的接收可以使用注解@JmsListener来实现
定义ActiveMQ服务接口:com.xiaoxie.service.ActiveMqService
package com.xioxie.service;
/**ActiveMQ服务接口*/
public interface ActiveMqService {
//发送消息
public void sendMsg(String message);
//接收消息
public void receiveMsg(String message);
}
新增ActiveMQ服务实现类:com.xiaoxie.service.ActiveMqServiceImpl
package com.xioxie.service.impl;
import com.xioxie.service.ActiveMqService;
import org.springframework.beans.factory.annotation.Autowired;
import org.springframework.jms.annotation.JmsListener;
import org.springframework.jms.core.JmsTemplate;
import org.springframework.stereotype.Service;
@Service
public class ActiveMqServiceImpl implements ActiveMqService {
//Spring Boot会自动生成jsmTemplate
@Autowired
private JmsTemplate jmsTemplate = null;
@Override
public void sendMsg(String message) {
System.out.println("发送消息:" + message);
jmsTemplate.convertAndSend(message);
//如果要自定义发送地址可以如下
//jmsTemplate.convertAndSend("destination",message);
}
@Override
@JmsListener(destination = "${spring.jms.template.default-destination}") //监听地址发送的消息
public void receiveMsg(String message) {
System.out.println("接收消息:" + message);
}
}
在这个实现类中,首先是注入了JmsTemplate,这个对象是由Spring Boot的自动配置机制生成的,对于sendMsg方法,它的目的就是发送JMS消息,其中有一个方法convertAndSend就是用来发送消息的
convertAndSend方法说明
首先,它包含convert,就是转换的意思,把发送的消息进行转换,在默认的情况下会使用SimpleMessageConverter的规则去转换,如果要使用其这的转换规则则只需要使用JmsTemplate的setMessageConverter方法进行设置即可
其次,是send,它是用来发送消息的,我们在application.properties中默置了默认的地址,所在在这里不用指定地址
新增一个controller进行测试:com.xiaoxie.controller.ActiveMqController
package com.xioxie.controller;
import com.xioxie.service.ActiveMqService;
import org.springframework.beans.factory.annotation.Autowired;
import org.springframework.stereotype.Controller;
import org.springframework.web.bind.annotation.GetMapping;
import org.springframework.web.bind.annotation.ResponseBody;
@Controller
public class ActiveMqController {
@Autowired
private ActiveMqService activeMqService = null;
@GetMapping("/activemq/sendMessage")
@ResponseBody
public String sendMessage(String msg){
activeMqService.sendMsg(msg);
return "message send success!";
}
}
启动Spring Boot后访问:http://localhost:8080/activemq/sendMessage?msg=你好!
在控制台我们可以看到打印信息如下
发送消息:你好!
接收消息:你好!
这里我们发送的是普通的文本消息,也可以发送POJO消息
新增一个POJO:com.xiaoxie.pojo.User
package com.xioxie.pojo;
import org.apache.ibatis.type.Alias;
import java.io.Serializable;
@Alias("user")
public class User implements Serializable {
private Long id;
private String userName;
private String note;
public User(){} //空参构函数
public User(Long id,String userName,String note){ //有参构造函数
this.id = id;
this.userName = userName;
this.note = note;
}
/**setter、getter*/
public Long getId() {
return id;
}
public void setId(Long id) {
this.id = id;
}
public String getUserName() {
return userName;
}
public void setUserName(String userName) {
this.userName = userName;
}
public String getNote() {
return note;
}
public void setNote(String note) {
this.note = note;
}
}
对于这个POJO来说一定要实现Serializable,表示这个类是支持序列化的
在ActiveMqService接口中新增接口方法用来发送和接收User对象
//发送User这个POJO对象
public void sendUser(User user);
public void receiveUser(User user);
在ActiveMqServiceImpl实现类中实现上面两个方法
//自已定义一个地址
private static final String MY_DESTINATION = "xiaoxie-destination";
@Override
public void sendUser(User user) {
System.out.println("发送消息:" + user);
//使用自定义的地址发送消息
jmsTemplate.convertAndSend(MY_DESTINATION,user);
}
@Override
@JmsListener(destination = MY_DESTINATION)
public void receiveUser(User user) {
System.out.println("接收到消息:" + user);
}
注意:这里发送消化息使用了自定义的地址,所以这里要定义一个地址信息
在ActiveMqController类中新增测试方法
@GetMapping("/activemq/sendUser")
@ResponseBody
public String SendMessage(Long id,String userName,String note){
User user = new User(id,userName,note);
activeMqService.sendUser(user);
return "User send success!";
}
启动spring Boot,访问:http://localhost:8080/activemq/sendUser?id=1&userName=xiaoxie¬e=哈哈
在控制台中可以看到打印类似如下信息
发送消息:com.xioxie.pojo.User@e2b632
接收到消息:com.xioxie.pojo.User@1d69c0d
RabbitMQ
RabbitMQ是符合AMQP协议的消息处理中间件。
RabbitMQ安装
略
我们在pom.xml中添加RabbitMQ相关的依赖
<!--RabbitMQ依赖-->
<dependency>
<groupId>org.springframework.boot</groupId>
<artifactId>spring-boot-starter-amqp</artifactId>
</dependency>
在application.properties中添加RabbitMQ相关的配置信息
#RabbitMQ配置
#RabbitMQ服务地址
spring.rabbitmq.host=localhost
#RabbitMQ端口
spring.rabbitmq.port=5672
#RabbitMQ用户及密码
spring.rabbitmq.username=xiaoxie
spring.rabbitmq.password=xiaoxie
#是否确认发送消息已经被消费
spring.rabbitmq.publisher-confirms=true
#RabbitMQ消息队列的名称,由它发送字符串
rabbitmq.queue.msg=queue-msg
#RabbitMQ消息队列的名称,由它发送用户对象
rabbitmq.queue.user=queue-user
有了这些配置,Spring Boot会相应地创建RabbitMQ相关对象
连接工厂
RabbitTemplate
……
spring.rabbitmq.publisher-confirms=true,表示发送消息的那一方可以监听到发送消息到消费端是否成功,如果成功则会根据设置类进行回调。
添加RabbitMQ的配置类:com.xiaoxie.config.RabbitMQConfig
package com.xioxie.config;
import org.springframework.amqp.core.Queue;
import org.springframework.beans.factory.annotation.Value;
import org.springframework.context.annotation.Bean;
import org.springframework.context.annotation.Configuration;
@Configuration
public class RabbitMQConfig {
//两个消息队列的名称
@Value("${rabbitmq.queue.msg}")
private String msgQueueName = null;
@Value("${rabbitmq.queue.user}")
private String userQueueName = null;
//创建字符串消息队列
@Bean
public Queue createQueueMsg(){
//这里的第二个参数表示是否持久化消息
return new Queue(msgQueueName,true);
}
//创建用户消息队例
@Bean
public Queue createQueueUser(){
return new Queue(userQueueName,true);
}
}
在这个配置类中注册两个队列。
添加RabbitMQ的服务接口:com.xiaoxie.service.RabbitMqService
package com.xioxie.service;
import com.xioxie.pojo.User;
public interface RabbitMqService {
//发送字符串消息
public void sendMsg(String msg);
//发送用户消息
public void sendUser(User user);
}
添加RabbitMQ的服务接口实现类:com.xiaoxie.service.impl.RabbitMqServiceImpl
package com.xioxie.service.impl;
import com.xioxie.pojo.User;
import com.xioxie.service.RabbitMqService;
import org.springframework.amqp.rabbit.core.RabbitTemplate;
import org.springframework.amqp.rabbit.support.CorrelationData;
import org.springframework.beans.factory.annotation.Autowired;
import org.springframework.beans.factory.annotation.Value;
import org.springframework.stereotype.Service;
import java.io.IOException;
//注意这里实现了ConfirmCallback接口,用来回调
@Service
public class RabbitMqServiceImpl implements RabbitMqService,RabbitTemplate.ConfirmCallback {
@Value("${rabbitmq.queue.msg}")
private String msgRoute = null;
@Value("${rabbitmq.queue.user}")
private String userRoute = null;
@Autowired
private RabbitTemplate rabbitTemplate = null;
@Override
public void sendMsg(String msg) {
System.out.println("发送消息:" + msg);
//设置回调
rabbitTemplate.setConfirmCallback(this);
//发送消息通过msgRoute来确定队列
rabbitTemplate.convertAndSend(msgRoute,msg);
}
@Override
public void sendUser(User user) {
System.out.println("发送用户:" + user);
//设置回调
rabbitTemplate.setConfirmCallback(this);
rabbitTemplate.convertAndSend(userRoute,user);
}
//回调的确认方法
@Override
public void confirm(CorrelationData correlationData, boolean b, String s) {
if(b){
System.out.println("消息消费成功!");
} else {
System.out.println("消息消费失败:" + s);
}
}
}
注意:这个类它也实现了:RabbitTemplate.ConfirmCallback这个接口,在这个接口中有一个回调确认方法confirm,当发送消息后消息者得到消息会回调confirm方法。我们在sendMsg方法和sendUser方法中调用了setConfirmCallback(this),这里的参数this表示回调为当前对象
上面完成了RabbitMQ生产者的设计,下面新增一个类来模拟消费者:com.xiaoxie.rabbit.RabbitMessageReceiver
package com.xioxie.rabbit;
import com.xioxie.pojo.User;
import org.springframework.amqp.rabbit.annotation.RabbitListener;
import org.springframework.stereotype.Component;
//RabbitMQ消息接收器
@Component
public class RabbitMessageReceiver {
@RabbitListener(queues = {"${rabbitmq.queue.msg}"})
public void receiveMsg(String msg){
System.out.println("收到消息:" + msg);
}
@RabbitListener(queues = {"${rabbitmq.queue.user}"})
public void receiveUser(User user){
System.out.println("收到用户:" + user);
}
}
注意:这个类要使用@Component来做注解;第二要实现消费在方法上加上@RabbitListener并指定相应的队列名称即可。
新增一个控制器:com.xiaoxie.controller.RabbitMqController
package com.xioxie.controller;
import com.xioxie.pojo.User;
import com.xioxie.service.RabbitMqService;
import org.springframework.beans.factory.annotation.Autowired;
import org.springframework.stereotype.Controller;
import org.springframework.web.bind.annotation.GetMapping;
import org.springframework.web.bind.annotation.ResponseBody;
@Controller
public class RabbitMqController {
@Autowired
private RabbitMqService rabbitMqService = null;
@GetMapping("/rabbitmq/msg")
@ResponseBody
public String msg(String msg){
rabbitMqService.sendMsg(msg);
return "消息发送完成!";
}
@GetMapping("/rabbitmq/user")
@ResponseBody
public String user(Long id,String userName,String note){
User user = new User(id,userName,note);
rabbitMqService.sendUser(user);
return "用户发送完成!";
}
}
启动Spring Boot
当访问:http://localhost:8080/rabbitmq/msg?msg=你好
可以看到控制台打印的结果如下:
发送消息:你好
消息消费成功!
收到消息:你好
当访问:http://localhost:8080/rabbitmq/user?id=1&userName=张三¬e=你好
可以看到控制台打印的结果类似如下:
发送用户:com.xioxie.pojo.User@3b996a
收到用户:com.xioxie.pojo.User@16dd868
消息消费成功!
三、定时调度
定时调度,指的是在实际的生产中,需要在特定的时间或周期上执行一些任务。
在Spring中使用定时器
1、在本配置文件中加入@EnableScheduling,可以在SpringBoot的启动类中添加注解
2、通过注解@Scheduled去配置如何定时,可以在service中添加注解
新增一个service的接口:com.xiaoxie.service.ScheduleService
package com.xioxie.service;
public interface ScheduleService {
public void job1(); //定时任务1
public void job2(); //写时任务2
}
新增service的实现类:com.xiaoxie.service.impl.ScheduleServiceImpl
package com.xioxie.service.impl;
import com.xioxie.service.ScheduleService;
import org.springframework.scheduling.annotation.Async;
import org.springframework.scheduling.annotation.Scheduled;
import org.springframework.stereotype.Service;
@Service
public class ScheduleServiceImpl implements ScheduleService {
//新增计数器
int count1 = 1;
int count2 = 1;
//使用定时计划
@Scheduled(fixedRate = 1000) //每一秒执行一次
@Async //使用异步
@Override
public void job1() {
System.out.println(Thread.currentThread().getName() + ":【job1】每秒执行一次,执行第" + count1 + "次");
count1++;
}
//使用定时计划
@Scheduled(fixedRate = 1000) //每一秒执行一次
@Async //使用异步
@Override
public void job2() {
System.out.println(Thread.currentThread().getName() + ":【job2】每秒执行一次,执行第" + count2 + "次");
count2++;
}
}
在启动类上新增一个注解@EnableScheduing,用以来支持定时调度
启动Spring Boot可以看到在控制台有类似如下打印消息,说明定时调度已经生效
ThreadPoolTaskExecutor-1:【job1】每秒执行一次,执行第1次
ThreadPoolTaskExecutor-2:【job2】每秒执行一次,执行第1次
ThreadPoolTaskExecutor-3:【job1】每秒执行一次,执行第2次
ThreadPoolTaskExecutor-4:【job2】每秒执行一次,执行第2次
ThreadPoolTaskExecutor-5:【job1】每秒执行一次,执行第3次
ThreadPoolTaskExecutor-6:【job2】每秒执行一次,执行第3次
……
在上面的service的实现类中@Scheduled只是按时间间隔来执行,有时我们的定时调度任务希望可以按指定时间执行,为了达到这个目的,@Scheduled支持更多的配置项
|
配置项
|
配置值类型
|
说明
|
|
cron
|
String
|
使用表达式的方式定义任务执行时间
|
|
zone
|
String
|
设置区域时间
|
|
fixedDelay
|
long
|
表示从上一任务完成开始到下一个任务开始的间隔毫秒数
|
|
fixedDelayString
|
String
|
与fixedDelay相同,这里只是使用字符串,便于SpEL引入配置值
|
|
initialDelay
|
long
|
在Spring IoC容器完成初始化后,首次任务执行延迟毫秒数
|
|
initialDelayString
|
String
|
与initialDelay相同,这里只是使用字符串,便于SpEL引入配置值
|
|
fixedRate
| long |
从上一个任务开始到下一个任务开始间隔毫秒值
|
|
fixedRateString
|
String
|
与fixedRate相同,这里只是使用字符串,便于SpEL引入配置值
|
这里重点说一个cron,它是可以通过表达式更为灵活地配置运行的方式。
cron由6到7个空格分隔的时间元素,按顺序分别是“秒 分 时 天 月 星期 年”
关于cron的说明及验证可以参考:
https://www.matools.com/cron/
四、WebSocket应用简述
WebSocket协议是基于TCP的网络协议,这实现了浏览器与服务器全双工通信,支持服务器主动发送信息给客户端,这样的话就实现了从客户端发送消息到服务器,服务器则可以转发消息到客户端达到与客户端交互的目的。
简易WebSocket服务开发
先通过Spring创建Java配置文件,在这个文件中,先新建Server EndpointExporter对象,通过这个就定义了WebSocket服务器的端点,客户端则可以请求这个服务器的端点。
新增一个配置类,在这个类中我们创建一个服务器端点:com.xiaoxie.config.WebSocketConfig
package com.xioxie.config;
import org.springframework.context.annotation.Bean;
import org.springframework.context.annotation.Configuration;
import org.springframework.web.socket.server.standard.ServerEndpointExporter;
@Configuration
public class WebSocketConfig {
//创建服务器端点
@Bean
public ServerEndpointExporter serverEndpointExporter(){
return new ServerEndpointExporter();
}
}
有了上面的配置类后则可以通过@ServerEndpoint来定义服务器端站点
新增一个service的接口:com.xiaoxie.service.WebSocketService
package com.xioxie.service;
import javax.websocket.*;
import java.io.IOException;
public interface WebSocketService {
//建立连接
public void onOpen(Session session);
//关闭连接
public void onClose();
//收到消息处理
public void onMessage(String message,Session session);
//发生错误处理
public void onError(Session session,Throwable error);
//发送消息
public void sendMessage(String message) throws IOException;
}
新增service的实现类:com.xiaoxie.service.impl.WebSocketServiceImpl
package com.xioxie.service.impl;
import com.xioxie.service.WebSocketService;
import org.springframework.stereotype.Service;
import javax.websocket.*;
import javax.websocket.server.ServerEndpoint;
import java.io.IOException;
import java.util.concurrent.CopyOnWriteArraySet;
@Service
@ServerEndpoint("/ws")
public class WebSocketServiceImpl implements WebSocketService {
//记录当前在线连接数
private static int onlineCount = 0;
//存放每个客户端的WebSocketServiceImpl对象
private static CopyOnWriteArraySet<WebSocketServiceImpl> webSocketSet = new CopyOnWriteArraySet<>();
//某个客户端的session
private Session session;
@Override
@OnOpen
public void onOpen(Session session) {
this.session = session;
webSocketSet.add(this);
//在线连接加1
onlineCount ++;
System.out.println("有新连接加入,当前连接数为:" + onlineCount);
try {
sendMessage("有新的连接加入!!");
} catch (IOException e) {
System.out.println("发生了IO异常!");
}
}
@Override
@OnClose
public void onClose() {
webSocketSet.remove(this);
onlineCount--;
System.out.println("有一个连接关闭,当前连接数为:" + onlineCount);
//sendMessage("有一个连接关闭!!"); //如果这里再调用sendMessage会报错
}
@Override
@OnMessage
public void onMessage(String message, Session session) {
System.out.println("收到来自客户端的消息:" + message);
//群发消息
for(WebSocketServiceImpl item:webSocketSet){
try {
item.sendMessage(message);
} catch (IOException e) {
e.printStackTrace();
}
}
}
@Override
@OnError
public void onError(Session session, Throwable error) {
System.out.println("发生了错误!!");
error.printStackTrace();
}
@Override
public void sendMessage(String message) throws IOException {
this.session.getBasicRemote().sendText(message);
}
}
@ServiceEndpoint("/ws") 让Spring创建WebSocket的服务端点,请求地址是/ws
@OnOpen 标注客户端打开WebSocket服务端点调用的方法
@OnClose 标注客户端关闭WebSocket服务端点调用方法
@OnMessage 标注客户端发送消息,WebSocket服务端点调用方法
@OnError 标注客户端请求WebSocket服务端点发生异常调用方法
新增JSP页面:/webapp/WEB-INF/jsp/websocket.jsp
<%@ page contentType="text/html;charset=UTF-8" language="java" %>
<html>
<head>
<title>WebSocket</title>
<script type="text/javascript" src="../../js/jquery-3.2.1.min.js"></script>
<script type="text/javascript" src="../../js/websocket.js"></script>
</head>
<body>
<input id="message" type="text"/>
<button onclick="sendMessage()">发送消息</button>
<button onclick="closeWebSocket()">关闭WebSocket连接</button>
<div id="context"></div>
</body>
</html>
新增对应的js文件:/webapp/js/websocket.js
var websocket = null;
//判断当前浏览器是否支持WebSocket
if('WebSocket' in window){
//创建WebSocket对象,连接服务器端点
websocket = new WebSocket("ws://localhost:8080/ws");
} else {
alert('Not support websocket');
}
//把消息显示在页面上
function appendMessage(s) {
var context = $("#context").html() + "<br/>" + s;
$("#context").html(context);
}
//连接发生错误的回调方法
websocket.onerror = function () {
appendMessage("error");
}
//连接成功
websocket.onopen = function (ev) {
appendMessage("open");
}
//接收到消息
websocket.onmessage = function (ev) {
appendMessage(ev.data);
}
//关闭连接
websocket.onclose = function () {
appendMessage("close");
}
//监听窗口关闭事件
window.onbeforeunload = function () {
websocket.close();
}
//关闭连接
function closeWebSocket(){
websocket.close();
}
//发送消息
function sendMessage() {
var message = $("#message").val();
websocket.send(message);
}
新增一个controller类来打开websocket.jsp页面:com.xiaoixe.controller.WebSocketController
package com.xioxie.controller;
import org.springframework.stereotype.Controller;
import org.springframework.web.bind.annotation.GetMapping;
@Controller
public class WebSocketController {
@GetMapping("/websocket/index")
public String websocket(){
return "websocket";
}
}


 7662
7662

 被折叠的 条评论
为什么被折叠?
被折叠的 条评论
为什么被折叠?
 到【灌水乐园】发言


