


1.1 什么是实时同步:如何实现实时同步
- 要利用监控服务(inotify),监控同步数据服务器目录中信息的变化
- 发现目录中数据产生变化,就利用rsync服务推送到备份服务器上
1.2 实现实时同步的方法
inotify+rsync 方式实现数据同步
sersync 方式实现实时数据同步 详情参照:http://www.cnblogs.com/clsn/p/7707828.html
1.2.1 实时同步原理介绍
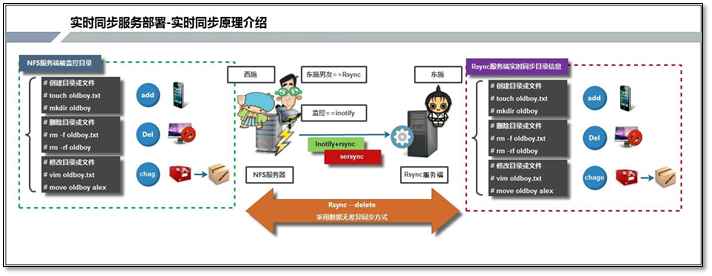
1.3 inotify+rsync 方式实现数据同步
1.3.1 Inotify简介
Inotify是一种强大的,细粒度的。异步的文件系统事件监控机制,linux内核从2.6.13起,加入了 Inotify支持,通过Inotify可以监控文件系统中添加、删除,修改、移动等各种事件,利用这个内核接口,第三方软件就可以监控文件系统下文件的各种变化情况,而 inotify-tools 正是实施这样监控的软件。国人周洋在金山公司也开发了类似的实时同步软件sersync。
提示信息:
sersync软件实际上就是在 inotify软件基础上进行开发的,功能要更加强大些 ,多了定时重传机制,过滤机制了提供接口做 CDN,支持多线程橾作。
Inotify实际是一种事件驱动机制,它为应用程序监控文件系统事件提供了实时响应事件的机制,而无须通过诸如cron等的轮询机制来获取事件。cron等机制不仅无法做到实时性,而且消耗大量系统资源。相比之下,inotify基于事件驱动,可以做到对事件处理的实时响应,也没有轮询造成的系统资源消耗,是非常自然的事件通知接口,也与自然世界事件机制相符合。
inotify的实现有几款软件:
inotify-tools,sersync,lrsyncd
1.3.2 inotify+rsync使用方式
inotify 对同步数据目录信息的监控
rsync 完成对数据信息的实时同步
利用脚本进行结合
1.4 部署inotify软件的前提
需要2.6.13以后内核版本才能支持inotify软件。2.6.13内核之后版本,在没有安装inotify软件之前,应该有这三个文件。
[root@backup ~]# ll /proc/sys/fs/inotify/
total 0
-rw-r--r-- 1 root root 0 Oct 17 10:12 max_queued_events
-rw-r--r-- 1 root root 0 Oct 17 10:12 max_user_instances
-rw-r--r-- 1 root root 0 Oct 17 10:12 max_user_watches
1.4.1 三个重要文件的说明
|
文件 |
默认值 |
作用说明 |
|
max_user_watches |
8192 |
设置inotifywait或inotifywatch命令可以监视的文件数量(单进程) |
|
max_user_instances |
128 |
设置每个用户可以运行的inotifywait或inotifywatch命令的进程数 |
|
max_queued_events |
16384 |
设置inotify实例事件(event)队列可容纳的事件数量 |
1.4.3 【官方说明】三个重要文件1.4.2 【服务优化】可以将三个文件的数值调大,监听更大的范围
[root@nfs01 ~]# man proc
/proc/sys/fs/inotify (since Linux 2.6.13)
       This   directory   contains    files    max_queued_events,
       max_user_instances, and max_user_watches, that can be used
       to limit the amount of kernel memory consumed by the  inotify interface.
for further details, see inotify(7).
通过man手册的第7级别中查到 inotify的默认文件的详细说明。
[root@nfs01 ~]# man 7 inotify
/proc/sys/fs/inotify/max_queued_events
       The  value  in this file is used when an application calls
       inotify_init(2) to set an upper limit  on  the  number  of
       events  that  can  be  queued to the corresponding inotify
       instance.  Events in excess of this limit are dropped, but
       an IN_Q_OVERFLOW event is always generated.

/proc/sys/fs/inotify/max_user_instances
       This  specifies  an  upper  limit on the number of inotify
       instances that can be created per real user ID.

/proc/sys/fs/inotify/max_user_watches
       This specifies an upper limit on  the  number  of  watches
       that can be created per real user ID.
1.5 inotify软件介绍及参数说明
1.5.1 两种安装方式
1) yum install -y inotify-tools
2) 手工编译安装
注:
YUM 安装需要有epel源
http://mirrors.aliyun.com
手工编译安装方式需要到github上进行下载软件包
inotify软件的参考资料链接:
https://github.com/rvoicilas/inotify-tools/wiki
1.5.2 inotify主要安装的两个软件
inotifywait: (主要)
在被监控的文件或目录上等待特定文件系统事件(open close delete等)发生,执行后处于阻塞状态,适合在shell脚本中使用
inotifywatch:
收集被监控的文件系统使用的统计数据,指文件系统事件发生的次数统计。
说明:在实时实时同步的时候,主要是利用inotifywait对目录进行监控
1.5.3 inotifywait命令参数说明
|
参数 |
含义 |
|
-m, --monitor (重要参数) |
Keep listening for events forever. Without this option, inotifywait will exit after one event is received. 始终保持事件监听。 |
|
-d, --daemon |
111 |
|
-r, --recursive (重要参数) |
Watch all subdirectories of any directories passed as arguments. 递归监控目录数据信息变化 |
|
-o, --outfile <file> |
Print events to <file> rather than stdout. 打印事件到文件中,相当于标准正确输出 |
|
-s, --syslog |
Output errors to syslog(3) system log module rather than stderr. 发送错误到syslog相当于标准错误输出 |
|
-q, --quiet (重要参数) |
If specified once, the program will be less verbose. Specifically, it will not state when it has completed establishing all inotify watches. 输出信息少(只打印事件信息) |
|
--exclude <pattern> |
Exclude all events on files matching the extended regular expression <pattern>. 排除文件或目录 |
|
--excludei <pattern> |
Like --exclude but case insensitive. 排除文件或目录时,不区分大小写 |
|
--timefmt <fmt> (重要参数) |
Print using a specified printf-like format string; read the man page for more details. 指定时间输出格式 |
|
--format <fmt> (重要参数) |
Print using a specified printf-like formatstring; read the man page for more details. 打印使用指定的输出类似格式字符串;即实际监控输出内容 |
|
-e (重要参数) |
Listen for specific event(s). If omitted, all events are listened for. 指定监听指定的事件,如果省略,表示所有事件都进行监听 |
|
以上的信息可以通过 inotifywait --help 获得 | |
1.5.4 -e[参数] 可以指定的事件类型
|
事件名称 |
事件说明 |
|
access |
file or directory contents were read 文件或目录内容被读取 |
|
modify |
file or directory contents were writterv 文件或目录内容被写入 |
|
attrib |
file or directory attributes changed 文件或目录属性改变 |
|
close_write (重要参数) |
file or directory closed, after being opened in writeable mode. 文件或目录关闭,在写入模式打开之后关闭的。 |
|
close_nowrite |
file or directory closed, after being opened in read-only mode. 文件或目录关闭,在只读模式打开之后关闭的 |
|
close |
file or directory closed, regardless of read/write mode 文件或目录关闭,不管读或是写模式 |
|
open |
file or directory opened 文件或目录被打开 |
|
moved_to 拉 |
file or directory moved to watched directory 文件或目录被移动到监控的目录中 |
|
moved_from 推 |
file or directory moved from watched directory 文件或目录被移动从监控的目录中 |
|
move (重要参数) |
file or directory moved to or from watched directory 文件或目录不管移动到或是移出监控目录都触发事件 |
|
create (重要参数) |
file or directory created within watched directory 文件或目录创建在监控目录中 |
|
delete (重要参数) |
file or directory deleted within watched directory 文件或目录被删除在监控目录中 |
|
delete_self |
file or directory was deleted 文件或目录被删除,目录本身被删除 |
|
unmount |
file system containing file or directory unmounted |
|
以上的信息可以通过 inotifywait --help 获得 | |
1.5.4.1 【实例】inotifywait监控中的事件测试
1、创建事件
[root@nfs01 data]# touch test2.txt
[root@nfs01 ~]# inotifywait -mrq  /data --timefmt "%d-%m-%y %H:%M" --format "%T %w%f 事件信息: %e" -e create
17-10-17 11:19 /data/test2.txt 事件信息: CREATE
2、删除事件
[root@nfs01 data]# \rm -f test1.txt
[root@nfs01 ~]# inotifywait -mrq  /data --timefmt "%d-%m-%y %H:%M" --format "%T %w%f 事件信息: %e" -e delete
17-10-17 11:28 /data/test1.txt 事件信息: DELETE
3、修改事件
[root@nfs01 data]# echo "132" > test.txt
[root@nfs01 ~]# inotifywait -mrq  /data --timefmt "%d-%m-%y %H:%M" --format "%T %w%f 事件信息: %e" -e close_write
17-10-17 11:30 /data/test.txt 事件信息: CLOSE_WRITE,CLOSE
4、移动事件 moved_to
[root@nfs01 data]# mv /etc/hosts .
[root@nfs01 ~]# inotifywait -mrq  /data --timefmt "%d-%m-%y %H:%M" --format "%T %w%f 事件信息: %e" -e moved_to
17-10-17 11:33 /data/hosts 事件信息: MOVED_TO
5、移动事件 moved_from
[root@nfs01 data]# mv ./hosts  /tmp/
[root@nfs01 ~]# inotifywait -mrq  /data --timefmt "%d-%m-%y %H:%M" --format "%T %w%f 事件信息: %e" -e moved_from
17-10-17 11:34 /data/hosts 事件信息: MOVED_FROM
1.5.5 inotifywait 参数 --format <fmt>格式定义参数
|
命令参数 |
参数说明 |
|
%w(重要参数) |
事件出现时,监控文件或目录的名称信息 |
|
%f(重要参数) |
事件出现时,将显示监控目录下触发事件的文件或目录信息,否则为空 |
|
%e(重要参数) |
显示发生的事件信息,不同的事件信息用逗号进行分隔 |
|
%Xe |
显示发生的事件信息,不同的事件信息有x进行分隔,可以修改X为指定分隔符 |
|
%T(重要参数) |
输出时间格式中定义的时间格式信息,通过 --timefmt option 语法格式指定时间信息 这个格式是通过strftime函数进行匹配时间格式信息的 |
|
以上的信息可以通过 inotifywait --help 获得 | |
1.5.6 inotifywait 参数--timefmt <fmt>时间格式参数
|
命令参数 |
参数说明 |
|
%d(重要参数) |
The day of the month as a decimal number(range 01 to 31) 每月的第几天,显示倍息为十进制数(范围是 01-31 ) |
|
%m(重要参数) |
The month as a decimal number (range 01 to 12). 显示月份,显示信息为十进制(范围 01-12 ) |
|
%M |
The minute as a decimal number (range 00 to 59). 显示分钟,显示信息为十进制(范围 00-59 ) |
|
%y(重要参数) |
The year as a decimal number without a century (range 00 to 99). 年份信息,显示信息为十进制,并且没有世纪信息 |
|
%Y |
The year as a decimal number including the century. 年份信息,显示信息为十进制,并且包含世纪信息 |
|
%H |
The hour as a decimal number using a 24-hour clock (range 00 to 23). 小时信息,显示信息为十进制,使用 24小时制(范围 00-23 ) |
|
说明:以上信息可以通过 man strftime信息获取 | |
1.5.6.1 修改输出的日期格式
[root@nfs01 ~]# inotifywait -mrq  /data --timefmt "%d/%m/%y %H:%M" --format "%T %w%f"
17/10/17 11:12 /data/test1.txt
1.5.7 -e[参数] 重要监控事件参数汇总表:
|
重要事件 |
包含事件 |
备注说明 |
|
close |
close_write close_nowrite |
文件或目录关闭,不管读或是写模式 即包含写关闭与读关闭 |
|
close_write |
create |
包含文件创建事件,但不包含目录创建事件 |
|
move |
moved_to moved_from |
文件或目录不管移动到或是移动出监控目录都触发事件 即包含信息移入或移出监控目录事件 |
|
重要参数汇总:根据以上说明,在实际使用时,只要监控以下事件即可 create 创建、 delete 删除、 movedjto 移入、 close_write 修 改 inotifywait -mrq /data --format "%w%f" -e create,delete,moved_to,close_write | ||
1.6 对inotifywait命令的测试
对inotifywait命令测试的说明:
需要打开两个连接窗口
1窗口运行inotifywait
2窗口对文件夹进行操作,可在一窗口中查看出inotifywait的监控记录
1.6.1 、创建文件的逻辑↓
[root@nfs01 ~]# inotifywait /data
Setting up watches.
Watches established.
/data/ CREATE test1.txt
/data/ OPEN test1.txt
/data/ ATTRIB test1.txt
/data/ CLOSE_WRITE,CLOSE test1.txt
创建文件,inotifywait显示创建文件的过程↑
[root@nfs01 data]# touch test1.txt
1.6.2 创建目录逻辑↓
[root@nfs01 data]# mkdir testdir
[root@nfs01 ~]#
/data/ CREATE,ISDIR testdir
1.6.3 监控子目录下的文件↓
[root@nfs01 data]# touch  testdir/test01.txt
[root@nfs01 ~]# inotifywait -mrq  /data
/data/testdir/ OPEN test01.txt
/data/testdir/ ATTRIB test01.txt
/data/testdir/ CLOSE_WRITE,CLOSE test01.txt
1.6.4 sed命令修改逻辑
[root@nfs01 data]# sed 's#132#123#g' test.txt -i

[root@nfs01 ~]# inotifywait -mrq  /data --timefmt "%d-%m-%y %H:%M" --format "%T %w%f 事件信息: %e" -e moved_from
 /data/test.txt 事件信息: OPEN
 /data/sedDh5R8v 事件信息: CREATE
 /data/sedDh5R8v 事件信息: OPEN
 /data/test.txt 事件信息: ACCESS
 /data/sedDh5R8v 事件信息: MODIFY
 /data/sedDh5R8v 事件信息: ATTRIB
 /data/sedDh5R8v 事件信息: ATTRIB
 /data/test.txt 事件信息: CLOSE_NOWRITE,CLOSE
 /data/sedDh5R8v 事件信息: CLOSE_WRITE,CLOSE
 /data/sedDh5R8v 事件信息: MOVED_FROM
 /data/test.txt 事件信息: MOVED_TO
sed命令替换逻辑 :
01. 创建临时文件
02. 将原文件内容放置到临时文件中,修改替换临时文件中的内容,原有文件不做改动
03. 重命名临时文件,覆盖原文件
1.6.5 inotifywait监控中 -e 的参数使用
inotifywait -mrq /data --timefmt "%d/%m/%y %H:%M" --format "%T %w%f 事件信息: %e" -e create
说明:表示只监听create事件
inotifywait -mrq /data --timefmt "%d/%m/%y %H:%M" --format "%T %w%f 事件信息: %e"
说明:不指定-e参数,表示监听所有事件
02. 删除事件delete
    # inotifywait -mrq /data --timefmt "%F %H:%M" --format "%T %w%f 事件信息: %@e" -e delete
    2017-10-17 11:28 /data/02.txt 事件信息: DELETE
    2017-10-17 11:28 /data/03.txt 事件信息: DELETE
    2017-10-17 11:28 /data/04.txt 事件信息: DELETE
03. 修改事件close_write
  # inotifywait -mrq /data --timefmt "%F %H:%M" --format "%T %w%f 事件信息: %@e" -e delete,close_write
    2017-10-17 11:30 /data/oldgirl.txt 事件信息: CLOSE_WRITE@CLOSE
    2017-10-17 11:30 /data/.oldgirl.txt.swx 事件信息: CLOSE_WRITE@CLOSE
    2017-10-17 11:30 /data/.oldgirl.txt.swx 事件信息: DELETE
    2017-10-17 11:30 /data/.oldgirl.txt.swp 事件信息: CLOSE_WRITE@CLOSE
    2017-10-17 11:30 /data/.oldgirl.txt.swp 事件信息: DELETE
    2017-10-17 11:30 /data/.oldgirl.txt.swp 事件信息: CLOSE_WRITE@CLOSE
    2017-10-17 11:30 /data/.oldgirl.txt.swp 事件信息: DELETE
04. 移动事件moved_to
inotifywait -mrq /data --timefmt "%F %H:%M" --format "%T %w%f 事件信息: %@e" -e delete,close_write,moved_to
    2017-10-17 11:34 /data/hosts 事件信息: MOVED_TO
1.7 实时同步命令参数示意图
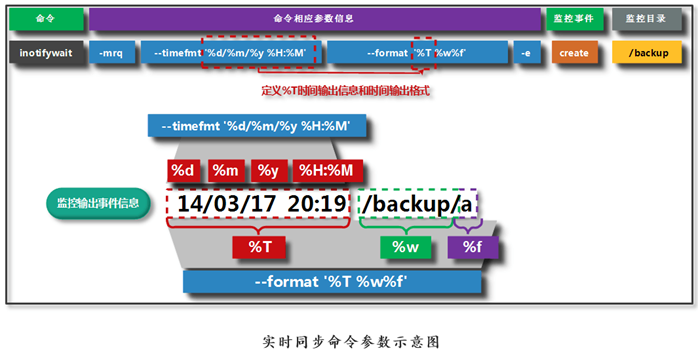
第2章 inotify+rsync实时同步服务部署
2.1 第一个里程碑:部署rsync服务
2.1.1 rsync服务端部署
1)软件是否存在
[root@backup ~]# rpm -qa |grep rsync
rsync-3.0.6-12.el6.x86_64
需求:查询到某个命令非常有用。但是不知道属于哪个软件包
yum provides rysnc
provides Find what package provides the given value
2)进行软件服务配置
[root@backup ~]# vim /etc/rsyncd.conf
uid = rsync
gid = rsync
use chroot = no
max connections = 200
timeout = 300
pid file = /var/run/rsyncd.pid
lock file = /var/run/rsync.lock
log file = /var/log/rsyncd.log
ignore errors
read only = false
list = false
hosts allow = 172.16.1.0/24
auth users = rsync_backup
secrets file = /etc/rsync.password
[backup]
comment = "backup dir by oldboy"
path = /backup
[nfsbackup]
comment = "nfsbackup dir by hzs"
path = /nfsbackup
3)创建rsync管理用户
[root@backup ~]# useradd -s /sbin/nologin -M rsync
4)创建数据备份储存目录,目录修改属主
[root@backup ~]# mkdir /nfsbackup/
[root@backup ~]# chown -R rsync.rsync /nfsbackup/
5)创建认证用户密码文件并进行授权600
echo "rsync_backup:clsn123" >>/etc/rsync.password
chmod 600 /etc/rsync.password
6)启动rsync服务
rsync --daemon
至此服务端配置完成
[root@backup ~]# ps -ef |grep rsync
root       2076      1  0 17:05 ?        00:00:00 rsync --daemon
root       2163   1817  0 17:38 pts/1    00:00:00 grep --color=auto rsync
2.1.2 rsync客户端配置
1)软件是否存在
[root@backup ~]# rpm -qa |grep rsync
rsync-3.0.6-12.el6.x86_64
2)创建安全认证文件,并进行修改权限600
echo "clsn123" >>/etc/rsync.password
chmod 600 /etc/rsync.password
3) 测试数据传输
[root@nfs01 sersync]# rsync -avz /data  rsync_backup@172.16.1.41::nfsbackup  --password-file=/etc/rsync.password
sending incremental file list
data/
data/.hzs
data/.tar.gz
data/.txt
2.2 第二个里程碑:部署inotify服务
首先先确认是否有epel源用来安装inotify-tools软件
[root@nfs01 ~]# yum repolist
Loaded plugins: fastestmirror, security
Loading mirror speeds from cached hostfile
 * base: mirrors.aliyun.com
 * epel: mirrors.aliyun.com
 * extras: mirrors.aliyun.com
 * updates: mirrors.aliyun.com
repo id  repo name                                       status
base     CentOS-6 - Base - mirrors.aliyun.com             6,706
epel     Extra Packages for Enterprise Linux 6 - x86_64  12,401
extras   CentOS-6 - Extras - mirrors.aliyun.com              46
updates  CentOS-6 - Updates - mirrors.aliyun.com            722
repolist: 19,875
2.2.1 安装inotify软件
两种安装方式
1) yum install -y inotify-tools
2) 手工编译安装
注:
手工编译安装方式需要到github上进行下载软件包
inotify软件的参考资料链接:
https://github.com/rvoicilas/inotify-tools/wiki
2.2.2 查看inotify安装上的两个命令(inotifywait,inotifywatch)
[root@nfs01 ~]# rpm -ql inotify-tools
/usr/bin/inotifywait      #主要
/usr/bin/inotifywatch
2.2.2.1 inotifywait和inotifywatch的作用:
一共安装了2个工具(命令),即inotifywait和inotifywatch
inotifywait : 在被监控的文件或目录上等待特定文件系统事件(open close delete等)发生,
执行后处于阻塞状态,适合在shell脚本中使用
inotifywatch :收集被监控的文件系统使用的统计数据,指文件系统事件发生的次数统计。
说明:yum安装后可以直接使用,如果编译安装需要进入到相应软件目录的bin目录下使用
#命令 man手册说明
# man inotifywait
inotifywait - wait for changes to files using inotify

使用inotify进行监控,等待产生变化的文件信息

# man inotifywatch
inotifywatch - gather filesystem access statistics using inotify
使用inotify进行监控,收集文件系统访问统计佶息
2.3 第三个里程碑:编写脚本,实现rsync+inotify软件功能结合
2.3.1 rsync服务命令:
rsync -avz --delete /data/ rsync_backup@172.16.1.41::nfsbackup --password-file=/etc/rsync.password
2.3.2 inotify服务命令:
inotifywait -mrq /data -format "%w%f" -e create,delete,move_to,close_write
2.3.3 编写脚本:
[root@nfs01 sersync]# vim /server/scripts/inotify.sh
#!/bin/bash
inotifywait -mrq /data --format "%w%f"  -e create,delete,moved_to,close_write|\
while read line
do
        rsync -az --delete /data/ rsync_backup@172.16.1.41::nfsbackup --password-
file=/etc/rsync.password
done
脚本说明:
for循环会定义一个条件,当条件不满足时停止循环
while循环:只要条件满足就一直循环下去
2.3.4 对脚本进行优化
#!/bin/bash

Path=/data
backup_Server=172.16.1.41

/usr/bin/inotifywait -mrq --format '%w%f' -e create,close_write,delete /data  | while read line
do
    if [ -f $line ];then
        rsync -az $line --delete rsync_backup@$backup_Server::nfsbackup --password-file=/etc/rsync.password
    else
        cd $Path &&\
        rsync -az ./ --delete rsync_backup@$backup_Server::nfsbackup --password-file=/etc/rsync.password
    fi

done
2.4 第四个里程碑:测试编写的脚本
2.4.1 让脚本在后台运行
在/data 目录先创建6个文件
[root@nfs01 data]# sh  /server/scripts/inotify.sh &
[root@nfs01 data]# touch {1..6}.txt
在backup服务器上,已经时候同步过去了6个文件。
[root@backup ~]# ll /nfsbackup/
total 8
-rw-r--r-- 1 rsync rsync 0 Oct 17 12:06 1.txt
-rw-r--r-- 1 rsync rsync 0 Oct 17 12:06 2.txt
-rw-r--r-- 1 rsync rsync 0 Oct 17 12:06 3.txt
-rw-r--r-- 1 rsync rsync 0 Oct 17 12:06 4.txt
-rw-r--r-- 1 rsync rsync 0 Oct 17 12:06 5.txt
-rw-r--r-- 1 rsync rsync 0 Oct 17 12:06 6.txt
2.5 利用while循环语句编写的脚本停止方法(kill)
01. ctrl+z暂停程序运行,kill -9杀死
02. 不要暂停程序,直接利用杀手三剑客进行杀进程
说明:kill三个杀手不是万能的,在进程暂停时,无法杀死;kill -9 (危险)
2.5.1 查看后台都要哪些程序在运行
[root@nfs01 data]# jobs
[1]+  Running                 sh /server/scripts/inotify.sh &
2.5.2 fg将后台的程序调到前台来
[root@nfs01 data]# fg 1
sh /server/scripts/inotify.sh
2.6 进程的前台和后台运行方法:
fg -- 前台
bg -- 后台
2.6.1 脚本后台运行方法
01. sh inotify.sh &
02. nohup sh inotify.sh &
03. screen实现脚本程序后台运行
sh /server/scripts/inotify.sh &
nohup
nohup sh inotify.sh &
2.7 screen实现脚本程序后台运行
2.7.1 经过yum查找发现screen命令属于screen包
[root@test ~]# yum provides screen
Loaded plugins: fastestmirror, security
Loading mirror speeds from cached hostfile
 * base: mirrors.aliyun.com
 * epel: mirrors.aliyun.com
 * extras: mirrors.aliyun.com
 * updates: mirrors.aliyun.com
base                                                      | 3.7 kB     00:00
epel                                                      | 4.3 kB     00:00
extras                                                    | 3.4 kB     00:00
updates                                                   | 3.4 kB     00:00
screen-4.0.3-19.el6.x86_64 : A screen manager that supports multiple logins on
                           : one terminal
Repo        : base
Matched from:
2.7.2 安装screen软件
[root@test ~]# yum install -y screen
2.7.3 screen命令的参数
在shell中输入 screen即可进入screen 视图
[root@test ~]# screen
Screen实现后台运行程序的简单步骤:
screen -ls :可看screen会话
screen +a d :退出当前的screen,保持其后台运行
screen -r ID :指定进入哪个screen会话
Screen命令中用到的快捷键
Ctrl+a c :创建窗口
Ctrl+a w :窗口列表
Ctrl+a n :下一个窗口
Ctrl+a p :上一个窗口
Ctrl+a 0-9 :在第0个窗口和第9个窗口之间切换
Ctrl+a K(大写) :关闭当前窗口,并且切换到下一个窗口 ,
(当退出最后一个窗口时,该终端自动终止,并且退回到原始shell状态)
exit :关闭当前窗口,并且切换到下一个窗口
(当退出最后一个窗口时,该终端自动终止,并且退回到原始shell状态)
Ctrl+a d :退出当前终端,返回加载screen前的shell命令状态
Ctrl+a " : 窗口列表不同于w
提示信息:
sersync软件实际上就是在 inotify软件基础上进行开发的,功能要更加强大些 ,多了定时重传机制,过滤机制了提供接口做 CDN,支持多线程橾作。
本文出自“惨绿少年”,欢迎转载,转载请注明出处!http://blog.znix.top
我的博客即将同步至腾讯云+社区,邀请大家一同入驻。
 1477


 扫一扫


 被折叠的 条评论
为什么被折叠?
 到【灌水乐园】发言


