


使用到的技术
vue3 + ts + svg+ less
使用场景
近期在项目上遇到了如下的需求
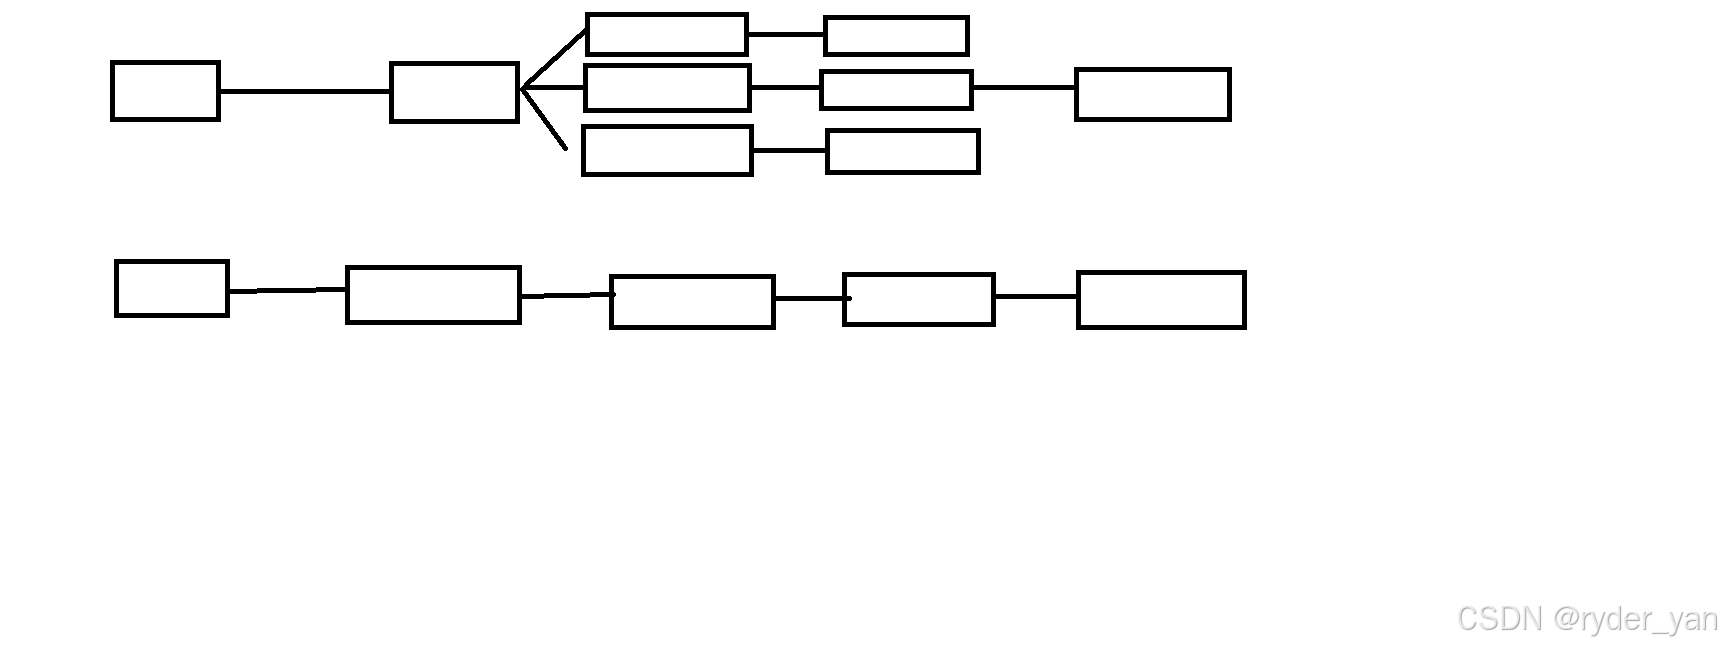
对于这个需求我做了如下设计:卡片通过设计 div 数据格式循环而来,中间的svg通过获取开始卡片右边中心点位置和结束卡片左侧中心点位置来进行绘制。方案设计好了,就让我们开始做吧!
实现成果
数据结构设计
首先让我们开始构建数据结构
首先因为有很多行他是一个数组,在设计单行的时候,我们需要考虑到一一对应的连线关系且每列的数量不固定,我们就不能直接使用数组包裹一行,这里我采用的方法是使用object, {type1:[],type2:[],tyep3:[]} 这样的数据结构去描绘单行数据,对待单个卡片我们需要设计连线相关的数据,只需要加上 id和parentId 即可了解他们之间的连线关系。详细的数据结构设计如下:
const nodeDataList= ref([
  {
    1: [
      {
        id: 1001,
        parentId: null,
        title: "开始",
        type: "start",
        status: "",
        msg: "",
      },
    ],
    2: [
      {
        id: 2001,
        parentId: 1001,
        title: "步骤1",
        type: "step1",
        status: "",
        msg: "我是步骤一",
      },
    ],
    3: [
      {
        id: 3001,
        parentId: 2001,
        title: "审批开始",
        type: "step2",
        status: "通过",
        msg: "张三",
      },
      {
        id: 3002,
        parentId: 2001,
        title: "审批开始",
        type: "step2",
        status: "通过",
        msg: "李四",
      },
      {
        id: 3003,
        parentId: 2001,
        title: "审批开始",
        type: "step2",
        status: "通过",
        msg: "王五",
      },
    ],
    4: [
      {
        id: 4001,
        parentId: 3001,
        title: "打款",
        type: "step3",
        status: "失败",
        msg: "打款失败",
      },
      {
        id: 4002,
        parentId: 3002,
        title: "打款",
        type: "step3",
        status: "成功",
        msg: "打款成功",
      },
      {
        id: 4003,
        parentId: 3003,
        title: "打款",
        type: "step3",
        status: "失败",
        msg: "打款失败",
      },
    ],
    5: [
      {
        id: 5001,
        parentId: 4002,
        title: "已到账",
        type: "end",
        status: "",
        msg: "已到账",
      },
    ],
  },
]);
循环数据展示卡片
根据上述的数据让我们遍历一下吧!
<template>
  <div class="canvasLine">
    <!-- 遍历节点数据 -->
    <div
      ref="treeContainer"
      v-for="(nodeData, index) in nodeDataList"
      :key="`task-node-${index}`"
      class="tree-container"
    >
      <div v-for="(nodes, level) in nodeData" :key="level" class="node-level">
        <!-- 渲染每个节点 -->
        <div
          v-for="(node, index) in nodes"
          :id="`node-${node.id}`"
          :key="node.id || index"
          class="node-wrapper"
        >
          <div class="node">
            <div class="node-name">{{ node.title }}</div>
            <div class="node-msg">
              {{ node.msg }}
            </div>
          </div>
        </div>
      </div>
    </div>
  </div>
</template>
再让我们加点样式
<style lang="less" scoped>
.canvasLine {
  .tree-container {
    display: flex;
    flex-direction: row;
    overflow-x: auto;
    margin: 30px 0 px;
    position: relative;
    z-index: 2;
    .node-level {
      display: flex;
      flex-direction: column;
      justify-content: center;
      .node-wrapper {
        margin: 12px 18px;
        position: relative; /* 确保节点有定位 */
        background: #fff;
        .node {
          border: 1px solid #ccc;
          border-radius: 8px;
          padding: 10px;
          text-align: center;
          min-width: 120px;
          max-width: 200px;
          box-shadow: 0 2px 4px rgba(0, 0, 0, 0.1);
          border-left: 10px solid #2da4f2;
          cursor: pointer;
          .node-name {
            font-size: 14px;
            font-weight: bold;
            text-align: left;
            word-wrap: break-word; /* 或者 overflow-wrap: break-word; */
          }

          .node-msg {
            font-size: 12px;
            color: #888;
            margin-top: 6px;
            display: flex;
            justify-content: flex-start;
          }
        }
      }
    }
  }
}
</style>
基础布局就已经

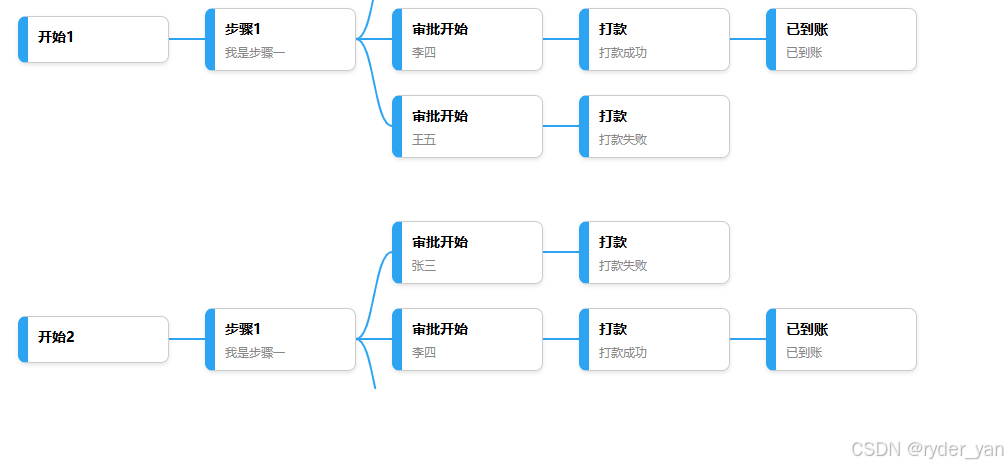
让我们再加一行数据试试效果
const nodeDataList = ref([
  {
    1: [
      {
        id: 1001,
        parentId: null,
        title: "开始1",
        type: "start",
        status: "",
        msg: "",
      },
    ],
    2: [
      {
        id: 2001,
        parentId: 1001,
        title: "步骤1",
        type: "step1",
        status: "",
        msg: "我是步骤一",
      },
    ],
    3: [
      {
        id: 3001,
        parentId: 2001,
        title: "审批开始",
        type: "step2",
        status: "通过",
        msg: "张三",
      },
      {
        id: 3002,
        parentId: 2001,
        title: "审批开始",
        type: "step2",
        status: "通过",
        msg: "李四",
      },
      {
        id: 3003,
        parentId: 2001,
        title: "审批开始",
        type: "step2",
        status: "通过",
        msg: "王五",
      },
    ],
    4: [
      {
        id: 4001,
        parentId: 3001,
        title: "打款",
        type: "step3",
        status: "失败",
        msg: "打款失败",
      },
      {
        id: 4002,
        parentId: 3002,
        title: "打款",
        type: "step3",
        status: "成功",
        msg: "打款成功",
      },
      {
        id: 4003,
        parentId: 3003,
        title: "打款",
        type: "step3",
        status: "失败",
        msg: "打款失败",
      },
    ],
    5: [
      {
        id: 5001,
        parentId: 4002,
        title: "已到账",
        type: "end",
        status: "",
        msg: "已到账",
      },
    ],
  },
  {
    1: [
      {
        id: 21001,
        parentId: null,
        title: "开始2",
        type: "start",
        status: "",
        msg: "",
      },
    ],
    2: [
      {
        id: 22001,
        parentId: 21001,
        title: "步骤1",
        type: "step1",
        status: "",
        msg: "我是步骤一",
      },
    ],
    3: [
      {
        id: 23001,
        parentId: 22001,
        title: "审批开始",
        type: "step2",
        status: "通过",
        msg: "张三",
      },
      {
        id: 23002,
        parentId: 22001,
        title: "审批开始",
        type: "step2",
        status: "通过",
        msg: "李四",
      },
      {
        id: 23003,
        parentId: 22001,
        title: "审批开始",
        type: "step2",
        status: "通过",
        msg: "王五",
      },
    ],
    4: [
      {
        id: 24001,
        parentId: 23001,
        title: "打款",
        type: "step3",
        status: "失败",
        msg: "打款失败",
      },
      {
        id: 24002,
        parentId: 23002,
        title: "打款",
        type: "step3",
        status: "成功",
        msg: "打款成功",
      },
      {
        id: 24003,
        parentId: 23003,
        title: "打款",
        type: "step3",
        status: "失败",
        msg: "打款失败",
      },
    ],
    5: [
      {
        id: 25001,
        parentId: 24002,
        title: "已到账",
        type: "end",
        status: "",
        msg: "已到账",
      },
    ],
  },
]);
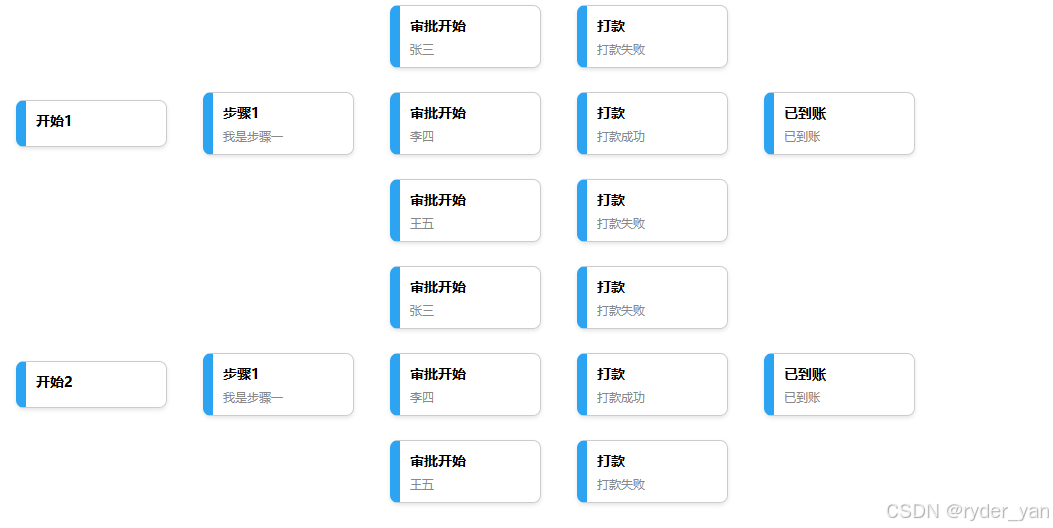
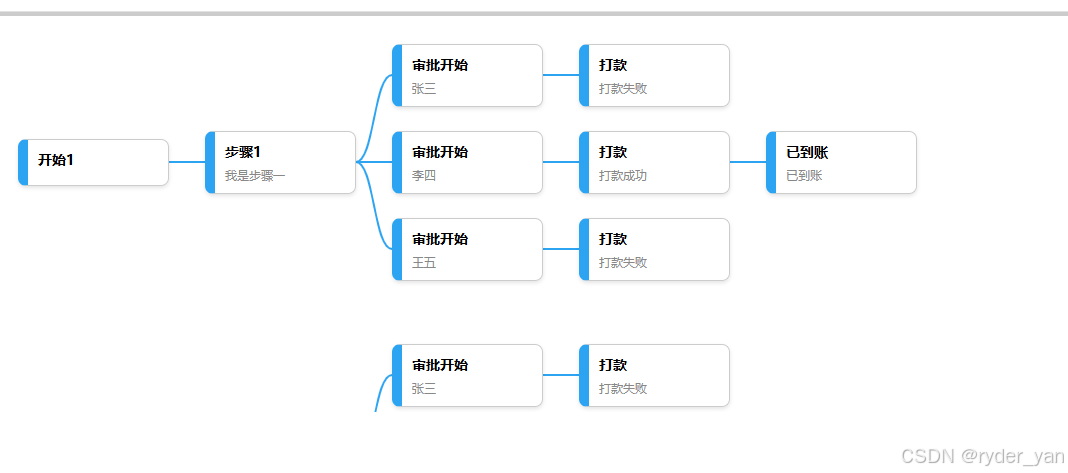
效果很ok,后续我们需要考虑的就是如何在点与点之间增加连线即可
svg绘制连线
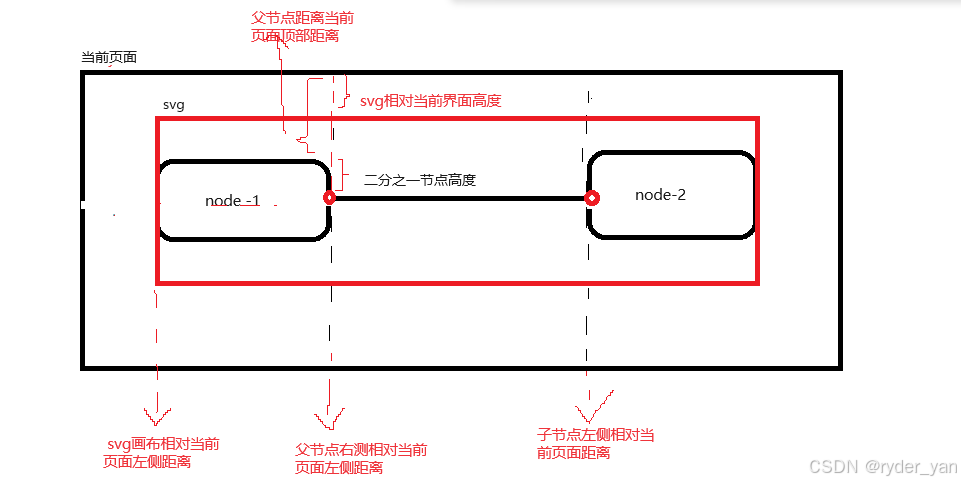
我的想法是,在节点所在的空间下层增加一层图层,在绘画图层上绘制点与点的连线。
点与点的连线关系是通过字段中的id与parentId确定的。parentId对应的节点取该节点的右侧中心点所在位置是连线的起点。id对应的节点取该节点的左侧中心点位置是连线的终点。
我们可以通过 document.getElementById 与 getBoundingClientRect() 获取节点对应当前页面所在位置;
svg画布对应的位置我们可以通过 *** ref 与 getBoundingClientRect()*** 获得。
此时我们就可以计算连线在 svg画布 对应的位置了
起点X轴位置: startX = 父节点右侧相对当前页面左侧距离 - svg画布相对当前页面左侧距离
起点Y轴位置: startY = 父节点距离当前页面顶部距离 - svg相对当前页面高度 + 节点高度/2
终点X轴:endX = 子节点左侧相对当前页面距离 - svg画布相对当前页面左侧距离;
终点Y轴:endY = 子节点距离当前页面顶部距离 - svg相对当前界面高度 + 节点高度/2;
理论公式如上,让我们开始写代码吧
template中添加如下svg画布
  <!-- SVG画布 -->
    <svg ref="taskSvgCanvas" class="svg-canvas">
      <path
        v-for="line in lines"
        :key="line.id"
        :d="line.path"
        stroke="#2da4f2"
        fill="none"
        stroke-width="2"
        stroke-linecap="round"
      />
    </svg>

样式:
  .canvasLine {
  	position: relative;
  }
  .svg-canvas {
    position: absolute;
    top: 0;
    left: 0;
    width: 100%; /* 覆盖整个父容器 */
    height: 100%;
    pointer-events: none; /* 不影响鼠标事件 */
    z-index: 0;
  }
js代码如下:
// svg 连线
const lines = ref<{ id: string; path: string }[]>([]);
const taskSvgCanvas = ref<SVGElement | null>(null);
// 计算节点之间的连线
const calculateLines = () => {
  const tempLines: { id: string; path: string }[] = [];
  // 获取SVG的相对坐标位置
  const svgRect = taskSvgCanvas.value?.getBoundingClientRect() || {
    left: 0,
    top: 0,
  };
  // 获取滚动容器的偏移量
  nodeDataList.value.forEach((tree) => {
    Object.values(tree).forEach((nodes) => {
      nodes.forEach((node: any) => {
        if (node.parentId) {
          const startEl = document.getElementById(`node-${node.parentId}`);
          const endEl = document.getElementById(`node-${node.id}`);
          if (startEl && endEl) {
            const startRect = startEl.getBoundingClientRect();
            const endRect = endEl.getBoundingClientRect();

            // 计算相对SVG画布的坐标
            const startX = startRect.right - svgRect.left; // 起点:右侧中间
            const startY = startRect.top + startRect.height / 2 - svgRect.top;

            const endX = endRect.left - svgRect.left; // 终点:左侧中间
            const endY = endRect.top + endRect.height / 2 - svgRect.top;

            const path = `M ${startX} ${startY} L ${endX} ${endY}`; // 使用直线

            tempLines.push({
              id: `${node.parentId}-${node.id}`,
              path,
            });
          }
        }
      });
    });
  });
  console.log("_tempLines_", tempLines);
  lines.value = tempLines;
};
onMounted(() => {
  calculateLines();
});
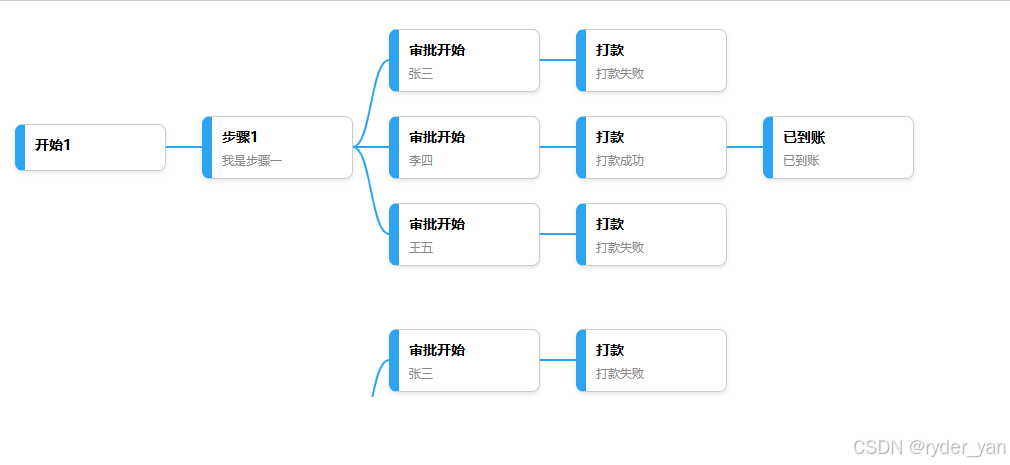
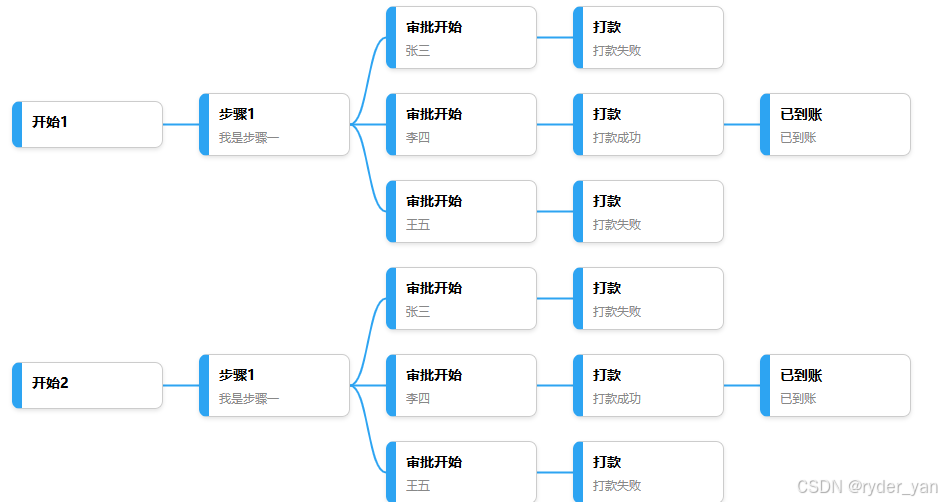
运行绘制完毕
此时已经能绘制出连线了!基础的需求已经开发完毕
优化曲线
如上图连线太生硬了
我们可以使用贝塞尔曲线路径
          // 贝塞尔曲线路径
            const path = `M ${startX} ${startY} C ${
              (startX + endX) / 2
            } ${startY}, ${(startX + endX) / 2} ${endY}, ${endX} ${endY}`;
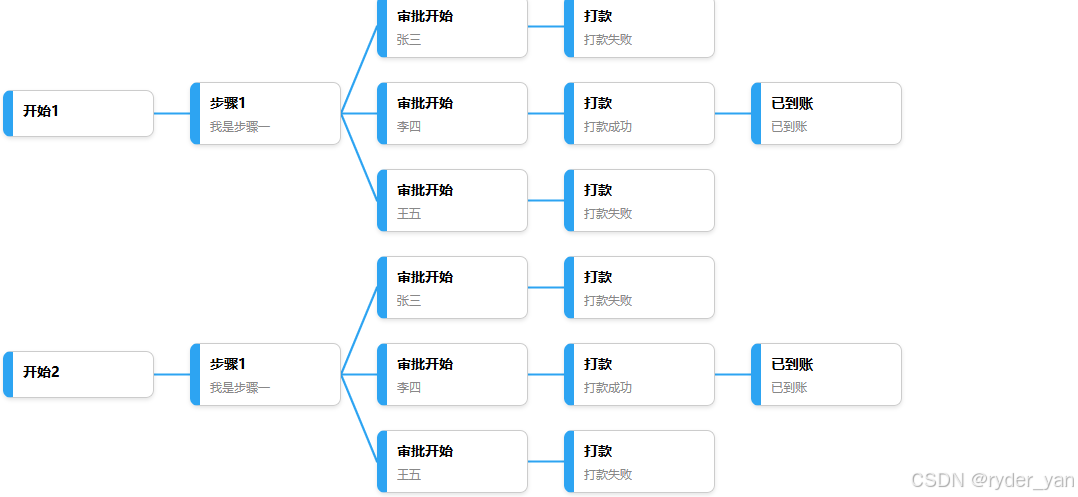
可见效果很好
优化滚动效果函数
让我们模拟一下在template最外层增加一层div,并且为div设置高度
    <div
      style="
        height: 400px;
        overflow: hidden;
        overflow-y: scroll;
        position: relative;
      "
    >
    <!-- 遍历节点数据 -->
    。。。。。。。。。
    <div>
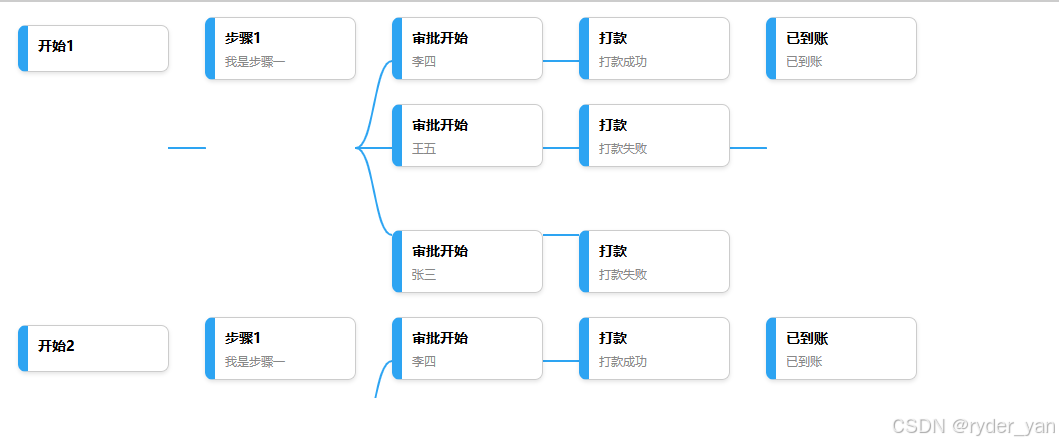
滚动后我们会发现连线异常!问题在于svg的高度其实与外层div高度一致都为400px,这是不合理的,svg只在mounted的时候更新过一次,滚动时并不更新,这样才导致连线错位,如果我们在滚动事件中重新渲染连线,其实能解决此问题,但是这样的计算带价太大了。我们可以通过动态的计算滚动区域的真实高度赋予svg,看看这样是否能解决上述问题。
  const treeContainer = ref<HTMLElement | null>(null);
  const taskProcessRef = ref<HTMLElement | null>(null);
  // 更新 SVG 画布高度
  const updateSvgCanvasHeight = () => {
    if (taskProcessRef.value && taskSvgCanvas.value) {
      // 获取 task-process 容器的高度
      const treeContainers = document.querySelectorAll('.tree-container');

      let totalHeight = 0;
      treeContainers.forEach((container) => {
        totalHeight += container.clientHeight; // 累加每个 container 的高度
      });
      console.log('totalHeight__', totalHeight);

      // 设置 SVG 画布的高度
      taskSvgCanvas.value.style.height = `${totalHeight}px`;
    }
  };

onMounted(() => {
  updateSvgCanvasHeight();
  calculateLines();
});
完成!
完整代码
<template>
  <div class="canvasLine">
    <div
      style="
        height: 400px;
        overflow: hidden;
        overflow-y: scroll;
        position: relative;
      "
    >
      <!-- 遍历节点数据 -->
      <div
        ref="treeContainer"
        v-for="(nodeData, index) in nodeDataList"
        :key="`task-node-${index}`"
        class="tree-container"
      >
        <div v-for="(nodes, level) in nodeData" :key="level" class="node-level">
          <!-- 渲染每个节点 -->
          <div
            v-for="(node, index) in nodes"
            :id="`node-${node.id}`"
            :key="node.id || index"
            class="node-wrapper"
          >
            <div class="node">
              <div class="node-name">{{ node.title }}</div>
              <div class="node-msg">
                {{ node.msg }}
              </div>
            </div>
          </div>
        </div>
      </div>
      <!-- SVG画布 -->
      <svg ref="taskSvgCanvas" class="svg-canvas">
        <path
          v-for="line in lines"
          :key="line.id"
          :d="line.path"
          stroke="#2da4f2"
          fill="none"
          stroke-width="2"
          stroke-linecap="round"
        />
      </svg>
    </div>
  </div>
</template>

<script setup lang="ts">
import {
  ref,
  onMounted,
  nextTick,
  computed,
  onUnmounted,
  defineProps,
  watch,
} from "vue";

const nodeDataList = ref([
  {
    1: [
      {
        id: 1001,
        parentId: null,
        title: "开始1",
        type: "start",
        status: "",
        msg: "",
      },
    ],
    2: [
      {
        id: 2001,
        parentId: 1001,
        title: "步骤1",
        type: "step1",
        status: "",
        msg: "我是步骤一",
      },
    ],
    3: [
      {
        id: 3001,
        parentId: 2001,
        title: "审批开始",
        type: "step2",
        status: "通过",
        msg: "张三",
      },
      {
        id: 3002,
        parentId: 2001,
        title: "审批开始",
        type: "step2",
        status: "通过",
        msg: "李四",
      },
      {
        id: 3003,
        parentId: 2001,
        title: "审批开始",
        type: "step2",
        status: "通过",
        msg: "王五",
      },
    ],
    4: [
      {
        id: 4001,
        parentId: 3001,
        title: "打款",
        type: "step3",
        status: "失败",
        msg: "打款失败",
      },
      {
        id: 4002,
        parentId: 3002,
        title: "打款",
        type: "step3",
        status: "成功",
        msg: "打款成功",
      },
      {
        id: 4003,
        parentId: 3003,
        title: "打款",
        type: "step3",
        status: "失败",
        msg: "打款失败",
      },
    ],
    5: [
      {
        id: 5001,
        parentId: 4002,
        title: "已到账",
        type: "end",
        status: "",
        msg: "已到账",
      },
    ],
  },
  {
    1: [
      {
        id: 21001,
        parentId: null,
        title: "开始2",
        type: "start",
        status: "",
        msg: "",
      },
    ],
    2: [
      {
        id: 22001,
        parentId: 21001,
        title: "步骤1",
        type: "step1",
        status: "",
        msg: "我是步骤一",
      },
    ],
    3: [
      {
        id: 23001,
        parentId: 22001,
        title: "审批开始",
        type: "step2",
        status: "通过",
        msg: "张三",
      },
      {
        id: 23002,
        parentId: 22001,
        title: "审批开始",
        type: "step2",
        status: "通过",
        msg: "李四",
      },
      {
        id: 23003,
        parentId: 22001,
        title: "审批开始",
        type: "step2",
        status: "通过",
        msg: "王五",
      },
    ],
    4: [
      {
        id: 24001,
        parentId: 23001,
        title: "打款",
        type: "step3",
        status: "失败",
        msg: "打款失败",
      },
      {
        id: 24002,
        parentId: 23002,
        title: "打款",
        type: "step3",
        status: "成功",
        msg: "打款成功",
      },
      {
        id: 24003,
        parentId: 23003,
        title: "打款",
        type: "step3",
        status: "失败",
        msg: "打款失败",
      },
    ],
    5: [
      {
        id: 25001,
        parentId: 24002,
        title: "已到账",
        type: "end",
        status: "",
        msg: "已到账",
      },
    ],
  },
]);

// svg 连线
const lines = ref<{ id: string; path: string }[]>([]);
const taskSvgCanvas = ref<SVGElement | null>(null);
// 计算节点之间的连线
const calculateLines = () => {
  const tempLines: { id: string; path: string }[] = [];
  // 获取SVG的相对坐标位置
  const svgRect = taskSvgCanvas.value?.getBoundingClientRect() || {
    left: 0,
    top: 0,
  };
  // 获取滚动容器的偏移量
  nodeDataList.value.forEach((tree) => {
    Object.values(tree).forEach((nodes) => {
      nodes.forEach((node: any) => {
        if (node.parentId) {
          const startEl = document.getElementById(`node-${node.parentId}`);
          const endEl = document.getElementById(`node-${node.id}`);
          if (startEl && endEl) {
            const startRect = startEl.getBoundingClientRect();
            const endRect = endEl.getBoundingClientRect();

            // 计算相对SVG画布的坐标
            const startX = startRect.right - svgRect.left; // 起点:右侧中间
            const startY = startRect.top + startRect.height / 2 - svgRect.top;

            const endX = endRect.left - svgRect.left; // 终点:左侧中间
            const endY = endRect.top + endRect.height / 2 - svgRect.top;

            // 直线路径
            // const path = `M ${startX} ${startY} L ${endX} ${endY}`; // 使用直线

            // 贝塞尔曲线路径
            const path = `M ${startX} ${startY} C ${
              (startX + endX) / 2
            } ${startY}, ${(startX + endX) / 2} ${endY}, ${endX} ${endY}`;

            tempLines.push({
              id: `${node.parentId}-${node.id}`,
              path,
            });
          }
        }
      });
    });
  });
  lines.value = tempLines;
};

const treeContainer = ref<HTMLElement | null>(null);
// 更新 SVG 画布高度
const updateSvgCanvasHeight = () => {
  if (taskSvgCanvas.value) {
    // 获取 task-process 容器的高度
    const treeContainers = document.querySelectorAll(".tree-container");

    let totalHeight = 0;
    treeContainers.forEach((container) => {
      totalHeight += container.clientHeight; // 累加每个 container 的高度
    });
    console.log("totalHeight__", totalHeight);

    // 设置 SVG 画布的高度
    taskSvgCanvas.value.style.height = `${totalHeight}px`;
  }
};

onMounted(() => {
  updateSvgCanvasHeight();
  calculateLines();
});
</script>
<style lang="less" scoped>
.canvasLine {
  .tree-container {
    display: flex;
    flex-direction: row;
    overflow-x: auto;
    margin: 30px 0 px;
    position: relative;
    z-index: 2;
    height: 300px;
    .node-level {
      display: flex;
      flex-direction: column;
      justify-content: center;
      .node-wrapper {
        margin: 12px 18px;
        position: relative; /* 确保节点有定位 */
        background: #fff;
        .node {
          border: 1px solid #ccc;
          border-radius: 8px;
          padding: 10px;
          text-align: center;
          min-width: 120px;
          max-width: 200px;
          box-shadow: 0 2px 4px rgba(0, 0, 0, 0.1);
          border-left: 10px solid #2da4f2;
          cursor: pointer;
          .node-name {
            font-size: 14px;
            font-weight: bold;
            text-align: left;
            word-wrap: break-word; /* 或者 overflow-wrap: break-word; */
          }

          .node-msg {
            font-size: 12px;
            color: #888;
            margin-top: 6px;
            display: flex;
            justify-content: flex-start;
          }
        }
      }
    }
  }
  .svg-canvas {
    position: absolute;
    top: 0;
    left: 0;
    width: 100%; /* 覆盖整个父容器 */
    height: 100%;
    pointer-events: none; /* 不影响鼠标事件 */
    z-index: 0;
  }
}
</style>


 959
959

 被折叠的 条评论
为什么被折叠?
被折叠的 条评论
为什么被折叠?
 到【灌水乐园】发言


