


目录
2.4 node1,node2,node3,node4 查看分布式条带卷
2.5 node1,node2,node3,node4 查看分布式复制卷
一、GFS理论
1、GlusterFS简介
- 开源的分布式文件系统 (分布式:就是把一个大问题拆分成多个小问题,逐一去解决,最终协同合作)
- 由存储服务器、客户端以及NFS/Samba 存储网关组成
- 无元数据服务器 (就是保存数据的地方)
GlusterES 是一个开源的分布式文件系统。由存储服务器、客户端以及NES/Samba存储网关(可选,根据需要选择使用) 组成。没有元数据服务器组件,这有助于提升整个系统的性能、可靠性和稳定性
MFS传统的分布式文件系统大多通过元服务器来存储元数据,元数据包含存储节点上的目录信息、目录结构等。这样的设计在浏览目录时效率高,但是也存在一些缺陷,例如单点故障。一旦元数据服务器出现故障,即使节点具备再高的冗余性,整个存储系统也将崩溃。而 GlusterES分布式文件系统是基于无元服务器的设计,数据横向扩展能力强,具备较高的可靠性及存储效率。
GlusterEs同时也是Scale-Out (横向扩展) 存储解决方案GLuster的核心,在存储数据方面具有强大的横向扩展能力,通过扩展能够支持数PB存储容量和处理数千客户端。
GlusterFS支持借助TCP/IP或InfiniBandRDMA网络 (一种支持多并发链接的技术具有高带宽、低时延、高扩展性的特点) 将物理分散分布的存储资源汇聚在起,统一提供存储服务,并使用统一全局命名空间来管理数据。
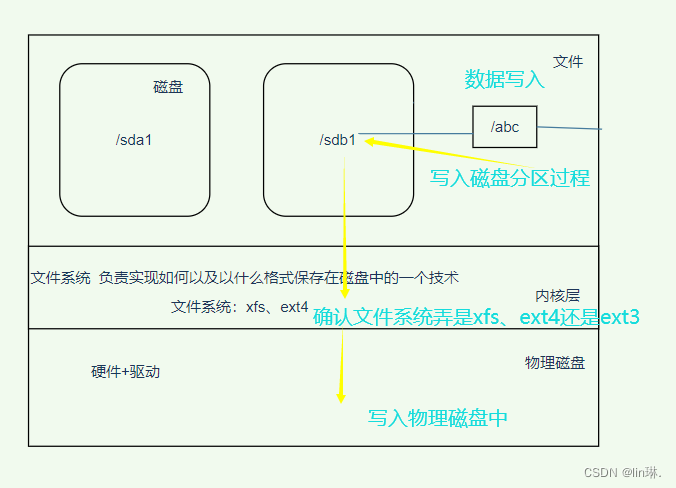
本地文件系统:
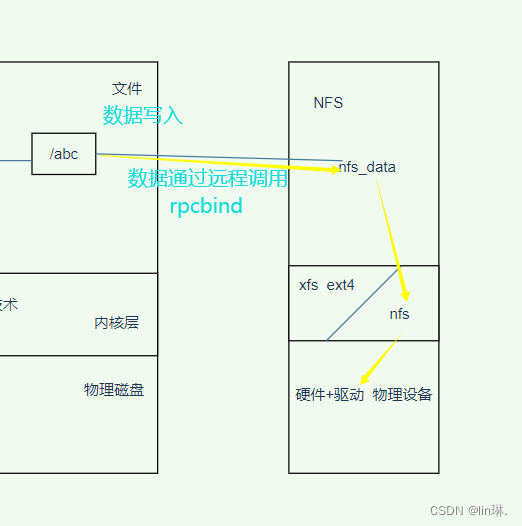
NFS存储过程:
2、GlusterFS特点
- 扩展性和高性能 (分布式的特性)
- 高可用性 (冗余、容灾的能力)
- 全局统一命名空间
- 弹性卷管理
- 基于标准协议
扩展性和高性能
- GlusterFS利用双重特性来提供高容量存储解决方案。
- Scale-out架构允许通过简单地增加存储节点的方式来提高存储容量和性能《磁盘、计算和I/0资源都可以独立增加),支持10GbE和InfiniBand等高速网络互联。
- Gluster弹性哈养 (ElasticHash) 解决了GlusterFS对元数据服务器的依赖,改善了单点故障和性能瓶颈,真正实现了并行化数据访问。GlusterPS采用弹性哈希算法在存储池中可以智能地定位任意数据分片《将数据分片存储在不同节点上),不需要查看索引或者向元数据服务器查询。
高可用性
- GlusterFs可以对文件进行自动复制,如镜像或多次复制,从而确保数据总是可以访问,甚至是在硬件故障的情况下也能正常访问。
- 当数据出现不一致时,自我修复功能能够把数据恢复到正确的状态,数据的修复是以增量的方式在后台执行,几乎不会产生性能负载。
- GlusterFs可以支持所有的存储,因为它没有设计自己的私有数据文件格式,而是采用操作系统中主流标准的磁盘文件系统(如EXT3、XFS等)来存储文件,因此数据可以使用传统访问磁盘的方式被访问
全局统一命名空间
- 分布式存储中,将所有节点的命名空问整合为统一命名空间,将整个系统的所有节点的存储容量组成一个大的虚拟存储池,供前端主机访问这些节点完成数据读写操作。
弹性卷管理
- GlusterFS通过将数据储存在逻辑卷中,逻辑卷从逻辑存储池进行独立逻辑划分而得到。
- 逻辑存储池可以在线进行增加和移除,不会导致业务中断。逻辑卷可以根据需求在线增长和缩减,并可以在多个节点中实现负载均衡。
- 文件系统配置也可以实时在线进行更改并应用,从而可以适应工作负载条件变化或在线性能调优。
基于标准协议
- Gluster 存储服务支持 NES、CIES、HTTP、ETP、SMB 及 Gluster原生协议,完全与 POSIX标准(可移植操作系统接口)兼容。
- 现有应用程序不需要做任何修改就可以对Gluster 中的数据进行访问,也可以使用专用 API 进行访问。
3、GlusterEs 术语
3.1 Brick (存储块)
指可信主机池中由主机提供的用于物理存储的专用分区,是GlusterES中的基本存储单元,同时也是可信存储池中服务器上对外提供的存储目录。存储目录的格式由服务器和目录的绝对路径构成,表示方法为 SERVER:EXPORT,如192.168.80.10:/data/mydir/。
3.2 Volume (逻辑卷)
一个逻辑卷是一组 Brick 的集合。卷是数据存储的逻辑设备,类似于 LVM 中的逻辑卷。大部分Gluster 管理操作是在卷上进行的。
3.3 FUSE
是一个内核模块,允许用户创建自己的文件系统,无须修改内核代码。伪文件系统
3.4 VFS
内核空间对用户空间提供的访问磁盘的接口。虚拟端口
3.5 Glusterd (后台管理进程) :服务端
在存储群集中的每个节点上都要运行。
4、模块化堆栈式架构
- GlusterEs 采用模块化、堆栈式的架构。
- 通过对模块进行各种组合,即可实现复杂的功能。例如 Replicate 模块可实现 RAID,Stripe模块可实现 RAIDO, 通过两者的组合可实现 RAID10 和 RAIDO1,同时获得更高的性能及可靠性。
5、GlusterFS工作流程
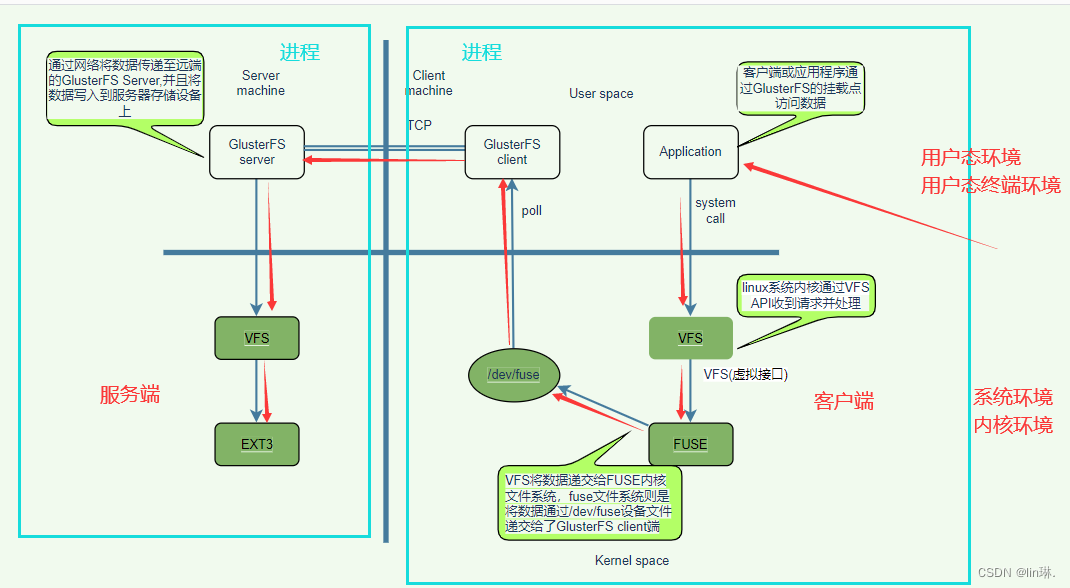
- 客户端或应用程序通过 GlusterFS 的挂载点访问数据。
- linux系统内核通过 VES API 收到请求并处理。
- VES 将数据递交给 EUSE 内核文件系统,并向系统注册一个实际的文件系统 EUSE,而 EUSE文件系统则是将数据通过 /dev/fuse 设备文件递交给了 GlusterES client 端。可以将 EUSE文件系统理解为一个代理。
- GlusterES client 收到数据后,client 根据配置文件的配置对数据进行处理
- 经过 GlusterFS client 处理后,通过网络将数据传递至远端的 GlusterFSServer,并且将数据写入到服务器存储设备上。
6、弹性HASH算法
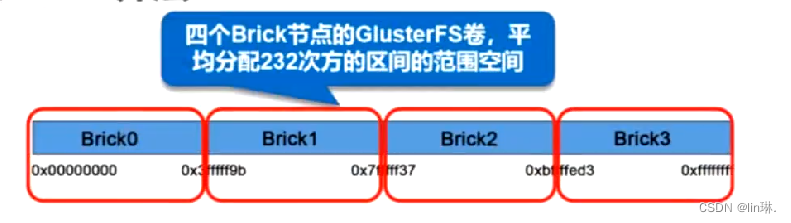
- 通过HASH算法得到一个32位的整数
- 划分为N个连续的子空间,每个空间对应一个Brick
- 弹性HASH算法的优点
- 保证数据平均分布在每一个Brick中
- 解决了对元数据服务器的依赖,进而解决了单点故障以及访问瓶颈
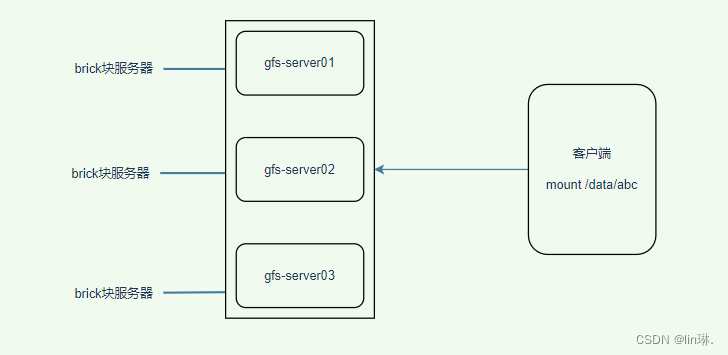
二、GlusterFS的卷类型
- 分布式卷
- 条带卷
- 复制卷
- 分布式条带卷
- 分布式复制卷
- 条带复制卷
- 分布式条带复制卷
1、 分布式卷
- 没有对文件进行分块处理
- 通过扩展文件属性保存HASH值
- 支持的底层文件系统有EXT3、EXT4、ZFS、XFS等
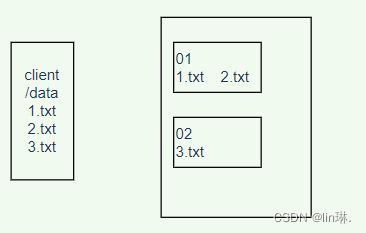
02挂了数据就丢失
分布式卷的特点
- 文件分布在不同的服务器,不具备冗余性
- 更容易和廉价地扩展卷的大小
- 单点故障会造成数据丢失
- 依赖底层的数据保护
2、条带卷
- 根据偏移量将文件分成N块 (N个条带节点),轮询的存储在每个Brick Server节点
- 存储大文件时,性能尤为突出
- 不具备元余性,类似Raid0
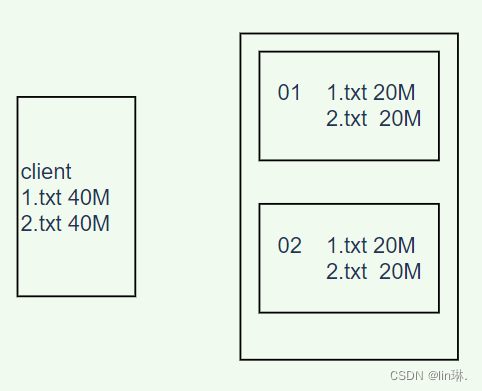
条带卷特点
- 数据被分割成更小块分布到块服务器群中的不同条带区
- 分布减少了负载且更小的文件加速了存取的速度
- 没有数据冗余
3、复制卷
- 同一文件保存一份或多分副本
- 因为要保存副本,所以磁盘利用率较低
- 若多个节点上的存储空间不一致,将按照木桶效应取最低节点的容量作为该卷的总容量
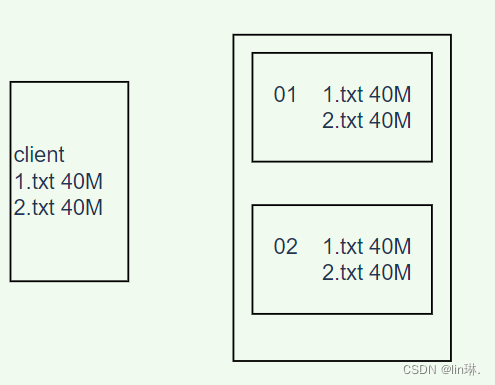
复制卷特点
- 卷中所有的服务器均保存一个完整的副本
- 卷的副本数量可由客户创建的时候决定
- 至少有两个块服务器或更多服务器
- 具备冗余性
4、分布式条带卷
- 兼顾分布式卷和条带卷的功能
- 主要用于大文件访问处理
- 至少最少需要4台服务器
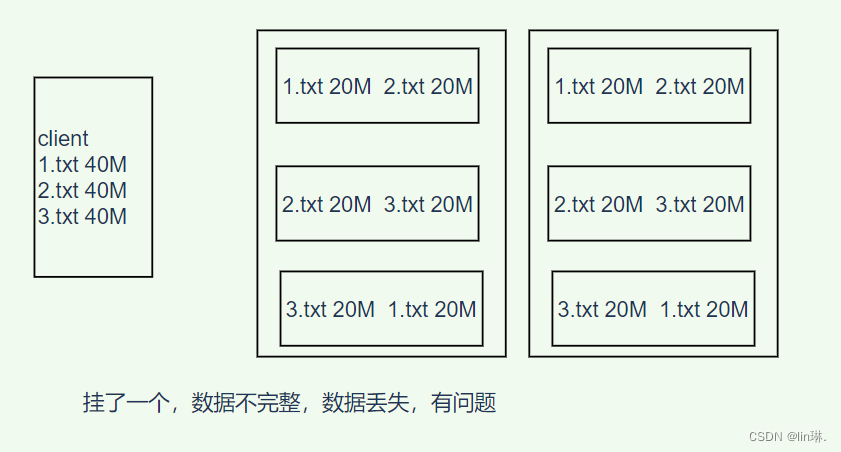
分布式条带卷特点
- 分布式处理,不能保证数据冗余
5、分布式复制卷
- 兼顾分布式卷和复制卷的功能
- 用于需要冗余的情况

三: 部署GlusterFS
1、准备环境(所有node节点)
1.1 关闭防火墙
[root@host103 ~]# systemctl  stop firewalld
[root@host103 ~]# setenforce 0
1.2 磁盘分区,并挂载
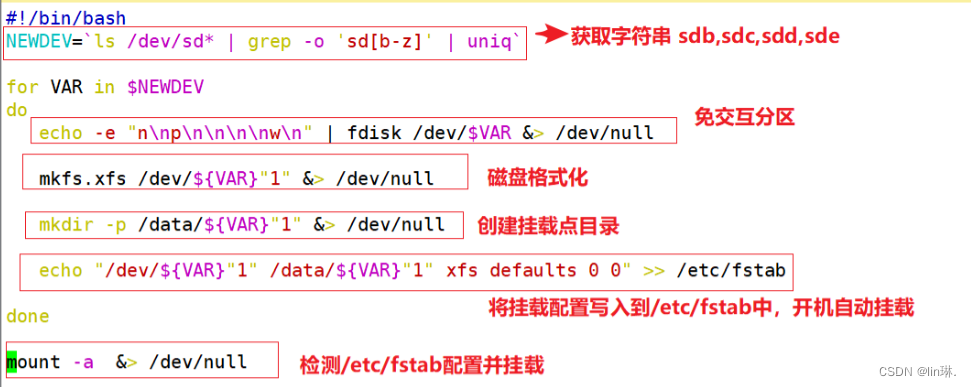
vim /opt/fdisk.sh
#!/bin/bash
#获取sdb,sdc,sdd,sde
NEWDEV=`ls /dev/sd* | grep -o 'sd[b-z]' | uniq`

for VAR in $NEWDEV
do
   #免交互分区
   echo -e "n\np\n\n\n\nw\n" | fdisk /dev/$VAR &> /dev/null

   #刷新分区表
   partprobe &> /dev/null

   #格式化
   mkfs.xfs /dev/${VAR}"1" &> /dev/null

   #创建挂载点
   mkdir -p /data/${VAR}"1" &> /dev/null

  #在 /etc/fstab配置开机自动挂载
   echo "/dev/${VAR}"1" /data/${VAR}"1" xfs defaults 0 0" >> /etc/fstab
done
#检测并挂载
mount -a  &> /dev/null

#授予脚本执行权限,运行脚本,查看挂载情况
[root@host103 ~]# chmod  +x /opt/fdisk.sh
[root@host103 ~]# /opt/fdisk.sh
[root@host103 ~]# df -h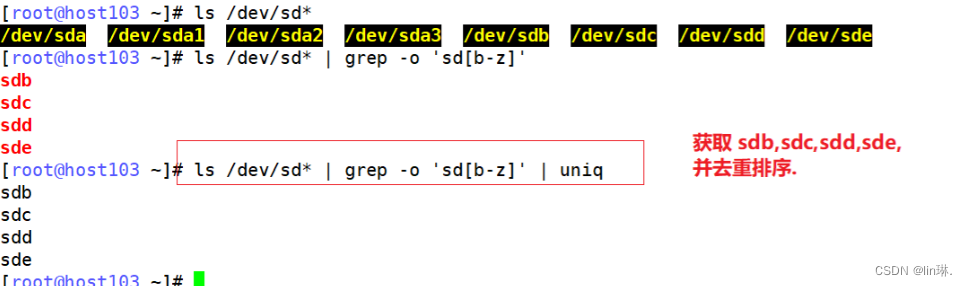

1.3 修改主机名,配置/etc/hosts文件
#其他节点修改为相应的主机名
#修改完主机名可以重新连接,或者使用 su 切换
[root@host11 ~]# hostnamectl  set-hostname node1

#每台node 节点都将 所有node 节点的主机名映射写入到 /etc/hosts文件
[root@node1 ~]# echo "192.168.23.11 node1" >> /etc/hosts
[root@node1 ~]# echo "192.168.23.12 node2" >> /etc/hosts
[root@node1 ~]# echo "192.168.23.13 node3" >> /etc/hosts
[root@node1 ~]# echo "192.168.23.103 node4" >> /etc/hosts
2、安装GFS
#将gfsrepo 软件上传到/opt目录下。可以在windows里将包压缩成 zip 格式上传到linux
[root@node3 ~]# cd  /opt/
[root@node3 opt]# unzip gfsrepo.zip

[root@node1 ~]#cd /etc/yum.repos.d/
[root@node1 yum.repos.d]# mkdir bak2
[root@node1 yum.repos.d]# mv *.repo bak2


[root@node1 yum.repos.d]# vim glfs.repo
[glfs]
name=glfs
baseurl=file:///opt/gfsrepo
gpgcheck=0
enabled=1

[root@node1 ~]# yum -y install glusterfs glusterfs-server glusterfs-fuse glusterfs-rdma


#启动服务
[root@node1 ~]# systemctl start glusterd.service
[root@node1 ~]# systemctl  enable glusterd.service

3、任意node上,添加节点到存储信任池中
#在任意node节点上,将节点添加到存储信任池中
[root@node1 ~]# gluster peer probe node1
peer probe: success. Probe on localhost not needed
[root@node1 ~]# gluster peer probe node2
peer probe: success.
[root@node1 ~]# gluster peer probe node3
peer probe: success.
[root@node1 ~]# gluster peer probe node4
peer probe: success.
[root@node1 ~]#
在任意Node节点查看集群状态
[root@node1 ~]# gluster peer status


四 创建卷
根据规划创建如下卷:
| 卷名 | 卷类型 | Brick |
|---|---|---|
| dis-volume | 分布式卷 | node1(/data/sdb1), node2(/data/sdb1) |
| stripe-volume | 条带卷 | node1(/data/sdc1)、node2(/data/sdc1) |
| rep-volume | 复制卷 | node3(/data/sdb1)、node4(/data/sdb1) |
| dis-stripe | 分布式条带卷 | node1(/data/sdd1)、node2(/data/sdd1)、node3(/data/sdd1)、node4(/data/sdd1) |
| dis-rep | 分布式复制卷 | node1(/data/sde1)、node2(/data/sde1)、node3(/data/sde1)、node4(/data/sde1) |
在任意node主机都可以操作。因为都关联起来了.
1、分布式卷
1.1 创建分布式卷
创建分布式卷,没有指定类型,默认创建的是分布式卷.。在没有指传输协议时,默认使用tcp
[root@node1 ~]# gluster volume create dis-volume node1:/data/sdb1 node2:/data/sdb1 force

1.2 查看卷列表
[root@node1 ~]# gluster volume list
dis-volume
1.3 启动新建分布式卷
[root@node1 ~]# gluster volume start dis-volume
volume start: dis-volume: success
1.4 查看创建分布式卷信息
[root@node1 ~]# gluster volume info dis-volume 
2、创建条带卷
指定类型为 stripe ,数值为2,且后面跟了2 个 Brick Server,所以创建的是条带卷
[root@node1 ~]# gluster volume create stripe-volume stripe 2 node1:/data/sdc1 node2:/data/sdc1 force

[root@node1 ~]# gluster volume start stripe-volume

[root@node1 ~]# gluster volume info stripe-volume

3、创建复制卷
指定类型为replica ,数值为2 ,且后面跟了2 个 Brick Server,所以创建的是复制卷
[root@node3 ~]# gluster volume create rep-volume replica 2 node3:/data/sdb1 node4:/data/sdb1 force

[root@node3 ~]# gluster volume start rep-volume

[root@node3 ~]# gluster volume info rep-volume
4、创建分布式条带卷
指定类型为stripe ,数值为2,后面跟了4个brick Server,是2的两倍。所以创建的是分布式条带卷
[root@node1 ~]# gluster volume create dis-stripe stripe 2 node1:/data/sdd1 node2:/data/sdd1 node3:/data/sdd1 node4:/data/sdd1 force

[root@node1 ~]# gluster volume start dis-stripe

[root@node1 ~]# gluster volume info dis-stripe

5、创建分布式复制卷
指定类型为 replica,数值为 2,而且后面跟了 4 个 Brick Server,是 2 的两倍,所以创建的是分布式复制
[root@node1 ~]# gluster volume create dis-rep replica 2 node1:/data/sde1 node2:/data/sde1 node3:/data/sde1 node4:/data/sde1 force

[root@node1 ~]# gluster volume start dis-rep

[root@node1 ~]# gluster volume info dis-rep 
6、查看当前所有卷列表
[root@node1 ~]# gluster volume list
dis-rep
dis-stripe
dis-volume
rep-volume
stripe-volume
五: 部署Gluster 客户端
1、安装部客户端软件
将gfsrepo 软件上传到 /opt 目录下(可以解压后压缩为zip 格式上传到linux中)
[root@host104 opt]# unzip gfsrepo.zip
[root@host104 opt]# cd /etc/yum.repos.d/
[root@host104 yum.repos.d]# mkdir bak02
[root@host104 yum.repos.d]# mv *.repo bak02
[root@host104 yum.repos.d]# vim glfs.repo
[glfs]
name=glfs
baseurl=file:///opt/gfsrepo
gpgcheck=0
enabled=1

[root@host104 yum.repos.d]# yum clean all && yum makecache
[root@host104 yum.repos.d]# yum -y install glusterfs glusterfs-fuse.x86_64
2、创建挂载点目录,配置主机名映射,挂载卷
[root@host104 ~]# mkdir -p /test/{dis,stripe,rep,dis_stripe,dis_rep}
[root@host104 ~]# ls /test/
dis  dis_rep  dis_stripe  rep  stripe

[root@host104 ~]# echo "192.168.23.11 node1" >> /etc/hosts
[root@host104 ~]# echo "192.168.23.12 node2" >> /etc/hosts
[root@host104 ~]# echo "192.168.23.13 node3" >> /etc/hosts
[root@host104 ~]# echo "192.168.23.103 node4" >> /etc/hosts


[root@host104 ~]# ping node1
[root@host104 ~]# ping node2
[root@host104 ~]# ping node3
[root@host104 ~]# ping node4

[root@host104 ~]# vim /etc/fstab
node1:dis-volume /test/dis glusterfs defaults,_netdev 0 0
node1:stripe-volume /test/stripe glusterfs defaults,_netdev 0 0node1:rep-volume /test/rep glusterfs defaults,_netdev 0 0
node1:dis-stripe /test/dis_stripe glusterfs defaults,_netdev 0 0node1:dis-rep /test/dis_rep glusterfs defaults,_netdev 0 0

[root@host104 ~]# mount -a
[root@host104 ~]# df -h

六、测试GlusterFS 文件系统
1、卷中写入文件,客户端操作
[root@host104 opt]# dd if=/dev/zero of=/opt/test1.txt bs=1M count=40
[root@host104 opt]# dd if=/dev/zero of=/opt/test2.txt bs=1M count=40
[root@host104 opt]# dd if=/dev/zero of=/opt/test3.txt bs=1M count=40
[root@host104 opt]# dd if=/dev/zero of=/opt/test4.txt bs=1M count=40
[root@host104 opt]# dd if=/dev/zero of=/opt/test5.txt bs=1M count=40


[root@host104 opt]# cp test* /test/dis
[root@host104 opt]# cp test* /test/stripe/
[root@host104 opt]# cp test* /test/rep/
[root@host104 opt]# cp test* /test/dis_stripe/
[root@host104 opt]# cp test* /test/dis_rep/
2、查看文件分布
2.1 node1,node2 查看分布式文件分布
[root@node1 ~]# ls -lh /data/sdb1
[root@node2 ~]# ls -lh  /data/sdb1

2.2 node1,node2 查看条带卷文件分布
[root@node1 ~]# ls -lh /data/sdc1
[root@node2 ~]# ls -lh /data/sdc1

2.3 node3,node4查看复制卷
[root@node3 ~]# ls -lh /data/sdb1
[root@node4 ~]# ls -lh /data/sdb1

2.4 node1,node2,node3,node4 查看分布式条带卷
[root@node1 ~]# ls -lh /data/sdd1
[root@node2 ~]# ls -lh /data/sdd1
[root@node3 ~]# ls -lh /data/sdd1
[root@node4 ~]# ls -lh /data/sdd1

2.5 node1,node2,node3,node4 查看分布式复制卷
[root@node1 ~]# ls -lh /data/sde1
[root@node2 ~]# ls -lh /data/sde1
[root@node3 ~]# ls -lh /data/sde1
[root@node4 ~]# ls -lh /data/sde1

3、破坏性测试
(虚拟机)挂起node2节点或者关闭glusterd服务来模拟故障
虚拟机挂起node2或者停止glusterd服务
[root@node2 ~]# systemctl stop glusterd.service

3.1 客户端查看分布式卷数据
<span style="background-color:#2b2b2b"><span style="color:#f8f8f2">复制<code class="language-bash"><span style="color:#fefefe">[</span>root@host104 ~<span style="color:#fefefe">]</span><span style="color:#d4d0ab"># ls /test/dis/</span>
test1.txt  test3.txt  test4.txt

</code></span></span>
3.2 客户端查看条带卷数据
[root@host104 ~]# ls  /test/stripe/
[root@host104 ~]#

3.3 客户端查看分布式条带卷
[root@host104 ~]# ls /test/dis_stripe/
test2.txt  test5.txt
3.4 客户端查看分布式复制卷
[root@host104 ~]# ls /test/dis_rep/
test1.txt  test2.txt  test3.txt  test4.txt  test5.txt
3.5 宕机node3.客户端查看复制卷
[root@host104 ~]# ls /test/rep/
test1.txt  test2.txt  test3.txt  test4.txt  test5.txt

3.6 小结
所以,凡是带复制数据的,相比而言数据比较安全。在写入数据时,条带式卷比复制卷和分布式卷速度更快
4、其他维护命令
4.1 查看 GlusterFS卷
[root@node1 ~]# gluster volume list
4.2 查看卷信息
#查看卷dis-volume 的信息
[root@node1 ~]# gluster volume  info dis-volume

#查看所有卷的信息
[root@node1 ~]# gluster volume info

4.3 查看卷状态
#查看 卷 dis—volume的状态
[root@node1 ~]# gluster volume status dis-volume

#查看所有卷的状态
[root@node1 ~]# gluster volume status

4.4 停止一个卷
[root@node1 ~]# gluster volume stop dis-stripe
Stopping volume will make its data inaccessible. Do you want to continue? (y/n) y 
4.5 删除一个卷
删除卷时,需要先停止卷,且信任池中不能有主机处于宕机状态,否则删除不成功
[root@node1 ~]# gluster volume delete dis-stripe
Deleting volume will erase all information about the volume. Do you want to continue? (y/n) y

当没有停止卷而尝试删除卷,则报错
[root@node1 ~]# gluster volume delete dis-rep
Deleting volume will erase all information about the volume. Do you want to continue? (y/n) y
volume delete: dis-rep: failed: Volume dis-rep has been started.Volume needs to be stopped before deletion.

当信任池中有处于宕机状态的主机,删除时则报错
#宕机 node3.然后停止卷 rep-volume,并尝试删除
[root@node1 ~]# gluster volume stop  rep-volume
[root@node1 ~]# gluster volume delete  rep-volume
#报错
volume delete: rep-volume: failed: Some of the peers are down

4.6设置卷的访问控制值
设置白名单(仅允许)
[root@node1 ~]# gluster volume  set dis-rep auth.allow 192.168.23.104
volume set: success

设置黑名单(仅拒绝)
[root@node1 ~]# gluster volume set rep-volume auth.reject 192.168.23.104
volume set: success
 1330


 扫一扫


 被折叠的 条评论
为什么被折叠?
 到【灌水乐园】发言


