


redux最新版本中引入createStore有删除线
redux 最新版本中注册redux的导入发生了改变。
解决:
import {legacy_createStore as createStore} from ‘redux’
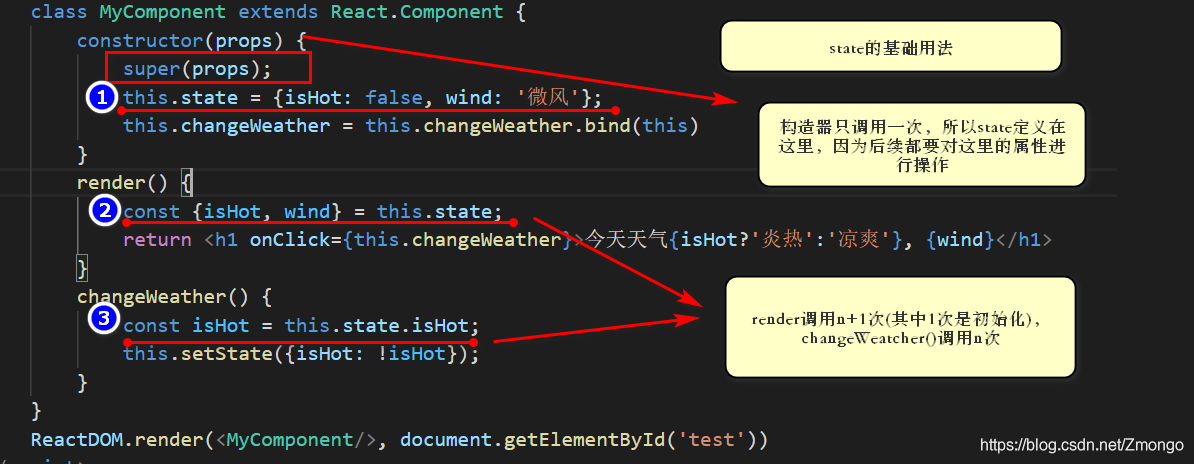
严重注意:状态必须通过setState进行更新,且更新是一种合并,不是替换。
this.setState({isHot:!isHot})
Inline Babel script: ‘this’ is not allowed before super()
当使用基本的state时,也就是不使用简化版的,需要在constructor中定义state,这时可能会报错,这个错是因为在子类的使用中没有使用super(props);,子类必须在constructor方法中调用super方法,否则新建实例时会报错。如果子类在constructor方法中使用了this初始化实例属性, 调用super方法必须放到this初始化实例属性的前面。这是因为子类没有自己的this对象,而是继承父类的this对象,然后对其进行加工。如果不调用super方法,子类就得不到this对象。
自定义方法中this为undefined:1,强制绑定this,(bind()), 2,箭头函数
        Weather = ()=>{
            const isHot = this.state.isHot;
            this.setState({isHot:!isHot})
        }
props传参
ReactDOM.render(, document.getElementById(‘test’))
const p = {name: ‘老刘’, age: 18, sex: ‘女’}
ReactDOM.render(<Person {…p} />, document.getElementById(‘test1’))
类组件的this,包含state,props,refs等属性,可以直接解构拿出来。
props限制类型和默认值
<script type="text/javascript" src="../js/prop-types.js"></script>
static propTypes = {
name: PropTypes.string.isRequired,
sex: PropTypes.string,
age: PropTypes.number
}
static defaultProps = {
sex: ‘男’,
age: 18
}
react没有v-model,如果要使用类似功能,需要使用非受控组件,加函数柯里化
函数的柯里化:通过函数调用继续返回函数的方式,实现多次接收参数最后统一处理的函数编码形式。
function sum(a){
return(b)=>{
return (c )=>{
return a+b+c
}
}
}
生命周期(新)
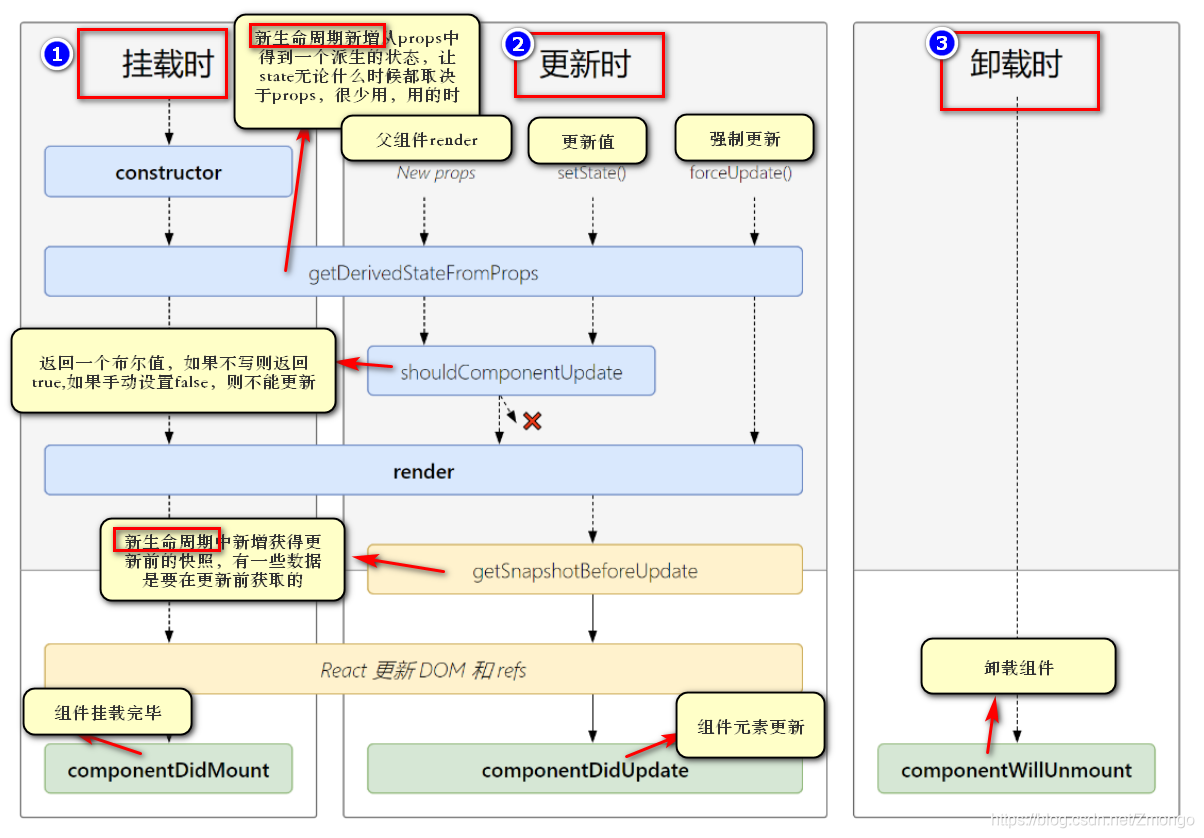
比较常用的生命周期有:
render: 初始化渲染,或更新渲染调用
componentDidMount: 一般在这个钩子中做一些出初始化的事:开启定时器、发送网络请求、订阅消息
componentWillUnmount: 一般在这个钩子中做一些收尾的事:关闭定时器、取消订阅消息
componentDidUpdate的使用(要用if条件语句判断前后值)
componentDidUpdate(prevProps, prevState, snapshot)
componentDidUpdate(prevProps) {
// 典型用法(不要忘记比较 props):
if (this.props.userID !== prevProps.userID) {
this.fetchData(this.props.userID);
}
}
render函数中的内容一定要用一个盒子包住,不然会报错
组件状态提升
当一个组件被复用,并且多次复用需要用到同一个状态的时候,就需要将状态从组件中抽出来,放到父组件中,这叫组件状态提升。
想做类似vue中的slot功能时,react可以用props做
脚手架的使用注意事项:
安装环境:
node, npm,yarn
要退出时,一定要ctrl+c,不然会占用端口号,导致下次start有问题
封装NavLink
NavLink:能够动态增加样式的路由跳转
> import React, { Component } from 'react'
import {NavLink} from 'react-router-dom'

export default class MyNavLink extends Component {
    render() {
        return (
            // 标签体内容是一个特殊的标签属性,在props中体现为children属性,当标签
            // 自结束时,children属性可以代替标签体内容
            // <NavLink activeClassName="active" {...this.props}>{this.props.children}</NavLink>
            <NavLink activeClassName="active" {...this.props}/>
        )
    }
}
antd样式不生效
yarn add antd之后,样式还是没生效,配置json文件也不生效,解决办法:
可能是没引入css,在入口文件index.jsx中import ‘./index.css’;,在index.css中引入
@import ‘~antd/dist/antd.css’;
就生效了。
另外如果组件的index.jsx中要加入样式,而且不想用公共样式,也可以用import引入css文件
配置代理
react脚手架配置代理总结
方法一
在package.json中追加如下配置
"proxy":"http://localhost:5000"
说明:
- 优点:配置简单,前端请求资源时可以不加任何前缀。
- 缺点:不能配置多个代理。
- 工作方式:上述方式配置代理,当请求了3000不存在的资源时,那么该请求会转发给5000 (优先匹配前端资源)
方法二
-
第一步:创建代理配置文件
在src下创建配置文件:src/setupProxy.js -
编写setupProxy.js配置具体代理规则:
const proxy = require('http-proxy-middleware')

module.exports = function(app) {
  app.use(
    proxy('/api1', {  //api1是需要转发的请求(所有带有/api1前缀的请求都会转发给5000)
      target: 'http://localhost:5000', //配置转发目标地址(能返回数据的服务器地址)
      changeOrigin: true, //控制服务器接收到的请求头中host字段的值
      /*
      	changeOrigin设置为true时,服务器收到的请求头中的host为:localhost:5000
      	changeOrigin设置为false时,服务器收到的请求头中的host为:localhost:3000
      	changeOrigin默认值为false,但我们一般将changeOrigin值设为true
      */
      pathRewrite: {'^/api1': ''} //去除请求前缀,保证交给后台服务器的是正常请求地址(必须配置)
    }),
    proxy('/api2', {
      target: 'http://localhost:5001',
      changeOrigin: true,
      pathRewrite: {'^/api2': ''}
    })
  )
}
说明:
- 优点:可以配置多个代理,可以灵活的控制请求是否走代理。
- 缺点:配置繁琐,前端请求资源时必须加前缀。
跳转页面到当前url的首页
let href = window.location.protocol + ‘//’ + window.location.host;
window.location.href = href + ‘/’;
兄弟组件间的通信(消息订阅与发布:PubSubJS)
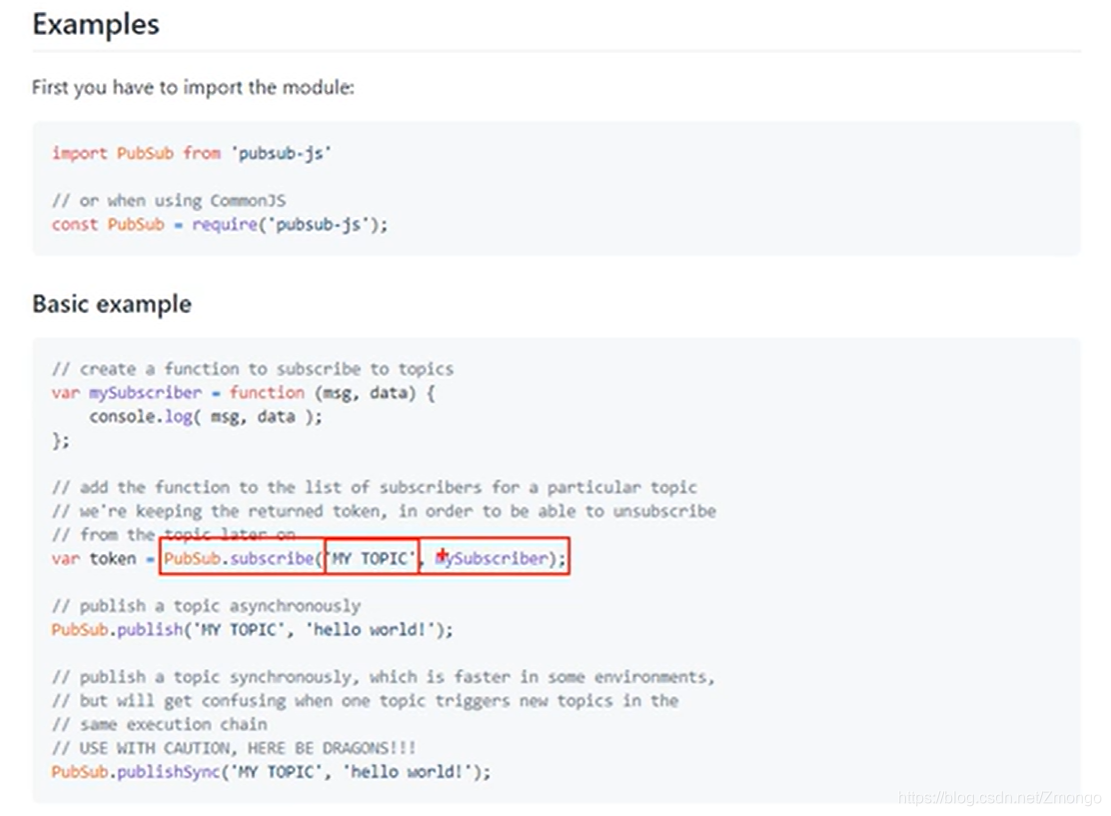
当组件卸载的时候需要清空订阅,就像清空定时器一样,通过PubSub.unsubscribe() 清空
向路由组件传递参数
			1.params参数
						路由链接(携带参数):<Link to='/demo/test/tom/18'}>详情</Link>
						注册路由(声明接收):<Route path="/demo/test/:name/:age" component={Test}/>
						接收参数:this.props.match.params
			2.search参数
						路由链接(携带参数):<Link to='/demo/test?name=tom&age=18'}>详情</Link>
						注册路由(无需声明,正常注册即可):<Route path="/demo/test" component={Test}/>
						接收参数:this.props.location.search
						备注:获取到的search是urlencoded编码字符串,需要借助querystring解析
			3.state参数
						路由链接(携带参数):<Link to={{pathname:'/demo/test',state:{name:'tom',age:18}}}>详情</Link>
						注册路由(无需声明,正常注册即可):<Route path="/demo/test" component={Test}/>
						接收参数:this.props.location.state
						备注:刷新也可以保留住参数
编程式路由导航
				借助this.prosp.history对象上的API对操作路由跳转、前进、后退
						-this.prosp.history.push()
						-this.prosp.history.replace()
						-this.prosp.history.goBack()
						-this.prosp.history.goForward()
						-this.prosp.history.go()
BrowserRouter与HashRouter的区别
		1.底层原理不一样:
					BrowserRouter使用的是H5的history API,不兼容IE9及以下版本。
					HashRouter使用的是URL的哈希值。
		2.path表现形式不一样
					BrowserRouter的路径中没有#,例如:localhost:3000/demo/test
					HashRouter的路径包含#,例如:localhost:3000/#/demo/test
		3.刷新后对路由state参数的影响
					(1).BrowserRouter没有任何影响,因为state保存在history对象中。
					(2).HashRouter刷新后会导致路由state参数的丢失!!!
		4.备注:HashRouter可以用于解决一些路径错误相关的问题。
配置antd主题颜色报错
TypeError: this.getOptions is not a function
解决方式:
安装低版本less-loader
yarn add less-loader@6.0.0
redux状态更改默认不会引起页面更新
ReactDOM.render(
  <BrowserRouter>
    <App />
  </BrowserRouter>,
  document.getElementById('root')
);
store.subscribe(() => {
  ReactDOM.render(
  <BrowserRouter>
    <App />
  </BrowserRouter>,document.getElementById('root'))
})
react脚手架快捷方式
rcc 创建类式组件
react-redux
容器组件
/**
 * 容器组件的作用就是联系左手的UI组件和右手的redux
 *
 */
//引入UI组件
import CountUi from '../../components/ReduxAbout/Count';

import { createIncrementAction, createDecrementAction} from '../../redux/count_action'

//引入connect用于连接UI组件与redux
import {connect} from 'react-redux'

//映射状态
const mapStateToProps = state => ({ count: state })
//映射操作状态的方法
const mapDispatchToProps = dispatch => (
    {
        jia: number => dispatch(createIncrementAction(number)),
        jian: number => dispatch(createDecrementAction(number))
    }
)

//创建并暴露一个容器组件
export default connect(
    mapStateToProps,
    mapDispatchToProps
    )(CountUi)
容器组件的优化
//创建并暴露一个容器组件
export default connect(
    state => ({ count: state }),
    dispatch => (
        {
            jia: number => dispatch(createIncrementAction(number)),
            jian: number => dispatch(createDecrementAction(number))
        }
    )
    )(CountUi)
容器组件的最终精简优化
mapDispathToProps可以是函数也可以是对象,react-redux帮助做了dispatch
//使用connect()()创建并暴露一个Count的容器组件
export default connect(
    state => ({ count: state }),
    {
        /**
         * 精简版
         * 参数和dispatch都不用写
         *
         */
        jia: createIncrementAction,
        jian: createDecrementAction
    }
)(CountUi)
eact-redux中的connect方法已经给容器组件做了检测的能力,所以不用手动操作store.subscribe()进行监测。
Provider(in react-redux)
未优化前:每个组件都要传入一个store
<Count store={store}></Count>
<CountReasult store={store}></CountReasult>
优化后:在入口文件中,Provider能精准将store传入所有的容器组件,无需手动传入store
ReactDOM.render(
    <Provider store={store}>
    <BrowserRouter>
      <App />
    </BrowserRouter>
  </Provider>,
  document.getElementById('root')
);
一个组件要和redux“打交道”要经过哪几步?
						(1).定义好UI组件---不暴露
						(2).引入connect生成一个容器组件,并暴露,写法如下:
								connect(
									state => ({key:value}), //映射状态(redux帮助保存的状态)
									{key:xxxxxAction} //映射操作状态的方法
								)(UI组件)
						(4).在UI组件中通过this.props.xxxxxxx读取和操作状态
react-redux使用多个reducers
redux中存储多个reducer使用的状态时,内部使用对象的状态存储的。
取值时根据key取出value
操作:
(1) 需要合并reducer ->在redux中引入combineReducers
const allReducer = combineReducers({ countReducer, countResult}),传入的这个对象就是redux保存的总的状态对象
(2)在组件中使用时:
export default connect(
state => ({ count: state.countReducer }), //在这使用key获取state值
{
jia: createIncrementAction,
jian: createDecrementAction
}
)(Count)
(3)如果实现数据共享更容易:key:value就可以
state => ({ person: state.countResult, count: state.countReducer})
redux的reducer函数必须是一个纯函数
纯函数:
<1>不得改写参数数据比如: data.push(1),更改了传入的data
<2>不会产生任何副作用比如: 网络请求,输入和输出设备
<3>不能调用Date.now()或者Math.radom()等不纯的方法,因为这违背了纯函数的定义:只要是同样的输入,必得到同样的输出(返回)
Fragment/<></>
如果在组件中外部包裹的div无实际用处可以用上述代替
Fragment只拥有key属性,可以用于遍历
<></>无任何属性,不可用于遍历
PureComponent
控制当state和props发生改变时才render组件,用于优化Component,但值得注意的是,它内部用了浅比较,所以不要直接修改state中的数据要产生新数据,不然堆中的地址一直不变,shouldComponentUpdate()返回false不会发生改变
vue中的slot插槽技术(renderProps)
在A组件中预留插槽位置:{this.props.render(n);}
在使用时: <A render={n=>}/>; 就可以在A组件中插入B组件,并且B组件可以使用A组件中的值:n。
错误边界
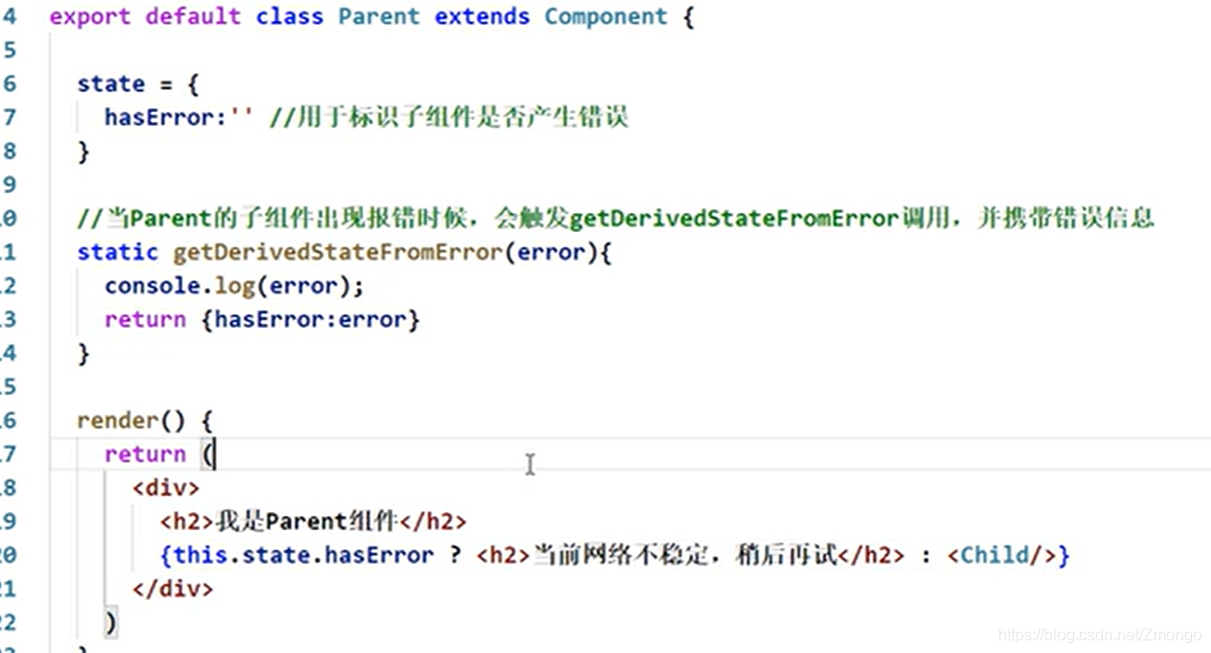
// 生命周期函数,一旦后台组件报错,就会触发
static getDerivedStateFromError(error) {
console.log(error);
// 在render之前触发
// 返回新的state
return {
hasError: true,
};
}
componentDidCatch(error, info) {
// 统计页面的错误。发送请求发送到后台去
console.log(error, info);
}
组件通信方式总结
组件间的关系:
- 父子组件
- 兄弟组件(非嵌套组件)
- 祖孙组件(跨级组件)
几种通信方式:
	1.props:
		(1).children props
		(2).render props
	2.消息订阅-发布:
		pubs-sub、event等等
	3.集中式管理:
		redux、dva等等
	4.conText:
		生产者-消费者模式
比较好的搭配方式:
	父子组件:props
	兄弟组件:消息订阅-发布、集中式管理
	祖孙组件(跨级组件):消息订阅-发布、集中式管理、conText(开发用的少,封装插件用的多)
关于Route,通俗得总结一下,不知道对不对!
HashRouter,BrowerRouter 是容器,用于控制url得展示
Router 用来检测url得地址,并通过这个地址显示配置在里面得内容
Link 用来改变url得地址,可以传参。
但是传参也可以通过编程式路由传,更方便只需要在两个不同的组件分别加上WithRouter 包裹。
Switch 也是一个容器,用于控制匹配Router,匹配到第一个就不会向下继续匹配,只能渲染一个组件,更快捷。经常和exact结合使用,这样可以避免多余渲染也可以不用注意顺序。


 1535
1535

 被折叠的 条评论
为什么被折叠?
被折叠的 条评论
为什么被折叠?
 到【灌水乐园】发言


