


 本文介绍了在Spring Boot应用中遇到的@Autowired注解无法正常注入导致为null的问题及其四种解决方法,包括检查类是否被扫描、添加@Component、使用PostConstruct初始化和通过工具类手动注入。
1.场景重现
1.今天在做统一配置的时候,将所有的yml中的配置文件移到class类里面,并且用@Component注解注入到spring容器中管理,然后在其他类中用@Autowired注入进去,获取配置文件属性,这样做的好处是统一管理,不用在其他类中一个一个获取。如下图所示:
@Data
@Component
public class SystemYml {
    @Value("${electronsign.priKeyString}")
    private  String priKeyString;
    @Value("${electronsign.appId}")
    private  String appId;
    @Value("${electronsign.baseUrl}")
    private  String baseUrl;
    @Value("${electronsign.templateId}")
    private String templateId;
    @Value("${electronsign.notifyUrl}")
    private String notifyUrl;
    @Value("${electronsign.aygPublicKeyStr}")
    public String aygPublicKeyStr;
    @Value("${electronsign.notifyUrlIdCard}")
    private String notifyUrlIdCard;
    @Value("${electronsign.isPreview}")
    private String isPreview;
    @Value("${uploadFile.filePath}")
    private String saveImgFile;
}
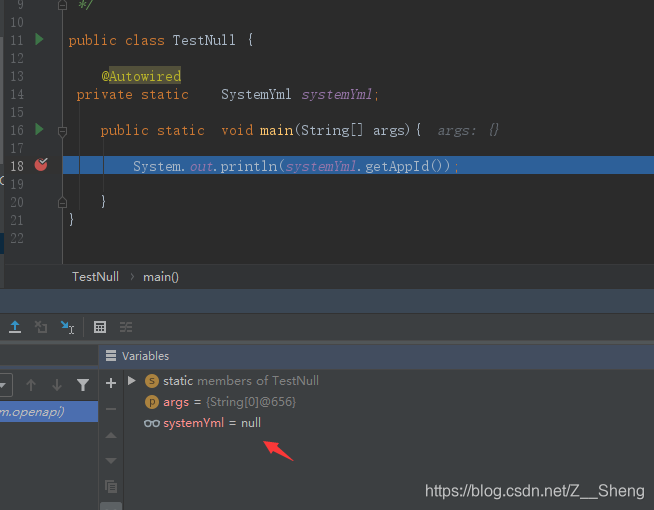
按道理来说,我们平常的用法都是可以注入的,但是此时我们注入的systemYml为null,导致获取属性的时候直接报空指针错误。
2.四种解决方案
1.首先看看注入失败的类有没有被spring包扫描到,不过这个一般都是没有问题的。在启动类中加入@ComponentScan注解扫描。
2.这个类没有托管给spring 管理,一般在类的上面添加@Component注解就行。
3.通过PostConstruct 注解,在初始化bean之前进行init方法,初始化完成以后,就可以获取到对象属性值。
@RestController
public class TestNull {
    @Autowired
    public   SystemYml systemYml;
    private TestNull testNull;
    @RequestMapping("/v1/inner/ttt")
    public  void test1() {
        System.out.println(systemYml.getAppId());
    }
//@PostConstruct 注解的方法在加载类的构造函数之后执行,也就是在加载了构造函数之后,执行init方法,实现初始化bean之前进行的操作
    @PostConstruct
    public void init() {
        testNull = this;
        testNull.systemYml = this.systemYml;
    }
}
4.手动实现自动注入的效果:写个工具类实现ApplicationContextAware接口,这样在其他地方使用这个工具类,就可以获取到被管理bean对象的值。
import org.springframework.beans.BeansException;
import org.springframework.context.ApplicationContext;
import org.springframework.context.ApplicationContextAware;
import org.springframework.stereotype.Component;
/**
 * @Author: Mr sheng.z
 * @Description: 实现了ApplicationContextAware ,这个类就可以获取到所有引用对象的bean
 * @Date: Create in 13:19 2020/6/30
 */
@Component
public final class ContextUtil implements ApplicationContextAware {
    protected static ApplicationContext applicationContext ;
    @Override
    public void setApplicationContext(ApplicationContext arg0) throws BeansException {
        if (applicationContext == null) {
            applicationContext = arg0;
        }
    }
    public static Object getBean(String name) {
        //name表示其他要注入的注解name名
        return applicationContext.getBean(name);
    }
    /**
     * 拿到ApplicationContext对象实例后就可以手动获取Bean的注入实例对象
     */
    public static <T> T getBean(Class<T> clazz) {
        return applicationContext.getBean(clazz);
    }
}
测试类:
import org.springframework.web.bind.annotation.RequestMapping;
import org.springframework.web.bind.annotation.RestController;
/**
 * @Author: Mr sheng.z
 * @Description:
 * @Date: Create in 13:07 2020/6/30
 */
@RestController
public class TestNull {
   //手动获取被spring管理的bean,根据bean的名称
    private    SystemYml systemYml= ContextUtil.getBean(SystemYml.class);
    @RequestMapping("/v1/inner/ttt")
    public  void test1() {
        System.out.println(systemYml.getAppId());
    }
}


 2778
2778


 到【灌水乐园】发言


