


 本文介绍了一种使用Socket实现半双工通信的方法,通过封装Socket类,解决了接收缓冲区垃圾数据处理和简化通信流程的问题。代码示例展示了如何初始化Socket、连接远程设备以及发送和接收数据。
由来描述
从工业控制到物联网,我们的通信接口也由原来的串口逐步向网口发展。网络通信的方式基本上都是全双工(双方都可以在同一时刻进行发送和接收),但是在某些时候(设备控制),我们也习惯了使用半双工(不能同时发送和接收)的通信方式。本文就从如何使用Socket实现半双工的通信展开(虽然实际开发过程中使用的不多)。
思路
在串行的通信模式中,通信的流程一般为:上位机发送命令;上位机等待接收响应;下位机接收到命令;下位机响应命令;上位机接收到响应。因此在我们的Socket封装过程应该如此。
Socket的封装实现
直接上代码:
 public class SocketTcpDeamon
    {
        /// <summary>
        /// 初始化套接字
        /// </summary>
        /// <returns></returns>
        private Socket Initialize()
        {
            Socket socket = new Socket(AddressFamily.InterNetwork, SocketType.Stream, ProtocolType.Tcp);

            socket.ExclusiveAddressUse = true;

            socket.LingerState = new LingerOption(true, 10);

            socket.NoDelay = true;

            // 设置接收缓冲区的大小为 1k
            socket.ReceiveBufferSize = 1024;

            // 设置接收超时时间
            socket.ReceiveTimeout = 5000;

            // 设置发送缓冲区的大小为 1k.
            socket.SendBufferSize = 1024;

            // 设置发送超时时间
            socket.SendTimeout = 2000;

            // TTL生存周期
            socket.Ttl = 42;

            return socket;
        }


        /// <summary>
        /// 所有的通信
        /// </summary>
        public static Dictionary<string, SocketTcpDeamon> SocketDeamons { private set; get; }


        public IPEndPoint RemotePoint;

        /// <summary>
        /// 客户端Socket
        /// </summary>
        public Socket Client { get; set; }

        /// <summary>
        /// 键
        /// </summary>
        public string SocketKey
        {
            get
            {
                return RemotePoint.ToString();
            }
        }

        /// <summary>
        /// 构造函数
        /// </summary>
        /// <param name="remote">远程IP和端口</param>
        public SocketTcpDeamon(IPEndPoint remote)
        {
            RemotePoint = remote;

            Client = Initialize();


            if (SocketDeamons == null) SocketDeamons = new Dictionary<string, SocketTcpDeamon>();
            if (!SocketDeamons.ContainsKey(SocketKey)) SocketDeamons.Add(SocketKey, this);
        }


        /// <summary>
        /// 连接
        /// </summary>
        /// <returns></returns>
        public bool Connect()
        {
            try
            {
                if (!Client.Connected)
                {
                    Client.Connect(RemotePoint);
                }

                return true;
            }
            catch (SocketException e)
            {
                return false;
            }
        }

        /// <summary>
        /// 缓冲区
        /// </summary>
        private byte[] buffer = new byte[1024];

        /// <summary>
        /// 发送命令,采集数据
        /// </summary>
        /// <param name="cmd">命令</param>
        /// <returns>数据</returns>
        public byte[] Send(byte[] cmd)
        {
            // 判断是否存在可以读取的数据,存在可以读取得数据位垃圾数据,丢掉
            if (Client.Available > 0)
            {
                // 读取一次,丢掉数据
                Client.Receive(buffer);
            }

            // 下发命令
            try
            {
                Client.Send(cmd);
            }
            catch (SocketException e)
            {
                if (e.ErrorCode == 10060)// 超时的时候错误号码是10060
                    Console.WriteLine("超时...");
                return null;
            }

            // 采集
            try
            {
                int bytes = Client.Receive(buffer);
                Console.WriteLine(Client.RemoteEndPoint.ToString() +":"+ DeamonCommon.MeCommon.ByteArrayToString(buffer, 0, bytes));
                return buffer;
            }
            catch (SocketException e)
            {
                if (e.ErrorCode == 10060)// 超时的时候错误号码是10060
                    Console.WriteLine("超时...");
                return null;
            }
        }
    }
值得注意的是,本类的封装之后,解决两个问题:
1.如果接收缓冲区存在未处理的垃圾数据,可以直接清空重新采集。
2.如果使用者不再关心数据如何获取和发送的,只需要调用Connect和Send即可收到数据。(这是封装带来的便利)
下面我来看看具体的测试吧。
测试
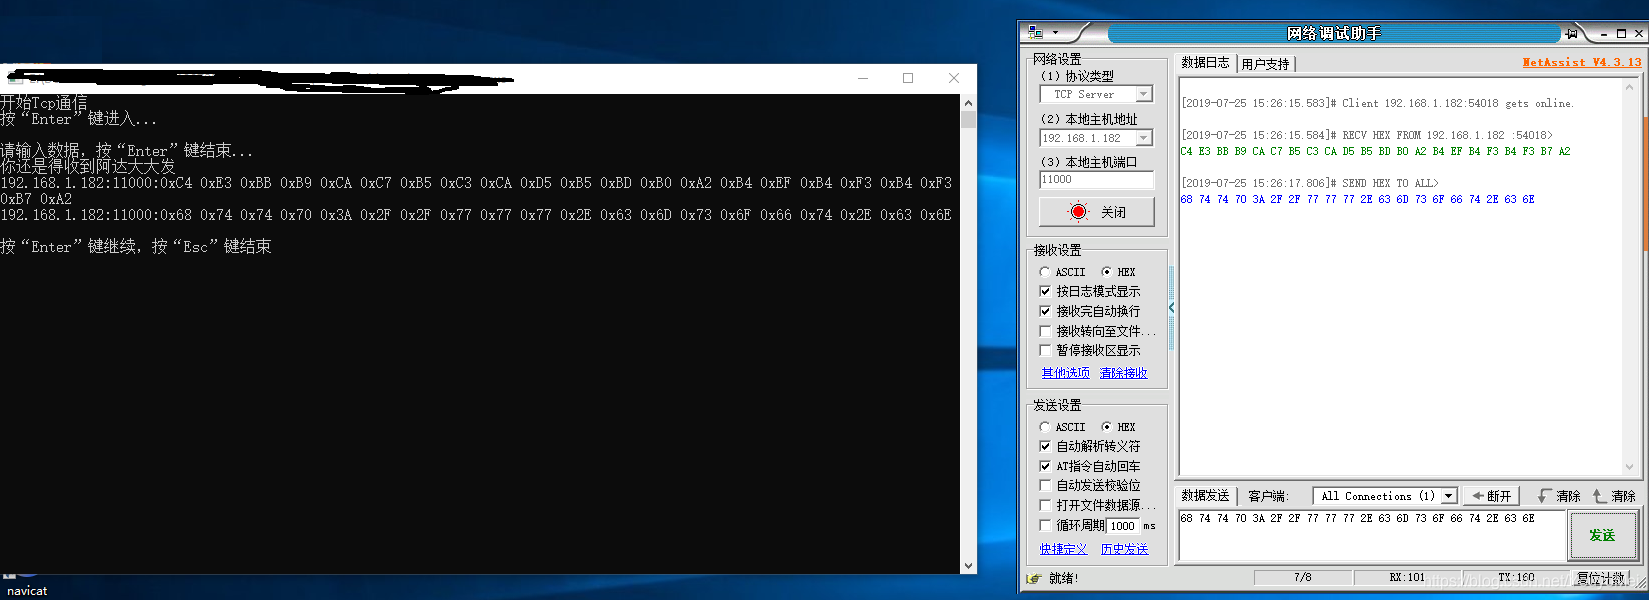
 static void Main(string[] args)
        {

            // 进入Tcp通信
            Console.WriteLine("开始Tcp通信");

            Console.WriteLine("按“Enter”键进入...");
            Console.ReadLine();
            SocketTcpDeamon socketD = new SocketTcpDeamon(new IPEndPoint(DeamonCommon.MeCommon.GetLocalhostIPAddress(), 11000));

            while (true)
            {
                foreach (var item in SocketTcpDeamon.SocketDeamons)
                {
                    Console.WriteLine("请输入数据,按“Enter”键结束...");
                    string message = Console.ReadLine();
                    byte[] cmd = Encoding.Default.GetBytes(message);
                    Console.WriteLine(item.Key+":"+DeamonCommon.MeCommon.ByteArrayToString(cmd, 0, cmd.Length));

                    item.Value.Connect();
                    item.Value.Send(cmd);
                }
                Console.WriteLine("");
                Console.WriteLine("按“Enter”键继续,按“Esc”键结束");
                if (Console.ReadKey().Key == ConsoleKey.Escape) { break; }
            }
        }
使用NetAssist软件作为调试软件进行测试。
源码地址:https://download.youkuaiyun.com/download/youyomei/11453941
Over
每次记录一小步...点点滴滴人生路..


 678
678

 被折叠的 条评论
为什么被折叠?
被折叠的 条评论
为什么被折叠?
 到【灌水乐园】发言


