


 文章介绍了如何在Linux系统中操作GPIO,包括通过sysfs接口导出和设置GPIO,使用设备树来配置GPIO驱动,创建简单的内核模块读写GPIO,以及使用gpiolib库进行GPIO操作。同时,文章还提到了GPIO的设备树配置、驱动程序的编写和注册,以及原厂GPIO芯片驱动的实现。
GPIO子系统
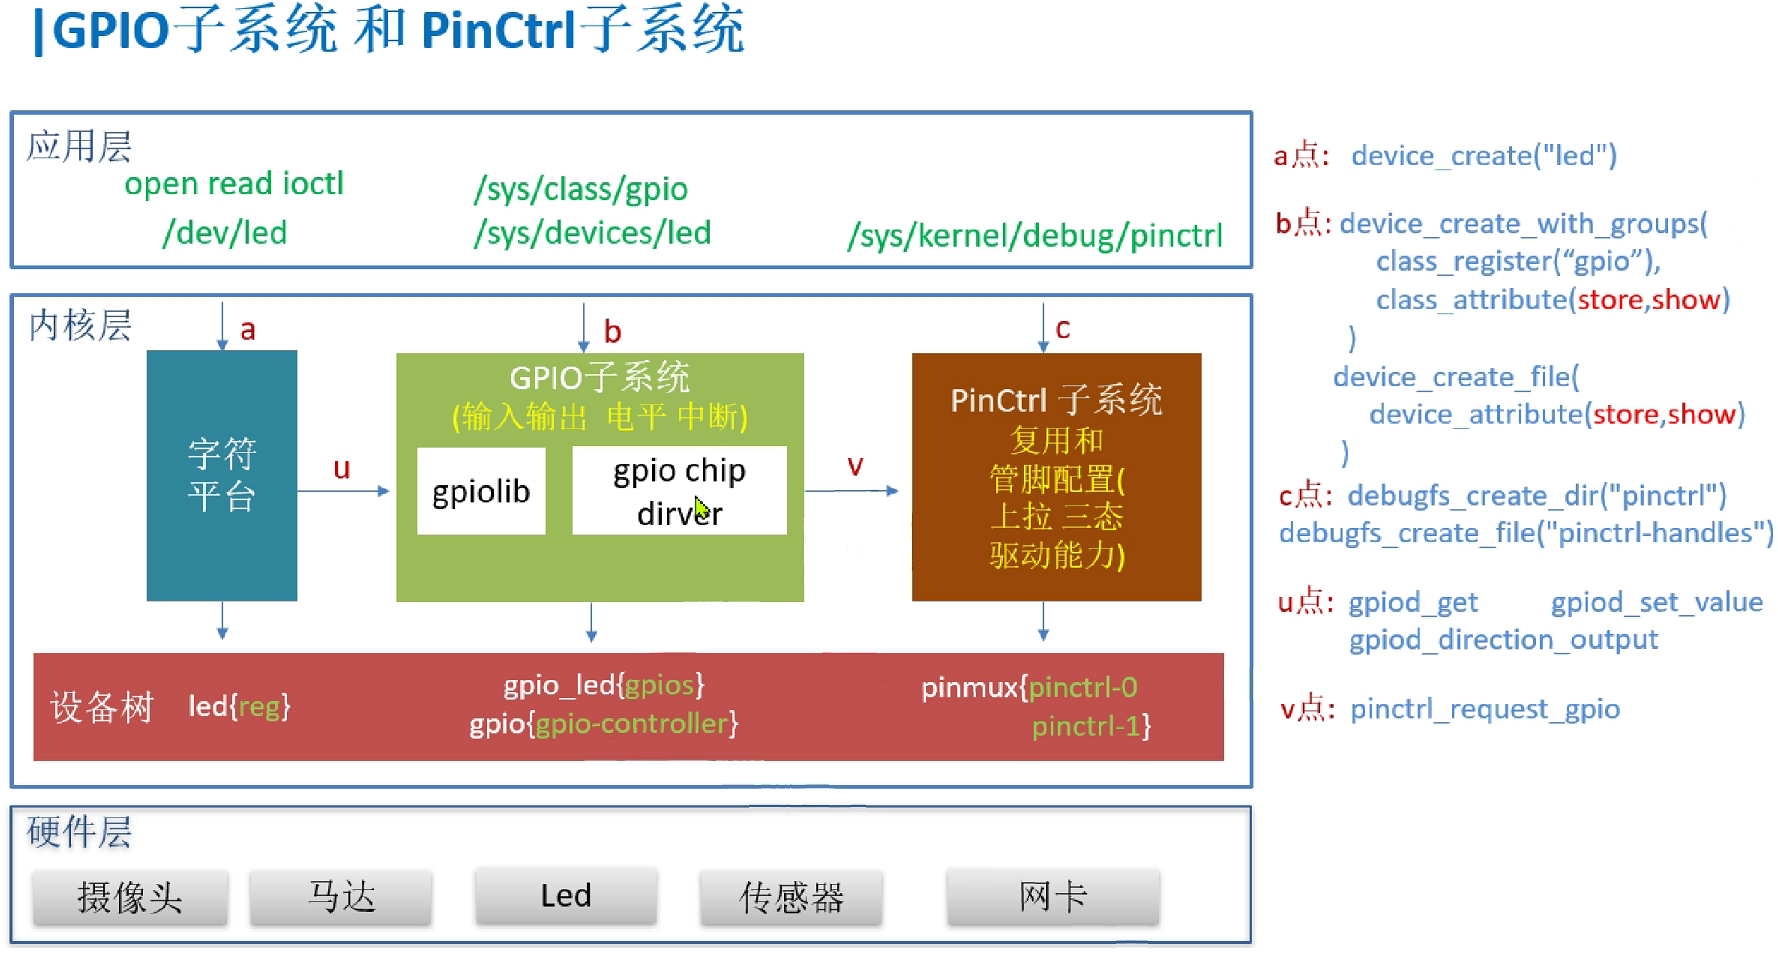
0.暴露给应用层
应用
$ echo 79 > /sys/class/gpio/export   //导出79号gpio 引脚,使得可在应用层访问
$ echo out > /sys/class/gpio/gpio79/direction  //设置 为输出
$ echo 1 > /sys/class/gpio/gpio79/value //输出高电平 开灯
$ echo 0 > /sys/class/gpio/gpio79/value  //输出低电平, 关灯
$ cat /sys/kernel/debug/gpio  //查询gpio状态(问题:发现找不到gpio文件)
$ echo 79 > unexport //取消导出(发现gpio79消失了)
解决调试目录为空的问题
原因 //debug需要的文件系统 debugfs没有挂载
在 /etc/fstab	 的后面添加一行
debugfs     /sys/kernel/debug   debugfs  defaults         0       0
调试信息
$ cat /sys/kernel/debug/gpio  //查看gpio 当前配置情况(驱动暴露的调试信息)
$ cat  /sys/kernel/debug/tegra_gpio  //查看GPIO 寄存器内容(和芯片手册进行对应)
$ cat  /sys/kernel/debug/tegra_pinctrl_reg   //查看 pinctrl 寄存器内容
1.最简读写文件(在/SYS下)
设备树
   sys_rw_led{

     //对应生成 /sys/devices/sys_rw_led/led_gpio
        compatible = "sys_rw_led";
        led_gpio  = <&gpio TEGRA_GPIO(J,7) GPIO_ACTIVE_HIGH>;
    };
验证测试
$ cd sys_rw_led
$ make
$ cp led.ko /nfs/rootfs

$ cd ~/kernel-4.9
$ make dtbs
$ cp arch/arm64/boot/dts/tegra210-p3448-0000-p3449-0000-b00.dtb   /tftpboot/

重启板子
$ insmod led.ko
$ cd /sys/devices/sys_rw_led
$ echo 0 > led_gpio  //关灯
$ echo 1 > led_gpio  //亮灯
编译文件
//Makefile
ifeq ($(KERNELRELEASE),)
KERNELDIR ?= ~/kernel-4.9
PWD := $(shell pwd)

all:
	$(MAKE) -C $(KERNELDIR) M=$(PWD) modules

clean:
	rm -rf *.o *~ core .depend .*.cmd *.ko *.mod.c .tmp_versions Module* modules* a.out *.bak

else
    obj-m := led.o
endif
驱动
-
of_get_named_gpio_flags//获取设备树节点的属性gpio_is_valid//判断是否合法devm_gpio_request//申请使用gpio,并调用设置pinctrl
-
device_create_file //根据设备树节点属性,创建相应的属性文件 /sys/devices/sys_rw_led/led_gpio
- static struct device_attribute dev_attr_file //属性文件的描述
//led.c
#include <linux/init.h>
#include <linux/module.h>
#include <linux/kernel.h>
#include <linux/init.h>
#include <linux/slab.h>
#include <linux/err.h>

#include <linux/of_gpio.h>
#include <linux/gpio.h>

#include <linux/platform_device.h>
#include <asm/io.h>


#include <dt-bindings/gpio/gpio.h>

#ifdef CONFIG_OF
#include <linux/of.h>
#include <linux/of_device.h>
#include <linux/of_gpio.h>
#endif

int  led_gpio;
static ssize_t led_store(struct device *dev, struct device_attribute *attr,
              const char *buf, size_t count) {


    //写文件,控制 gpio 输出 ( echo 1 >   led_gpio)
    if (buf[0] == '0') {


        gpio_direction_output(led_gpio, 0);
    }else if (buf[0] == '1') {


        gpio_direction_output(led_gpio, 1);
    }

    printk(KERN_ERR "led_gpio_store %c \n",buf[0]);
    return count;
}

ssize_t led_show(struct device *dev, struct device_attribute *attr,char *buf){


	printk("led_show go \n");
 	return 0;
}
//属性文件的描述
static struct device_attribute dev_attr_file = {


    .attr = {


       .name = "led_gpio",
       .mode = (S_IRUGO | S_IWUSR)
    },
    .store = led_store, //echo 1> 就调用到这里了
    .show = led_show,  //cat led_gpio时调用,如果无需读的功能,可设为NULL,  且删除前面的S_IRUGO
};


int leds_probe(struct platform_device *pdev)
{


   int  ret = 0;

   enum of_gpio_flags flags;

  //获取设备树节点的属性 "led_gpio"
   led_gpio = of_get_named_gpio_flags(pdev->dev.of_node, "led_gpio", 0, &flags);
   if (gpio_is_valid(led_gpio)) //判断是否合法
   {


      ret = devm_gpio_request(&pdev->dev,led_gpio, "led_gpio"); //申请使用gpio(如果被占用,将申请失败)
      if (ret) {


	  printk("Failed to get led_gpio gpio.\n");
	  return -1;
       }
   }

   //根据设备树节点属性,创建相应的属性文件 /sys/devices/sys_rw_led/led_gpio
   device_create_file(&pdev->dev, &dev_attr_file);  // /device_create_file 里面是调用了 sysfs_create_file
   printk("leds_probe 1 ok\n");
   return 0;
}

int leds_remove(struct platform_device *pdev)
{


    device_remove_file(&pdev->dev, &dev_attr_file);
    printk("leds_remove  ok\n");
    return 0;
}

static const struct of_device_id of_led_match[] = {


    {

    .compatible = "sys_rw_led", },
    {

   },
};

MODULE_DEVICE_TABLE(of, of_led_match);

struct platform_driver leds_drv = {


   .driver = {


      .owner = THIS_MODULE,
      .name = "sys_rw_led driver" ,
      .of_match_table = of_led_match,
   },
   .probe = leds_probe,
   .remove = leds_remove,
};
module_platform_driver(leds_drv);
MODULE_LICENSE("GPL");
2.读写多个属性文件(在SYS下)
设备树
sys_rw_gpio{


    compatible = "bbcen,sys_rw_gpio";
    led_gpio  = <&gpio TEGRA_GPIO(J,7) GPIO_ACTIVE_HIGH>;     //40pin 丝印 12
    smoke_sensor_gpio = <&gpi
最低0.47元/天 解锁文章


 1358
1358

 被折叠的 条评论
为什么被折叠?
被折叠的 条评论
为什么被折叠?
 到【灌水乐园】发言


