


 本文介绍了注解的基础知识,包括标准注解和元注解,讲解了@Target和@Retention的用法。接着阐述了注解处理器的使用,包括运行时注解处理器和编译时注解处理器的实现,以ButterKnife的BindView功能为例,详细展示了如何自定义注解和处理器。最后,提到了如何在Android项目中应用编译时注解处理器,以及生成的文件内容和处理过程。
1.基础知识
注解分为标准注解和元注解。注解是代码中的特殊标记,可以在编译,类加载,运行时被读取,并执行相应的处理。
标准注解有4种:
| @Override | 对覆盖超类中的方法进行标记 |
| @Deprecated | 对不鼓励使用或已经过时的方法进行标记 |
| @SuppressWarnings | 选择性地取消特定代码段中的警告 |
| @SafeVarargs | 声明使用了可变长度参数的方法 |
元注解用来注解其他注解,从而创建新的注解。元注解有以下几种:
| @Target | 注解所修饰的对象范围 |
| @Inherited | 表示注解可以被继承 |
| @Documented | 表示这个注解应该被JavaDoc工具记录 |
| @Retention | 声明注解的保留策略 |
| @Repeatable |
允许一个注解在同一声明类型上多次使用 |
其中 @Target 注解取值是一个ElementType类型的数组(即可取多个值),有以下几种取值,对应不同的对象范围。
| ElementType.TYPE | 能修饰类,接口或枚举 |
| ElementType.FIELD | 能修饰成员变量 |
| ElementType.METHOD | 能修饰方法 |
| ElementType.PARAMETER | 能修饰参数 |
| ElementType.CONSTRUCTOR | 能修饰构造方法 |
| ElementType.LOCAL_VARIABLE | 能修饰局部变量 |
| ElementType.ANNOTATION | 能修饰注解 |
| ElementType.PACKAGE | 能修饰包 |
| ElementType.TYPE_PARAMETER | 类型参数声明,应用于类的泛型声明之处 |
| ElementType.TYPE_USE | 使用类型 |
如果一个注解没有指定@Target注解,则此注解可以用于除了TYPE_PARAMETER和TYPE_USE以外的任何地方。
@Retention有3种保留策略,分别表示不同级别的保留策略。
| RetentionPolicy.SOURCE | 源码级注解,只会保留在源码中,编译后不会保留在 .class 文件中 |
| RetentionPolicy.CLASS | 编译时注解,保留在源码及 .class文件中,不保留在JVM中 |
| RetentionPolicy.RUNTIME | 运行时注解,JVM保留注解信息,可通过反射获取该注解信息 |
2.基本使用
// 定义新的注解类型使用 @interface 关键字
public @interface Ant{
    ...
}

// 定义成员变量
public @interface Ant{
   String name();
}

// 使用注解时就应该为成员变量指定值
public class Test{

    @Ant(name = "Mike")
    public void intro(){
        ...
    }
}

// 也可以为成员变量指定默认值 使用时可不用指定
public @interface Ant{
   String name() default “Duke”;
}

// 使用元注解进行修饰
@Retention(RetentionPolicy.RUNTIME)
public @interface Ant{
   String name();
}
3. 注解处理器
定义了注解后就需要处理注解的工具,对于不同的注解有不同的注解处理器。针对运行时注解会采用反射机制进行处理,针对编译时注解会采用 AbstractProcessor 来处理。
先介绍运行时注解处理器,首先定义运行时注解:
@Documented
@Retention(RetentionPolicy.RUNTIME)
@Target(ElementType.METHOD)
public @interface MyAnnotation {
    String value() default "";
}
接下来使用该注解:
public class Test {

    @MyAnnotation(value = "192.168.0.1")
    public String getIpMsg(){
        return "";
    }

}
接下来写一个简单的注解处理器:
public class AnnotationProcessor {
    // 通过反射获取修饰方法并打印
    public static void main(String[] args) {
        Method[] methods = Test.class.getDeclaredMethods();
        for(Method method:methods){
            if (method.isAnnotationPresent(MyAnnotation.class)){
                MyAnnotation annotation = method.getAnnotation(MyAnnotation.class);
                System.out.println(annotation.value());
            }
        }
    }
}
4.编译时注解器
接下来是编译时注解器在android中的应用,实现ButterKnife的BindView功能,处理编译时注解步骤有点多,首先是定义注解。
首先在项目中新建一个java library来专门存放注解,名为apt-annotations,然后定义注解:
//编译时注解 类似于ButterKnife 的 @BindView
@Retention(RetentionPolicy.CLASS)
@Target(ElementType.FIELD)
public @interface BindView {
    int value() default 1;
}
接下来编写注解处理器,项目中再新建一个java library来存放注解处理器,名为apt-processor,然后配置其build.gradle:
apply plugin: 'java-library'

dependencies {
    implementation fileTree(dir: 'libs', include: ['*.jar'])
    implementation project(':annotations')
}

sourceCompatibility = "7"
targetCompatibility = "7"
接下来编写注解处理器ClassProcessor,它继承AbstractProcessor:
//注解处理器
public class BindViewProcessor extends AbstractProcessor {

    private Messager messager;
    private Elements elementUtils;
    private Map<String,ClassCreatorProxy> proxyMap = new HashMap<>();

    public BindViewProcessor(){}

    //初始化。可以得到ProcessingEnviroment,
    // ProcessingEnviroment提供很多有用的工具类Elements, Types 和 Filer
    @Override
    public synchronized void init(ProcessingEnvironment processingEnv) {
        super.init(processingEnv);
        messager = processingEnv.getMessager();
        elementUtils = processingEnv.getElementUtils();
    }

    //指定这个注解处理器是注册给哪个注解的,这里说明是注解BindView
    @Override
    public Set<String> getSupportedAnnotationTypes() {
        HashSet<String> supportTypes = new LinkedHashSet<>();
        supportTypes.add(BindView.class.getCanonicalName());
        return supportTypes;
    }

    //指定使用的Java版本,通常这里返回SourceVersion.latestSupported()
    @Override
    public SourceVersion getSupportedSourceVersion() {
        return SourceVersion.latestSupported();
    }

    //扫描、评估和处理注解的代码,生成Java文件
    @Override
    public boolean process(Set<? extends TypeElement> annotations, RoundEnvironment roundEnv) {
        //通过roundEnvironment.getElementsAnnotatedWith(BindView.class)得到所有注解elements,
        // 然后将elements的信息保存到mProxyMap中,最后通过mProxyMap创建对应的Java文件,
        // 其中mProxyMap是ClassCreatorProxy的Map集合。
        messager.printMessage(Diagnostic.Kind.NOTE, "processing...");
        proxyMap.clear();
        //得到所有的注解
        Set<? extends Element> elements = roundEnv.getElementsAnnotatedWith(BindView.class);
        for (Element element : elements) {
            VariableElement variableElement = (VariableElement) element;
            TypeElement classElement = (TypeElement) variableElement.getEnclosingElement();
            String fullClassName = classElement.getQualifiedName().toString();
            ClassCreatorProxy proxy = proxyMap.get(fullClassName);
            if (proxy == null) {
                proxy = new ClassCreatorProxy(elementUtils, classElement);
                proxyMap.put(fullClassName, proxy);
            }
            BindView bindAnnotation = variableElement.getAnnotation(BindView.class);
            int id = bindAnnotation.value();
            proxy.putElement(id, variableElement);
        }
        //通过遍历mProxyMap,创建java文件
        for (String key : proxyMap.keySet()) {
            ClassCreatorProxy proxyInfo = proxyMap.get(key);
            try {
                messager.printMessage(Diagnostic.Kind.NOTE, " --> create " + proxyInfo.getProxyClassFullName());
                JavaFileObject jfo = processingEnv.getFiler().createSourceFile(proxyInfo.getProxyClassFullName(), proxyInfo.getTypeElement());
                Writer writer = jfo.openWriter();
                writer.write(proxyInfo.generateJavaCode());
                writer.flush();
                writer.close();
            } catch (IOException e) {
                messager.printMessage(Diagnostic.Kind.NOTE, " --> create " + proxyInfo.getProxyClassFullName() + "error");
            }
        }

        messager.printMessage(Diagnostic.Kind.NOTE, "process finish ...");
        return true;
    }
}
init方法:被注解处理工具调用,并输入ProcessingEnviroment参数。ProcessingEnviroment提供很多有用的工具类,比如Type,Elements,Filer等。
process方法:相当于每个处理器的主函数,在这里写你的扫描,评估和处理注解的代码,以及生成java文件,输入参数RoundEnviroment,可以让你查询出包含特定注解的被注解元素。
getSupportedAnnotationTypes方法:这是必须指定的方法,指定这个注解处理器是注册给哪个注解的。返回值为一个字符串的集合,包含本处理器的注解类型的合法全称。
getSupportedSourceVersion方法:用来指定你使用的java版本,通常返回SourceVersion.latestSupported()
其中 ClassCreatorProxy 用来生成java文件,可以用字符串拼接的方法,也可以用javapoet生成,使用javapoet需先导入包:
// 生成java文件 其中包名为app模块中的包名
public class ClassCreatorProxy {

    private String mBindingClassName;
    private String mPackageName;
    private TypeElement mTypeElement;
    private Map<Integer, VariableElement> mVariableElementMap = new HashMap<>();

    public ClassCreatorProxy(Elements elementUtils, TypeElement classElement) {
        this.mTypeElement = classElement;
        PackageElement packageElement = elementUtils.getPackageOf(mTypeElement);
        String packageName = packageElement.getQualifiedName().toString();
        String className = mTypeElement.getSimpleName().toString();
        this.mPackageName = packageName;
        this.mBindingClassName = className + "_ViewBinding";
    }

    public void putElement(int id, VariableElement element) {
        mVariableElementMap.put(id, element);
    }

    /**
     * 创建Java代码
     *
     * @return String
     */
    public String generateJavaCode() {
        StringBuilder builder = new StringBuilder();
        builder.append("package ").append(mPackageName).append(";\n\n");
        builder.append("import com.yang.apt_library.*;\n");
        builder.append('\n');
        builder.append("public class ").append(mBindingClassName);
        builder.append(" {\n");

        generateMethods(builder);
        builder.append('\n');
        builder.append("}\n");
        return builder.toString();
    }

    /**
     * 加入Method
     *
     * @param builder
     */
    private void generateMethods(StringBuilder builder) {
        builder.append("public void bind(" + mTypeElement.getQualifiedName() + " host ) {\n");
        for (int id : mVariableElementMap.keySet()) {
            VariableElement element = mVariableElementMap.get(id);
            String name = element.getSimpleName().toString();
            String type = element.asType().toString();
            builder.append("host." + name).append(" = ");
            builder.append("(" + type + ")(((android.app.Activity)host).findViewById( " + id + "));\n");
        }
        builder.append("  }\n");
    }

    public String getProxyClassFullName() {
        return mPackageName + "." + mBindingClassName;
    }

    public TypeElement getTypeElement() {
        return mTypeElement;
    }

    //======================

    /**
     * 创建Java代码
     * javapoet
     *
     * @return
     */
    public TypeSpec generateJavaCode2() {
        TypeSpec bindingClass = TypeSpec.classBuilder(mBindingClassName)
                .addModifiers(Modifier.PUBLIC)
                .addMethod(generateMethods2())
                .build();
        return bindingClass;

    }

    /**
     * 加入Method
     * javapoet
     */
    private MethodSpec generateMethods2() {
        ClassName host = ClassName.bestGuess(mTypeElement.getQualifiedName().toString());
        MethodSpec.Builder methodBuilder = MethodSpec.methodBuilder("bind")
                .addModifiers(Modifier.PUBLIC)
                .returns(void.class)
                .addParameter(host, "host");

        for (int id : mVariableElementMap.keySet()) {
            VariableElement element = mVariableElementMap.get(id);
            String name = element.getSimpleName().toString();
            String type = element.asType().toString();
            methodBuilder.addCode("host." + name + " = " + "(" + type + ")(((android.app.Activity)host).findViewById( " + id + "));");
        }
        return methodBuilder.build();
    }


    public String getPackageName() {
        return mPackageName;
    }

}
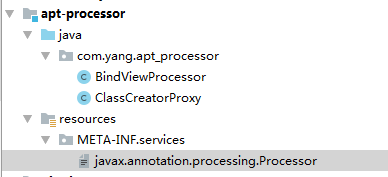
为了能够使用注解,需要用一个服务文件来注册它。首先在apt-processor库的main目录下创建resources资源文件夹,接着在这个文件夹中创建META-INF/services 目录文件夹。最后在META-INF/services 目录文件夹中创建javax.annotation.processing.Processor 文件,文件内容为 com.yang.apt_processor.BindViewProcessor,即包名+注解处理器名:

也可以利用开源的AutoService来创建注册文件,但我没有成功,可能是gradle版本原因。使用需导入包: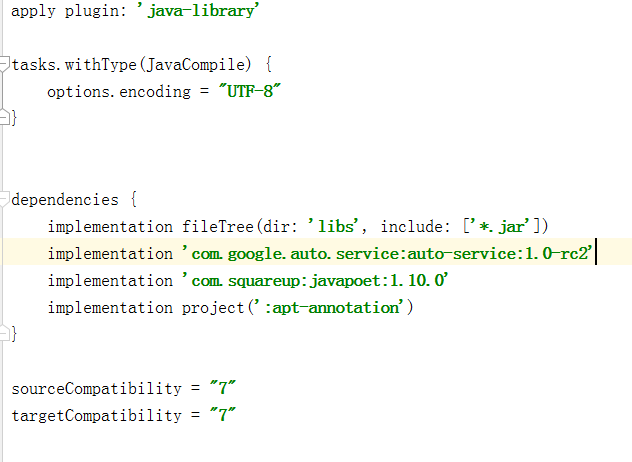
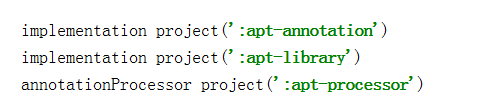
接下来需要在我们的主模块(app)中引用注解,首先在其build.gradle中引用apt-annotation和apt-processor:
最后一行是使用android-apt插件,因为注解处理器只在编译期用到,而app模块引入对应的库会增加很多不必要文件。所以需要使用android-apt来解决这个问题,它能够使app模块仅在编译期的依赖注解处理库进行工作,不会将其打包到apk中,而且会为注解处理器生成的文件设置好路径,以便Android studio 能够找到它。
在activity中使用我们自定义注解,它的功能跟bindView相似,我们在注解处理器中会生成文件对控件进行初始化。
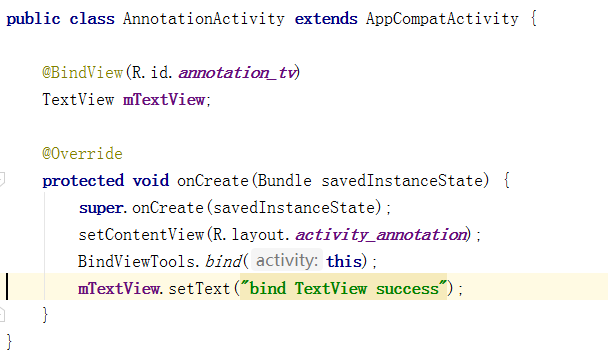
其中BindViewTools通过反射获取生成文件并执行其中方法完成控件初始化:
public class BindViewTools {

    public static void bind(Activity activity) {

        Class clazz = activity.getClass();
        try {
            Class bindViewClass = Class.forName(clazz.getName() + "_ViewBinding");
            Method method = bindViewClass.getMethod("bind", activity.getClass());
            method.invoke(bindViewClass.newInstance(), activity);
        } catch (ClassNotFoundException e) {
            e.printStackTrace();
        } catch (IllegalAccessException e) {
            e.printStackTrace();
        } catch (InstantiationException e) {
            e.printStackTrace();
        } catch (NoSuchMethodException e) {
            e.printStackTrace();
        } catch (InvocationTargetException e) {
            e.printStackTrace();
        }
    }

}
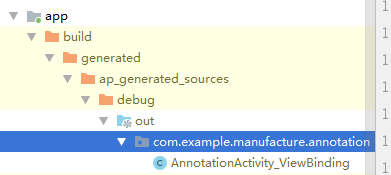
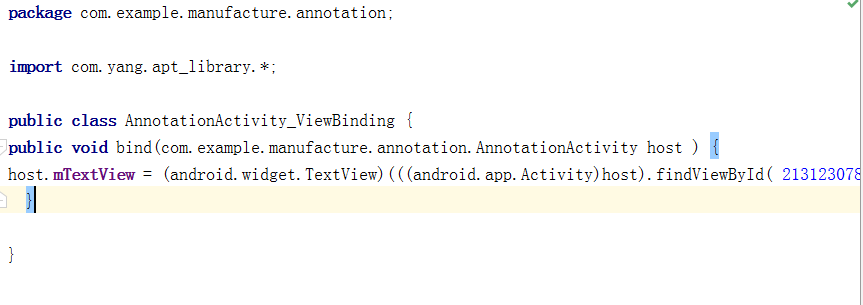
生成的文件所在位置及内容:
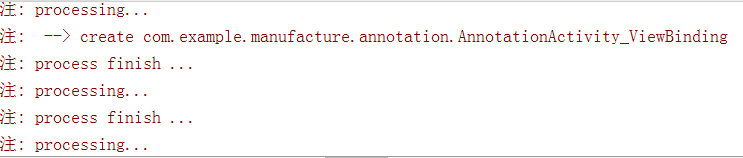
自定义注解处理器process方法中的打印信息:


 566
566

 被折叠的 条评论
为什么被折叠?
被折叠的 条评论
为什么被折叠?
 到【灌水乐园】发言


