【Appium踩坑】使用Appium Setting开启wifi or 关闭wifi,弹系统wifi权限弹窗问题

本文介绍了使用Appium设置手机WiFi状态时遇到的系统权限弹窗问题及其解决方法。提供了四种不同的解决思路,并详细分析了每种方法的可行性及注意事项。

1、背景说明

从解决这个问题引申而来:
【Appium踩坑】Mitmproxy脚本+Appium启动后,手机无网络问题

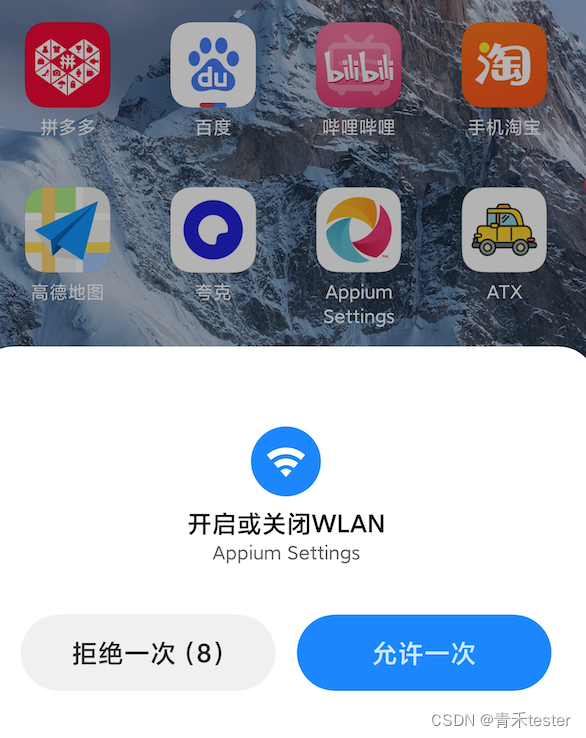
使用Appium Setting开启wifi or 关闭wifi后,会弹系统wifi权限弹窗。
请添加图片描述

2、原理分析

使用Appium Setting开启wifi or 关闭wifi,其实就是执行这个命令:

# 开启wifi
adb shell am broadcast -a io.appium.settings.wifi -n io.appium.settings/.receivers.WiFiConnectionSettingReceiver --es setstatus enable
# 关闭wifi
adb shell am broadcast -a io.appium.settings.wifi -n io.appium.settings/.receivers.WiFiConnectionSettingReceiver --es setstatus disable

但是通过broadcast 申请权限后,就会弹出系统弹窗,我们需要对弹窗内容做处理。

3、解决

(1)思路1 - 手动允许Appium setting的wifi权限,可行✅

Appium setting 在一个设备上一般只安装一次,下次不需要重新安装。
也就是只需要手动操作一次,也算一劳永逸。

(2)思路2 - 通过 svc 开启/关闭wifi, 可行 ✅
adb shell svc wifi enable
adb shell svc wifi disable

其他信息:

  • 本命令在小米11上执行生效,但不知道是否会有厂商限制 ,有待确认。
  • 本命令必须在driver启动之前执行,不然可能会导致目标app anr -> 出现概率99%,不知道是有个啥大病
(3)思路3 - 通过Appium UI操作开启、关闭wifi - 待验证❓
1、先打开wifi页面:
adb shell am start -a android.intent.action.MAIN -n com.android.settings/.wifi.WifiSettings
2、判断当前网络情况,如 ping baidu
3、如ping通,UI操作-关闭wifi,再打开wifi
4、如ping不通,UI操作-打开wifi
(4)思路4 - Appium申请修改wifi状态后,uiautomator2关闭弹窗 - 不可行❌

不可行原因:Appium 和 U2,一起用会抢占 Accessibility Service

def appiumAlert_handler(switch):
    """
    开启wifi,关闭wifi;监听弹窗处理
    :return:
    """
    devices = get_devices()
    _driver = uiautomator2.connect_usb(serial=devices)

    # 关闭wifi
    t1 = threading.Thread(target=switch_connection, args=(switch,))
    t1.start()
    # 开始检查弹窗

    obj = _driver.watch_context()
    alert = "允许一次"
    obj.when(alert).click()
    obj.stop() 
    _driver.uiautomator.stop() 
    time.sleep(2)
### 处理 Appium 自动化测试中的动态权限弹窗 在进行 Appium 自动化测试时,应用可能会动态请求系统权限,例如访问照片、媒体库、位置等。这些权限请求通常以系统弹窗的形式出现,若不加以处理,会阻断自动化流程,导致后续操作无法继续执行。 一种常见方式是通过设置 `DesiredCapabilities` 来预授权部分权限,从而避免弹窗的出现。例如,在 Android 平台上,可以通过以下配置指定授予特定权限: ```python desired_caps = { 'platformName': 'Android', 'deviceName': 'emulator-5554', 'appPackage': 'com.example.app', 'appActivity': '.MainActivity', 'autoGrantPermissions': True } ``` 该配置项 `autoGrantPermissions` 会在应用安装后自动授予权限,适用于大多数标准权限请求[^1]。 当某些权限必须在运行时由用户手动确认时,可以采用控件识别的方式定位并点击“允许”或“拒绝”按钮。例如,使用 `find_element_by_id` 或 `find_element_by_xpath` 查找弹窗中的按钮并执行点击操作: ```python try: allow_button = driver.find_element_by_id("com.android.packageinstaller:id/permission_allow_button") allow_button.click() except: pass ``` 对于 iOS 平台,由于系统限制,Appium 无法直接与原生弹窗交互,因此可结合图像识别技术实现点击模拟。通过截图比对模板匹配方式,识别弹窗出现的位置,并计算中心坐标执行点击: ```python import cv2 import numpy as np import pyautogui # 截图并保存 screenshot = pyautogui.screenshot() screenshot.save("screen.png") # 加载模板图片 template = cv2.imread("permission_popup_template.png", 0) w, h = template.shape[::-1] # 图像匹配 img_gray = cv2.cvtColor(cv2.imread("screen.png"), cv2.COLOR_BGR2GRAY) res = cv2.matchTemplate(img_gray, template, cv2.TM_CCOEFF_NORMED) threshold = 0.8 loc = np.where(res >= threshold) for pt in zip(*loc[::-1]): center_x = pt[0] + w // 2 center_y = pt[1] + h // 2 pyautogui.click(center_x, center_y) ``` 此外,也可以借助 WebDriverAgent(WDA)扩展能力,自定义脚本处理 iOS 上的系统弹窗[^2]。 在某些情况下,Appium 可能无法直接识别原生控件,此时可通过 UIAutomator(Android)或 XCTest(iOS)工具获取当前界面元素结构,并编写条件判断逻辑进行点击控制。 ---
评论
成就一亿技术人!
拼手气红包6.0元
还能输入1000个字符
 
红包 添加红包
表情包 插入表情
 条评论被折叠 查看
添加红包

请填写红包祝福语或标题

红包个数最小为10个

红包金额最低5元

当前余额3.43前往充值 >
需支付:10.00
成就一亿技术人!
领取后你会自动成为博主和红包主的粉丝 规则
hope_wisdom
发出的红包
实付
使用余额支付
点击重新获取
扫码支付
钱包余额 0

抵扣说明:

1.余额是钱包充值的虚拟货币,按照1:1的比例进行支付金额的抵扣。
2.余额无法直接购买下载,可以购买VIP、付费专栏及课程。

余额充值