


 本文详细介绍了BIO和NIO的对比,包括BIO服务器和客户端实例,NIO的Buffer缓冲区操作,以及NIO的核心原理如Buffer属性、Channel与Buffer结合、MappedByteBuffer、Selector选择器等。通过实例展示了如何使用NIO进行文件操作和网络通信,并深入解析了SelectionKey在非阻塞网络编程中的角色。
文章目录
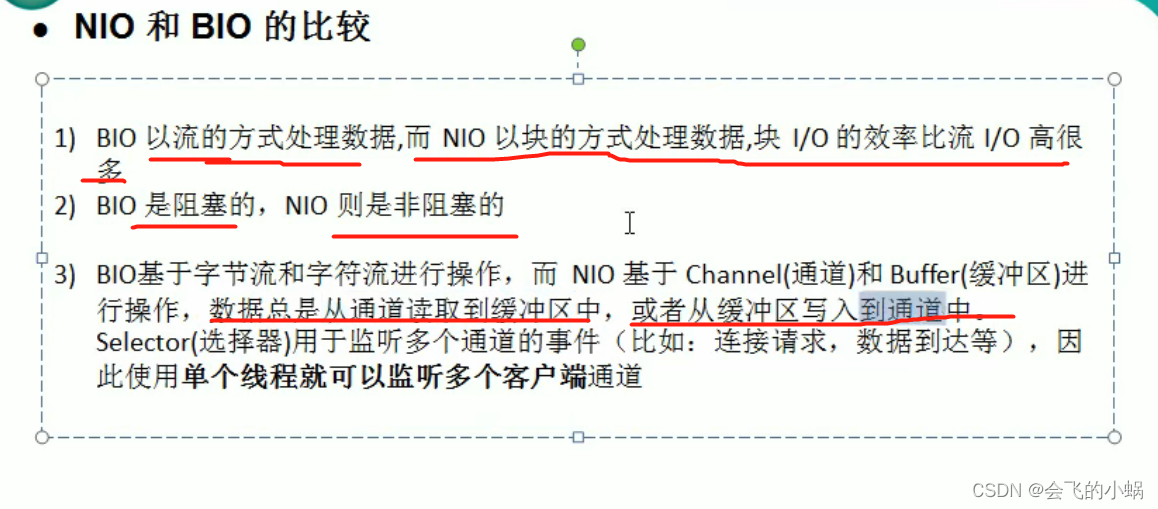
0、BIO与NIO的比较
1、BIO实例
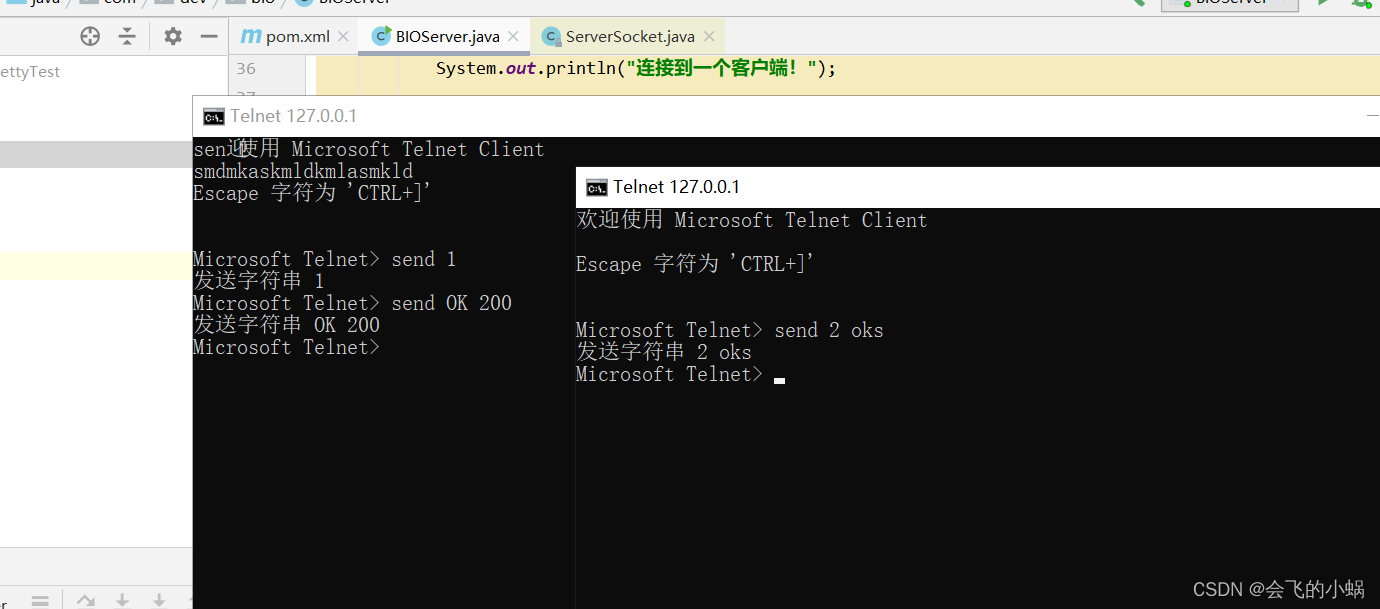
启动主函数后使用"cmd"窗口:
实验代码:
package com.dev.bio;

import java.io.IOException;
import java.io.InputStream;
import java.net.ServerSocket;
import java.net.Socket;
import java.util.concurrent.Executor;
import java.util.concurrent.ExecutorService;
import java.util.concurrent.Executors;

/**
 * @author : lei.yu
 * @date :2022/3/24 下午 4:54
 * @description :
 * @modyified By:
 */
public class BIOServer {

    private final static int port=6666;//监听端口

    public static void main(String[] args) throws IOException {
        //线程池机制
        //思路
        //1. 创建一个线程池
        //2. 如果有客户端连接,就创建一个线程,与之通讯(单独写一个方法)
        ExecutorService executorService = Executors.newCachedThreadPool();//线程池
        //创建ServerSocket
        ServerSocket serverSocket = new ServerSocket(port);//socket
        //监听,等待客户端连接
        System.out.println("服务启动!");
        while (true){
            System.out.println("当前线程:"+Thread.currentThread().getName());
            System.out.println("等待连接");
            //会阻塞在accept()
            final Socket socket = serverSocket.accept();
            System.out.println("连接到一个客户端!");

            executorService.execute(new Runnable() {
                public void run() {
                    handler(socket);
                }
            }
            );
        }
    }

    //编写一个handler方法,和客户端通讯
    public static void handler(Socket socket) {
        try {
            System.out.println("线程信息id = " + Thread.currentThread().getId() + "名字 = " + Thread.currentThread().getName());
            byte[] bytes = new byte[1024];
            //通过socket获取输入流
            InputStream inputStream = socket.getInputStream();
            //循环的读取客户端发送的数据
            while (true) {
                System.out.println("线程信息id = " + Thread.currentThread().getId() + "名字 = " + Thread.currentThread().getName());
                System.out.println("read....");
                int read = inputStream.read(bytes);
                if (read != -1) {
                    System.out.println(new String(bytes, 0, read));//输出客户端发送的数据
                } else {
                    break;
                }
            }
        } catch (Exception e) {
            e.printStackTrace();
        } finally {
            System.out.println("关闭和client的连接");
            try {
                socket.close();
            } catch (Exception e) {
                e.printStackTrace();
            }
        }
    }
}
#连接
telnet 127.0.0.1 6666

#输入
"Ctrl+]"

#输入内容(send + 你想打印的内容)
send OK 200
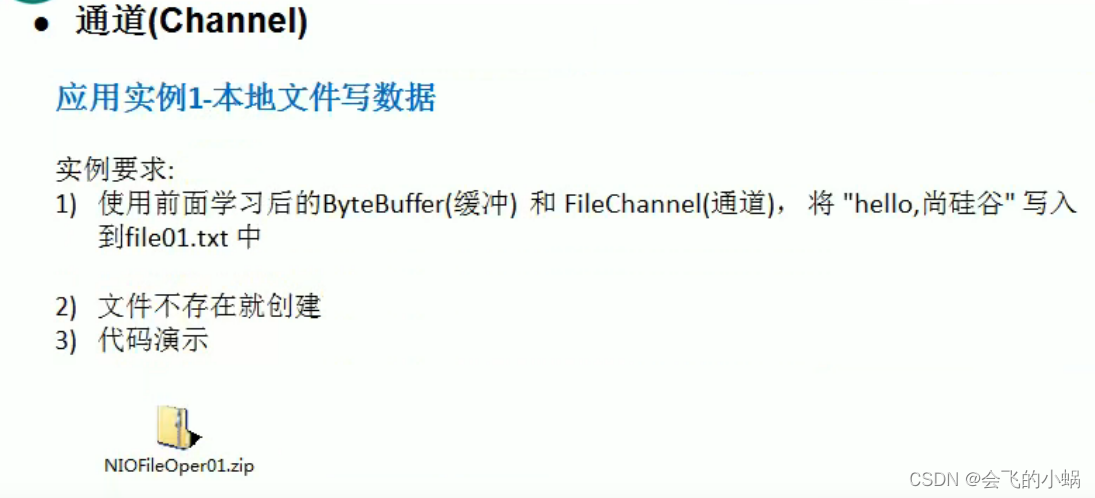
2、NIO实例
buffer缓冲区实例
package com.dev.nio;

import java.nio.IntBuffer;

/**
 * @author : lei.yu
 * @date :2022/3/27 上午 8:34
 * @description : NIO缓冲区 Buffer实例
 * @modyified By:
 */
public class BufferServer {

    public static void main(String[] args) {
        //创建一个buffer ,大小为5
        IntBuffer intBuffer = IntBuffer.allocate(5);
        for (int i = 0; i < intBuffer.capacity(); i++) {
            intBuffer.put(i*3);
        }

        //转换 存入为输出, 读写切换,这个是必须做的事
        intBuffer.flip();

        while (intBuffer.hasRemaining()){
//            intBuffer.get(); 自己会维护一个索引,获取之后指针自动向下一个移动
            System.out.println(intBuffer.get());
        }

    }

}
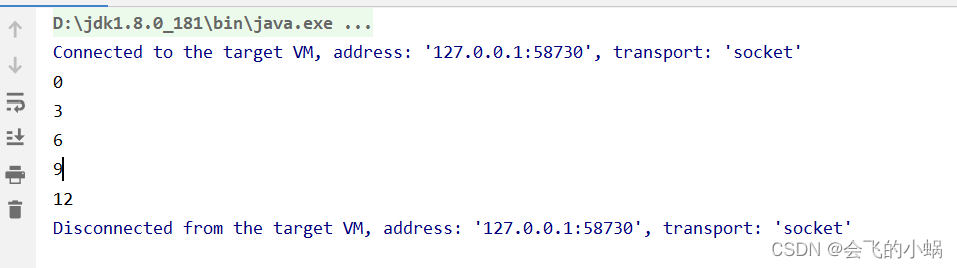
打印结果:
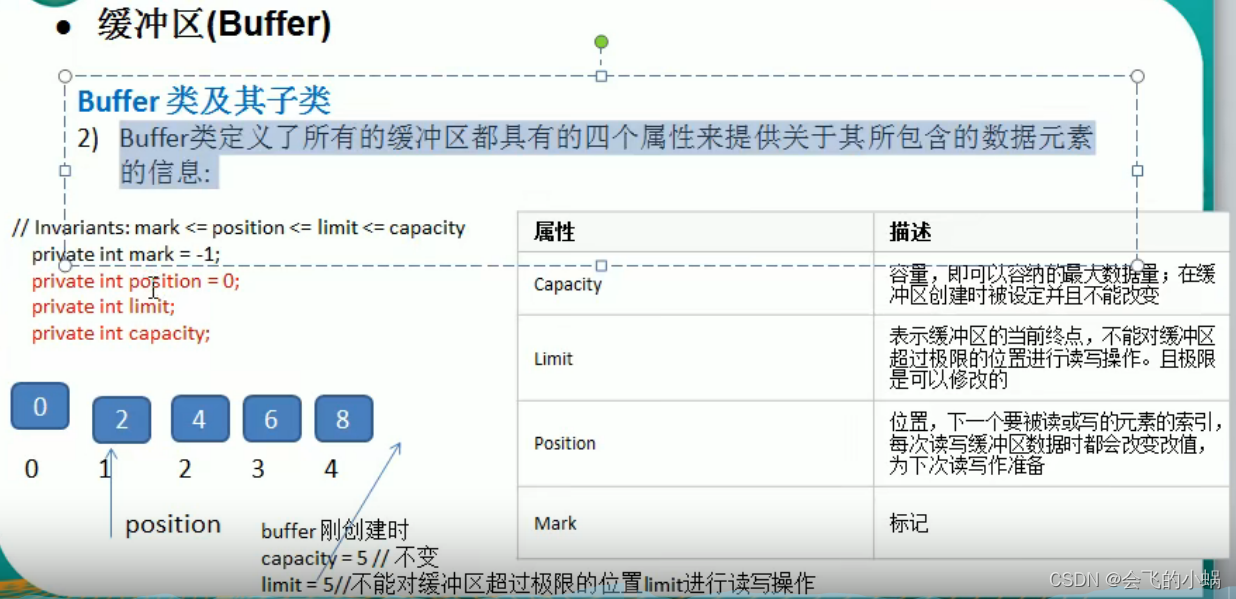
NIO三大核心原理总结
Buffer四大属性
Channel 结合 Buffer 的使用案例
写入流
输出流里面包含channel :
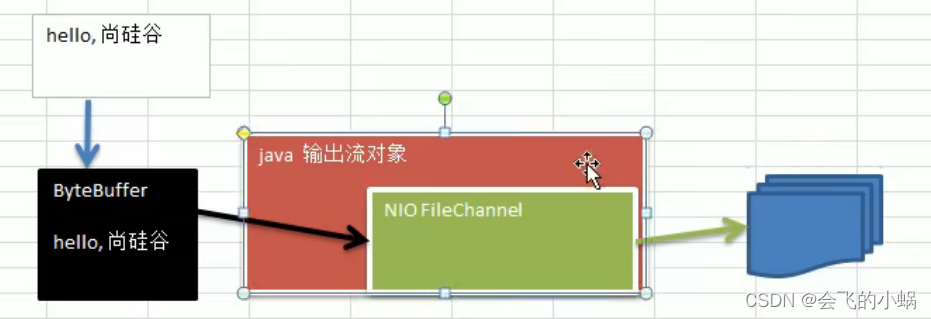
代码示例:
package com.dev.nio;

import java.io.FileNotFoundException;
import java.io.FileOutputStream;
import java.io.IOException;
import java.nio.ByteBuffer;
import java.nio.channels.FileChannel;

/**
 * @author :
 * @date :2022/3/27 下午 1:30
 * @description :
 * @modyified By:
 */
public class ChannelBufferServer {
    public static void main(String[] args) throws IOException {

        String str="OK,海绵宝宝";
        //创建一个输出流channel
        FileOutputStream fileOutputStream = new FileOutputStream("d:\\file001.txt");
        //创建一个通道
        //通过 FileOutputStream 获取一个 filechannel,其实这个channel 的真是类型是 FilechannelImpl
        FileChannel channel = fileOutputStream.getChannel();
        //创建一个缓冲区
        ByteBuffer byteBuffer = ByteBuffer.allocate(1024);
        //将数据放入缓冲区
        ByteBuffer put = byteBuffer.put(str.getBytes());

        //切换输入流为输出流
        byteBuffer.flip();

        //将缓冲区数据写入到流中
        channel.write(byteBuffer);

        //关闭这个流
        fileOutputStream.close();

    }
}
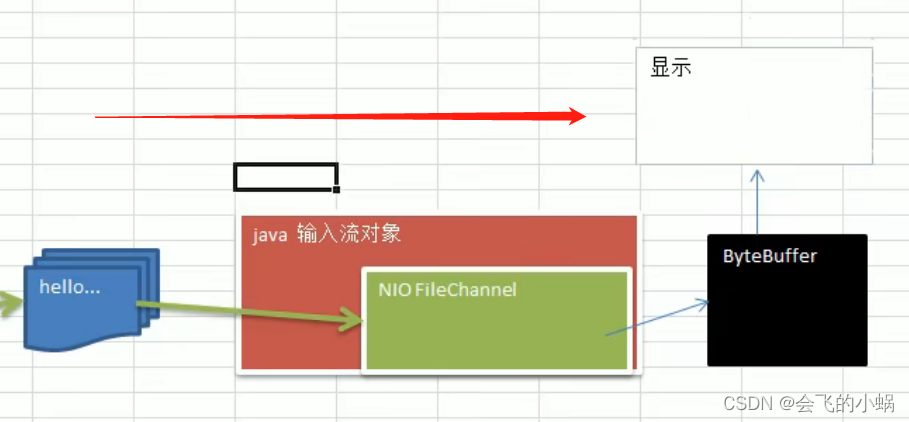
读取流
package com.dev.nio;

import java.io.File;
import java.io.FileInputStream;
import java.nio.ByteBuffer;
import java.nio.channels.FileChannel;

/**
 * @author :
 * @date :2022/3/27 下午 2:26
 * @description :
 * @modyified By:
 */
public class channelBufferInputServer {
    public static void main(String[] args) throws Exception{
        File file = new File("d:\\file001.txt");
        FileInputStream fileInputStream = new FileInputStream(file);
        FileChannel channel = fileInputStream.getChannel();
        //创建缓冲区
        ByteBuffer byteBuffer = ByteBuffer.allocate((int) file.length());
        //读取缓冲区
        channel.read(byteBuffer);
        //将byteBuffer字节流转成字符串
        System.out.println(new String(byteBuffer.array()));
        fileInputStream.close();
    }
}
使用一个buffer完成文件拷贝
完成目标:
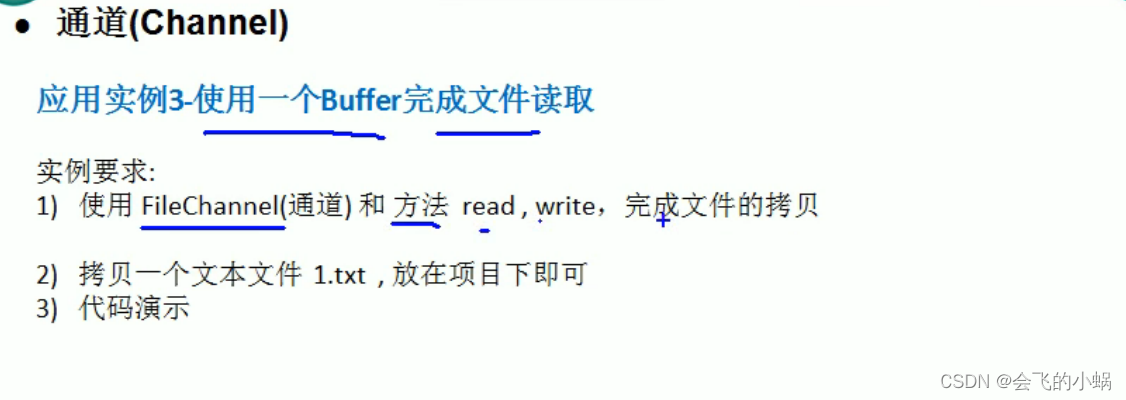
实现原理图:
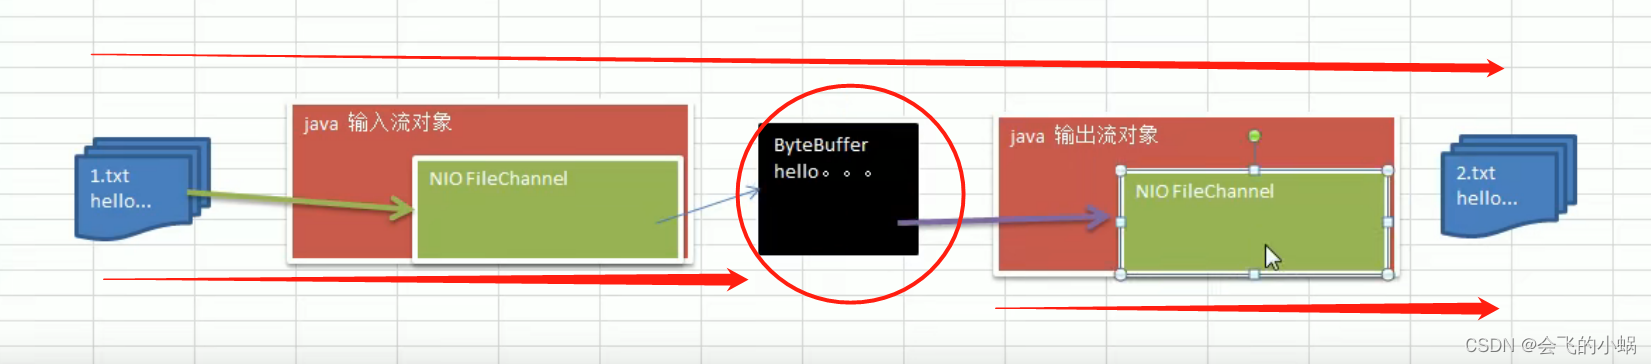
实验源码:
package com.dev.nio;

import java.io.FileInputStream;
import java.io.FileOutputStream;
import java.nio.ByteBuffer;
import java.nio.channels.FileChannel;

/**
 * @author :
 * @date :2022/3/27 下午 6:08
 * @description :
 * @modyified By:
 */
public class BufferCopyServer {
    public static void main(String[] args) throws Exception{
        //创建一个
        FileInputStream fileInputStream = new FileInputStream("d:\\file001.txt");
        FileChannel channel01 = fileInputStream.getChannel();

        FileOutputStream fileOutputStream = new FileOutputStream("d:\\file002.txt");
        FileChannel channel02 = fileOutputStream.getChannel();
        //定义一个缓冲区
        ByteBuffer byteBuffer = ByteBuffer.allocate(1024);
        //遍历读取
        while (true){
            //1.必须清空,不然指针不能复位
            byteBuffer.clear();
            int read = channel01.read(byteBuffer);
            if(read==-1){
                break;
            }
            //2.切换通道[必须]
            byteBuffer.flip();
            channel02.write(byteBuffer);
        }
    }
}
使用 transferFrom 完成拷贝

实验源码:
package com.dev.nio;

import java.io.FileInputStream;
import java.io.FileNotFoundException;
import java.io.FileOutputStream;
import java.io.IOException;
import java.nio.channels.FileChannel;

/**
 * @author :lei.yu
 * @date :2022/3/28 上午 8:01
 * @description :
 * @modyified By:
 */
public class NIOFileChannel {
    public static void main(String[] args) throws IOException {
        FileInputStream fileInputStream = new FileInputStream("d:\\file001.txt");
        FileChannel channel01 = fileInputStream.getChannel();

        FileOutputStream fileOutputStream = new FileOutputStream("d:\\file002.txt");
        FileChannel channel02 = fileOutputStream.getChannel();

        //拷贝
        channel02.transferFrom(channel01,0,channel01.size());

        //关闭通道
        fileInputStream.close();
        channel01.close();
        fileOutputStream.close();
        channel02.close();
    }


}
MappedByteBuffer是一种效率低于零拷贝,但高于传统IO的IO操作。
特点:
可以让文件直接在内存(堆外)进行修改,操作系统不需要拷贝一次
实验源码:
package com.dev.nio;

import java.io.IOException;
import java.io.RandomAccessFile;
import java.nio.MappedByteBuffer;
import java.nio.channels.FileChannel;

/**
 * @author :
 * @date :2022/3/28 上午 8:52
 * @description :
 * @modyified By:
 */
public class MappedBetyBufferServer {
    public static void main(String[] args) throws IOException {
        RandomAccessFile rw = new RandomAccessFile("d:\\1.txt", "rw");
        //获取通道
        FileChannel channel = rw.getChannel();
        /**
         * 参数1:FileChannel.MapMode.READ_WRITE 使用的读写模式
         * 参数2:0 : 可以直接修改的起始位置
         * 参数3:5:是映射到内存的大小(不是索引位置),即将1.txt 的多少个字节映射到内存
         * 可以直接修改的范围就是 0-5,不包含 5
         * 实际类型 DirectByteBuffer
         */
        MappedByteBuffer mappedByteBuffer = channel.map(FileChannel.MapMode.READ_WRITE, 0, 5);

        mappedByteBuffer.put(0,(byte)'H');
        mappedByteBuffer.put(3,(byte)'9');

        /**
         * Exception in thread "main" java.lang.IndexOutOfBoundsException
         * 	at java.nio.Buffer.checkIndex(Buffer.java:540)
         * 	at java.nio.DirectByteBuffer.put(DirectByteBuffer.java:306)
         * 	at com.dev.nio.MappedBetyBufferServer.main(MappedBetyBufferServer.java:30)
         */
        mappedByteBuffer.put(5,(byte)'Y');//越界报错

        rw.close();
        System.out.println("修改成功~~~");
    }

}
Selector 选择器
选择器基本简介:
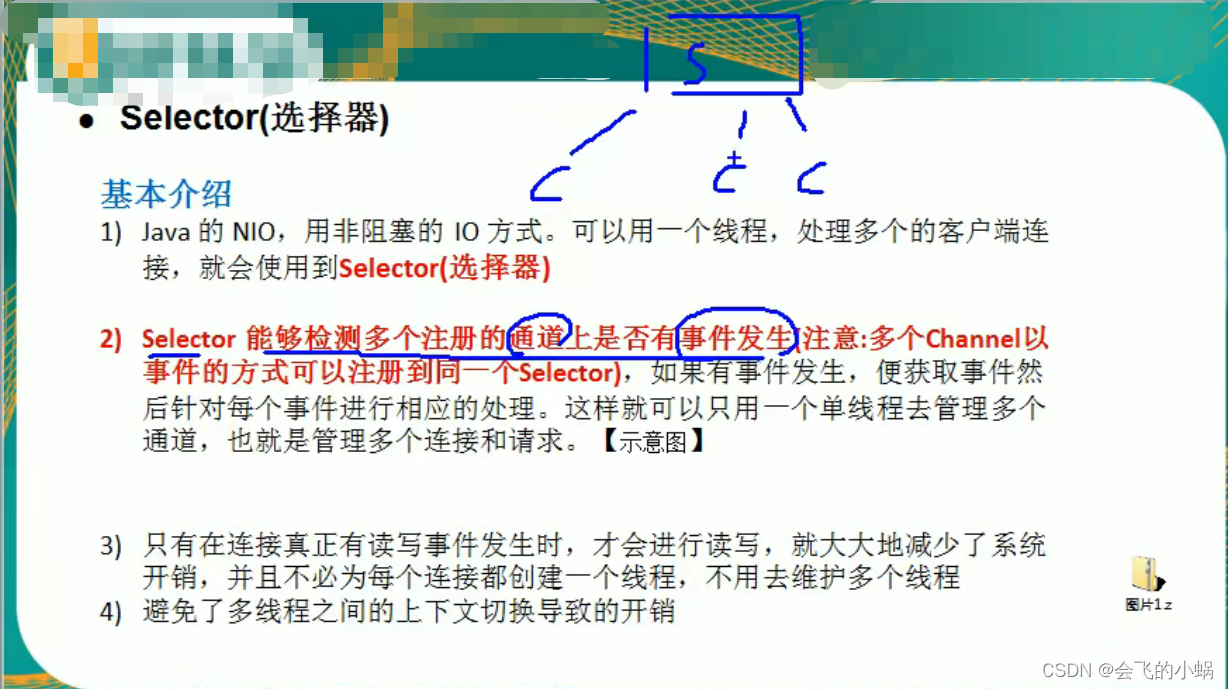
选择器特点:
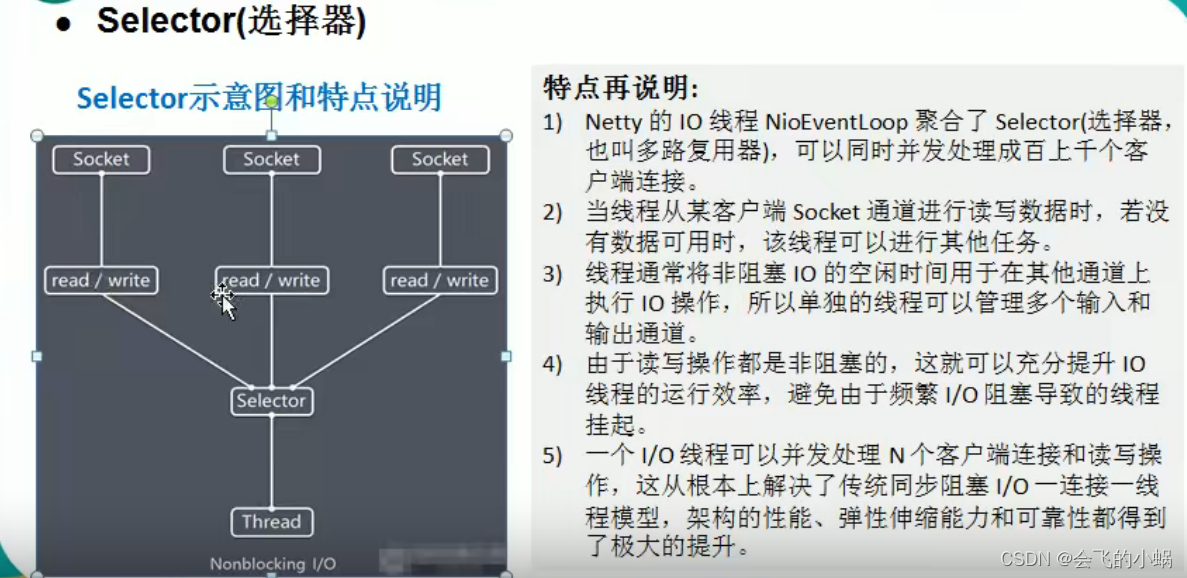
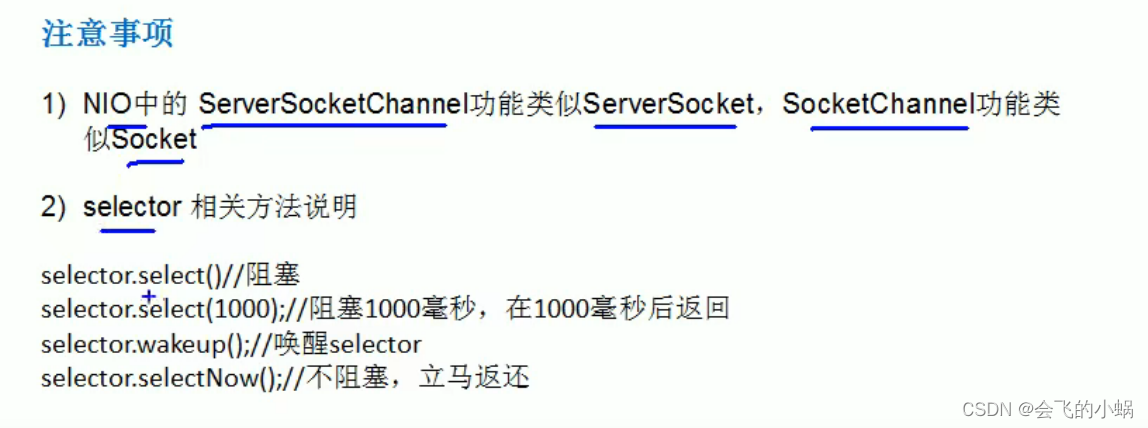
选择器的类方法:
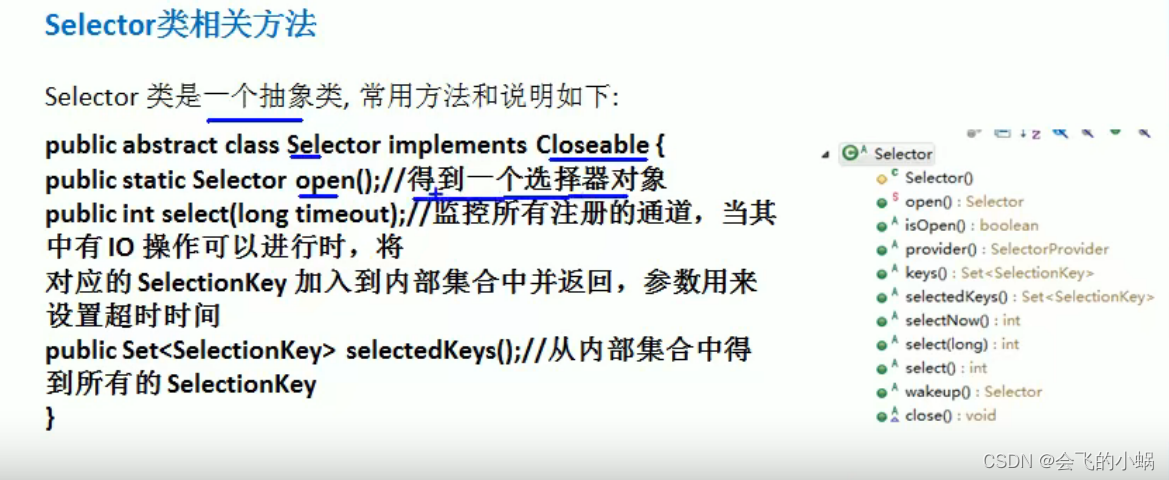
选择器的注意事项:
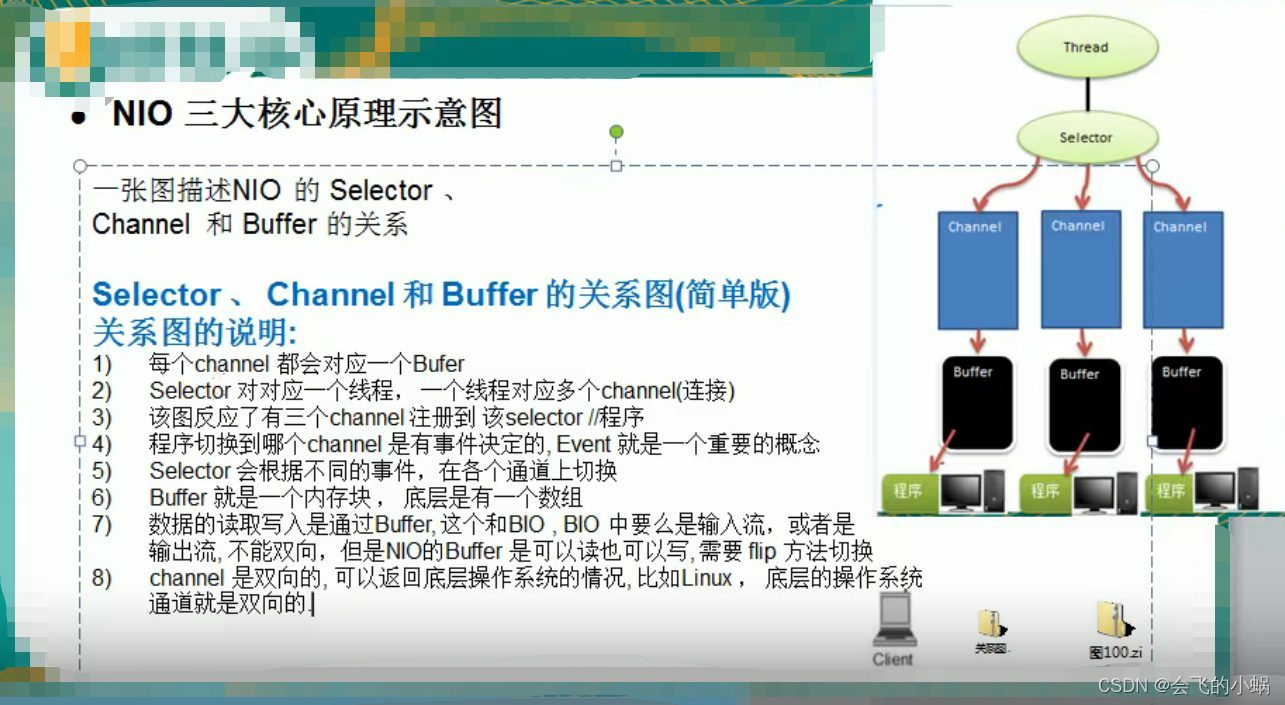
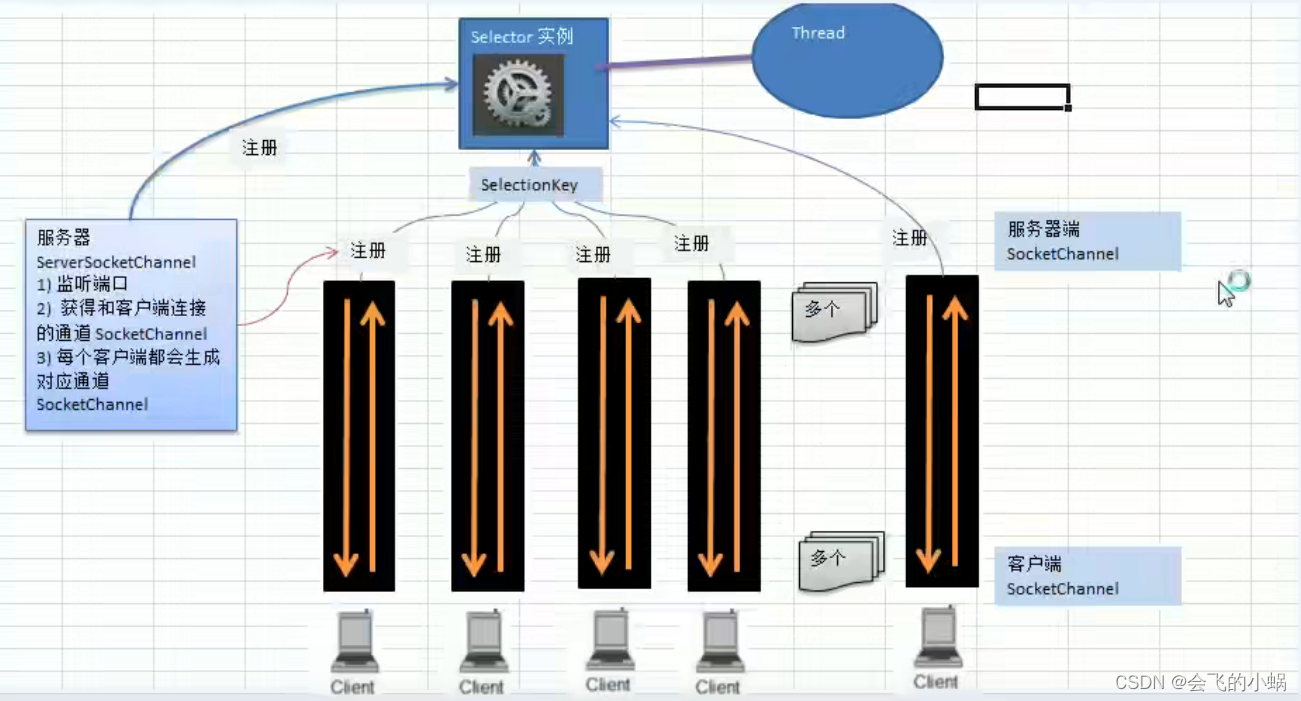
NIO重点分析图:
对图的说明:
- 1、当客户端连接时,会通过ServerSocketChannel 得到 SocketChannel。
- 2、将 SocketChannel 注册到 Selector 上,register ( Selector sel , int ops)。
- 3、注册后返回一个 SelectionKey , 会和该Selector 关联【集合】。
- 4、Selector 进行监听 select 方法,返回有事件发生的通道个数。
- 5、进一步得到各个 SelectionKey(有事件发生)
- 6、在通过SelectionKey 反相获取 SocketionKey ,方法 channel()
- 7、可以通过得到 channel , 完成业务处理
NIO 非阻塞网络编程快速入门
案例:
1、编写一个 NIO 入门案例,实现服务器端和客户端之间的数据简单通讯(非阻塞)
2、目的:理解 NIO 非阻塞网络编程机制
服务端源码 NIOServer :
package com.dev.nio.NIOTEST;

import java.io.IOException;
import java.net.InetSocketAddress;
import java.net.ServerSocket;
import java.nio.ByteBuffer;
import java.nio.channels.SelectionKey;
import java.nio.channels.Selector;
import java.nio.channels.ServerSocketChannel;
import java.nio.channels.SocketChannel;
import java.util.Iterator;
import java.util.Set;

/**
 * @author :
 * @date :2022/3/28 下午 1:43
 * @description :
 * @modyified By:
 */
public class NIOServer {
    public static void main(String[] args) throws Exception {
        //创建ServerSocketChannel -> ServerSocket
        ServerSocketChannel serverSocketChannel = ServerSocketChannel.open();
        //得到一个Selector对象
        Selector selector = Selector.open();
        //绑定一个端口 :6666 ,在服务端进行监听
        serverSocketChannel.socket().bind(new InetSocketAddress(6666));
        //设置为非阻塞【这一步很重要,不然会报错,默认为阻塞】
        serverSocketChannel.configureBlocking(false);
        //把serverSocketChannel 注册到 selector 关心事件 为 OP_ACCEPT
        serverSocketChannel.register(selector, SelectionKey.OP_ACCEPT);
        System.out.println("注册后的selectionkey 数量=" + selector.keys().size()); // 注册数

        //循环等待客户端连接
        while (true) {

            //这里我们等待1秒,如果没有事件发生, 返回
            if(selector.select(1000) == 0) { //没有事件发生
                System.out.println("服务器等待了1秒,无连接");
                continue;
            }

            //如果返回的>0, 就获取到相关的 selectionKey集合
            //1.如果返回的>0, 表示已经获取到关注的事件
            //2. selector.selectedKeys() 返回关注事件的集合
            //   通过 selectionKeys 反向获取通道
            Set<SelectionKey> selectionKeys = selector.selectedKeys();
            System.out.println("!!!有事件发生的 selectionKeys 数量 = " + selectionKeys.size());

            //遍历 Set<SelectionKey>, 使用迭代器遍历
            Iterator<SelectionKey> keyIterator = selectionKeys.iterator();

            while (keyIterator.hasNext()) {
                //获取到SelectionKey
                SelectionKey key = keyIterator.next();
                //根据key 对应的通道发生的事件做相应处理
                if(key.isAcceptable()) { //如果是 OP_ACCEPT, 有新的客户端连接
                    //该该客户端生成一个 SocketChannel
                    SocketChannel socketChannel = serverSocketChannel.accept();
                    System.out.println("客户端连接成功 生成了一个 socketChannel " + socketChannel.hashCode());
                    //将  SocketChannel 设置为非阻塞
                    socketChannel.configureBlocking(false);
                    //将socketChannel 注册到selector, 关注事件为 OP_READ, 同时给socketChannel
                    //关联一个Buffer
                    socketChannel.register(selector, SelectionKey.OP_READ, ByteBuffer.allocate(1024));

                    System.out.println("!!!客户端连接后 ,注册的selectionkey 数量=" + selector.keys().size()); //2,3,4..


                }
                if(key.isReadable()) {  //发生 OP_READ

                    //通过key 反向获取到对应channel
                    SocketChannel channel = (SocketChannel)key.channel();

                    //获取到该channel关联的buffer
                    ByteBuffer buffer = (ByteBuffer)key.attachment();
                    channel.read(buffer);
                    System.out.println("form 客户端 " + new String(buffer.array()));

                }

                //手动从集合中移动当前的selectionKey, 防止重复操作
                keyIterator.remove();

            }

        }
    }
}
对于带码的一些解释:
1、对操作系统有一定了解的同学,就会大概知道这里监听的是一个Accept通道。这个通道的
作用就是监听,实际建立连接了还会有一个通道。
2、简单说一下为什么。因为客户端发请求的时候,服务器这边是肯定要先有一个监听通道,
监听某个端口是否有客户端要建立链接,如果有客户端想要建立链接,那么会再创建一个和
客户端真正通信的通道。
3、如果有其它客户端还想要建立链接,这个Accept监听端口监听到了,就会再创建几个真正
的通信通道。
4、也就是Server的一个端口可以建立多个TCP连接,因为IP层协议通过
目标地址+端口+源地址+源端口四个信息识别一个上下文
客户端源码 NIOClient :
package com.dev.nio.NIOTEST;

import java.io.IOException;
import java.net.InetSocketAddress;
import java.nio.ByteBuffer;
import java.nio.channels.SocketChannel;

/**
 * @author :
 * @date :2022/3/28 下午 1:59
 * @description :
 * @modyified By:
 */
public class NIOClient {
    public static void main(String[] args) throws Exception {
        //得到一个网络通道
        SocketChannel socketChannel = SocketChannel.open();
        //设置非阻塞
        socketChannel.configureBlocking(false);
        //提供服务器端的ip 和 端口
        InetSocketAddress inetSocketAddress = new InetSocketAddress("127.0.0.1", 6666);
        //连接服务器
        if (!socketChannel.connect(inetSocketAddress)) {

            while (!socketChannel.finishConnect()) {
                System.out.println("因为连接需要时间,客户端不会阻塞,可以做其它工作..");
            }
        }

        //...如果连接成功,就发送数据
        String str = "hello, 连接了~~~";
        //Wraps a byte array into a buffer
        ByteBuffer buffer = ByteBuffer.wrap(str.getBytes());
        //发送数据,将 buffer 数据写入 channel
        socketChannel.write(buffer);
        System.in.read();
    }
}
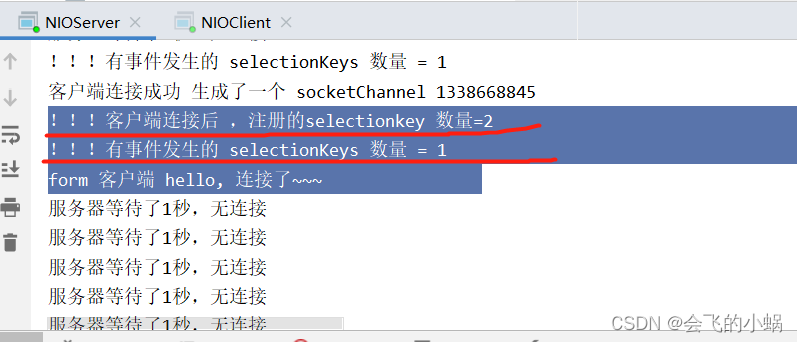
实验结果(推荐自己尝试):
SelectionKey,表示 Selector 和网络通道的注册关系
SelectionKey,表示 Selector 和网络通道的注册关系,共四种:
- int OP_ACCEPT:有新的网络连接可以 accept,值为 16
- int OP_CONNECT:代表连接已经建立,值为 8
- int OP_READ:代表读操作,值为 1
- int OP_WRITE:代表写操作,值为 4
源码中:
public static final int OP_READ = 1 << 0;
public static final int OP_WRITE = 1 << 2;
public static final int OP_CONNECT = 1 << 3;
public static final int OP_ACCEPT = 1 << 4;


 2291
2291

 被折叠的 条评论
为什么被折叠?
被折叠的 条评论
为什么被折叠?
 到【灌水乐园】发言


