


 本文介绍MVVM模式的应用,通过一个Kotlin和DataBinding实现的Demo,对比MVP和MVVM的区别,展示如何减少接口使用。
最近学习MVVM模式,特此记录~~
本文目的:
①主要通过一个 MVVM的 Demo来了解一下我们在平时该怎么使用它
②对比 MVP和 MVVM的区别
好了,废话不多说~开始吧

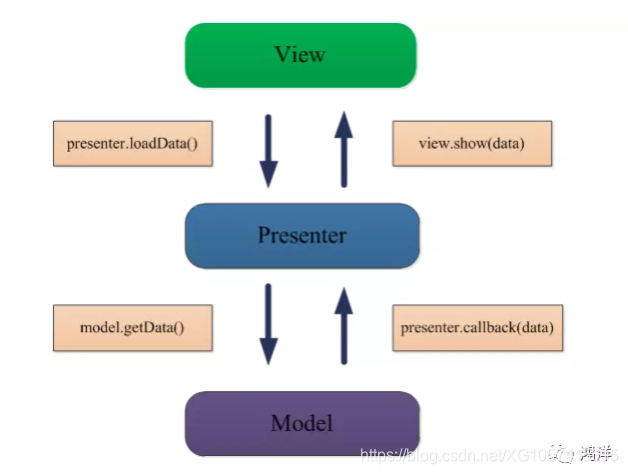
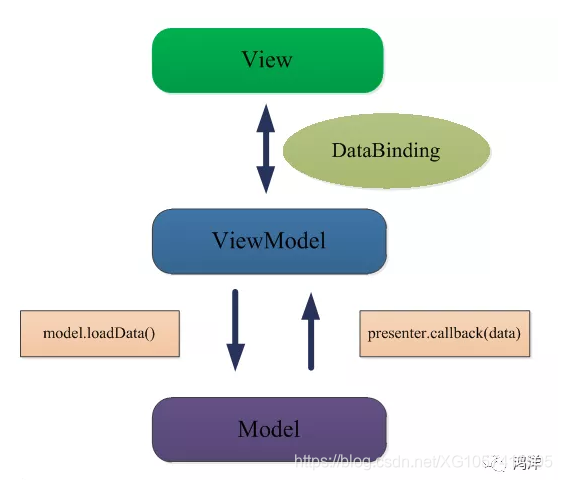
首先我们来看一下 MVP和 MVVM的结构图:
图片来自https://mp.weixin.qq.com/s/PspA4DYPhzLtsJGJykGY0w
可以看出两者的区别并不大,MVP的 Presenter和 MVVM的 ViewModel扮演的角色一样,但是 MVP中 View层和 Presenter层是通过接口来连接的,所以我们通常需要大量的接口来完成 View层和 Presenter层的连接。而 MVVM中 View层和 ViewModel层是通过 DataBinding来连接的,从而减少了接口的使用。
MVP大家应该都很熟悉,这里我们直接通过一个MVVM的 Demo来演示。
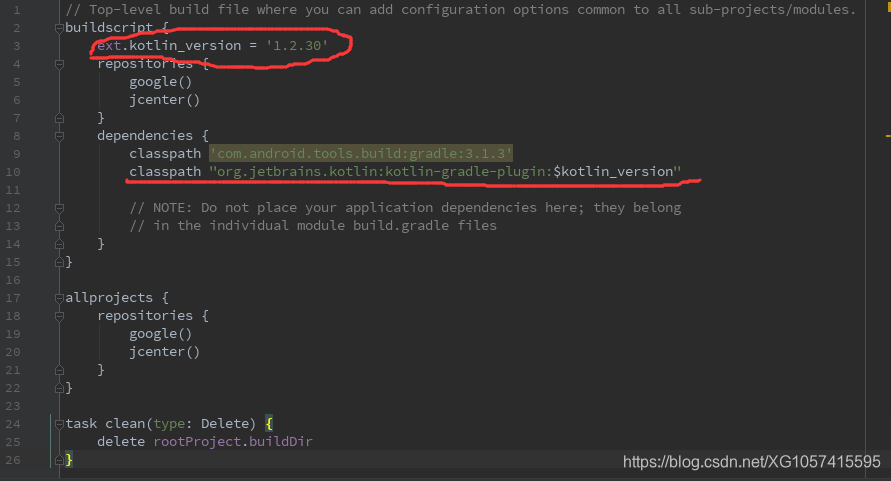
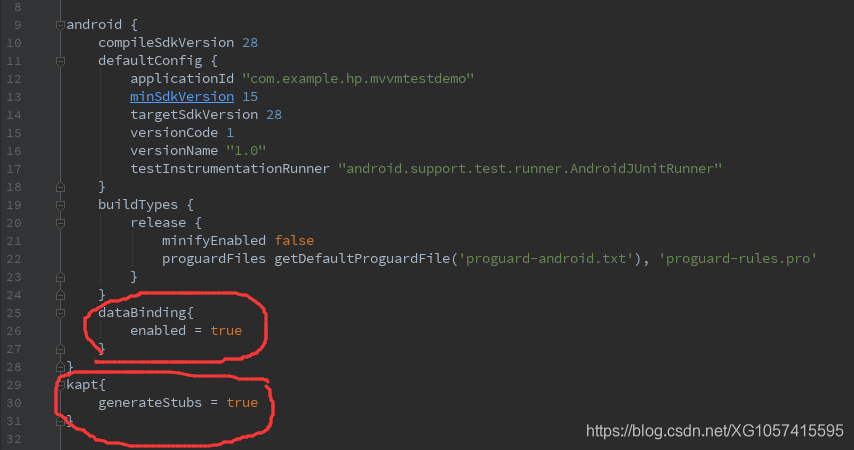
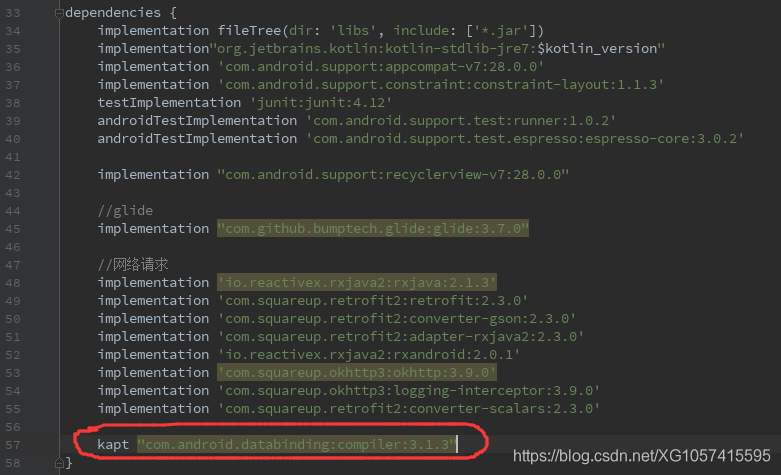
这个 Demo用到了 Kotlin和 DataBinding,所以先要进行一些配置
在 project的 build.gradle需要添加 kotlin的配置
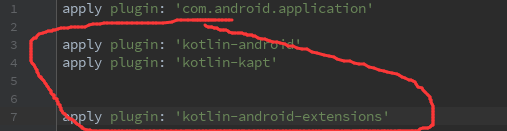
app模块下的 build.gradle
先看效果图

一个 Activity中放一个 Fragment,Fragment中只有一个 TextView和 RecyclerView,很简单~
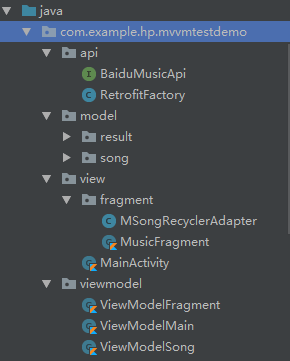
先看一下目录结构
先看 MainActivity的 xml布局,外层是 layout,否则无法使用在Activity中无法使用DataBinding
<?xml version="1.0" encoding="utf-8"?>
<layout xmlns:android="http://schemas.android.com/apk/res/android"
    xmlns:app="http://schemas.android.com/apk/res-auto"
    xmlns:tools="http://schemas.android.com/tools">

    <LinearLayout
        android:layout_width="match_parent"
        android:layout_height="match_parent"
        android:orientation="vertical">
        <FrameLayout
            android:id="@+id/music_fragment"
            android:layout_width="match_parent"
            android:layout_height="match_parent"/>
    </LinearLayout>
</layout>
MainActivity.class只做了添加Fragment的操作
class MainActivity : AppCompatActivity() {

    override fun onCreate(savedInstanceState: Bundle?) {
        super.onCreate(savedInstanceState)
        initView()
    }

    private fun initView() {
        supportFragmentManager.beginTransaction().add(R.id.music_fragment,MusicFragment.getInstance()).commit()
    }
}
接下来看一下 MusicFragment的 xml布局,外层是 layout,包含 viewModel为 ViewModelFragment,加载数据失败时,会显示 “获取失败”的 TextView,该TextView的可见性由 ViewModel中的变量控制:
<?xml version="1.0" encoding="utf-8"?>
<layout xmlns:android="http://schemas.android.com/apk/res/android">
    <data>
        <variable
            name="viewModel"
            type="com.example.hp.mvvmtestdemo.viewmodel.ViewModelFragment"/>
    </data>
    <RelativeLayout
        android:layout_width="match_parent"
        android:layout_height="match_parent">
        <TextView
            android:id="@+id/search_word"
            android:layout_width="match_parent"
            android:layout_height="wrap_content"
            android:text="@{viewModel.search_word}"
            android:gravity="center_horizontal"
            android:textSize="35sp"/>
        <android.support.v7.widget.RecyclerView
            android:id="@+id/recycler_view"
            android:background="#ddd"
            android:layout_width="match_parent"
            android:layout_height="match_parent"
            android:padding="8dp"
            android:layout_below="@id/search_word">

        </android.support.v7.widget.RecyclerView>

        <LinearLayout
            android:layout_width="match_parent"
            android:id="@+id/error_info_layout"
            android:orientation="vertical"
            android:layout_height="match_parent">
            <TextView
                android:text="获取失败"
                android:layout_gravity="center"
                android:layout_width="wrap_content"
                android:layout_height="wrap_content"
                android:visibility="@{viewModel.errorInfoLayoutVisibility}"/>
        </LinearLayout>

    </RelativeLayout>

</layout>
MusicFragment.class,主要得到 FragmentMusicBinding实例,在 onCreateView中返回 binding实例的 root,这个root表示布局的根;然后初始化 RecyclerView 和 ViewModel
class MusicFragment : Fragment() {

    lateinit var fragmentBinding: FragmentMusicBinding
    lateinit var viewModelFragment: ViewModelFragment

    lateinit var adapter: MSongRecyclerAdapter

    companion object {
        val INSTANCE = MusicFragment()
        fun getInstance():MusicFragment{
            return INSTANCE
        }
    }

    override fun onCreateView(inflater: LayoutInflater, container: ViewGroup?, savedInstanceState: Bundle?): View? {
        // 通过 DataBindingUtil获得 binding实例
        fragmentBinding = DataBindingUtil.inflate(inflater,R.layout.fragment_music,container,false)
        initView()
        return fragmentBinding.root
    }

    private fun initView() {
        adapter = MSongRecyclerAdapter(context)
        // 初始化 recyclerView
        fragmentBinding.recyclerView.layoutManager = LinearLayoutManager(context,LinearLayoutManager.VERTICAL,false)
        fragmentBinding.recyclerView.itemAnimator = DefaultItemAnimator()
        fragmentBinding.recyclerView.adapter = adapter
        //初始化 VewiModel
        viewModelFragment = ViewModelFragment(adapter)
        fragmentBinding.viewModel = viewModelFragment
    }
}
重点就是这里的 ViewModel了
class ViewModelFragment(adapter: MSongRecyclerAdapter) : BaseObservable(){
    var adapter: MSongRecyclerAdapter = adapter

    var search_word = ObservableField<String>("月光")

    lateinit var errorInfoLayoutVisibility: ObservableField<Int>

    init {
        initData()
        getSong()
    }

    private fun getSong() {
        RetrofitFactory.provideBaiduApi()
                .queryMerge(search_word.get(), 1, 50)
                .subscribeOn(Schedulers.io())
                .observeOn(AndroidSchedulers.mainThread())
                .subscribe(object : Observer<QueryMergeResp> {
                    override fun onSubscribe(d: Disposable) {}
                    override fun onNext(queryMergeResp: QueryMergeResp) {
                        if (queryMergeResp != null && queryMergeResp!!.isValid()) {

                            var list = queryMergeResp.result.song_info.song_list
                            adapter.updateData(list)
                            adapter.notifyDataSetChanged()

                            errorInfoLayoutVisibility.set(View.GONE)
                        } else {

                        }
                    }
                    override fun onError(e: Throwable) {
                        e.printStackTrace()
                        errorInfoLayoutVisibility.set(View.VISIBLE)
                    }
                    override fun onComplete() {
                    }
                })
    }

    private fun initData() {
        errorInfoLayoutVisibility = ObservableField()
        errorInfoLayoutVisibility.set(View.GONE)
    }
}
这里使用 Retrofit+ RxJava进行网络请求,网络请求不是这里的重点,就不赘述了。然后使用ObservableField,数据更新时就会通知 View层,这样就能减少接口的使用了~~

我们再来看看 RecyclerView的 ItemView的布局,这里也使用了 viewModel来进行数据绑定:
<?xml version="1.0" encoding="utf-8"?>
<layout xmlns:android="http://schemas.android.com/apk/res/android"
    xmlns:tools="http://schemas.android.com/tools">

    <data>
        <variable
            name="viewModel"
            type="com.example.hp.mvvmtestdemo.viewmodel.ViewModelSong"/>
    </data>

    <RelativeLayout
        android:layout_width="match_parent"
        android:layout_height="70dp">
        <ImageView
            android:id="@+id/merge_song_more"
            android:layout_width="50dp"
            android:layout_height="50dp"
            android:src="@drawable/ic_icon_more"
            android:layout_alignParentRight="true"
            android:layout_centerVertical="true"
            android:padding="16dp" />
        <RelativeLayout
            android:id="@+id/merge_song_info"
            android:layout_width="match_parent"
            android:layout_height="wrap_content"
            android:layout_toLeftOf="@id/merge_song_more"
            android:paddingTop="10dp"
            android:paddingLeft="14dp"
            android:paddingBottom="10dp"
            android:paddingRight="14dp">
            <TextView
                android:id="@+id/merge_song_title"
                android:layout_width="wrap_content"
                android:layout_height="wrap_content"
                tools:text="@{viewModel.song.title}"
                android:textSize="19sp"
                android:textColor="@android:color/black"
                android:letterSpacing="0.1"

                android:ellipsize="marquee"
                android:singleLine="true"
                android:focusable="true"
                android:focusableInTouchMode="true"
                android:marqueeRepeatLimit="marquee_forever"/>
            <TextView
                android:id="@+id/merge_song_artist"
                android:layout_width="wrap_content"
                android:layout_height="wrap_content"
                android:layout_below="@id/merge_song_title"
                android:layout_marginTop="3dp"
                tools:text="@{viewModel.song.artist}"

                android:ellipsize="marquee"
                android:singleLine="true"
                android:focusable="true"
                android:focusableInTouchMode="true"
                android:marqueeRepeatLimit="marquee_forever"/>
        </RelativeLayout>


    </RelativeLayout>

</layout>
Adapter
public class MSongRecyclerAdapter extends RecyclerView.Adapter<MSongRecyclerAdapter.MSViewHolder> {

    private Context mContext;
    private List<Song> list;        //该list应该提前初始化

    private OnMergeSongClickListener listener;

    public MSongRecyclerAdapter(Context context){
        this.mContext = context;
        list = new ArrayList<>();
    }

    @NonNull
    @Override
    public MSViewHolder onCreateViewHolder(@NonNull ViewGroup parent, int viewType) {
        SongItemBinding itemBinding = DataBindingUtil.inflate(LayoutInflater.from(parent.getContext()),R.layout.song_item,parent,false);
        return new MSViewHolder(itemBinding,itemBinding.getRoot());
    }

    @Override
    public void onBindViewHolder(@NonNull MSViewHolder holder, final int position) {
        final Song song = list.get(position);

        ViewModelSong viewModelSong = new ViewModelSong(song);
        holder.binding.setViewModel(viewModelSong);

        holder.binding.mergeSongInfo.setOnClickListener(new View.OnClickListener() {
            @Override
            public void onClick(View v) {
                if(listener!=null)listener.onClickItem(position);
            }
        });
        holder.binding.mergeSongMore.setOnClickListener(new View.OnClickListener() {
            @Override
            public void onClick(View v) {
                showPopMenu(song,v);
            }
        });
    }

    @Override
    public int getItemCount() {
        return list.size();
    }

    public void setList(@Nullable List<? extends Song> get) {
        list = (List<Song>) get;
    }

    public class MSViewHolder extends RecyclerView.ViewHolder {
        SongItemBinding binding;

        public MSViewHolder(SongItemBinding binding,View itemView) {
            super(itemView);
            this.binding = binding;
        }
    }

    private void showPopMenu(final Song song, View anchor){
    }

    public interface OnMergeSongClickListener{
        void onClickMenuItem(int itemId, Song song);
        void onClickItem(int position);
    }

    public void setOnClickListener(OnMergeSongClickListener listener){
        this.listener = listener;
    }

    public List<Song> getData(){
        return list;
    }

    public void updateData(List<Song> newList){
        if(newList==null){
            list.clear();
        }else {
            this.list = newList;
        }
    }
}
在onCreateViewHolder中也是通过 DataBindingUtil来获取 binding实例。在 onBindViewHolder中也是使用 binding实例直接获取控件来进行点击事件的初始化,而且很多情况下点击事件的触发也可以通过 DataBinding来实现。
所以说 MVVM大大减少了接口的使用~~
项目源码:https://github.com/SkUnK-cc/MVVMTestDemo

好了,本文章就写到这里,喜欢点个赞~~~


 1340
1340

 被折叠的 条评论
为什么被折叠?
被折叠的 条评论
为什么被折叠?
 到【灌水乐园】发言


