


原理分析
大概概括就是整个APP作为容器,里面存放有多个父组件,子组件,孙子组件,各个组件都含有state和props这两个最重要的属性
遵循三大原则
-
单一数据源
整个应用的 state 被储存在一棵 object tree 中,并且这个 object tree 只存在于唯一一个 store 中。
-
State只读
惟一改变 state 的方法就是触发 action,action 是一个用于描述已发生事件的普通对象。
-
使用纯函数来执行修改
为了描述action如何改变state Tree,你需要编写reucers。
React NativeUI是根据相应的state进行render的,而页面又是由大大小小的组件构成,导致每个组件必须维护自身的一套状态,因此当页面复杂化的时候,管理state会相当吃力的,而redux提供了一套机制来组织管理整个应用状态
Redux有三部分组成:store,action,reducer。
- store:维护全局的state,以及将action和reducer结合起来
- action:用来传递state的信息。就比如我们在action中处理登陆操作,将返回user对象传递给对应的reducer
- reducer:reducer是简单的处理函数,通过传入旧的state和指示操作的action来更细state,从而达到页面的刷新
首先得在项目下安装相关的库:
- 安装redux:npm install --save redux
- 安装redux绑定库:npm install --save react-redux
- 安装开发者工具:npm install --save-dev redux-devtools
- 安装异步action构造器:npm install --save redux-thunk
简单看下LoginDemo的目录结构:
.
├── source              #开发目录
|   |
|   ├──config           #主要方配置文件
|   |
|   ├──redux            #里面主要是action,reducer,store实现redux的整体流程
|   |
|   ├──resource         #主要存放图片
|   |
|   ├──util             #封装的一些工具类
|   |
|   ├──view             #登陆也和跳转页面,内部组件,容器组件
|   |
|   ├──main.js          #构建页面
|   |
|   └──root.js          #用Provider导入main
|
├── node_modules        #包文件夹
├── .gitignore
├── package.json        #依赖库
├── index.android.js    #入口文件
├── index.ios.js        #入口文件
粗略的看下目录文件 redux文件是最重要的 内部是项目应用到redux最好的体现
首先介绍action:
- Action官方解释:把数据从应用传到store的有效载荷。它是store数据的唯一来源。一般来说你会通过store.dispatch()将action传到store。
- 其实Action就是一个普通的对象,其中type属性是必须的,表示Action的名称。其他属性可以自由设置。
redux规定Action内使用一个字符串类型的type字段来表示将要执行的动作名称。
{
    type: 'ADD_TODO'
}
除此type之外,Action可以需要的数据
{
    type: 'ADD_ITEM',
    text: 'Learn Redux'
}
Action Creator
View要发送多少种消息,就会有多少种Action。要是都手写肯定会麻烦,可以定义一个函数生成Action,这个函数叫Action Creator
const ADD_TODO = '添加 TODO'

function addTodo(text) {
  return {
    type: ADD_TODO,
    text
  }
}

const action = addTodo('Learn Redux')
上面代码中,addtodo函数就是一个Action Creator,在Redux中的Action Creator只是简单的返回一个Action
当调用Action Creator时,一般会触发一个dispatch
function addTodoWithDispatch(text) {
  const action = {
    type: ADD_TODO,
    text
  }
  dispatch(action)
}
在Redux中只需把Action Creator的结果传给dispatch()方法即可发起一次dispatch过程
dispatch(addTodo(text))
然后直接调用他们
boundAddTodo(text)
store 里能直接通过 store.dispatch() 调用 dispatch() 方法,但是多数情况下我们选择使用 react-redux 提供的 connect() 函数。bindActionCreators() 可以自动把多个 action 创建函数 绑定到 dispatch() 方法上
Reducer
- Store收到Action以后,必须给出一个新的State,这样View才会发生变化,这种State的计算过程叫做Reducer。
- Reducer是一个普通的回调函数
- 当它被redux调用的时候会为他传递两个参数State和Action
- 它会根据Action的type属性来对旧的State进行操作,返回新的State
const defaultState = 10

const reducer = (state = defaultState, action) => {
  switch (action.type) {
    case Constants.INCREASE:
      return state + 1
    case Constants.DECREASE:
      return state - 1
    default:
      return state
  }
}

const state = reducer(10, {
  type: Constants.INCREASE
})
上面代码中,reducer函数收到名为Constans.INCREASE的Action以后,就返回一个新的State,作为加法的计算结果。
在实际应用中,Reducer函数不用像上面这样手动调用,store.dispatch方法会触发Reducer的自动调用,为此,store需要知道Reducer函数,做法就是在生成Store的时候,将Reducer传入createStore方法中。
import { createStore } from 'redux'
import reducer from '../reducer'

const store = createStore(reducer)
上面代码中,createStore接受 Reducer 作为参数,生成一个新的 Store。以后每当store.dispatch发送过来一个新的 Action,就会自动调用 Reducer,得到新的 State
Reducer的拆分
在实际开发中State会涉及很多功能,唉一个Reducer函数中处理所有逻辑非常混乱,所以需要拆分成多个子Reducer,每个子Reducer只处理它管理的那部分State数据,然后再由一个主rootReducers来专门管理这些子Reducer。
Redux提供了一个方法combineReducers专门管理这些子Reducer
import {createStore, combineReducers} from 'redux'

const list = (state = [], action) => {
  switch (action.type) {
    case ADD_ITEM:
      return [createItem(action.text), ...state]
    default:
      return state
  }
}

const counter = (state = defaultState, action) => {
  switch (action.type) {
    case Constants.INCREASE:
      return state + 1
    case Constants.DECREASE:
      return state - 1
    default:
      return state
  }
}

let rootReducers = combineReducers({list, counter})
combineReducers 生成了一个类似于Reducer的函数。为什么是类似于,因为它不是真正的Reducer,它只是一个调用Reducer的函数,只不过它接收的参数与真正的Reducer一模一样
function combineReducers(reducers) {

  // 过滤reducers,把非function类型的过滤掉~
  var finalReducers = pick(reducers, (val) => typeof val === 'function');

  var defaultState = mapValues(finalReducers, () => undefined);

  return function combination(state = defaultState, action) {
    // finalReducers 是 reducers
    var finalState = mapValues(finalReducers, (reducer, key) => {

      // state[key] 是当前Reducer所对应的State,可以理解为当前的State
      var previousStateForKey = state[key];
      var nextStateForKey = reducer(previousStateForKey, action);

      return nextStateForKey;
    });

    // finalState 是 Reducer的key和stat的组合。。
  }
}
当使用combination的时候,combination会把所有子Reducer都执行一遍,子Reducer通过action.type 匹配操作,因为是执行所有子Reducer,所以如果两个子Reducer匹配的action.type是一样的,那么都会成功匹配。
Store
- Store 就是保存数据的地方,你可以把它看成一个容器。整个应用只能有一个 Store。
- Redux 提供createStore这个函数,用来生成 Store。
- 再次强调一下 Redux 应用只有一个单一的 store。当需要拆分数据处理逻辑时,你应该使用 reducer 组合 而不是创建多个 store。
import { createStore } from 'redux'
import reducer from '../reducer'

const store = createStore(reducer)
Store有四个方法
- Store.getState():获取应用当前State
- Store.subscribe():添加一个变化监听器
- Store.dispatch():分发Action。修改State
- Store.replaceReducer():替换Store当前用来处理State的reducer
import { createStore } from 'redux'
let { subscribe, dispatch, getState, replaceReducer} = createStore(reducer)
Redux工作流
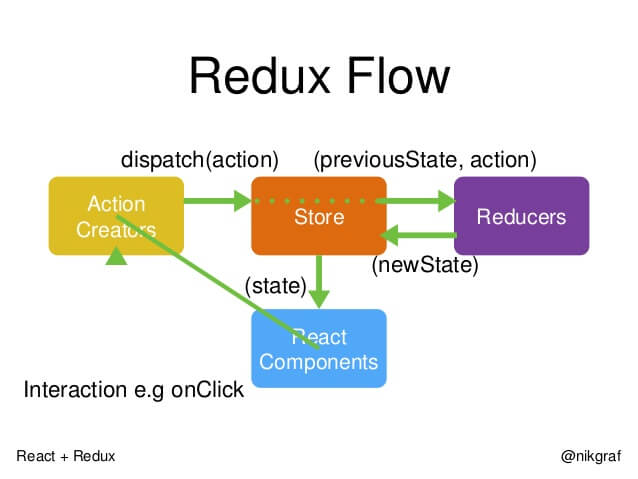
- 首先,用户发出 Action
store.dispatch(action)
- 然后,Store 自动调用 Reducer,并且传入两个参数:当前 State 和收到的 Action。 Reducer 会返回新的 State
let nextState = todoApp(previousState, action)
- State 一旦有变化,Store 就会调用监听函数
// 设置监听函数
store.subscribe(listener)
- listener可以通过store.getState()得到当前状态。如果使用的是 React,这时可以触发重新渲染 View
function listerner() {
  let newState = store.getState();
  component.setState(newState);
}
用到的第三方框架
| 库名 | 简介 | 地址 |
|---|---|---|
| react-native-image-progress | 图片加载进度条 | https://github.com/oblador/react-native-image-progress |
| react-native-navbar | 标题栏 | https://github.com/react-native-community/react-native-navbar |
| react-native-modalbox | 反应本地组件,简单,完全可定制,实现“刷下来关闭”功能。 | https://github.com/maxs15/react-native-modalbox |
| react-navigation | 反应导航源于本地社区对基于JavaScript的可扩展且易于使用的导航解决方案的需求 | https://github.com/react-community/react-navigation |
| redux | Redux 是 JavaScript 状态容器,提供可预测化的状态管理。 | http://www.redux.org.cn/index.html |


 3180
3180

 被折叠的 条评论
为什么被折叠?
被折叠的 条评论
为什么被折叠?
 到【灌水乐园】发言


