


在公司内部每天都要使用的系统中添加常用模块看板,可以让工程师知道自己经常使用的是哪个模块,点击直接跳转,提供了快速访问核心功能的入口,非常方便,提高工程师的操作效率与使用体验。
实现效果如下:
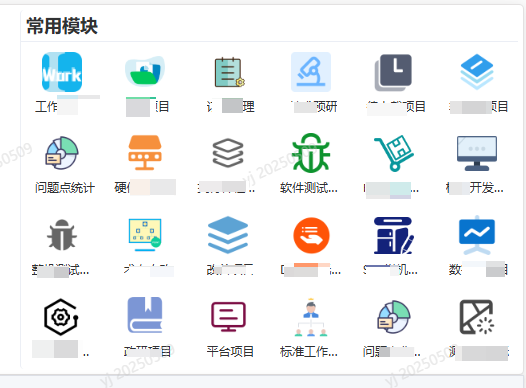
实现步骤
组件结构与模板
看板主要由 el-card 组件包裹,通过 slot 插槽自定义卡片的头部标题。卡片内部使用 CSS Grid 布局,通过 tag-grid 类定义网格规则,实现卡片的自适应排列:
<!-- 常用模块 -->
<el-card class="top-right-area" shadow="never">
  <template #header>
    <span class="title">常用模块</span>
  </template>
  <div class="tag-grid">
    <div v-for="(item, index) in commonlyData" :key="index" class="tag-card" @click="goToPage(item.path)">
      <div class="icon-container">
        <img :src="getIconPath(item.icon)" alt="" class="module-icon">
      </div>
      <div class="tag-text">{{ item.text }}</div>
    </div>
  </div>
</el-card>
通过 v-for 指令循环渲染每个常用模块卡片,同时绑定点击事件 goToPage,实现页面跳转功能。
方法
goToPage(path) {
this.$router.push({ path: path });
},
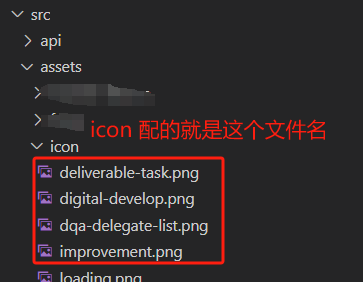
getIconPath(iconName) {
if (!iconName) {
return require("@/assets/icon/loading.png");
}
try {
// 尝试加载图标
const iconPath = require(`@/assets/icon/${iconName}.png`);
return iconPath;
} catch (e) {
// 如果加载失败,返回默认图标
return require("@/assets/icon/loading.png");
}
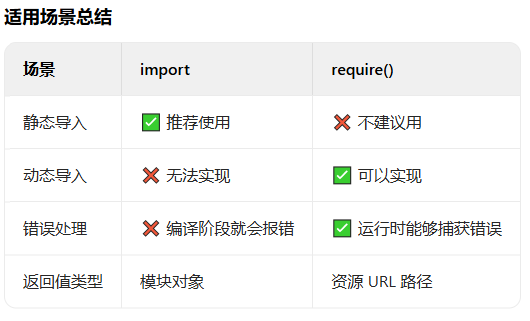
}为什么用 require 而不用 await import?
await import():
ES6 动态导入语法,返回 Promise,需要在 async 函数中使用。
静态分析限制:路径必须是静态可分析的格式(如 ./dir/${variable}.js),不能完全动态(如用户输入)。
适用于模块加载:主要用于动态加载 JavaScript 模块,而非直接处理资源文件。
require():
CommonJS 语法,同步加载,在 Vue/Webpack 中常用于处理资源路径。
完全动态:路径可以是任意表达式,适合根据变量动态加载图片、CSS 等资源。
资源处理:配合 Webpack loader 将资源转换为 URL 路径(如 file-loader)。
同步 vs 异步:
// 使用 require() 的同步加载(适合模板渲染)
const iconUrl = require('@/assets/icon.png');
<img src={iconUrl} />

// 使用 await import() 的异步加载(需要额外处理)
async loadIcon() {
  const module = await import('@/assets/icon.png');
  this.iconUrl = module.default; // 需要等待 Promise 解析
}
方案 适用场景 优点 缺点 require()资源路径动态加载(图片、CSS) 简单直接,同步返回 URL 非标准 ES 语法 await import()动态加载 JavaScript 模块 标准 ES 语法,支持 Tree-shaking 需要异步处理,不适用于模板直接渲染 1. 动态导入的需求
import 属于静态导入方式,在编译阶段就会确定导入内容。要是想依据变量动态加载资源,就得使用 require() 这种支持动态导入的方式。
2. 错误处理的必要性
require() 可以搭配 try-catch 来捕获资源加载过程中出现的错误,一旦图标不存在,就能返回默认图标。但静态导入没办法做到这一点。
3. Webpack 的资源处理机制
在 Vue 项目中,require() 往往会和 Webpack 的 file-loader 或者 url-loader 配合使用,从而把图片转为可访问的 URL 路径。
主要样式
.tag-grid {
  display: grid;
  grid-template-columns: repeat(auto-fill, minmax(80px, 1fr));
}

.tag-card {
  display: flex;
  flex-direction: column;
  align-items: center;
  justify-content: center;
  padding: 10px 8px;
  border-radius: 8px;
  cursor: pointer;
  transition: all 0.3s ease;
}

.tag-card:hover {
  background-color: #f5f7fa;
  transform: translateY(-2px);
}

.icon-container {
  width: 40px;
  height: 40px;
  display: flex;
  align-items: center;
  justify-content: center;
  margin-bottom: 8px;
}

.module-icon {
  max-width: 100%;
  max-height: 100%;
  object-fit: contain;
}

.tag-text {
  font-size: 12px;
  text-align: center;
  color: #303133;
  white-space: nowrap;
  overflow: hidden;
  text-overflow: ellipsis;
  max-width: 100%;
}
数据结构
      commonlyData: [
        { icon: "图标文件名1", text: "文案1", path: "/path1" },
        { icon: "图标文件2", text: "文案2", path: "/path12" },
        { icon: "图标文件名3", text: "文案3", path: "/path3" },
        { icon: "AAAAAA", text: "测试找不到图标", path: "/digital-develop" },
        { icon: "", text: "测试没图标", path: "/digital-develop" },
      ],
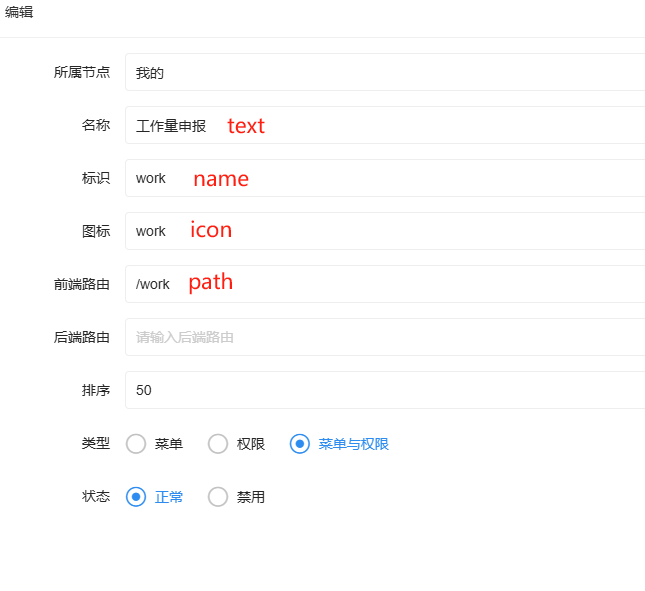
后台管理系统中的配置
图片压缩
为了减小体积,可以将下载下来的图标进行压缩,个人比较喜欢 TinyPNG,推荐一波。


 808
808

 被折叠的 条评论
为什么被折叠?
被折叠的 条评论
为什么被折叠?
 到【灌水乐园】发言


