Zend FrameWork需要mod_rewrite 支持。如果没有打开这个支持的话会提示这个错误进入跟踪,打开apache的错误日志:可以看到这个错误
Internal Server Error
The server encountered an internal error or misconfiguration and was unable to complete your request.
Please contact the server administrator, dennisbing@126.com and inform them of the time the error occurred, and anything you might have done that may have caused the error.
More information about this error may be available in the server error log.
More information about this error may be available in the server error log.
More information about this error may be available in the server error log.
PHP Fatal error: Uncaught exception 'RuntimeException' with message 'Unable to load ZF2. Run `php composer.phar install` or define a ZF2_PATH environment variable.' in D:\\218.244.137.14\\wwwroot\\zf\\init_autoloader.php:53\nStack trace:\n#0 D:\\218.244.137.14\\wwwroot\\zf\\public\\index.php(14): require()\n#1 {main}\n thrown in D:\\218.244.137.14\\wwwroot\\zf\\init_autoloader.php on line 53
解决方法:
打开 httpd.conf 文件,找到 #LoadModule rewrite_module modules/mod_rewrite.so 这一行,把这行左侧第一个字符(#)删除,保存并重启 Apache
三、安装Zend Framework 2
做完以上环境设置以后,本篇中最重要的部分来了!
ZF2 有两种安装方式:一种是“在线安装”另一种是“手动安装”。
1、在线安装
所谓的“在线安装”就是使用托管在 github 上的
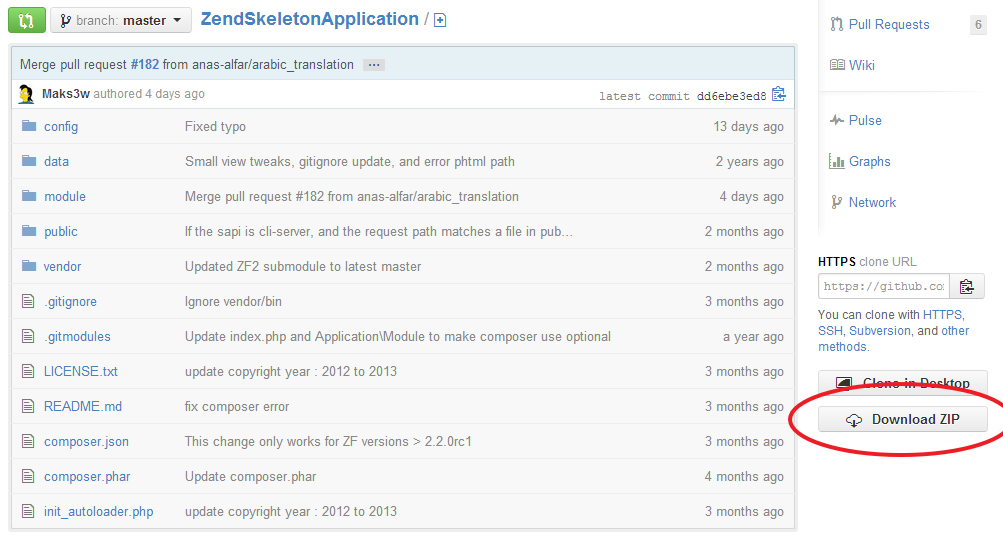
(1)在浏览器中打开
(2)点击图片右下角的 zip 按钮(上图画红圈的按钮),下载
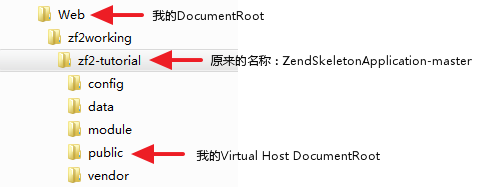
(3)将下载的压缩包解压,产生
(4)将
(5)将
有关虚拟主机的设置见下一个小节
(6)在 zf2-tutorial 目录下有一个文件叫
注意:由于要使用到 PHP 的命令行,所以要将 php.exe 文件路径添加到系统的 PATH 里面,不然会报找不到 php.exe 错误
(7)当命令执行完成后接下来就是在线安装 ZF2
上图中有关“git”和"hg"报错的信息没有什么关系,不会影响到 ZF2 的安装。
至此 ZF2 的“在线安装”全部结束。下面有几点做一个说明
(1)“在线安装”过程所花时间的长短取决于您当地的网络情况;
(2)ZendSkeletonApplication、composer 和 Zend Framework 2 这三者之间是什么关系?ZendSkeletonApplication 是 Zend 应用程序骨架(或者是 Zend 应用程序模板),ZendSkeletonApplication 通过 composer 来解决依赖性的问题,而
(3)php composer.phar self-update 这个命令干了什么?该命令主要是检测
(4)php composer.phar install 这个命令干了什么?该命令装了 Zend Framework 2。这个命令在项目目录下的 vendor 目录下安装了ZF2的库文件和一些辅助文件,同时在项目目录下添加了一个 composer.lock 文件。
(5)php composer.phar install 报错 “The process timed out.”怎么办?如果你得到以下结果
1 | [RuntimeException] |
2 | The process timed out. |
说明您的网速不给力,需要用以下命令
1 | COMPOSER_PROCESS_TIMEOUT=5000 php composer.phar install |
2、手动安装
“手动安装”和“在线安装”只是在最后一步不同,“手动安装”的最后一步不是用命令行方式下载 ZF2,而是需要你手动将ZF2库添加到
“手动安装”的前5步同“在线安装”的前5步
(6)下载ZF2,浏览器打开http://framework.zend.com/downloads/latest
(7)解压
至此 ZF2 的“手动安装”全部结束。
四、虚拟主机的设定与配置
这个虚拟主机是否需要配置看个人开发的习惯,一般来说有个虚拟主机相对来说开发比较方便。官方教程上是建立了一个 zf2-tutorial.localhost 的虚拟主机,那我们也设定一个虚拟主机。
由于 ZF2 框架有一个唯一入口的脚本来接受外网的访问请求,既 public/index.php。在我的例子中就是:e:\Web\zf2working\zf2-tutorial\public\index.php,所以我要将
(1)打开
(2)在文件底部添加以下代码
01 |
02 | DocumentRoot "E:/Web/zf2Working/zf2-tutorial/public" |
03 | ServerName zf2-tutorial.localhost |
04 | # This should be omitted in the production environment |
05 | SetEnv APPLICATION_ENV development |
06 | "E:/Web/ZF2Working/zf2-tutorial/public"> |
07 | DirectoryIndex index.php |
08 | AllowOverride All |
09 | Order allow,deny |
10 | Allow from all |
11 | |
12 |
(3)保存
(4)打开 hosts 文件,该文件路径:C:\Windows\System32\drivers\etc
添加以下代码至文件底部
1 | 127.0.0.1 zf2-tutorial.localhost |
保存并退出 hosts 文件
(5)重启 Apache
好了,ZF2 的所有安装和配置全部结束,看看自己的成果吧
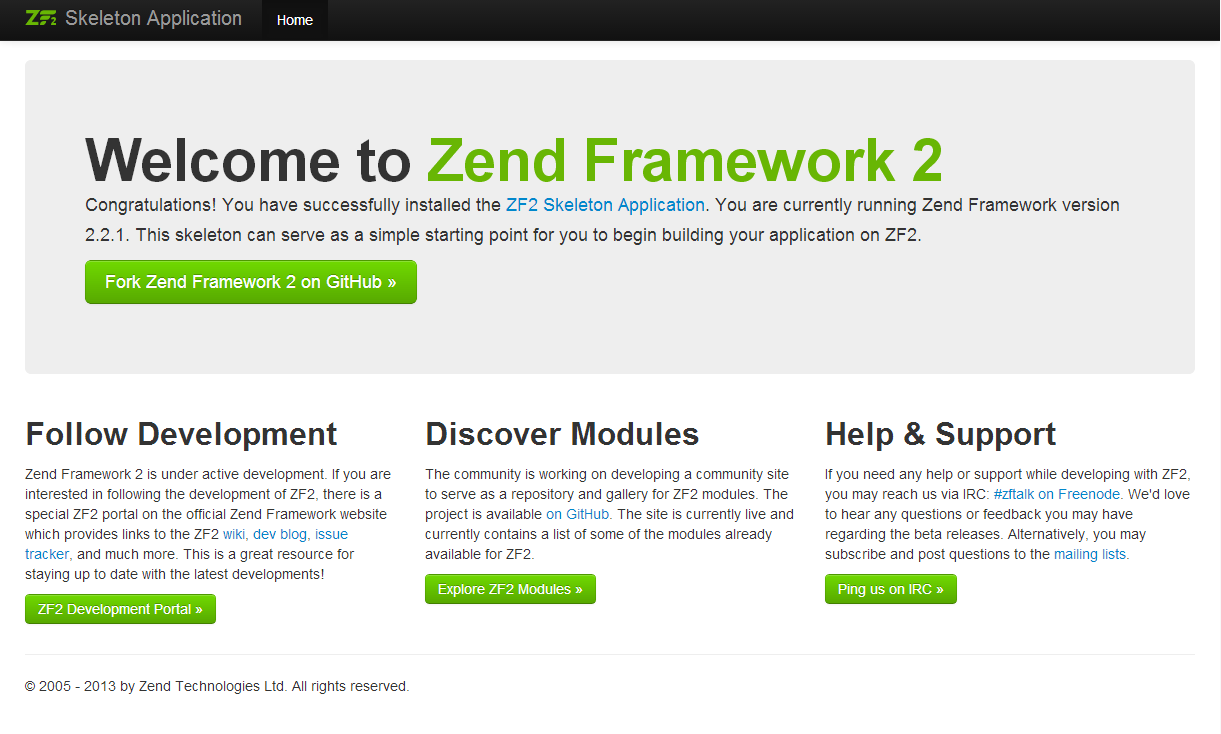
在浏览器中输入 zf2-tutorial.localhost,如果可以看到以下页面,恭喜你!成功了,哇哈哈哈
五、测试 .htaccess 文件
在浏览器中输入 http://zf2-tutorial.localhost/1234 由于 1234 这个文件不存在,如果您的 .htaccess 文件的设定是有效的话,应该可以看到如下的显示
如果您看到的是类似下图显示的标准 Apache 404 错误。
那么您在继续教程之前必须修改 .htaccess 文件。如果您使用的是 IIS + Rewrite 模式,按如下修改 .htaccess 文件
1 | RewriteCond %{REQUEST_FILENAME} !-f |
2 | RewriteRule ^.*$ index.php [NC,L] |


 本文详细介绍了如何在PHP环境中安装和配置Zend Framework 2,包括在线安装和手动安装的步骤,以及虚拟主机的设置与配置。在安装过程中,强调了Composer的重要作用,并提供了解决PHP运行时错误的方法。


 8825
8825

 被折叠的 条评论
为什么被折叠?


