


前言
Springboot整合依赖大概有三种方式:
- es原生依赖:elasticsearch-rest-high-level-client
- Spring Data Elasticsearch
- Easy-es
三者的区别
1. Elasticsearch Rest High Level Client
简介:
- 这是官方提供的 Elasticsearch 客户端,支持 Java 应用程序与 Elasticsearch 集群进行通信。
特点:
- 低级别 API: 提供对 Elasticsearch 的低级别 REST API 封装,允许开发者直接使用 Elasticsearch 的所有功能。
- 灵活性: 可以执行所有 Elasticsearch 支持的操作,如索引、搜索、更新和删除等。
- 直接的控制: 开发者可以手动构造请求和处理响应,提供了更大的控制权。
- 与 Elasticsearch 版本保持同步: 由于是官方客户端,可以更好地与 Elasticsearch 版本进行兼容。
使用场景:
- 适合需要精细控制和高灵活性的应用,特别是在处理复杂的查询或需要使用 Elasticsearch 的高级特性时。
2. Spring Data Elasticsearch
简介:
- 这是 Spring 生态系统中的一部分,旨在简化使用 Elasticsearch 的过程,提供了更高层次的抽象。
特点:
- 集成 Spring: 提供与 Spring 框架的无缝集成,支持依赖注入、配置和自动化管理。
- Repository 模式: 使用类似于 Spring Data JPA 的 Repository 接口,可以更方便地执行 CRUD 操作和查询。
- 实体映射: 支持将 Java 对象直接映射到 Elasticsearch 文档,简化了数据的处理。
- 注解支持: 通过注解定义索引、字段和查询,减少了样板代码。
使用场景:
- 适合已经在使用 Spring 的应用程序,特别是希望快速实现与 Elasticsearch 的集成,同时享受 Spring 提供的便利。
3. Easy-ES
简介:
- Easy-ES 是一个第三方的 Java 客户端库,旨在简化 Elasticsearch 的操作,提供更为便捷的 API。
特点:
- 简化 API: 封装了 Elasticsearch 的复杂性,使得操作更简单易用,尤其是在批量操作和查询时。
- 注解驱动: 提供了注解来配置索引和字段,使得使用更加直观。
- 支持多种数据源: 除了支持 Elasticsearch 外,还能与其他数据源进行集成。
- 灵活配置: 提供了多种配置选项,方便用户定制化。
使用场景:
- 适合需要简化 Elasticsearch 操作的开发者,特别是在处理简单应用或快速开发时,能够提高开发效率。
总结
- Elasticsearch Rest High Level Client: 提供全面的 API 访问,适合需要直接控制和高灵活性的场景。
- Spring Data Elasticsearch: 适合与 Spring 应用集成,简化数据访问的同时保持 Spring 风格。
- Easy-ES: 更加简化的 API,适合快速开发和简单应用,特别适合对 Elasticsearch 操作不太熟悉的开发者。
Elasticsearch Rest High Level Client整合
1、添加依赖
 <dependency>
            <groupId>org.elasticsearch.client</groupId>
            <artifactId>elasticsearch-rest-client</artifactId>
            <version>7.3.2</version>
        </dependency>
        <dependency>
            <groupId>org.elasticsearch.client</groupId>
            <artifactId>elasticsearch-rest-high-level-client</artifactId>
            <version>7.3.2</version>
        </dependency>
        <dependency>
            <groupId>org.elasticsearch</groupId>
            <artifactId>elasticsearch</artifactId>
            <version>7.3.2</version>
        </dependency>

<!-- ...其他依赖省略 具体可以才看源码 -->
2、属性类添加
EsProperties
主要用于读取yaml文件的配置
package com.walker.es.properites;

import lombok.Data;
import org.springframework.boot.context.properties.ConfigurationProperties;
import org.springframework.stereotype.Component;

@ConfigurationProperties(prefix = "es")
@Component
@Data
public class EsProperties {
    private String host;
    private Integer port;
    private String scheme;
    private EsSecurityProperites security;
}
package com.walker.es.properites;

import lombok.Data;

@Data
public class EsSecurityProperites {
    private String username;
    private String password;
    private boolean enable;
}
3、application.yaml配置添加
根据自己的es配置进行修改,
这里添加了账号密码配置,一般来说,配置一下安全一些,否则容易被攻击
es:
  host: localhost
  port: 19200
  scheme: http
#  配置账号密码
  security:
    enable: true
    username: elastic
    password: elastic
4、ES配置类
主要用于创建RestHighLevelClient类,该类是es的客户端工具类,方法都集成在该类中
package com.walker.es.config;

import com.walker.es.properites.EsProperties;
import com.walker.es.properites.EsSecurityProperites;
import lombok.extern.slf4j.Slf4j;
import org.apache.http.HttpHost;
import org.apache.http.auth.AuthScope;
import org.apache.http.auth.UsernamePasswordCredentials;
import org.apache.http.impl.client.BasicCredentialsProvider;
import org.elasticsearch.client.RestClient;
import org.elasticsearch.client.RestClientBuilder;
import org.elasticsearch.client.RestHighLevelClient;
import org.springframework.beans.factory.annotation.Autowired;
import org.springframework.context.annotation.Bean;
import org.springframework.context.annotation.Configuration;

@Slf4j
@Configuration
public class EsConfig {
    @Autowired
    private EsProperties esProperties;

//    注入restHighLevelClient到bean中
    @Bean
    public RestHighLevelClient restHighLevelClient(){

//        构建es客户端
        RestClientBuilder builder = RestClient.builder( new HttpHost(esProperties.getHost(),
                esProperties.getPort(), esProperties.getScheme()));

        // 是否需要开启账号密码验证
        EsSecurityProperites security = esProperties.getSecurity();
        if(security!=null&&security.isEnable()){
            log.info("es~开启账号密码验证!");
            BasicCredentialsProvider credentialsProvider = new BasicCredentialsProvider();
            credentialsProvider.setCredentials(AuthScope.ANY,
                    new UsernamePasswordCredentials(security.getUsername(), security.getPassword()));
            builder.setHttpClientConfigCallback(httpClientBuilder ->
                    httpClientBuilder.setDefaultCredentialsProvider(credentialsProvider));
        }

        log.info("构建RestHighLevelClient:{}",esProperties);

        return new RestHighLevelClient(builder);

    }
}
5、测试验证
实体类
package com.walker.es.model;

import lombok.Data;

@Data
public class AlarmRecordEntity {
//    事件
    private String title;
//    设备
    private String deviceCode;
//    时间
    private String time;

//    索引名称
    public static String getIndex(){
        return "alarms";
    }

}
controller类
主要有下面的接口方法
创建索引
- 直接执行新增client.index(indexRequest, RequestOptions.DEFAULT); 也可以创建索引,但是直接创建的索引,字段的配置就都是默认的,例如我们如果需要使用中文分词器,就需要重新创建索引,这个在生产环境来说是比较麻烦的,需要迁移数据
- 索引可以单独写一个接口去创建索引,指定好字段的属性。
@PostMapping("/createIndex")
    public String createIndex() {
        CreateIndexRequest request = new CreateIndexRequest(AlarmRecordEntity.getIndex());

//        设置别名
        request.alias(new Alias("alias_alarm"));

        // 设置索引的设置(可选)
        request.settings(Settings.builder()
                .put("number_of_shards", 3)  // 分片数量
                .put("number_of_replicas", 2) // 副本数量
                .put("analysis.tokenizer.ik_max_word.type", "ik_max_word") // 使用 ik_max_word 分词器
        );

        // 使用 HashMap 创建映射
        Map<String, Object> properties = new HashMap<>();
        Map<String, Object> titleField = new HashMap<>();
        titleField.put("type", "text");
        titleField.put("analyzer", "ik_max_word"); // 配置中文分词器
        properties.put("title", titleField);

        Map<String, Object> deviceCodeField = new HashMap<>();
        deviceCodeField.put("type", "keyword");
        properties.put("deviceCode", deviceCodeField);

        Map<String, Object> timeField = new HashMap<>();
        timeField.put("type", "date");
        properties.put("time", timeField);

        // 设置映射
        HashMap<String, Object> map = new HashMap<>();
        map.put("properties", properties);
        request.mapping(map);

        try {
            client.indices().create(request, RequestOptions.DEFAULT);
            return "Index created successfully";
        } catch (IOException e) {
            e.printStackTrace();
            return "Error creating index: " + e.getMessage();
        }
    }
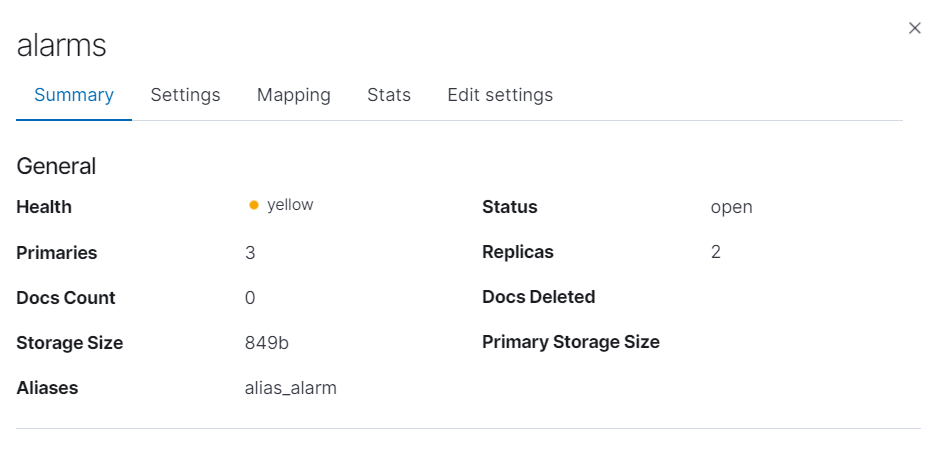
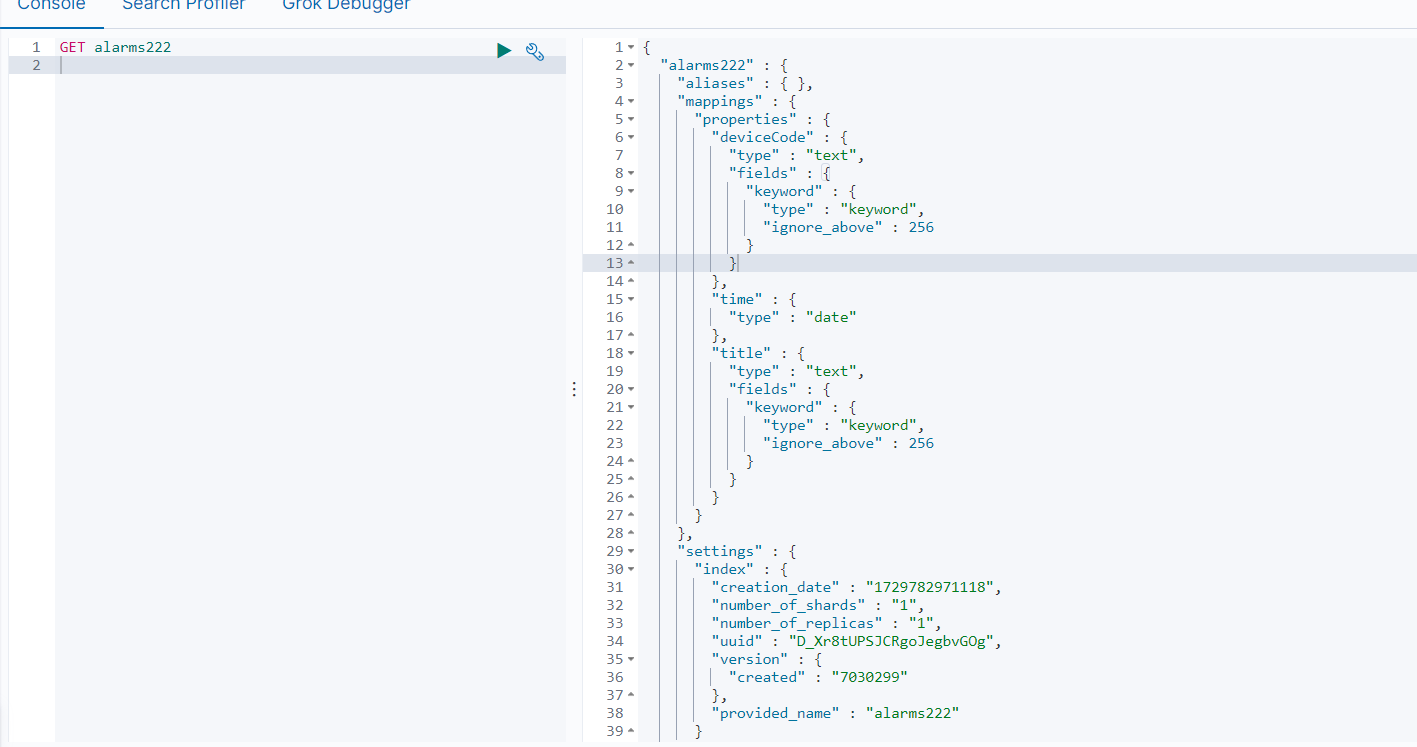
调用后:
在kibana中可以看到

-
可以看到分片,副本等数量,以及存储的大小、别名等
-
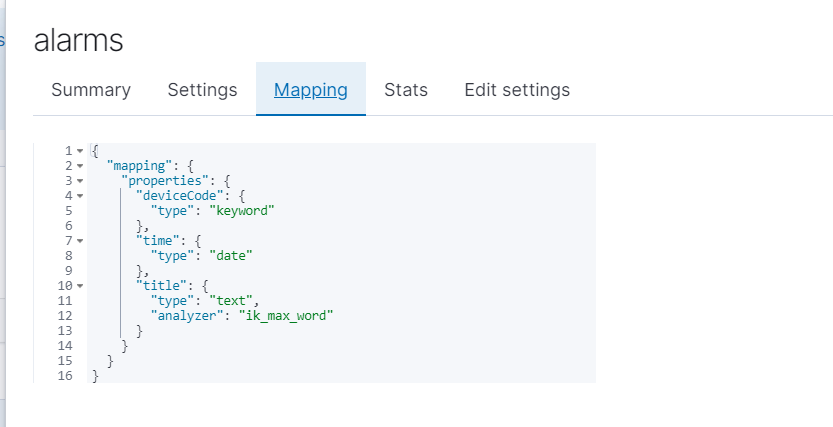
别名的作用也是很大的,如果后面索引太大,然后使用日期等配置索引的时候,就有作用了
-
mapping 映射 字段的类型,以及分词器
es的字段类型主要有以下这些:
1. 基本数据类型
String: 以前用于文本和关键词。现在使用以下两种类型替代:

text: 用于全文搜索,支持分词。
keyword: 用于精确匹配,不支持分词,适合用于过滤、排序和聚合。
Numeric Types:

integer: 整数类型(32位)。
long: 长整数类型(64位)。
float: 单精度浮点数(32位)。
double: 双精度浮点数(64位)。
short: 短整型(16位)。
byte: 字节类型(8位)。
Date: 日期类型,支持多种日期格式。

2. 布尔类型
boolean: 布尔类型,只能取值 true 或 false。
3. 复杂数据类型
Object: 嵌套的 JSON 对象,可以包含其他字段。

Nested: 嵌套对象,支持对嵌套文档的查询,保持对象之间的关联性。

4. 特殊类型
geo_point: 地理坐标类型,存储经纬度信息。

geo_shape: 用于存储复杂的地理形状数据(如多边形等)。

ip: 存储 IP 地址。

5. 二进制类型
binary: 存储二进制数据,支持 Base64 编码的内容。
6. 列表类型
Elasticsearch 也支持字段的数组形式,可以将多个值存储在同一个字段中
增加单条记录
// 增加单条报警记录
    @PostMapping("/createAlarm")
    public String createAlarm(@RequestBody AlarmRecordEntity alarmRecord) throws IOException {
        IndexRequest indexRequest = new IndexRequest(AlarmRecordEntity.getIndex())
                .source("title", alarmRecord.getTitle(),
                        "deviceCode", alarmRecord.getDeviceCode(),
                        "time", alarmRecord.getTime());
//        创建单条数据 使用index
        client.index(indexRequest, RequestOptions.DEFAULT);
        return "Alarm record created";
    }
- 使用index增加单条数据
- 如果使用执行该index的时候,索引不存在,则会自己创建索引,例如将index改为
alarms222,则可以看到执行的结果
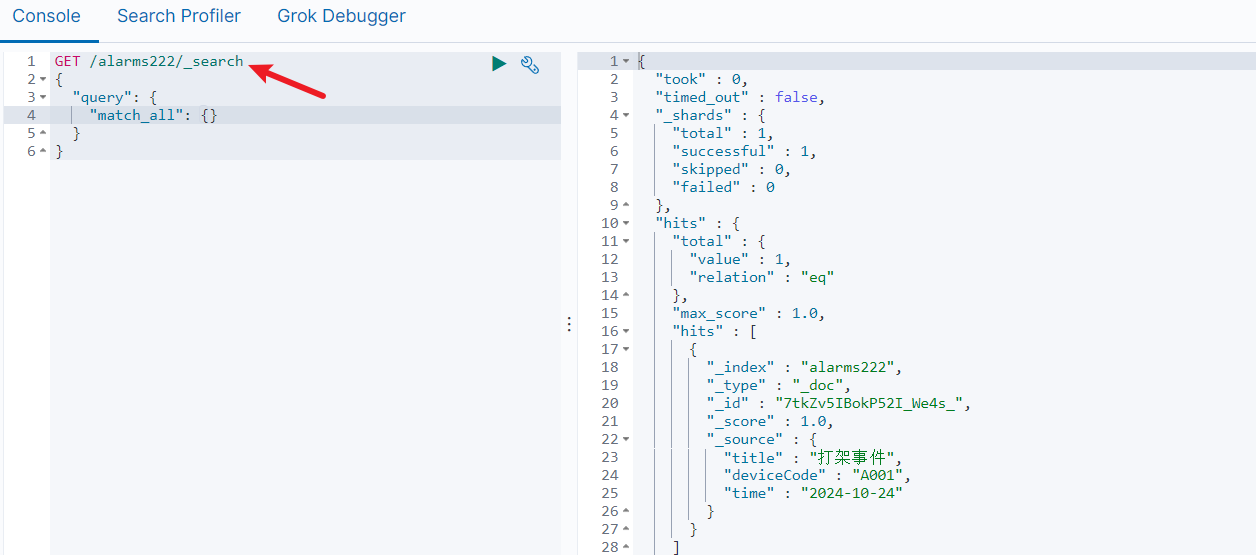
但是他的配置使用的都是默认的
批量增加
    // 批量增加报警记录
    @PostMapping("/bulk")
    public String bulkCreateAlarms(@RequestBody List<AlarmRecordEntity> alarmRecords) throws IOException {

//        批量增加数据 使用bulk方法
        BulkRequest bulkRequest = new BulkRequest();
        for (AlarmRecordEntity alarmRecord : alarmRecords) {
            IndexRequest indexRequest = new IndexRequest(AlarmRecordEntity.getIndex())
                    .source("title", alarmRecord.getTitle(),
                            "deviceCode", alarmRecord.getDeviceCode(),
                            "time", alarmRecord.getTime());
            bulkRequest.add(indexRequest);
        }
        BulkResponse bulkResponse = client.bulk(bulkRequest, RequestOptions.DEFAULT);

        if (bulkResponse.hasFailures()) {
            return "Failed to create some alarm records: " + bulkResponse.buildFailureMessage();
        }

        return "Batch alarm records created successfully";
    }
使用bulk插入多条数据
至于修改、删除、查询单个记录等,便不在多说,可以查看源码并进行调用
搜索
    @PostMapping("/search")
    public ResponseEntity<List<AlarmRecordEntity>> searchAlarms(@RequestBody AlarmSearchRequest request) {
        try {
            // 创建搜索请求
            SearchRequest searchRequest = new SearchRequest(AlarmRecordEntity.getIndex());
            SearchSourceBuilder sourceBuilder = new SearchSourceBuilder();

            // 分词查询
            if (StrUtil.isNotBlank(request.getTitle())) {
                sourceBuilder.query(QueryBuilders.matchQuery("title", request.getTitle()));
            }

//            精确查询
            if(StrUtil.isNotBlank(request.getDeviceCode()))  {
                sourceBuilder.query(QueryBuilders.termQuery("deviceCode", request.getDeviceCode()));
            }

            // 时间范围查询(假设时间字段是一个日期格式)
            if (StrUtil.isNotBlank(request.getStartTime())) {
                sourceBuilder.query(QueryBuilders.rangeQuery("time").gte(request.getStartTime()).lte(request.getEndTime()));
            }

            // 将构建好的查询条件放入搜索请求中
            searchRequest.source(sourceBuilder);

            // 执行搜索
            SearchResponse response = client.search(searchRequest, RequestOptions.DEFAULT);

            // 解析搜索结果
            List<AlarmRecordEntity> alarms = new ArrayList<>();
            response.getHits().forEach(hit -> {
                AlarmRecordEntity alarm = new AlarmRecordEntity();
                alarm.setTitle((String) hit.getSourceAsMap().get("title"));
                alarm.setDeviceCode((String) hit.getSourceAsMap().get("deviceCode"));
                alarm.setTime((String) hit.getSourceAsMap().get("time"));
                alarms.add(alarm);
            });
            return ResponseEntity.ok(alarms); // 返回 200 状态和报警记录列表
        } catch (Exception e) {
            return ResponseEntity.status(500).body(null); // 返回 500 状态和错误信息
        }
    }
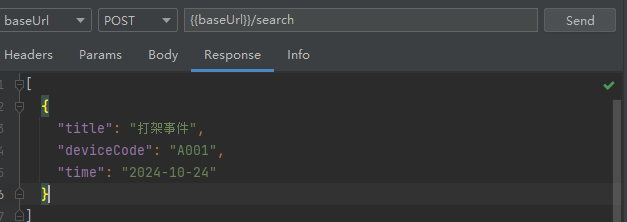
- 验证一下是否会分词
请求参数
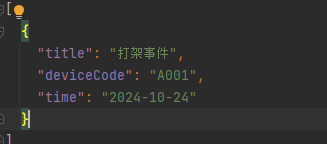
{
  "title": "打架"
}
搜索结果
- deviceCode精确查询
{
  "title": "",
  "deviceCode": "A001",
  "startTime": "",
  "endTime": ""
}
返回结果:

- 时间范围
{
  "title": "",
  "deviceCode": "",
  "startTime": "2024-10-20",
  "endTime": "2024-10-25"
}
返回结果:
总结
大概先做这些演示,不过在实际的过程中,使用原生的es依赖可能也不是最优选,因为会有很多字段需要手打,而不是直接方法获取
所以后面会演示使用spring封装的es依赖,以及easy-es的整合,敬请期待!
源码
https://gitee.com/shen-chuhao/walker_open_java.git


 4748
4748

 被折叠的 条评论
为什么被折叠?
被折叠的 条评论
为什么被折叠?
 到【灌水乐园】发言


