


一、创建一个界面
第一个 没用的 故 删除
二、vue 关键字
2.1 v-if条件判断
<div id="app">
  <label>
    <h2 v-if="isShow">test</h2>
    <h2 v-else>1010101 else</h2>
  </label>
  <button type="button" @click="btnClick">btn</button>
</div>
<script>
  const vm = new Vue({
    el: '#app',
    data: {
      isShow:true
    },
    methods:{
      btnClick(){
        this.isShow=!this.isShow
      }
    }
  })
</script>
2.2 v-show
<div id="app">
  <label>
<!--    v-if: 条件为false时 将包含的元素从dom中删掉
        v-show: 只仅仅隐藏 加了个 display:none
-->
    <h2 v-show="isShow">test</h2>
  </label>
  <button type="button" @click="btnClick">btn</button>
</div>
<script>
  const vm = new Vue({
    el: '#app',
    data: {
      isShow:true
    },
    methods:{
      btnClick(){
        this.isShow=!this.isShow
      }
    }
  })
2.3 created 和 mounted
Vue中实例或者组件从创建到消灭中间经过的一系列过程。

-
created:在模板渲染成html前调用,即通常初始化某些属性值(从后端获取数据),然后再渲染成视图。
-
mounted:在模板渲染成html后调用,通常是初始化页面完成后,再对html的dom节点进行一些需要的操作。
2.3 mustache(胡须)
mustache{{}}不仅仅可以写变量 也可以写简单的表达式。
<template>
  <div id="app">
    <h2>{{a+''+b}}</h2>
    <h2>{{count*2}}</h2>
  </div>
</template>

<script>
  export default {
    name: "Choice",
    data(){
      return{
        a:"11",
        b:"22",
        count:100
      }
    },
    create:function () {

    }
  }
</script>
<style scoped>
</style>
2.4 v-once
<h2 v-once>{{count}}</h2> 只会改变一次
2.5 v-html
解析变量html内容
<!DOCTYPE html>
<html lang="en">
<head>
    <meta charset="UTF-8">
    <title>Title</title>
  <script src="https://cdn.bootcss.com/vue/2.5.2/vue.min.js"></script>
</head>
<body>
<div id="app">
  <h2 v-html="a"></h2>
</div>
<script>
  const vm=new Vue({
    el:'#app',
    data:{
        a:'<h1>太帅了/h1>',
    }
  })
</script>
</body>
</html>
2.6 v-text
与mustache相似 显示文本 不够灵活不建议使用
<!DOCTYPE html>
<html lang="en">
<head>
    <meta charset="UTF-8">
    <title>Title</title>
  <script src="https://cdn.bootcss.com/vue/2.5.2/vue.min.js"></script>
</head>
<body>
<div id="app">
<!--  会直接覆盖,you不够灵活-->
  <h2 v-text="a">,you</h2>
</div>
<script>
  const vm=new Vue({
    el:'#app',
    data:{
        a:'<h1>太帅了</h1>',
    }
  })
</script>
</body>
</html>
2.7 v-pre
<!DOCTYPE html>
<html lang="en">
<head>
   <meta charset="UTF-8">
   <title>Title</title>
 <script src="https://cdn.bootcss.com/vue/2.5.2/vue.min.js"></script>
</head>
<body>
<div id="app">
 <h2>{{a}}</h2>
<!--  会原封不动的显示里面的内容 不作任何的解析-->
 <h2 v-pre>{{a}}</h2>
</div>
<script>
 const vm=new Vue({
   el:'#app',
   data:{
       a:'<h1>太帅了</h1>',
   }
 })
</script>
</body>
</html>
2.8 cloak
翻译为斗篷
<!DOCTYPE html>
<html lang="en">
<head>
  <meta charset="UTF-8">
  <title>Title</title>
  <script src="https://cdn.bootcss.com/vue/2.5.2/vue.min.js"></script>
  <style>
    [v-cloak]{
      display: none;
    }
  </style>
</head>
<body>
<!--  一旦vue对app进行解析 v-cloak会将对app进行自定义的样式操作 直到完成解析并且v-cloak在div中删除-->
<div id="app" v-cloak>
  <h2>{{a}}</h2>
</div>
<script>
  //设置延时1000ms
  setTimeout(function () {
    const vm = new Vue({
      el: '#app',
      data: {
        a: '<h1>太帅了</h1>',
      }
    })
  }, 1000)
</script>
</body>
</html>
2.9 v-bind 动态绑定属性
动态地显示图片 也就是可以控制图片内容显示
<!DOCTYPE html>
<html lang="en">
<head>
  <meta charset="UTF-8">
  <title>Title</title>
  <script src="https://cdn.bootcss.com/vue/2.5.2/vue.min.js"></script>
  <style>
  </style>
</head>
<body>
<div id="app">
  <h2>{{url}}</h2>
  <!--  这里不可以使用胡须,只有内容位置才可以插入-->
  <img src="{{url}}" alt="">
  <!--  在html关键字前面加入v-bind: 动态绑定到data里面的url中 变成可以变化的src-->
  <img v-bind:src="url" alt="">
  <!--  可以缩写成  :-->
  <!--  <img :src="url" alt="">-->
  <a :href="url">图片地址</a>
</div>
<script>
  const vm = new Vue({
    el: '#app',
    data: {
      url: 'https://t7.baidu.com/it/u=1819248061,230866778&fm=193&f=GIF'
    }
  })
</script>
</body>
</html>
2.9.1 动态绑定css
对象语法(常用)
<!DOCTYPE html>
<html lang="en">
<head>
  <meta charset="UTF-8">
  <title>Title</title>
  <script src="https://cdn.bootcss.com/vue/2.5.2/vue.min.js"></script>
  <style>
    .s1{
      color: red;
    }
    .s2{
      color: blue;
    }
    .s3{
      font-family: 宋体;
    }
  </style>
</head>
<body>
<div id="app">
<!--  {里面是对象 key:value}  isS1 为true时加入到class里-->
  <h2 :class="{s1:isS1,s2:isS2}">TEST</h2>
  <button @click="btn">变色</button>

<!--vue 会将两个class合并 不会覆盖-->
  <h2 class="s3" :class="{s1:isS1,s2:isS2}">TEST</h2>
</div>
<script>
  const vm = new Vue({
    el: '#app',
    data: {
      isS1:true,
      isS2:false,
    },
    methods:{
      btn:function () {
        this.isS1=!this.isS1;
      }
    }
  })
</script>
</body>
</html>
数组语法
<!DOCTYPE html>
<html lang="en">
<head>
  <meta charset="UTF-8">
  <title>Title</title>
  <script src="https://cdn.bootcss.com/vue/2.5.2/vue.min.js"></script>
  <style>
    .s1{
      color: red;
    }
    .s2{
      color: blue;
    }
    .s3{
      font-family: 宋体;
    }
  </style>
</head>
<body>
<div id="app">
  <h2 class="s3" :class="getClass()">TEST</h2>
</div>
<script>
  const vm = new Vue({
    el: '#app',
    data: {
      isS1:true,
      isS2:false,
      s1:'s1',
      s2:'s2',
    },
    methods:{
      btn:function () {
        this.isS1=!this.isS1;
      },
      getClass:function () {
        //别忘了this
        return [this.s1,this.s2];
      }
    }
  })
</script>
</body>
</html>
2.9.2 动态绑定style
对象语法
<!DOCTYPE html>
<html lang="en">
<head>
  <meta charset="UTF-8">
  <title>Title</title>
  <script src="https://cdn.bootcss.com/vue/2.5.2/vue.min.js"></script>
  <style>
  </style>
</head>
<body>
<div id="app">
<!--  不加引号 vue会当变量去解析-->
  <h3 :style="getStyles()">test</h3>
</div>
<script>
  const vm = new Vue({
    el: '#app',
    data: {
      num:0,
      fontSize1: 90
      myColor:'red'
    },
    methods:{
      getStyles:function () {
          return {fontSize:this.fontSize1 + 'px',color:this.myColor}
      }
    }
  })
</script>
</body>
</html>
数组语法(不常用 参考上面)
2.10 Computed
2.10.1 基本用法
<!DOCTYPE html>
<html lang="en">
<head>
  <meta charset="UTF-8">
  <title>Title</title>
  <script src="https://cdn.bootcss.com/vue/2.5.2/vue.min.js"></script>
  <style>
  </style>
</head>
<body>
<div id="app">
  <h3>{{name}}</h3>
</div>
<script>
  const vm = new Vue({
    el: '#app',
    data: {
      firstName:'Big',
      lastName:'Boy'
    },
    computed:{
      name:function () {
        return this.firstName+' '+this.lastName
      }
    }
  })
</script>
</body>
</html>
2.10.2 复杂使用
<!DOCTYPE html>
<html lang="en">
<head>
  <meta charset="UTF-8">
  <title>Title</title>
  <script src="https://cdn.bootcss.com/vue/2.5.2/vue.min.js"></script>
  <style>
  </style>
</head>
<body>
<div id="app">
<!--  不加引号 vue会当变量去解析-->
  <h3>{{totalPrice}}</h3>
</div>
<script>
  const vm = new Vue({
    el: '#app',
    data: {
      books:[
        {id:1,name:'book1',price:98},
        {id:2,name:'book2',price:998},
        {id:3,name:'book3',price:998},
        {id:4,name:'book4',price:998}
      ]
    },
    computed:{
      totalPrice:function () {
        let sum=0;
        for(let i of this.books){//es6
          sum+=i.price;
        }
        return sum
      }
    },
    methods:{
      getStyles:function () {
          return {fontSize:this.fontSize1 + 'px',color:this.myColor}
      }
    }
  })
</script>
</body>
</html>
getter and setter
<!DOCTYPE html>
<html lang="en">
<head>
  <meta charset="UTF-8">
  <title>Title</title>
  <script src="https://cdn.bootcss.com/vue/2.5.2/vue.min.js"></script>
  <style>
  </style>
</head>
<body>
<div id="app">
  <h3>{{name}}</h3>
</div>
<script>
  const vm = new Vue({
    el: '#app',
    data: {
      firstName:'Big',
      lastName:'Boy'
    },
    computed:{
      //只读属性
      name:{
        //计算属性一般是没有set方法
        set:function (newValue) {
          const names=newValue.split(' ');
          this.firstName=names[0];
          this.lastName=names[1];
        },
        get:function () {
            return this.firstName+' '+this.lastName
        }
      }
    }
  })
</script>
</body>
</html>
计算属性(computed)对比方法(methods)
- 第一 在界面上可以当一个属性引用不需要加()直接引用
- 第二 计算属性的结果放在缓存中,复用效率高于方法
2.11 v-on
参数问题
如果函数需要参数 但是调用的时候没有输入 vue会将浏览器生产的event对象传到这个函数的第一个参数里
<div id="app">
  <h3>{{num}}</h3>
  <button @click="add">add</button>
</div>
<script>

  const vm = new Vue({
    el: '#app',
    data: {
      num:0
    },
    methods:{
      add(event){
        this.num++;
        console.log(event);
      }
    }
  })
</script>
多参数时用$event取event
如果不加 event会被当做变量在vue中寻找
<div id="app">
  <h3>{{num}}</h3>
  <button @click="add(11,$event)">add</button>
</div>
<script>

  const vm = new Vue({
    el: '#app',
    data: {
      num:0
    },
    methods:{
      add(abc,event){
        this.num+=abc;
        console.log(event);
      }
    }
  })
</script>
v-on修饰符
click.stop
阻止点击事件继续传播
点击add divClick不会被打印
<div id="app" @click="divClick">
  <h3>div</h3>
  <button @click.stop="btnClick">add</button>
</div>
<script>
  const vm = new Vue({
    el: '#app',
    data: {
      num:0
    },
    methods:{
      divClick(){
        console.log("divClick");
      },
      btnClick(){
        console.log("btnClick")
      }
    }
  })
click.prevent
阻止默认事件行为
<div id="app">
  <button type="submit" @click.prevent="btnClick">btn</button>
</div>
<script>

  const vm = new Vue({
    el: '#app',
    data: {
    },
    methods:{
      btnClick(){
        console.log("btnClick")
      }
    }
  })
</script>
xx.once
只监听一次事件 如下
keyup.enter
<div id="app">
  <label>
    <input @keyup.enter="btnClick1"/>
  </label>
  <button type="submit" @click.once="btnClick2">btn</button>
</div>
<script>
  const vm = new Vue({
    el: '#app',
    data: {
    },
    methods:{
      btnClick1(){
        console.log("keyup enter")
      },
      btnClick2(){
        console.log("keyup enter")
      }
    }
  })
</script>
2.12 v-for
<div id="app">
  <ul>
<!--   若是 item in yuge 那item仅仅是值-->
    <li v-for="(value,key,index) in yuge">
      {{value}} {{key}} {{index}}
    </li>
  </ul>
</div>
<script>
  const vm = new Vue({
    el: '#app',
    data: {
      yuge:{
        height:1.99,
        age:18,
        name:'shuaiguo'
      }
    },
    methods:{
    }
  })
</script>
为什么建议使用v-for设置一个:key
在向中间插入元素时 如果没有key 虚拟DOM的diff算法只能一个个将后面元素后移 效率低下 使用key作为数据标识可在中间直接插入数据 高效的更新虚拟DOM
特别:vue中数组哪个方法是响应式
- 1.push()
2.pop()
3.shift()
4.unshift()
5.splice() 拼接
6.sort() 将…分类
7.reverse() 颠倒 反转
<!doctype html>
<html lang="en">
<head>
  <meta charset="UTF-8">
  <meta name="viewport"
        content="width=device-width, user-scalable=no, initial-scale=1.0, maximum-scale=1.0, minimum-scale=1.0">
  <meta http-equiv="X-UA-Compatible" content="ie=edge">
  <title>Document</title>
</head>
<body>
  <div id="app">
    <ul>
      <li v-for="item in letters" :key="item">{{item}}</li>
    </ul>
    <button @click="btnClick">按钮</button>
  </div>

  <script src="../vue.min.js"></script>
  <script>
    const app=new Vue({
      el:'#app',
      data:{
        message:'hello',
        letters:['a','b','c','d'],
      },
      methods:{
        btnClick(){
          // 1.push方法
          // this.letters.push('aaa');

          //  2.通过索引值修改数组中的元素(不是响应式的)
          // this.letters[0]='bbbbb';

          //pop():删除数组中的最后一个元素
          this.letters.pop();

          //shift():删除数组中的第一个元素
          this.letters.shift();

          // unshift():在数组最前面添加元素
          this.letters.unshift('aaa','bbb','ccc');

          // splice()作用:删除元素/插入元素/替换元素
          //删除元素:第二个参数传入你要删除几个元素(如果没有传参数,就删除后面的所有元素)
          //替换元素:第二个参数辨识要替换几个元素,后面是用于替换前面的元素
          // 插入元素:第二元素为0,并且后面跟上要插入的元素
          // splice(start)
          this.letters.splice(1,3,'s','u','n');

          // sort():
          this.letters.sort();

          // reverse()
          this.letters.reverse();

          // set(要修改的对象,索引值,修改后的值)
          //this.letters[0]='bbbb' 这个vue不会响应!!!! 可以用splice
          Vue.set(this.letters,0,'bbbb');


        }

      }
    })

    //es6可变参数语法
    function sum(...num) {
      console.log(num);
    }
    sum(20,30,40,50,60,70);

  </script>
</body>
</html>
2.13 v-model
数据双向绑定 注意胡须什么的都是响应式 不会反过来影响数据
CheckBox
<div id="app">
  <h2>您的爱好是?:</h2>
<!--  :for="item" 值绑定-->
  <label v-for="item in list" :for="item">
    <input type="checkbox" v-model="act" :id="item" name="act" :value="item">{{item}}
  </label>

  <h2>{{act}}</h2>
</div>
<script>

  const vm = new Vue({
    el: '#app',
    data: {
      //注意这个地方是数组类型 单选框时对应的是boolean值
      act:[],
      list:['唱','跳','RUP']
    }
  })
</script>
Select
<div id="app">
  <h2>您的爱好是?:</h2>
  <select name="nameS" v-model="act">
    <option value="1">1</option>
    <option value="3">3</option>
    <option value="4">4</option>
    <option value="2">2</option>
  </select>
  <h2>{{act}}</h2>
</div>
<script>

  const vm = new Vue({
    el: '#app',
    data: {
      act:''
    }
  })
</script>
修饰符
lazy
<div id="app">
  <h2>您的爱好是?:</h2>
<!--  v-model.lazy 敲回车才绑定-->
  <input type="text" v-model.lazy="act">
  <h2>{{act}}</h2>
</div>
<script>

  const vm = new Vue({
    el: '#app',
    data: {
      act:''
    }
  })
</script>
number
<div id="app">
  <h2>您的爱好是?:</h2>
<!--  v-model.number act将一直保持number类型-->
  <input type="number" v-model.number="act">
  <h2>{{act+' '+typeof act}}</h2>
</div>
<script>

  const vm = new Vue({
    el: '#app',
    data: {
      act:0
    }
  })
</script>
trim
去除左右两边多余空格
v-model.trim
三、组件
3.1 组件内值必须为函数
为什么必须是函数呢?
因为用对象data(){ title:'dasfaa'}会导致所有组件的复用实例的数据是共享的 而用函数每次复用都会创建一个新的数据储存地址
<div id="app">
  <t1></t1>
</div>

<template id="t1">
  <div>
    <h2>qwer</h2>
    <h2>111111111111{{title}}</h2>
  </div>
</template>
<script>

  //注册一个全局组件
  Vue.component('t1',{
    template:'#t1',
    //组件里必须是 返回函数
    data(){
      return{
        title:'dasfaa'
      }
    }
  })

  const vm = new Vue({
    el: '#app',
    data: {
      act:0
    }
  })
</script>
4.2 父子组件通信与访问
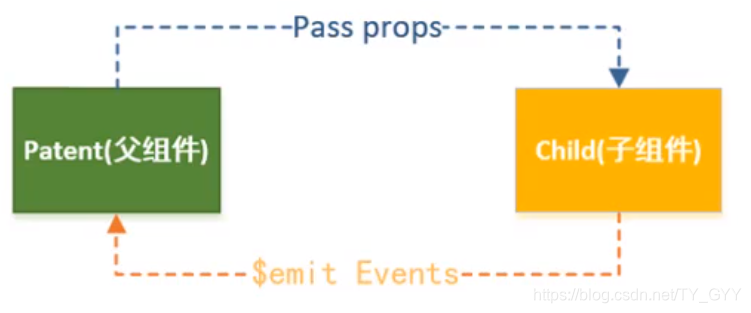
4.2.1 父传子 props
props支持的数据验证
String
Number
Boolean
Function
Object
Array
Symbol
<div id="app">
<!--  //模板里多了一个属性 就可以用bind-->
  <t1 :act="act" :list1="movies"></t1>
</div>

<template id="t1">
  <div>
    <h2>Data: {{act}}</h2>
    <ul>
      <li v-for="item in list1" :key="item">{{item}}</li>
    </ul>
  </div>
</template>
<script>

  const t1={
    template:'#t1',
    //父传子用 props
    props:{
      //对象可以指定类型
      act:{
        validator(value) {
          console.log(value);
          return false;
        }
      },
      list1:{
        type:Array,
        //可以设置默认值 如果类型是数组或者对象时 默认值必须是一个函数
        default(){
          return ['1','2']
        },
        //用来验证数据
        validator(value){
          console.log(value);
          //必须是其中一个
          return ['m11','m33','4m'].indexOf(value) !==-1
        },
        //使用这个组件时候 必须传值给这个属性
        required:true
      }
    },
    data(){
      return{
        list1: []
      }
    }
  }
  const vm = new Vue({
    el: '#app',
    data: {
      act:77,
      movies:['m1','m2','m3']
    },
    components:{
      t1  //cs6
    }
  })
</script>
4.2.2 子传父 $emit
<div id="app">
<!--  父组件 vue默认吧item传过去-->
  <t1 @btnclick="copyData"></t1>
</div>

<template id="t1">
  <div>
    <button @click="notifyClick('btn click')">button</button>
  </div>
</template>
<script>

  const t1={
    template:'#t1',
    //父传子用 props
    props:{
      //对象可以指定类型
      act:{
        validator(value) {
          console.log(value);
          return false;
        }
      }
    },
    data(){
      return{
        list1: []
      }
    },
    methods:{
      notifyClick(item){
        //不能用驼峰命名   发出一个名为btnclick的事件 可以在父组件中调用
        this.$emit('btnclick',item)
      }
    }
  }
  const vm = new Vue({
    el: '#app',
    data: {
      act:77,
      movies:['m1','m2','m3']
    },
    components:{
      t1  //cs6
    },
    methods: {
      copyData(v){
        console.log(v+"----------copy")
      }
    }
  })
</script>
4.2.3 父访问子 c h i l d r e n / children/ children/refs
<div id="app">
  <t1 ref="t01"></t1>
  <t1 ref="t02"></t1>
  <t1 ref="t03"></t1>
  <button @click="btnClick">button</button>
</div>

<script>

  const vm = new Vue({
    el: '#app',
    data: {
      num1: 0,
      num2: 0
    },
    components: {
      t1:{
        data(){
          return{
            name:'子组件内的name'
          }
        },
        methods: {
          message() {
            console.log("子组件的message方法...");
          }
        }
      }
    },
    methods: {
      btnClick(){
        // 1.$children
        //开发中一般不用children 不好维护
        // console.log(this.$children);
        // for (let t of this.$children){
        //   console.log(t.name);
        //   t.message()
        // }

        //2$refs 对象类型默认为空需要在使用子组件时 加入ref命名
        console.log(this.$refs);
      }
    }
  })
</script>
4.3 slot
4.3.1 基本使用
<div id="app">
  <t1></t1>
  <t1>
<!--    所有元素替换到slot中-->
    <span>data</span>
    <p>data2</p>
  </t1>
  <t1></t1>
</div>
<template id="t1">
  <div>
    <h2>--1122--</h2>
<!--    定义个slot相当于html元素占位符-->
    <slot>
<!--      设置默认元素-->
      <button>按钮</button>
    </slot>
  </div>
</template>
<script>

  const vm = new Vue({
    el: '#app',
    data: {
    },
    components: {
      t1:{
        template:'#t1',
        data(){
          return{
          }
        },
        methods: {
        }
      }
    },
    methods: {
    }
  })
</script>
4.3.2 具名使用
<div id="app">
  <t1>
    <p slot="s2">t1 test</p>
    <p slot="s1">t2 test</p>
  </t1>
<!--  要指定name 要不然什么都不显示-->
  <t1><p>t3 test</p></t1>
</div>
<template id="t1">
  <div>
    <h2>----</h2>
    <slot name="s1"><p>1</p></slot>
    <slot name="s2"><p>2</p></slot>
    <slot name="s3"><p>3</p></slot>

  </div>
</template>
<script>
  const vm = new Vue({
    el: '#app',
    data: {
    },
    components: {
      t1:{
        template:'#t1',
        data(){
          return{
          }
        },
        methods: {
        }
      }
    },
    methods: {
    }
  })
</script>
4.3.3 v-slot 作用域插槽
让父组件的插槽内容能够访问子组件中才有的数据
<div id="app">
  <t1></t1>
  <t1>
<!--    <template slot-scope="slot">
现在这样写:v-slot:插槽名 =“自定义属性名”  在template中
-->
    <template v-slot="slotProps">
      <span>{{slotProps.flowers.toString()}}</span>
    </template>
  </t1>
</div>
<template id="t1">
  <div>
    <h2>----</h2>
    <slot :flowers="flowers">
      <ul>
        <li v-for="item in flowers" :key="item">
          {{item}}
        </li>
      </ul>
    </slot>

  </div>
</template>
<script>
  const vm = new Vue({
    el: '#app',
    data: {
    },
    components: {
      t1:{
        template:'#t1',
        data(){
          return{
            flowers:['clover','rose','lily','...']
          }
        },
        methods: {
        }
      }
    },
    methods: {
    }
  })
</script>
四、Vue CLI
安装 创建项目
官网链接 写的很明白
注意
-
先安装node
-
Vue CLI 的包名称由
vue-cli改成了@vue/cli。 如果你已经全局安装了旧版本的vue-cli(1.x 或 2.x),你需要先通过npm uninstall vue-cli -g或yarn global remove vue-cli卸载它。
对Vue中 runtime-compiler 和 runtime-only 两种模式的理解
区别
- runtime-only 比 runtime-compiler 轻 6kb
- runtime-only 运行更快
- runtime-only 只能识别render函数,不能识别template,.vue文件中的template也是被 vue-template-compiler 翻译成了render函数,所以只能在.vue里写 template
五、vue router
5.1 url的hash HTML5的history
通过url的hash HTML5的history可以使页面不刷新
| 浏览器console输入 | 地址栏 |
|---|---|
| location.hash=‘wokao’ | http://localhost:8080/#/wokao |
| history.pushState({},’’,‘wokao2’) | http://localhost:8080/wokao2 |
| history.back()/history.go(-1)/history.forward(1) | http://localhost:8080/#/wokao |
| history.replaceState({},’’,‘wo’) | http://localhost:8080/wo |
- history.pushState是一个栈
- history.replaceState替换当前路由 被替换的路由嗝屁了
- history.go(-2)从栈里出两个 history.go(1) 从栈里压入一个history.forward一个道理 类似go
- 地址中有#表示使用的是hash值
5.2 vue-router 简单使用
-
创建界面文件
Home.vue
<template>
    <div>
        <h2>Home</h2>
    </div>
</template>

<script>
  export default {
    name: "home"
  }
</script>

<style scoped>

</style>
About.vue
<template> <div> <h2>About</h2> </div> </template> <script> export default { name: "About" } </script> <style scoped> </style> -
书写路由
import Vue from 'vue' import VueRouter from 'vue-router' import Home from "../views/Home"; import About from "../views/About"; Vue.use(VueRouter) const routes = [ { path:'/home', component:Home }, { path:'/about', component:About } ] const router = new VueRouter({ routes }) export default router -
使用路由
在APP.vue中书写
<template>
  <div id="app">
    <router-link to="/home">home  </router-link>
    <router-link to="/about">about</router-link>
    <router-view/>

  </div>
</template>

<style>
</style>
5.3 修改路由的默认值 改hash为history
import Vue from 'vue'
import VueRouter from 'vue-router'
import Home from "../views/Home";
import About from "../views/About";

Vue.use(VueRouter)

const routes = [
  {
    path:'',
      /*
  {
    path:'',
    component:Home
  }这种方式地址栏不会有home
      */
    redirect:'/home'
  },
  {
    path:'/home',
    component:Home
  },
  {
    path:'/about',
    component:About
  }
]

const router = new VueRouter({
  routes,
    //默认mode为hash
  mode:'history'
})

export default router
5.3 router-link属性
| 属性 | 作用 |
|---|---|
| to="/home" | 指定路由 |
| tag=“button” | 指定渲染成什么元素 |
| replace | 不会留下history记录 |
| active-class="" | 自定义router-link-active的名字 |
router-link-active
当某个路由被激活router自动加入class这个样式router-link-active 所以可以设置激活状态
也可以统一设置class 在router/index.js 下添加linkActiveClass
const router = new VueRouter({
  routes,
  mode:'history',
  linkActiveClass:'main'
})
演示代码
<template>
  <div id="app">
    <router-link style="margin-right: 10px" to="/home" tag="button" replace active-class="main">home</router-link>
    <router-link to="/about" tag="button" replace>about</router-link>
    <router-view/>
  </div>
</template>

<style>
  .router-link-active{
    color: #42b983;
  }
  .main{
    color: blueviolet;
  }
</style>
5.4 代码跳转路由
<template>
    <div id="app">
        <!--    <router-link style="margin-right: 10px" to="/home" tag="button">home</router-link>-->
        <!--    <router-link to="/about" tag="button" replace>about</router-link>-->
        <button @click="goHome">home</button>
        <button @click="goAbout">about</button>
        <router-view/>
    </div>
</template>

<script>
  export default {
    name: 'APP',
    methods: {
      goAbout() {
        //vue 会给所有的组件内置$router  $route为当前活跃的路由

        //防止重复点击 添加路由报错
        if (this.$route.path !== '/about')
          this.$router.replace('/about')
        else
          console.log('重复点击');
      },
      goHome() {
        if (this.$route.path !== '/home')
          this.$router.replace('/home')
        else
          console.log('重复点击');
      }
    }
  }
</script>

<style>
</style>
5.5 动态路由
user.vue
<template>
    <div>
        <h2>userId:{{$route.params.userId}}</h2>
        <h2>userId:{{$route.params.username}}</h2>
    </div>
</template>

<script>
  export default {
    name: "User"
  }
</script>

<style scoped>

</style>
添加路由
import Vue from 'vue'
import VueRouter from 'vue-router'
import Home from "../views/Home";
import About from "../views/About";
import User from "../views/User";

Vue.use(VueRouter)

const routes = [
  {
    path:'',
    redirect:'/home'
  },
  {
    path:'/home',
    component:Home
  },
  {
    path:'/about',
    component:About
  },
  {
    path:'/user/:userId&:username',
    component:User
  }
]

const router = new VueRouter({
  routes,
  mode:'history',
  linkActiveClass:'main'
})

export default router
app.vue
<template>
    <div id="app">
      <h1>APP Components</h1>
        <router-link style="margin-right: 10px" to="/home" tag="button">home</router-link>
        <router-link style="margin-right: 10px" :to="'/user/'+userId+'&'+username" tag="button">goUser</router-link>
        <router-link to="/about" tag="button" replace>about</router-link>
        <router-view/>
    </div>
</template>

<script>
  export default {
    name: 'APP',
    data(){
      return{
        userId:'1',
        username:'yuge'
      }
    },
    methods: {}
  }
</script>

<style>
    .main {
        color: blueviolet;
    }

</style>
5.6 路由懒加载
当打包构建应用时,JavaScript 包会变得非常大,影响页面加载。如果我们能把不同路由对应的组件分割成不同的代码块,然后当路由被访问的时候才加载对应组件,这样就更加高效了。
import Vue from 'vue'
import VueRouter from 'vue-router'
// import Home from "../views/Home";
// import About from "../views/About";
// import User from "../views/User";

Vue.use(VueRouter)
//路由懒加载 实现动态加载
//一个路由会被分为一个js文件 当使用时动态加载
const Home=()=>import('../views/Home')
const About=()=>import('../views/About')
const User=()=>import('../views/User')

const routes = [
  {
    path:'',
    redirect:'/home'
  },
  {
    path:'/home',
    component:Home
  },
  {
    path:'/about',
    component:About
  },
  {
    path:'/user/:userId&:username',
    component:User
  }
]

const router = new VueRouter({
  routes,
  mode:'history',
  linkActiveClass:'main'
})

export default router
5.7嵌套路由
创建HomeNews.vue
<template>
    <div>
<!--        // ul>li{新闻$}*4 按一个tab-->
        <ul>
            <li>新闻1</li>
            <li>新闻2</li>
            <li>新闻3</li>
            <li>新闻4</li>
        </ul>
    </div>
</template>

<script>
  export default {
    name: "HomeNews"
  }
</script>

<style scoped>

</style>
配路由
import Vue from 'vue'
import VueRouter from 'vue-router'

Vue.use(VueRouter)
//路由懒加载
const Home=()=>import('../views/Home')
const HomeNews=()=>import('../views/HomeNews')

const routes = [
  {
    path:'',
    redirect:'/home'
  },
  {
    path:'/home',
    component:Home,
    children:[
      {
        path:'',
        redirect:'news'
      },
      {
        // 不能加 /  vue会自动加入
        path:'news',
        component:HomeNews
      }
    ]
  }
]

const router = new VueRouter({
  routes,
  mode:'history',
  linkActiveClass:'main'
})

export default router
home.vue
<template>
    <div>
        <h2>Home</h2>
        <router-link to="/home/news">homeNews</router-link>
        <router-view/>
    </div>
</template>

<script>
  export default {
    name: "home"
  }
</script>

<style scoped>

</style>
5.8 参数传递
app.vue
<template>
    <div id="app">
        <h1>APP Components</h1>
        <router-link style="margin-right: 10px" to="/home" tag="button">home</router-link>

        <router-link :to="{path:'/profile',query:{name:'rose',id:2,age:18}}" tag="button">
            profile
        </router-link>
        <button @click="goProfile">goProfile 2.0</button>

        <router-link style="margin-right: 10px" :to="'/user/'+id+'&'+name" tag="button">goUser</router-link>
        <button @click="goUser">goUser 2.0</button>

        <router-link to="/about" tag="button" replace>about</router-link>
        <router-view/>
    </div>
</template>

<script>
  export default {
    name: 'APP',
    data() {
      return {
        id: '1',
        name: 'yuge',
        age: 18
      }
    },
    methods: {
      goUser() {
        this.$router.replace( '/user/'+this.id+'&'+this.name)
      },
      goProfile() {
        this.$router.replace({
          path: '/profile',
          query: {
            name: this.name,
            id: this.id,
            age: this.age
          }
        })

      }
    }
  }
</script>

<style>
    router-link,button{
        margin-right: 10px
    }

</style>
profile.vue
<template>
    <div>
        <h1>Profile Component</h1>
        <p>{{$route.query.name+' '+$route.query.id+' '+$route.query.age}}</p>
    </div>
</template>

<script>
  export default {
    name: "Profile",

  }
</script>

<style scoped>

</style>
router/index
{
  path:'/profile',
  component:Profile
}
5.9 全局导航守卫
router/index
import Vue from 'vue'
import VueRouter from 'vue-router'
// import Home from "../views/Home";
// import About from "../views/About";
// import User from "../views/User";

Vue.use(VueRouter)
//路由懒加载
const Home=()=>import('../views/Home')
const HomeNews=()=>import('../views/HomeNews')
const About=()=>import('../views/About')
const User=()=>import('../views/User')
const Profile=()=>import('../views/Profile')

const routes = [
  {
    path:'',
    redirect:'/home'
  },
  {
    path:'/home',
    component:Home,
      //定义元数据
    meta:{
      title:'首页'
    },
    children:[
      {
        path:'',
        redirect:'news'
      },
      {
        // 不能加 /  vue会自动加入
        path:'news',
        component:HomeNews,
        meta:{
          title:'首页-新闻'
        }
      }
    ]

  },
  {
    path:'/about',
    component:About,
    meta:{
      title:'关于'
    },
    beforeEnter:((to,from,next)=>{
      console.log('about beforeEnter');
      next()
    })
  },
  {
    path:'/user/:userId&:username',
    component:User,
    meta:{
      title:'用户'
    }
  },
  {
    path:'/profile',
    component:Profile,
    meta:{
      title:'我的'
    }
  }
]

const router = new VueRouter({
  routes,
  mode:'history',
  linkActiveClass:'main'
})
//全局前置守卫
router.beforeEach((to,from,next)=>{
  document.title=to.meta.title
  next()
})

export default router
5.10 keep-alive
app.vue
keep-alive保持组件不被销毁
<keep-alive  exclude="about,profile">
  <router-view/>
</keep-alive>
<template>
    <div>
        <h2>Home</h2>
        <router-link to="/home/news">homeNews</router-link>
        <router-view/>
    </div>
</template>

<script>
  export default {
    name: "home",
    data() {
      return {
        path:'/home/news'
      }
    },
    destroyed(){
      console.log('home onDestroyed');
    },
    //activated 和 deactivated 只有使用keep-alive才会有效
    //所以那时候可以用created 和 destroyed
    activated(){
      console.log('activated');
      this.$router.replace(this.path)
    },
    deactivated () {
      console.log('deactivated');
    },
    beforeRouterLeave(to,from,next){
      this.path=this.$route.path
      next()
    }
  }
</script>

<style scoped>

</style>
六、Vuex
vuex 作用是用来创建和管理全局变量 而且可以实现数据响应式
6.1 vuex基本使用
-
安装
npm install vuex --save -
在src下创建store/index.js
-
import Vue from 'vue' import Vuex from 'vuex' //安装插件 Vue.use(Vuex) //创建对象 const store = new Vuex.Store({ state:{ counter:0 } }) export default store -
<template>
    <div id="app">
        <h2>{{$store.state.counter}}</h2>
        <button @click="$store.state.counter++">+</button>
        <button @click="$store.state.counter--">-</button>
    </div>
</template>

<script>

  export default {
    name: 'APP',
    components: {
    },
    data() {
      return {}
    },
    methods: {
    }
  }
</script>

<style>
    @import "./assets/css/base.css";
    button{
        width: 50px;
        margin-right: 10px;
    }

</style>
不建议直接修改$store.state的数据,直接修改无法得知是哪个页面修改的数据 不利于找错改错
6.2 Vue Devtools安装
6.3 Vuex-store
6.3.1 响应式规则
- vuex 中store 中的 state是响应式的, 当state 中的数据发生变化的时候, vue 组件会自动更新。当我们修改vuex 中store 对象中的数据,都会加入到 vue 整个响应式中, 在vuex 中 store 对象中state 等价于 单个组件 data 存储数据源的地方; 每一个属性都会有一个依赖, Dep => 对应多个watcher
- vue: 响应式系统: 在 data 数据源中保存的数据都会被保存到vue 的响应式系统中, 而相应式系统会监听属性的变化。 当属性发生变化时, 会通知页面中所有用到该属性的地方。
- 后边追加到响应式系统中: 就不会是响应式的数据。 做到响应式系统数据: 就必须在data 数据初始化好。 被 vue 数据监听。
//info没有address也会增加这个字段并且添加到响应式中
Vue.set(state.info, 'address',  '山东省')
//delete state.info.adress 这个做不到响应式
Vue.delete(state.info,'address')
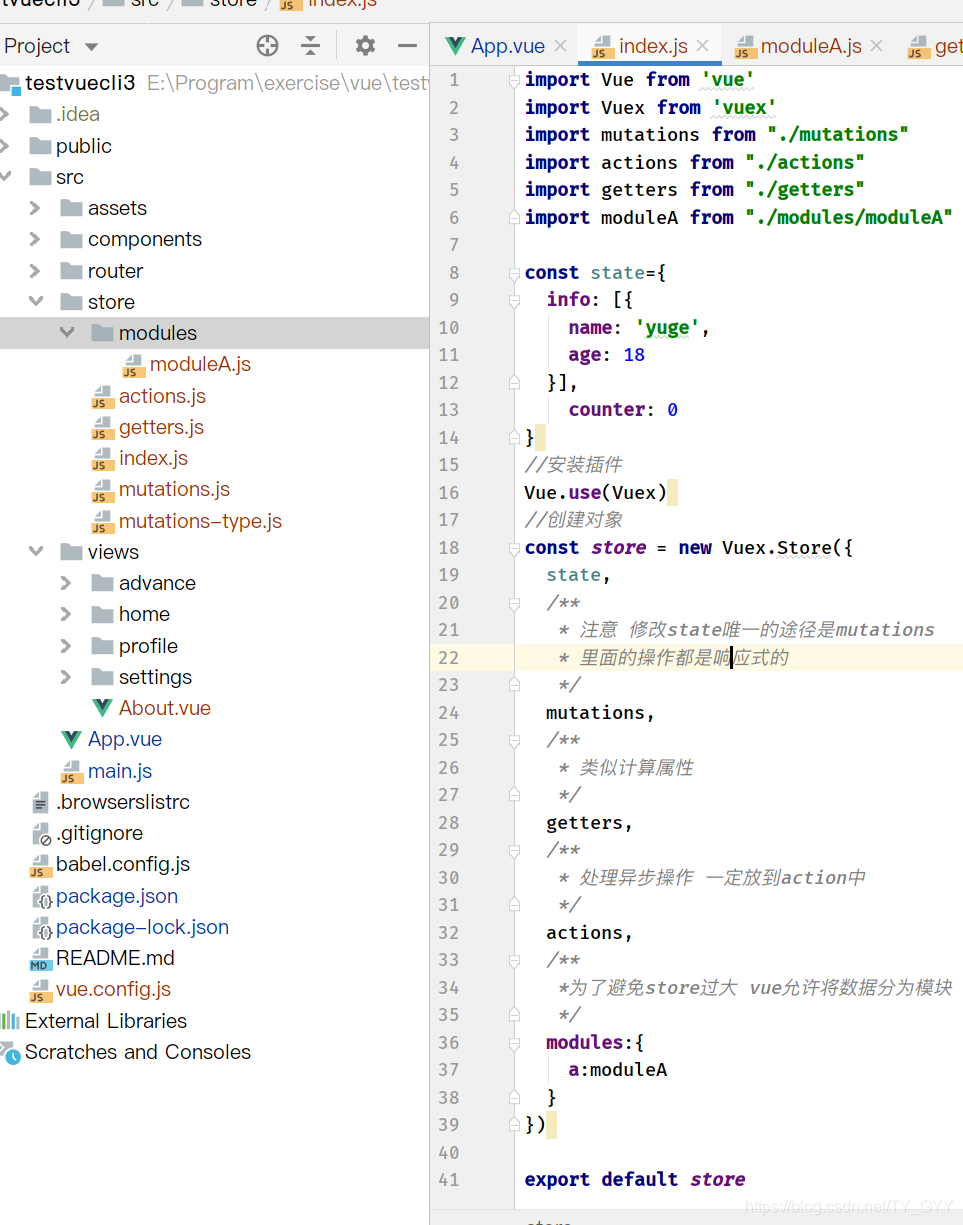
6.3.2 store基本属性
import Vue from 'vue'
import Vuex from 'vuex'
import {INCREMENT} from "./mutations-type";
//modules
const moduleA={
  state:{
    name:'shuaige',
    address:'shangdong hubaojian'
  },
  mutations:{
    //名字不要重复
    updateName(state){
      state.name='big shuaige'
    }
  },
  getters: {
    fullAddress(state,getters,rootState){
      return 'address:'+state.address+rootState.info[0].age
    }
  },
  actions: {
    updateANameAsync(context){
      setTimeout(()=>context.commit('updateName'),1000)
    }
  },
  modules:{
    //最好不要在嵌套
  }
}
//安装插件
Vue.use(Vuex)
//创建对象

const store = new Vuex.Store({
  state: {
    info: [{
      name: 'yuge',
      age: 18
    }],
    counter: 0
  },
  /**
   * 注意 修改state唯一的途径是mutations
   * 里面的操作都是响应式的
   */
  mutations: {
    //自定义参数可以是基本类型 也可以是对象
    //[INCREMENT] mutations类型常量 为了防止变量名书写错误 定义变量名全局使用常量
    [INCREMENT](state, num) {
      state.counter += num
    },
    decrement(state, payload) {
      state.counter -= payload.num
    },
    updateInfo(state, payload) {
      state.info.push(payload)
    }
  },
  /**
   * 类似计算属性
   */
  getters: {
    //可以有两个参数 对应store里的state getters
    powerCounter(state, getters) {
      // 强行使用
      return state.counter * getters.computeCounter(1)
    },
    // 由于不能接受getters 函数不能接受其他参数 可以返回一个函数来自定义操作
    computeCounter(state) {
      return (num) => state.counter * num
    }
  },
  /**
   * 处理异步操作 一定放到action中
   */
  actions: {
    //context相当于store
    aUpdateInfo(context) {
      //Promise 是js新特性 建议百度
      return new Promise(((resolve, reject) => {
        setTimeout(() => {
          context.commit('updateInfo', {name: 'gyy', age: 21})
          //给调用的地方做回调
          resolve('update success')
        }, 1000)
      }))


    }
  },
  /**
   *为了避免store过大 vue允许将数据分为模块
   */
  modules:{
    a:moduleA
  }
})

export default store
使用
<template>
    <div id="app">
<!--        mutations-->
        <h2>{{$store.state.counter}}</h2>
        <h2>{{$store.state.info}}</h2>
<!--        getters-->
        square:<h2>{{$store.getters.powerCounter}}</h2>
        multiply:<h2>{{$store.getters.computeCounter(18)}}</h2>

        <button @click="addition(1)">+1</button>
        <button @click="subtraction(1)">-1</button>
        <button @click="updateInfo">updateInfo</button>
<!--        modules-->
        <h2>{{$store.state.a.name}}</h2>
            <h2>getters:{{$store.getters.fullAddress}}</h2>

            <button @click="updateAName">updateAName</button>
            <button @click="updateANameAsync">updateANameAsync</button>
    </div>
</template>

<script>
import {INCREMENT} from "./store/mutations-type";

export default {
    name: 'APP',
    components: {
    },
    data() {
      return {}
    },
    methods: {
      addition(num){
        this.$store.commit(INCREMENT,num)
      },
      subtraction(num){
        this.$store.commit({
          type:'decrement',
          //在这种写法下所有的参数会变成一个对象
          num
        })
      },
      updateInfo(){
        this.$store.dispatch('aUpdateInfo').then(result=>{
          console.log(result);
        })
      },
      updateAName(){
        this.$store.commit('updateName')
      },
      updateANameAsync(){
        this.$store.dispatch('updateANameAsync')
      }

    }
  }
</script>

<style>
    @import "./assets/css/base.css";
    button{
        width: 150px;
        margin-right: 10px;
    }

</style>
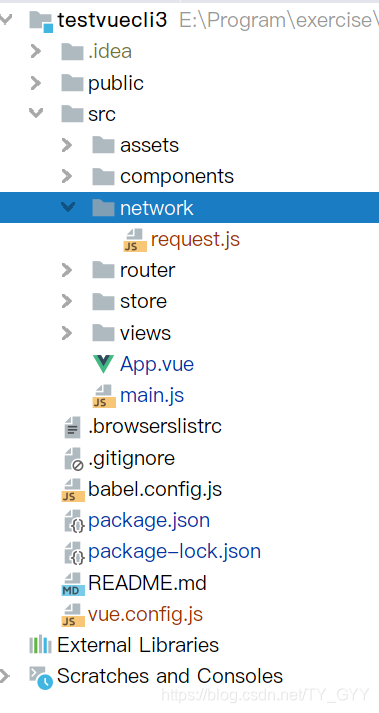
6.3.3 目录组织
七、网络模块封装(axios)
为了防止 因为过度依赖第三方网络请求而导致项目嗝屁时修改项目难度较大 所以要进行网络请求封装
使用说明 · Axios 中文说明 · 看云 (kancloud.cn)
7.1 axios基本使用
import Vue from 'vue'
import App from './App.vue'
import axios from 'axios'

Vue.config.productionTip = false

new Vue({
  render: h => h(App)
}).$mount('#app')

axios({
  url:'http://123.207.32.32:8000/home/data',
  method:'get',
  params:{
    type:'pop',
    page:1
  }
}).then(res=>{//内部支持promise
  console.log(res);
})
7.2 axios发送并发请求
axios.all([axios(),axios()]).then(results=>{})
const axios1 = {
  url: 'http://123.207.32.32:8000/home/data',
  method: 'get',
  params: {
    type: 'pop',
    page: 1
  }
}
const axios2 = {
  url: 'http://123.207.32.32:8000/home/multidata',
  method: 'get'
}

axios.all([axios(axios1),axios(axios2)]).then(results=>{
  console.log(results);
})
//也可以用axios.spread将每个请求分开
axios.all([axios(axios1), axios(axios2)]).then(axios.spread((res1, res2)=> {
  console.log(res1);
  console.log(res2);
}))
7.3 axios 配置信息
axios.defaults.baseURL='http://123.207.32.32:8000'   //默认为 http://localhost:8080
axios.defaults.timeout=5000    //ms

const axios1 = {
  url: '/home/data',
  method: 'get',
  params: {
    type: 'pop',
    page: 1
  }
}
const axios2 = {
  url: '/home/multidata',
  method: 'get'
}

axios.all([axios(axios1),axios(axios2)]).then(results=>{
  console.log(results);
})
//也可以用axios.spread将每个请求分开
axios.all([axios(axios1), axios(axios2)]).then(axios.spread((res1, res2)=> {
  console.log(res1);
  console.log(res2);
}))
7.3 axios 实例和模块封装
封装1
import axios from 'axios'

export function request(config,success,failure){
  const instance=axios.create({
    baseURL:'http://123.207.32.32:8000',
    timeout:5000
  })

  instance(config)
    .then(res=>success(res))
    .catch(err=>failure(err))
}
import Vue from 'vue'
import App from './App.vue'
import {request} from "./network/request";

Vue.config.productionTip = false

new Vue({
  render: h => h(App)
}).$mount('#app')

const axios1 = {
  url: '/home/multidata',
  method: 'get'
}

request(axios1,res=>{
  console.log(res)
},err=>{
  console.log(err);
})
封装2
import axios from 'axios'

export function request(config){
  const instance=axios.create({
    baseURL:'http://123.207.32.32:8000',
    timeout:5000
  })

  instance(config.baseConfig)
    .then(res=>config.success(res))
    .catch(err=>config.failure(err))
}
import Vue from 'vue'
import App from './App.vue'
import {request} from "./network/request";

Vue.config.productionTip = false

new Vue({
  render: h => h(App)
}).$mount('#app')

const axios2 = {
  baseConfig:{
    url: '/home/multidata',
    method: 'get'
  },
  success(res){
    console.log(res);
  },
  failure(err){
    console.log(err);
  }
}

request(axios2)
封装3(建议)
import axios from 'axios'

export function request(config){
  const instance=axios.create({
    baseURL:'http://123.207.32.32:8000',
    timeout:5000
  })

  return instance(config.baseConfig)
}
import Vue from 'vue'
import App from './App.vue'
import {request} from "./network/request";

Vue.config.productionTip = false

new Vue({
  render: h => h(App)
}).$mount('#app')

const axios2 = {
  baseConfig:{
    url: '/home/multidata',
    method: 'get'
  }
}

request(axios2)
  .then(res=>console.log(res))
  .catch(err=>console.log(err))
7.4 axios拦截器
import axios from 'axios'

export function request(config){
  const instance=axios.create({
    baseURL:'http://123.207.32.32:8000',
    timeout:5000
  })
  //请求拦截
  instance.interceptors.request.use(config=>{
    console.log(config);
    return config
  })
  //相应拦截
  instance.interceptors.response.use(res=>{
    //一般用来过滤数据
    console.log(res);
    return res.data
  },err=>{
    console.log(err);
    return err
  })

  return instance(config.baseConfig)
}
作业
4.1 动态绑定css
作业需求:点击列表中的哪一项,那么该项的文字变成红色,默认第一项变红
答案
<!DOCTYPE html>
<html lang="en">
<head>
  <meta charset="UTF-8">
  <title>Title</title>
  <script src="https://cdn.bootcss.com/vue/2.5.2/vue.min.js"></script>
  <style>
    .s1{
      color: red;
    }
    .s2{
      color: blue;
    }
  </style>
</head>
<body>
<div id="app">
  <ul>
<!--    index渲染时会替换成对应下标 只需控制num即可-->
    <li v-for="(item,index) in myList" :class="{s1:index===num}" @click="change(index)">{{item}}</li>
  </ul>
</div>
<script>
  const vm = new Vue({
    el: '#app',
    data: {
      myList:['t1111','t1111','t1111','t1111','t1111'],
      num:0
    },
    methods:{
      change:function (index) {
          this.num=index
      }
    }
  })
</script>
</body>
</html>
4.2父子组件数据双向绑定
需求:num1 num2 父子组件数据双向绑定 当num1发生改变 num2变成num1的100倍 当num2发生改变 num1变成num1的100分之一
ans:
<!DOCTYPE html>
<html lang="en">
<head>
  <meta charset="UTF-8">
  <title>Title</title>
  <script src="https://cdn.bootcss.com/vue/2.5.2/vue.min.js"></script>
  <style>
  </style>
</head>
<body>
<div id="app">
  <h2>num1:{{num1}}</h2>
  <h2>num2:{{num2}}</h2>
  <t1 :num1="num1" @num1change="num1Change"
      :num2="num2" @num2change="num2Change"></t1>
</div>

<template id="t1">
  <div>
    <h2>dnum1:{{dnum1}}</h2>
    <h2>dnum2:{{dnum2}}</h2>

    dnum1<input type="text" :value="dnum1" @input="dnum1Change">
    <hr/>
    dnum2<input type="text" :value="dnum2" @input="dnum2Change">
  </div>
</template>
<script>

  const t1={
    template:'#t1',
    props:{
      num1:Number,
      num2:Number
    },
    data(){
      return{
        dnum1:this.num1,
        dnum2:this.num2
      }
    },
    methods:{
      dnum1Change(event){
        this.dnum1=event.target.value;
        this.$emit('num1change',this.dnum1)

        this.dnum2=this.dnum1*100;
        this.$emit('num2change',this.dnum2)
      },
      dnum2Change(event){
        this.dnum2=event.target.value;
        this.$emit('num2change',this.dnum2)

        this.dnum1=this.dnum2/100;
        this.$emit('num1change',this.dnum1)
      }
    }
  }
  const vm = new Vue({
    el: '#app',
    data: {
      num1:0,
      num2:0
    },
    components:{
      t1
    },
    methods: {
      num1Change(v){
        this.num1=v
      },
      num2Change(v){
        this.num2=v
      }
    }
  })
</script>
</body>
</html>
拓展用 watch
<!DOCTYPE html>
<html lang="en">
<head>
  <meta charset="UTF-8">
  <title>Title</title>
  <script src="https://cdn.bootcss.com/vue/2.5.2/vue.min.js"></script>
  <style>
  </style>
</head>
<body>
<div id="app">
  <h2>num1:{{num1}}</h2>
  <h2>num2:{{num2}}</h2>
  <t1 :num1="num1" @num1change="num1Change"
      :num2="num2" @num2change="num2Change"></t1>
</div>

<template id="t1">
  <div>
    <h2>dnum1:{{dnum1}}</h2>
    <h2>dnum2:{{dnum2}}</h2>

    dnum1<input type="text" v-model="dnum1">
    <hr/>
    dnum2<input type="text" v-model="dnum2">
  </div>
</template>
<script>

  const t1 = {
    template: '#t1',
    //父传子用 props
    props: {
      num1: Number,
      num2: Number
    },
    data() {
      return {
        dnum1: this.num1,
        dnum2: this.num2
      }
    },
    methods: {},
    //用来监听属性变化
    watch: {
      //函数名要和变量名相同 可以有两个参数一般只用一个
      dnum1(newValue, oldValue) {
        //因为改变了dnum2 所以dnum2(newValue)将会收到改变 故不用再写发送num2change
        this.dnum2 = newValue * 100;
        this.$emit('num1change', newValue)
      },
      dnum2(newValue) {
        this.dnum1 = newValue / 100;
        this.$emit('num2change', newValue)
      }
    }

  }
  const vm = new Vue({
    el: '#app',
    data: {
      num1: 0,
      num2: 0
    },
    components: {
      t1  //cs6
    },
    methods: {
      num1Change(v) {
        this.num1 = v
      },
      num2Change(v) {
        this.num2 = v
      }
    }
  })
</script>
</body>
</html>
4.3 tabBar 案例
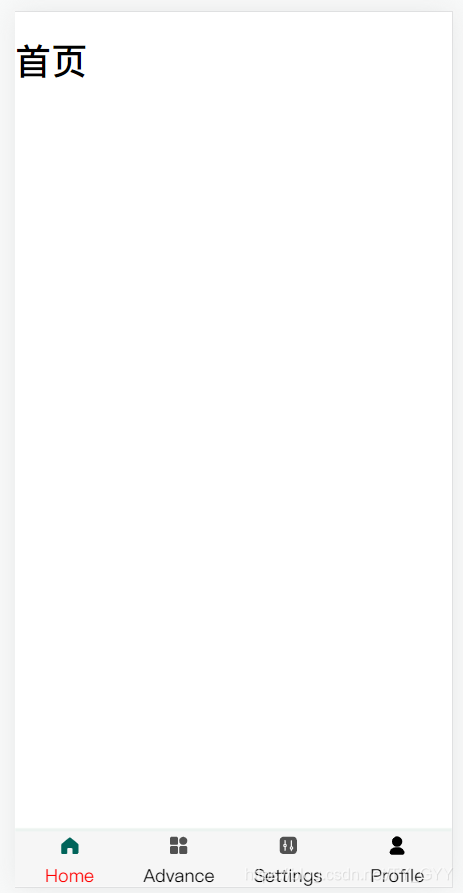
目录结构
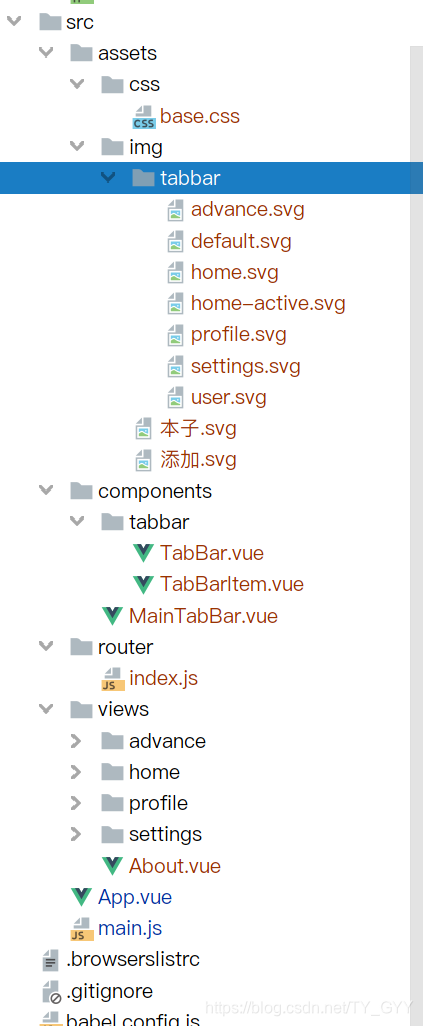
tabbar.vue
<template>
    <div id="tab-bar">
        <slot></slot>
    </div>
</template>

<script>
  export default {
    name: "TabBar"
  }
</script>

<style scoped>
    #tab-bar {
        display: flex;
        background-color: #f6f6f6;
        left: 0;
        right: 0;
        bottom: 0;
        position: fixed;
        box-shadow: 0 -3px 1px rgba(8, 100, 59, 0.08);
    }
</style>
TabBarItem.vue
<template>
    <div class="tab-bar-item" @click="itemClick">
        <slot v-if="!isActive" name="item-icon"></slot>
        <slot v-else name="item-icon-active"></slot>
        <!--        <slot :class="{name:isActive}" name="item-name"></slot> class会失效因为会被替换
                    v-if  虽然可以但建议还是用div封一下
-->
        <div :style="activeStyle">
            <slot name="item-name"></slot>
        </div>
    </div>
</template>

<script>
  export default {
    name: "TabBarItem",
    data() {
      return {
      }
    },
    props:{
      path:{
        default:'',
        type:String
      },
      activeColor:{
        default: '#00645A',
        type: String
      }
    },
    computed:{
      isActive(){
        return this.$route.path.indexOf(this.path) >=0
      },
      activeStyle(){
        return this.isActive?{color:this.activeColor}:{}
      }
    },
    methods: {
      itemClick(){
        if (!this.isActive)
        this.$router.replace(this.path)
      },
    }
  }
</script>

<style scoped>
    .tab-bar-item {
        flex: 1;
        text-align: center;
        height: 49px;
        margin-top: 3px;
        vertical-align: middle;
    }

    .tab-bar-item img {
        width: 20px;
        height: 20px;
    }
</style>
MainTabBar.vue
<template>
    <div>
        <tab-bar>
            <tab-bar-item path="/home" active-color="red">
                <img slot="item-icon" src="@/assets/img/tabbar/home.svg" alt="">
                <img slot="item-icon-active" src="@/assets/img/tabbar/home-active.svg" alt="">
                <div slot="item-name">Home</div>
            </tab-bar-item>
            <tab-bar-item path="/advance">
                <img slot="item-icon" src="@/assets/img/tabbar/advance.svg" alt="">
                <div slot="item-name">Advance</div>
            </tab-bar-item>
            <tab-bar-item path="/settings">
                <img alt="" slot="item-icon" src="@/assets/img/tabbar/settings.svg">
                <div slot="item-name">Settings</div>
            </tab-bar-item>
            <tab-bar-item path="/profile">
                <img slot="item-icon" src="@/assets/img/tabbar/profile.svg" alt="">
                <div slot="item-name">Profile</div>
            </tab-bar-item>
        </tab-bar>
    </div>
</template>

<script>
  import TabBar from "@/components/tabbar/TabBar"
  import TabBarItem from "@/components/tabbar/TabBarItem";
  export default {
    name: "MainTabBar",
    components:{
      TabBarItem,
      TabBar
    }
  }
</script>

<style scoped>

</style>
配置router
import Vue from 'vue'
import VueRouter from 'vue-router'
// import Home from "../views/Home";
// import About from "../views/About";
// import User from "../views/User";

Vue.use(VueRouter)
//路由懒加载
const Home=()=>import('../views/home/Home')
const About=()=>import('../views/About')
const Profile=()=>import('../views/profile/Profile')
const Advance=()=>import('../views/advance/Advance')
const Settings=()=>import('../views/settings/Settings')

const routes = [
  {
    path:'',
    redirect:'/home'
  },
  {
    path:'/home',
    component:Home,
    meta:{
      title:'首页'
    }
  },
  {
    path:'/about',
    component:About,
    meta:{
      title:'关于'
    }
  },
  {
    path:'/profile',
    component:Profile,
    meta:{
      title:'我的'
    }
  },
  {
    path:'/advance',
    component:Advance,
    meta:{
      title:'高级'
    }
  },
  {
    path:'/settings',
    component:Settings,
    meta:{
      title:'设置'
    }
  },
]

const router = new VueRouter({
  routes,
  mode:'history',
  linkActiveClass:''
})

router.beforeEach((to,from,next)=>{
  document.title=to.meta.title
  next()
})

export default router
app.vue
<template>
    <div id="app">
        <router-view></router-view>
       <MainTabBar></MainTabBar>
    </div>
</template>

<script>
  import MainTabBar from "./components/MainTabBar";

  export default {
    name: 'APP',
    components: {
      MainTabBar
    },
    data() {
      return {}
    },
    methods: {
    }
  }
</script>

<style>
    @import "./assets/css/base.css";


</style>
问题与填坑
Cannot read property ‘xx’ of undefined
- 80%是你的变量名是不是少了个 符 号 什 么 的 , 例 如 符号什么的,例如 符号什么的,例如route
vue-devtools 安装
Chrome 新版edge直接下载 打开开发者模式 拖进来安装就行


 8万+
8万+

 被折叠的 条评论
为什么被折叠?
被折叠的 条评论
为什么被折叠?
 到【灌水乐园】发言


