系列文章目录
👏欢迎来到我的React系列文章
🍭本系列文章从React入门开始,涵盖了React的一切基础,属于是从零开始的一个系列
🍭文章会以图文结合-动图-代码实现-解释代码的形式带领大家走进React的世界
🍭持续更新中~希望大家能够喜欢,系列文章👉React–从基础到实战
🌈博客主页👉codeMak1r的博客
👉关注✨点赞👍收藏📂
文章目录
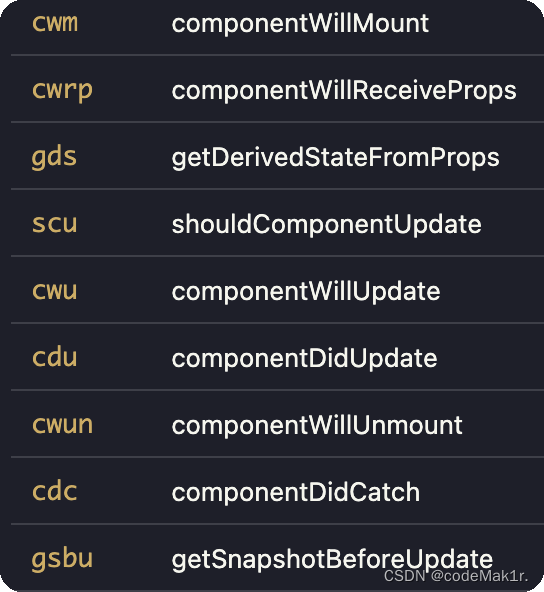
VSCode关于React的插件

使用该插件可以实现生命周期函数的代码联想功能

前言
之前我们引入了生命周期这个概念👉点这里查看
本文讲解的生命周期为React v16.8 旧版,新版生命周期是基于旧版的基础之上的,学好了旧的,新的生命周期掌握起来也轻而易举了~新版生命周期请看本系列下一篇文章。
生命周期流程图(旧)

组件挂载时:constructor => componentWillMount =>
render=> componentDidMount => componentWillUnmount
组件更新时(setState):shouldComponentUpdate => componentWillUpdate =>
render=> componentDidUpdate => componentWillUnmount
组件强制更新(forceUpdate): (绕开阀门)=>componentWillUpdate =>
render=> componentDidUpdate => componentWillUnmount
接下来我会就这三种情况以及组件传值情况下,对生命周期一一分析✅
生命周期示例(旧)
示例效果:

需求:
- 点击
+1按钮,求和数自动+1; - 点击
卸载组件按钮,组件从页面中卸载; - 点击
强制更新按钮,不更改状态中的数据,组件强制更新。
代码实现
<script type="text/babel">
    class Count extends React.Component {
      constructor(props) {
        console.log('Count-constructor')
        super(props)
        this.state = { count: 0 }
      }

      // 组件将要挂载的钩子
      componentWillMount() {
        console.log('Count-componentWillMount')
      }

      // 组件挂载完毕后的钩子
      componentDidMount() {
        console.log('Count-componentDidMount')
      }

      // 组件卸载前的钩子
      componentWillUnmount() {
        console.log('Count-componentWillUnmount')
      }

      // 控制组件更新的阀门,返回true组件更新,返回false组件不更新
      // 如果不写这个钩子,react底层会自动补一个默认返回值为true的shouldComponentUpdate()
      shouldComponentUpdate(nextProps, nextState) {
        console.log('Count-shouldComponentUpdate')
        return true
      }

      //WARNING! To be deprecated in React v17. Use componentDidUpdate instead.
      // 组件将要更新的钩子
      componentWillUpdate(nextProps, nextState) {
        console.log('Count-componentWillUpdate')
      }

      // 组件更新完毕的钩子
      componentDidUpdate(prevProps, prevState) {
        console.log('Count-componentDidUpdate')
      }


      render() {
        console.log('Count-render')
        const { count } = this.state
        return (
          <div>
            <h2>当前求和为:{count}</h2>
            <button onClick={this.add}>点我+1</button>
            <button onClick={this.death}>卸载组件</button>
            <button onClick={this.force}>不更改任何状态中的数据,强制更新一下</button>
          </div>
        );
      }

      add = () => {
        const { count } = this.state
        this.setState({ count: count + 1 });
      }

      death = () => {
        ReactDOM.unmountComponentAtNode(document.getElementById('test'))
      }

      // 强制更新
      force = () => {
        this.forceUpdate()
      }
    }
    ReactDOM.render(<Count />, document.getElementById('test'))
  </script>
我在每一个生命周期函数中都调用了console.log('当前组件名-当前生命周期钩子')语句,当生命周期函数被调用时,打印台会相应的打印出当前组件名和该生命周期函数名。
组件刚完成渲染时的生命周期函数调用

解释
constructor(props) {
  console.log('Count-constructor')
  super(props)
  this.state = { count: 0 }
}

// 组件将要挂载的钩子
componentWillMount() {
  console.log('Count-componentWillMount')
}

render() {
  console.log('Count-render')
  const { count } = this.state
  return (
    <div>
      <h2>当前求和为:{count}</h2>
      <button onClick={this.add}>点我+1</button>
      <button onClick={this.death}>卸载组件</button>
      <button onClick={this.force}>不更改任何状态中的数据,强制更新一下</button>
    </div>
	);
}

// 组件挂载完毕后的钩子
componentDidMount() {
  console.log('Count-componentDidMount')
}
组件挂载时:constructor => componentWillMount =>
render=> componentDidMount => componentWillUnmount
组件刚完成渲染时,也就是组件刚被挂载到页面中的时候,按照打印台的输出我们可以验证,调用函数的顺序是:constructor(当前类的构造函数) => componentWillMount(组件将要被挂载的钩子) => render(渲染) => componentDidMount(组件挂载完毕后的钩子)
点击+1按钮后的生命周期函数调用

解释
shouldComponentUpdate(nextProps, nextState) {
  console.log('Count-shouldComponentUpdate')
  return true
}

//WARNING! To be deprecated in React v17. Use componentDidUpdate instead.
// 组件将要更新的钩子
componentWillUpdate(nextProps, nextState) {
  console.log('Count-componentWillUpdate')
}

 render() {
   console.log('Count-render')
   const { count } = this.state
   return (
     <div>
       <h2>当前求和为:{count}</h2>
       <button onClick={this.add}>点我+1</button>
       <button onClick={this.death}>卸载组件</button>
       <button onClick={this.force}>不更改任何状态中的数据,强制更新一下</button>
     </div>
	);
}

// 组件更新完毕的钩子
componentDidUpdate(prevProps, prevState) {
  console.log('Count-componentDidUpdate')
}

add = () => {
  const { count } = this.state
  this.setState({ count: count + 1 });
}
组件更新时(setState):shouldComponentUpdate => componentWillUpdate =>
render=> componentDidUpdate => componentWillUnmount
点击+1按钮时,触发onClick事件中的回调函数add(),每次点击+1按钮,都会触发这个回调函数add(),函数中调用this.setState({ count: count + 1 });对状态进行更新,从打印台的输出可以看出,调用函数的顺序是:shouldComponentUpdate(组件应该被更新吗,如果返回值为false则组件不更新!不会执行后续的生命周期函数)=> componentWillUpdate(组件将要更新咯~)=> render(渲染组件的更新)=> componentDidUpdate(组件更新完毕咯~)
对shouldComponentUpdate的解释:
// 控制组件更新的阀门,返回true组件更新,返回false组件不更新
// 如果不写这个钩子,react底层会自动补一个默认返回值为true的shouldComponentUpdate()
shouldComponentUpdate(nextProps, nextState) {
  console.log('Count-shouldComponentUpdate')
  return true
}
点击卸载按钮后的生命周期函数调用

解释
<button onClick={this.death}>卸载组件</button>

// 组件卸载前的钩子
componentWillUnmount() {
  console.log('Count-componentWillUnmount')
}

death = () => {
  ReactDOM.unmountComponentAtNode(document.getElementById('test'))
}
点击卸载组件按钮时,触发onClick事件中的回调函数death(),函数内部调用了ReactDOM的unmountComponentAtNode方法,将组件从页面中卸载,在卸载之前会触发componentWillUnmount(组件被卸载前的钩子)。
点击强制更新按钮后的生命周期函数调用

解释
//WARNING! To be deprecated in React v17. Use componentDidUpdate instead.
// 组件将要更新的钩子
componentWillUpdate(nextProps, nextState) {
  console.log('Count-componentWillUpdate')
}

render() {
  console.log('Count-render')
  const { count } = this.state
  return (
    <div>
      <h2>当前求和为:{count}</h2>
      <button onClick={this.add}>点我+1</button>
      <button onClick={this.death}>卸载组件</button>
      <button onClick={this.force}>不更改任何状态中的数据,强制更新一下</button>
    </div>
	);
}

// 组件更新完毕的钩子
componentDidUpdate(prevProps, prevState) {
  console.log('Count-componentDidUpdate')
}

// 强制更新
force = () => {
  this.forceUpdate()
}
组件强制更新(forceUpdate): (绕开阀门)=>componentWillUpdate =>
render=> componentDidUpdate => componentWillUnmount
点击强制更新按钮,触发onClick事件中的回调函数force(),该函数内部使用了一个React提供的强制更新方法forceUpdate(),调用该方法会对组件强制更新(哪怕不更改组件state中的数据),该方法不需要阀门(shouldComponentUpdate)的返回值为true,哪怕阀门的返回值为false,组件依旧会绕开阀门,强制更新!
点击强制更新后的生命周期函数调用顺序是:componentWillUpdate(组件将要更新咯~)=> render(渲染组件的更新到页面)=> componentDidUpdate(组件更新完毕)
组件传值生命周期示例

需求:
- 点击换车按钮,显示的车从奔驰,变成奥拓。
- 探究组件传值时的生命周期函数。
借助React Developer Tools开发者工具可以看出:

该示例中:A组件是父组件,B组件包含在A组件中,B组件是子组件
父组件render(父组件给子组件传值,父组件重新render后):componentWillReceiveProps => shouldComponentUpdate => componentWillUpdate =>
render=> componentDidUpdate => componentWillUnmount注意:componentWillReceiveProps在第一次传入props时不调用,只有在props更新时才会执行,可以用此钩子监听子组件props的改变。
代码实现
父组件A
class A extends React.Component {
  state = { carName: '奔驰' }
  render() {
    return (
      <div>
        <div>我是A组件</div>
        <button onClick={this.changeCar}>换车</button>
        {/* 父组件A将state中的carName传到子组件B的props.carName中 */}
        <B carName={this.state.carName} />
      </div>
		);
	}

  changeCar = () => {
    this.setState({ carName: '奥拓' });
  }
}
ReactDOM.render(<A />, document.getElementById('test'))
子组件B
class B extends React.Component {

  // 组件将要接收新的props的钩子
  // 第一次传入props时不会调用该函数,props发生变化时才会调用
  componentWillReceiveProps(nextProps) {
    // this.props表示上一个参数,nextProps表示新接收到的参数
    console.log('B-componentWillReceiveProps', this.props.carName, nextProps)
  }

  // 控制组件更新的阀门
  shouldComponentUpdate(nextProps, nextState) {
    console.log('B-shouldComponentUpdate')
    return true
  }

  //WARNING! To be deprecated in React v17. Use componentDidUpdate instead.
  componentWillUpdate(nextProps, nextState) {
    console.log('B-componentWillUpdate')
  }

  componentDidUpdate(prevProps, prevState) {
    console.log('B-componentDidUpdate')
  }

  render() {
    return (
      <div>
        {/* 子组件B接收到carName,从props中取出 */}
        我是B组件,接收到的车是:{this.props.carName}
  		</div>
		);
	}
}
组件传值
// A组件内容:
{/* 父组件A将state中的carName传到子组件B的props.carName中 */}
<B carName={this.state.carName} />

// B组件内容:
{/* 子组件B接收到carName,从props中取出 */}
我是B组件,接收到的车是:{this.props.carName}
解释
父组件A的state中维护着一个属性:carName,初始值为’奔驰’;父组件A中的button按钮绑定了一个onClick事件,点击后触发该事件的回调函数changeCar,该函数内部调用setState方法将父组件中state的carName由 ‘奔驰’ 改为 ‘奥拓’因为状态的更改,父组件A此时重新调用render方法,将新的state数据(奥拓)传给子组件B,此时B组件接收到了A组件修改后的数据,触发的生命周期函数顺序如下:
- componentWillReceiveProps(组件将要接受的新props的钩子)
- 注意:第一次传入props时不会调用该函数,props发生变化时才会调用;
- componentWillReceiveProps可以接收到参数
nextProps,表示传入的新props(奥拓),函数内部也可以通过this.props拿到旧的props中的数据(奔驰); - 可以用此钩子监听子组件props的改变。
- shouldComponentUpdate(控制组件更新的阀门,组件是否被允许更新)
- 函数的返回值为
true表示组件允许更新;false表示组件不允许更新,后续生命周期函数不执行
- 函数的返回值为
- componentWillUpdate(组件被允许更新后,将要更新之时会触发这个函数)
- render(渲染更新后的组件到页面)
- componentDidUpdate(组件更新完毕后的钩子)
好啦~今天的文章就先到这里啦,如果在文章中发现错误还请各位道友私信我以便更改~
原创不易,如果对你有帮助的话,请不要吝啬你的三连哟✅~
感谢各位道友的支持✅回见~


 被折叠的 条评论
为什么被折叠?


