


 本文介绍Thymeleaf模板引擎在Spring Boot项目中的集成与使用方法,包括依赖引入、Controller创建及不同数据类型在HTML页面的展示。
Thymeleaf是一款用于渲染XML/XHTML/HTML5内容的模板引擎,springboot官方推荐。类似JSP,Velocity,FreeMaker等,它也可以轻易的与Spring MVC等Web框架进行集成作为Web应用的模板引擎。与其它模板引擎相比,Thymeleaf最大的特点是能够直接在浏览器中打开并正确显示模板页面,而不需要启动整个Web应用。
第一步:引入依赖包
<!--thymeleaf-->
<dependency>
    <groupId>org.springframework.boot</groupId>
    <artifactId>spring-boot-starter-thymeleaf</artifactId>
</dependency>
第二步:创建Thymeleaf测试Controller
package com.spring.bootdemo.controller;

import io.swagger.annotations.Api;
import io.swagger.annotations.ApiOperation;
import org.springframework.stereotype.Controller;
import org.springframework.ui.Model;
import org.springframework.web.bind.annotation.RequestMapping;
import org.springframework.web.bind.annotation.RequestMethod;

@Api(description = "thymeleaf测试")
@Controller
@RequestMapping(value = "/thymeleaf")
public class ThymeleafTestController {

    @ApiOperation(value = "thymeleaf页面传值测试",notes = "页面传值")
    @RequestMapping(value = "/hello",method = RequestMethod.GET)
    public String thymeleafTest(Model model){
        //接口中数据封装后。页面可以直接通过标准表达式的方式获取;例如
        model.addAttribute("name","张三");
        return "hello";
    }
}
第三步:html页面取值
方式一:
<!DOCTYPE HTML PUBLIC "-//W3C//DTD HTML 4.01 Transitional//EN"
        "http://www.w3.org/TR/html4/loose.dtd">
<html>
<head>
    <title>thymeleaf欢迎页面</title>
</head>
<body>
   <h4 th:text:${name}></h4>
</body>
</html>
方式二:如果Controller中封装的数据为List的话。
 List<String> list = Lists.newArrayList();
 list.add("张一");
 list.add("张二");
 list.add("张三");
 list.add("张四");
 model.addAttribute("list",list);
那就采用以下方式取值:
<!DOCTYPE HTML PUBLIC "-//W3C//DTD HTML 4.01 Transitional//EN"
        "http://www.w3.org/TR/html4/loose.dtd">
<html>
<head>
    <title>thymeleaf欢迎页面</title>
</head>
<body>
    <ul>
        <li th:each ="list :${list}" th:text="${list}"/>
    </ul>
</body>
</html>
方式三:如果List中封装了实体对象
List<Person> list = Lists.newArrayList();
Person person1 = new Person();
person1.setPid("1");
person1.setName("张三");
person1.setPassWord("1212134123");
person1.setEmail("1358579976@qq.com");
person1.setContext("测试专用1");

Person person2 = new Person();

person2.setPid("2");
person2.setName("张三2");
person2.setPassWord("455134123");
person2.setEmail("348579976@qq.com");
person2.setContext("测试专用2");

Person person3 = new Person();
person3.setPid("3");
person3.setName("张三3");
person3.setPassWord("45612134123");
person3.setEmail("6578579976@qq.com");
person3.setContext("测试专用3");

list.add(person1);
list.add(person2);
list.add(person3);
model.addAttribute("list",list);
那就采用以下方式取值
<ul th:each ="person :${list}" >
     <li th:text ="${person.pid}" />
     <li th:text ="${person.name}" />
     <li th:text ="${person.passWord}" />
     <li th:text ="${person.email}" />
     <li th:text ="${person.context}" />
 </ul>
方式四:如果是List<Map<String,Object>>数据封装
List<Map<String,Object>> list = Lists.newArrayList();
Map<String,Object> map= Maps.newHashMap();
map.put("name","张三");
map.put("age",18);
map.put("height",175);

Map<String,Object> map1= Maps.newHashMap();
map1.put("name","张三1");
map1.put("age",20);
map1.put("height",185);

Map<String,Object> map2= Maps.newHashMap();
map2.put("name","张三2");
map2.put("age",60);
map2.put("height",165);
list.add(map);
list.add(map1);
list.add(map2);
model.addAttribute("list",list);
采用以下方式取值:
<ul th:each ="map :${list}" >
    <li th:text ="${map.name}" />
    <li th:text ="${map.age}" />
    <li th:text ="${map.height}" />
</ul>
方式五:如果是JSONObject数据封装
首先要引入Json依赖包:
<dependency>
    <groupId>com.alibaba</groupId>
    <artifactId>fastjson</artifactId>
     <version>1.2.7</version>
</dependency>
然后封装Json数据
package com.spring.bootdemo.controller;
import com.alibaba.fastjson.JSONObject;
import io.swagger.annotations.Api;
import io.swagger.annotations.ApiOperation;
import org.springframework.stereotype.Controller;
import org.springframework.ui.Model;
import org.springframework.web.bind.annotation.RequestMapping;
import org.springframework.web.bind.annotation.RequestMethod;
@Api(description = "thymeleaf测试")
@Controller
@RequestMapping(value = "/thymeleaf")
public class ThymeleafTestController {
@ApiOperation(value = "thymeleaf页面传值测试",notes = "页面传值")
@RequestMapping(value = "/hello",method = RequestMethod.GET)
public String thymeleafTest(Model model){
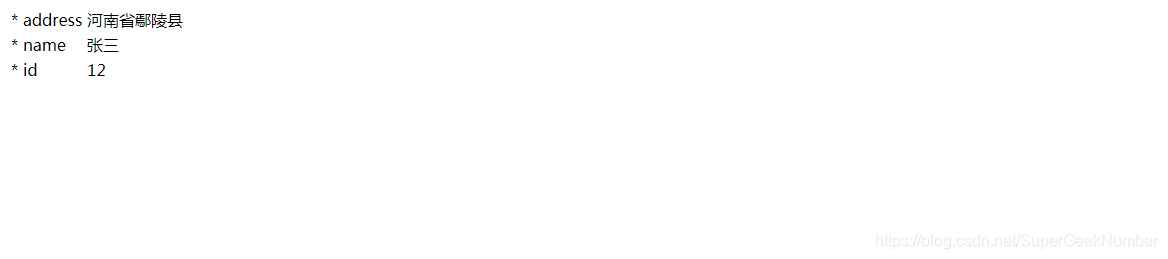
String json ="{\"id\":\"12\",\"name\":\"张三\",\"address\":\"河南省鄢陵县\"}";
JSONObject jsonObject = JSONObject.parseObject(json);
model.addAttribute("json",jsonObject);
return "hello";
}
}
采用以下取值方式:
<!DOCTYPE HTML PUBLIC "-//W3C//DTD HTML 4.01 Transitional//EN"
        "http://www.w3.org/TR/html4/loose.dtd">
<html>
<head>
    <title>thymeleaf欢迎页面</title>
</head>
<body>
    <table>
        <tbody th:remove="all-but-first">
            <tr th:each="ea : ${json.keySet()}">
                <td>*</td>
                <td th:text="${ea}"></td>
                <td th:text="${json.getString(ea)}"></td>
            </tr>
        </tbody>
    </table>
</body>
</html>
预期结果:


 704
704

 被折叠的 条评论
为什么被折叠?
被折叠的 条评论
为什么被折叠?
 到【灌水乐园】发言


