


 本文详细介绍了Spring框架中的依赖注入(DI),包括属性注入、方法注入、构造器注入、组件注入到@Bean修饰的方法参数中,以及通过回调样式的方法获取特定框架对象。通过@Autowire、@Resource和@Inject等注解,以及xxxAware接口,实现组件间的依赖管理。
一、依赖注入(将spring容器中的组件注入到bean中)
我们之前学习了怎么将bean注入到容器中,接下来我们来研究一下怎么将容器中的组件注入到bean中。
1、属性注入(将组件注入到属性中)
1.1、spring提供的方式
1、spring为我们提供了一个注解@Autowire,将@Autowired注解放到JavaBean对应类的属性上,该属性的值会在JavaBean对应类创建实例之前,去看容器中是不是存在属性对应类型的组件,有的话就从容器中取,并注入到该属性中。 如果不存在就报错,要想没有不报错,可以使用@Autowired的一个属性require=false。如果容器中存在多个同类型的组件,那么就会用属性的名字去匹配组件名。
2、;@Autowire还可以与@Qualifier注解连用。直接指定组件名去注入。
3、@Autowire支持@Primary【标注了@Primary注解的组件在按类型注入时会被优先选择】
@Component("qinglong")
public class PersonPojo {
    private String title = "青龙";//称号
    private String name = "宁仲";//真实姓名
    @Autowired//将容器中SkillPojo类型组件的注入到属性中
    @Qualifier("skillPojo")
    private SkillPojo skillPojo;//武器类
}

@Component("ghost")
@Primary//按类型注入时,这个组件会被优先选择
public class SkillPojo {
    private String name="以身饲鬼术";//武器名称
    private String type="召唤类";//武器功能
    @Override
    public String toString() {
        return "SkillPojo{" +
                "name='" + name + '\'' +
                ", type='" + type + '\'' +
                '}';
    }
    public String getName() {
        return name;
    }
    public void setName(String name) {
        this.name = name;
    }
    public String getType() {
        return type;
    }
    public void setType(String type) {
        this.type = type;
    }
}
1.2、jdk提供的方式
jdk为我们提供了@Resoure注解。它可以直接指定组件名注入也可以指定类型注入,不需要与其他注解连用。但是它不支持@Primary注解
@Component("qinglong")
public class PersonPojo {
    private String title = "青龙";//称号
    private String name = "宁仲";//真实姓名
    //@Resource(type = SkillPojo.class)//按组件类型注入
    @Resource(value="skillPojo")//按组件名称注入
    private SkillPojo skillPojo;//武器类

}
1.3、第三方提供的方式
既然是第三方提供的,我们就要导入第三方jar包。它的提供注解是@Inject。@Inject功能基本和@AutoWire注解一致。
它支持@Primary注解
它默认是按类型注入的,可以与@Qualifier注解连用。直接指定组件名去注入。
<dependency>
            <groupId>javax.inject</groupId>
            <artifactId>javax.inject</artifactId>
            <version>1</version>
</dependency>
2、方法注入(将组件注入到属性中)
将@Autowired注解放在方法上,方法可以有任意名称和任意数量的参数;每个参数都将与Spring容器中的匹配bean自动连接。Bean属性setter方法实际上只是这种通用配置方法的一个特例。这样的配置方法不必是公共的。
public class PersonPojo {
    private String title = "青龙";//称号
    private String name = "宁仲";//真实姓名

    private SkillPojo skillPojo;//武器类
    @Autowired
    private void setSkillPojo(SkillPojo skillPojo) {//skillPojo取的是spring容器中组件的值
        this.skillPojo = skillPojo;
    }
3、构造器注入
如果一个bean有且只有一个有参构造,那么有参构造每个参数都将与Spring容器中的匹配bean自动连接(假如有参构造的参数包含基本数据类型或容器中没有的组件类型,会报注入失败错误)
public class PersonPojo {
    private String title = "青龙";//称号
    private String name = "宁仲";//真实姓名

    private SkillPojo skillPojo;//武器类
 //只有一个有参构造,spring容器对应的组件会自动注册到构造器参数中
   public PersonPojo(SkillPojo skillPojo) {
        this.skillPojo = skillPojo;
        this.name=name;
      }
    }
4、将组件注入到被@Bean修饰的方法参数中
在配置类中,标准了@Bean方法中的方法参数,每个参数都将与Spring容器中的匹配bean自动连接
@Configuration
@ComponentScan(value = {"com.tellhow.review.spring_annotation.di"})
@Slf4j
public class DIConfig {
    @Bean("zhuque")
    public PersonPojo personPojo2(SkillPojo martial) {//martial会自动注入容器中相同类型的组件值
        PersonPojo personPojo = new PersonPojo();
        personPojo.setName("陆言");
        personPojo.setTitle("朱雀");
        return personPojo;
    }
5、spring容器通过回调样式的方法获取特定框架对象
5.1、基本操作
spring为我们提供了一些xxxAware接口,实现了这些接口我们通过通过回调样式方法获取到spring特定的框架对象。
/**
 * 向bean注入Spring底层组件.
 *    1、操作:Spring 提供了各种各样的xxxAware接口。只要实现了这些接口,就可以通过回调样式的方法获取到相应Spring的内置组件。
 *    2、原理:将Spring内置组件注入到javabean的属性中。它的底层原理是对应的ApplicationContextAwareProcessor(前置处理器)在创建组件对象进行初始化前进行一些判断,符合条件的就会将内置组件放到方法的参数中取
 * @author wujianghao
 * @date 2022年11月18日 15:42
 */
@Component
public class BuiltInComponents implements ApplicationContextAware, EnvironmentAware {
    ApplicationContext applicationContext;
    Environment environment;
    private String osName;
    @Override
    public void setApplicationContext(ApplicationContext applicationContext) throws BeansException {//实现了ApplicationContextAware方法,就会通过回调方法setApplicationContext,获取到spring容器对象。
        this.applicationContext = applicationContext;
    }
    public ApplicationContext getApplicationContext() {
        return applicationContext;
    }
    public Environment getEnvironment() {
        return environment;
    }
    public String getOsName() {
        return osName;
    }
    @Override
    public void setEnvironment(Environment environment) {
        this.environment = environment;
        this.osName = environment.getProperty("os.name");
    }
}
5.2、原理解析(以ApplicationContextAware为例)
1、我们知道bean的生命周期是bean的创建->初始化->销毁。
protected Object doCreateBean(String beanName, RootBeanDefinition mbd, @Nullable Object[] args)
			throws BeanCreationException {
Object bean = instanceWrapper.getWrappedInstance();//实例化bean
     // Initialize the bean instance.
		Object exposedObject = bean;
		try {
			populateBean(beanName, mbd, instanceWrapper);//用来自bean定义的属性值填充给定BeanWrapper中的bean实例
			exposedObject = initializeBean(beanName, exposedObject, mbd);//初始化bean

		}
}
2、我们想将spring特定的框架对象绑定到属性中,是通过前置处理器完成的,前置处理器的方法会在bean的初始化前后执行。将spring框架对象的值暴露給属性是在初始化之前进行的。所以接下来进入applyBeanPostProcessorsBeforeInitialization方法。
	protected Object initializeBean(String beanName, Object bean, @Nullable RootBeanDefinition mbd) {
		if (System.getSecurityManager() != null) {
			AccessController.doPrivileged((PrivilegedAction<Object>) () -> {
				invokeAwareMethods(beanName, bean);
				return null;
			}, getAccessControlContext());
		}
		else {
			invokeAwareMethods(beanName, bean);
		}

		Object wrappedBean = bean;
		if (mbd == null || !mbd.isSynthetic()) {
			wrappedBean = applyBeanPostProcessorsBeforeInitialization(wrappedBean, beanName);//执行前置处理器,在初始化之前
		}

		try {
			invokeInitMethods(beanName, wrappedBean, mbd);//执行初始化方法
		}
		catch (Throwable ex) {
			throw new BeanCreationException(
					(mbd != null ? mbd.getResourceDescription() : null),
					beanName, "Invocation of init method failed", ex);
		}
		if (mbd == null || !mbd.isSynthetic()) {
			wrappedBean = applyBeanPostProcessorsAfterInitialization(wrappedBean, beanName);//执行前置处理器,在初始化之前
		}
		return wrappedBean;
	}
我们来看看前置处理器在执行bean初始化前做了什么操作。
@Override
	public Object applyBeanPostProcessorsBeforeInitialization(Object existingBean, String beanName)
			throws BeansException {
		Object result = existingBean;
		for (BeanPostProcessor processor : getBeanPostProcessors()) {
			Object current = processor.postProcessBeforeInitialization(result, beanName);
			if (current == null) {
				return result;
			}
			result = current;
		}
		return result;
	}
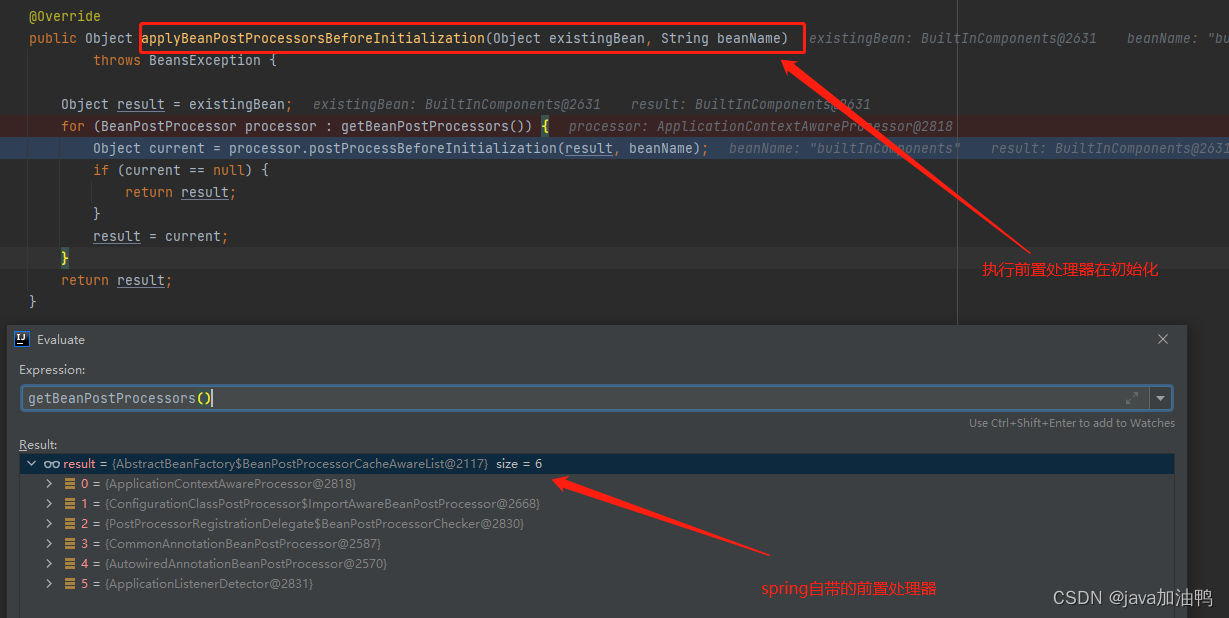 spring内置了6个前置处理器,他们在bean执行之前先执行这些BeanPostProcessor的postProcessBeforeInitialization()方法。我们进入查看一下ApplicationContextAwareProcessor的postProcessBeforeInitialization方法
  @Override
	@Nullable
	public Object postProcessBeforeInitialization(Object bean, String beanName) throws BeansException {
		if (!(bean instanceof EnvironmentAware || bean instanceof EmbeddedValueResolverAware ||
				bean instanceof ResourceLoaderAware || bean instanceof ApplicationEventPublisherAware ||
				bean instanceof MessageSourceAware || bean instanceof ApplicationContextAware ||
				bean instanceof ApplicationStartupAware)) {//bean是不是这些类型的
			return bean;
		}

		AccessControlContext acc = null;

		if (System.getSecurityManager() != null) {
			acc = this.applicationContext.getBeanFactory().getAccessControlContext();
		}

		if (acc != null) {
			AccessController.doPrivileged((PrivilegedAction<Object>) () -> {
				invokeAwareInterfaces(bean);
				return null;
			}, acc);
		}
		else {
			invokeAwareInterfaces(bean);//执行Aware接口的方法,原理在这里
		}
		return bean;
	}
beans实现ApplicationContextAware接口,将spring框架对象与重写的set方法的参数进行了连接。
	private void invokeAwareInterfaces(Object bean) {
		if (bean instanceof EnvironmentAware) {
			((EnvironmentAware) bean).setEnvironment(this.applicationContext.getEnvironment());
		}
		if (bean instanceof EmbeddedValueResolverAware) {
			((EmbeddedValueResolverAware) bean).setEmbeddedValueResolver(this.embeddedValueResolver);
		}
		if (bean instanceof ResourceLoaderAware) {
			((ResourceLoaderAware) bean).setResourceLoader(this.applicationContext);
		}
		if (bean instanceof ApplicationEventPublisherAware) {
			((ApplicationEventPublisherAware) bean).setApplicationEventPublisher(this.applicationContext);
		}
		if (bean instanceof MessageSourceAware) {
			((MessageSourceAware) bean).setMessageSource(this.applicationContext);
		}
		if (bean instanceof ApplicationStartupAware) {
			((ApplicationStartupAware) bean).setApplicationStartup(this.applicationContext.getApplicationStartup());
		}
		if (bean instanceof ApplicationContextAware) {
			((ApplicationContextAware) bean).setApplicationContext(this.applicationContext);
		}
	}


@Component
public class BuiltInComponents implements ApplicationContextAware, EnvironmentAware {
    ApplicationContext applicationContext;
    Environment environment;
    private String osName;
    @Override//所以applicationContext对象,已经被前置处理器赋值了(ApplicationContextAwareProcessor)
    public void setApplicationContext(ApplicationContext applicationContext) throws BeansException {
        this.applicationContext = applicationContext;
    }
    public ApplicationContext getApplicationContext() {
        return applicationContext;
    }
    public Environment getEnvironment() {
        return environment;
    }
    public String getOsName() {
        return osName;
    }
    @Override////所以applicationContext对象,已经被前置处理器赋值了(ApplicationContextAwareProcessor)
    public void setEnvironment(Environment environment) {
        this.environment = environment;
        this.osName = environment.getProperty("os.name");
    }
}
实现xxxAware接口,可以获取对应的框架对象。底层原理就是前置处理器(xxxAwareProcessor)


 1315
1315

 被折叠的 条评论
为什么被折叠?
被折叠的 条评论
为什么被折叠?
 到【灌水乐园】发言


