


 本文详细介绍了如何配置两台邮件服务器(example.com和ceshi.com)及DNS服务器,以实现xiaoming@example.com向wuneng@ceshi.com发送邮件。主要步骤包括:安装和配置postfix、dovecot、DNS服务,创建测试用户,调整防火墙和SELinux设置,并进行DNS解析测试。最后,在Foxmail中测试邮件发送。
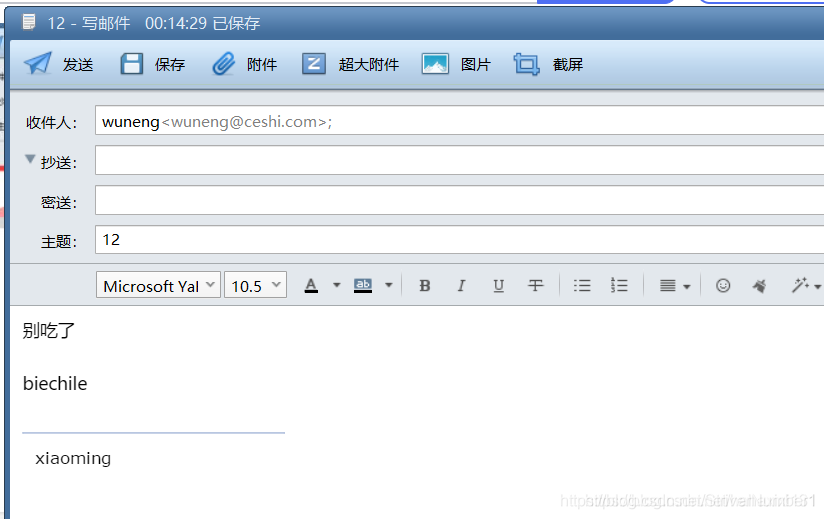
问题:搭建邮件服务器,在foxmail上使用xiaoming@example.com给wuneng@ceshi.com用户发一封邮件,内容为biechile。 (域间互发邮件)
由题可知,需要三台服务器,两个邮件服务器,一个DNS服务器
一、先配置第一个邮件服务器(example.com)
1.安装相应的软件包
yum -y install postfix #安装实现发送邮件的软件包
yum -y install dovecot #安装邮件接受服务器包
yum -y install mailx
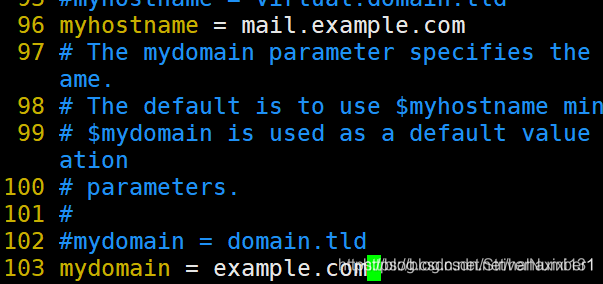
2.编辑主配置文件
vim /etc/postfix/main.cf #编辑主配置文件
myhostname = mail.example.com
mydomain = example.com
myorigin = $mydomain
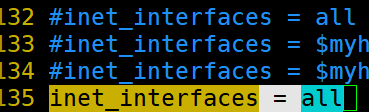
inet_interfaces = all
mydestination = $mydomain
mynetworks = 192.168.19.0/24
be614a34fe0b418e929b2eebde4.png?x-oss-process=image/watermark,type_ZmFuZ3poZW5naGVpdGk,shadow_10,text_aHR0cHM6Ly9ibG9nLmNzZG4ubmV0L1N0cml2ZXJOdW1iZXIx,size_16,color_FFFFFF,t_70)

3.编辑dovecot的主配置文件
vim /etc/dovecot/dovecot.conf
protocols = imap pop3 lmtp #登录方式
login_trusted_networks = 192.168.19.0/24 #设置允许登录的IP段
vim /etc/dovecot/conf.d/10-mail.conf #编辑子配置文件
mail_location = mbox:~/mail:INBOX=/var/mail/%u


4.服务端开启sasl认证,安装sasl模块的软件包cyrus-sasl
yum install -y cyrus-sasl
#再次编辑postfix配置文件
vim /etc/postfix/main.cf
broken_sasl_auth_clients = yes
smtpd_sasl_auth_enable =yes
smtpd_sasl_security_options = noanonymous
smtpd_recipient_restrictions = permit_sasl_authenticated,permit_mynetworks,reject_unauth_ destination

5.关闭防火墙和selinux并重启服务
systemctl restart dovecot # 重启服务
systemctl restart postfix
systemctl restart saslauthd
setenforce 0 #关闭selinux
systemctl stop firewalld #关闭防火墙
6.创建测试用户xiaoming
useradd xiaoming
echo 1 | passwd --stdin xiaoming

7.给相应的权限
chmod 600 /var/spool/mail/*
二、配置另一台邮件服务器(ceshi.com)
大致的配置过程和上面一致(认证只需要在一台服务器上认证即可)
yum -y install mailx
yum -y install postfix
yum -y install dovecot
vim /etc/postfix/main.cf
myhostname = mail.ceshi.com
mydomain = ceshi.com
myorigin = $mydomain
inet_interfaces = all
mydestination = $mydomain
mynetworks = 192.168.19.0/24
vim /etc/dovecot/dovecot.conf #修改配置文件
protocols = imap pop3 lmtp
login_trusted_networks = 192.168.19.0/24
vim /etc/dovecot/conf.d/10-mail.conf #修改dovecot子配置文件
mail_location = mbox:~/mail:INBOX=/var/mail/%u
systemctl restart dovecot #重启服务
systemctl stop firewalld
systemctl restart postfix
setenforce 0
useradd wuneng #创建测试用户
echo 1 | passwd --stdin wuneng
chmod 600 /var/spool/mail/* #赋予权限
三、搭建dns
1.安装相应的软件包
yum -y install bind
2.修改配置文件
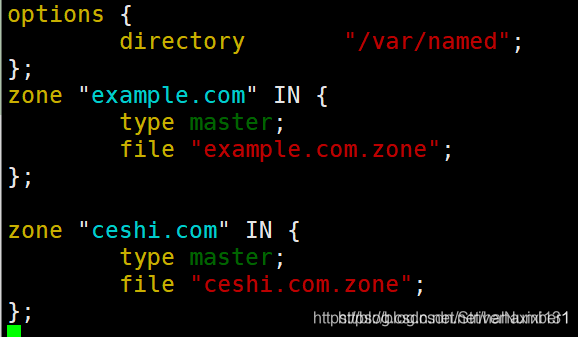
vim /etc/named.conf
options {
directory “/var/named”;
};
zone “example.com” IN {
type master;
file “example.com.zone”;
};
zone “ceshi.com” IN {
type master;
file “ceshi.com.zone”;
};
编写子配置文件
cd /var/named
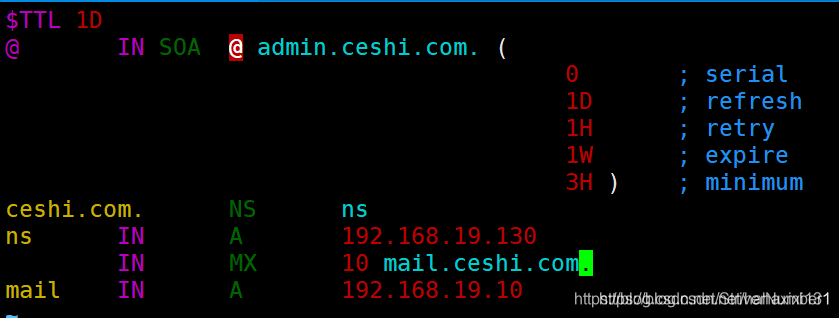
vim ceshi.com.zone
$TTL 1D
@ IN SOA @ admin.ceshi.com. (
0 ; serial
1D ; refresh
1H ; retry
1W ; expire
3H ) ; minimum
ceshi.com. NS ns.ceshi.com
IN MX 10 mail.ceshi.com.
ns A 192.168.19.130
mail A 192.168.19.10
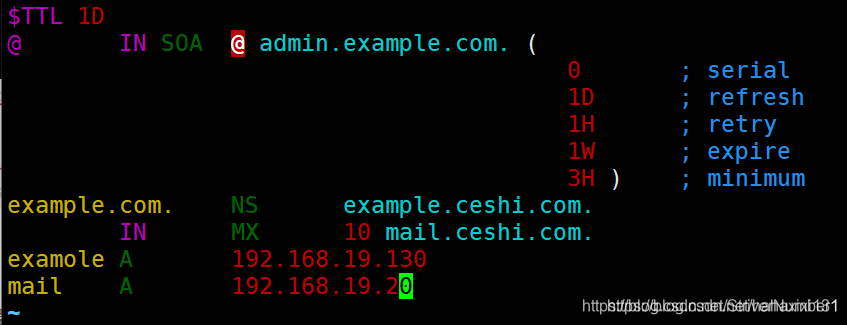
vim example.com.zone
$TTL 1D
@ IN SOA @ admin.example.com. (
0 ; serial
1D ; refresh
1H ; retry
1W ; expire
3H ) ; minimum
example.com. NS example.ceshi.com
IN MX 10 mail.ceshi.com.
examole A 192.168.19.130
mail A 192.168.19.20
3.重启服务,并修改其余两台邮件服务器的默认dns
systemctl restart named
#在第一个邮件服务器上修改默认dns
echo ‘nameserver 192.168.19.130’ > /etc/resolv.conf
#在第二个邮件服务器上修改默认dns
echo ‘nameserver 192.168.19.130’ > /etc/resolv.conf
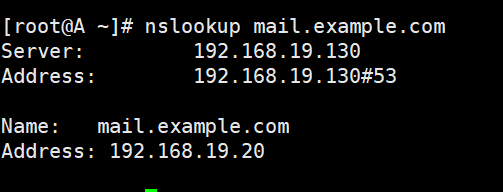
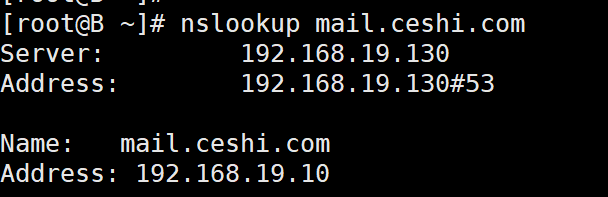
4.测试dns
五、Foxmail测试情况
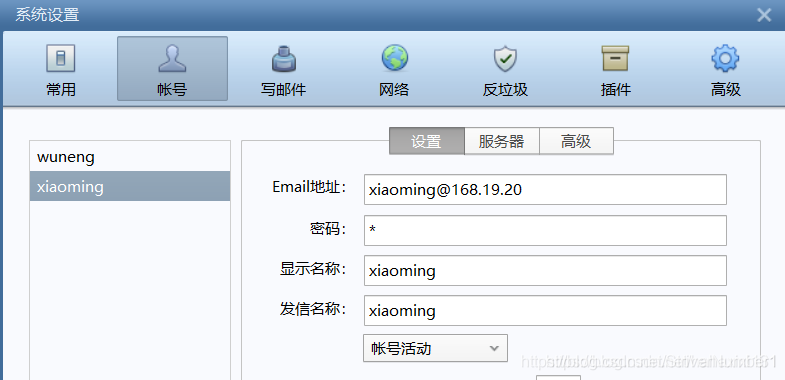
先添加刚刚创建的用户
写邮件
用xiaoming给wuneng写信


 720
720

 被折叠的 条评论
为什么被折叠?
被折叠的 条评论
为什么被折叠?
 到【灌水乐园】发言


