


 本文详细介绍了ShardingSphere-Proxy如何对客户端进行身份认证,特别是对于MySQL、PostgreSQL和openGauss协议的支持。文中通过比较这三种数据库的认证方式,展示了Proxy如何实现多种认证算法,并提供了配置示例,解释了如何为不同用户指定不同的认证方法,以适应各种客户端需求。
前言:相信多数 ShardingSphere 的用户都知道,ShardingSphere-Proxy 是透明化的数据库代理,它理论上支持任何使用 MySQL、PostgreSQL、openGauss 协议的客户端进行交互操作。同传统数据库一样,Proxy 也提供了用户认证的功能,且能够适配多种数据库协议的不同认证方式。但是有一个问题很少被关注到,甚至于在 Github 社区中几乎没有相应的问题 issue:“ShardingSphere-Proxy 是如何对客户端进行身份认证的?”
注:本文仅讨论密码(口令)认证方式,不包括非密码身份认证,如 UDS(Unix Domain Socket)等
背景知识
在解读 ShardingSphere-Proxy 的认证机制前,让我们先回顾几种常见的数据库是如何进行身份认证的。
MySQL
以 MySQL 5.7 版本为例,客户端与服务端之间的认证交互可简单理解为如下流程:
🌟 客户端与服务端协议握手,其中包括协商使用何种认证协议,这里默认值是 mysql_native_password;

🌟 服务端生成一个 20 字节的随机数发送给客户端;

🌟 客户端根据该随机数对用户输入的密码加密,并发送加密后的信息到服务端用于密码验证[1]。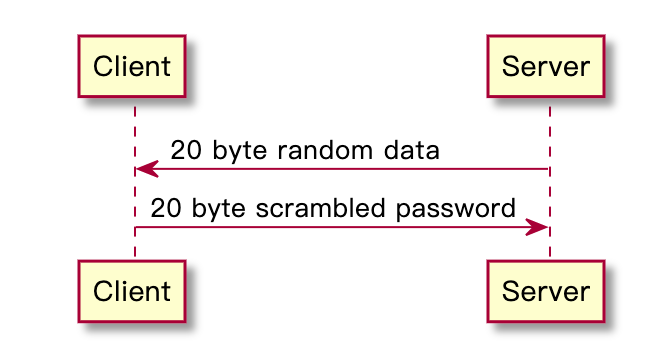
图1 MySQL Native Authentication 示意图
以上就是对 MySQL Native Authentication 的简要描述,可以帮助我们大致理解在客户端输入密码后究竟发生了什么。由于不同场景的需要,MySQL 以插件化[2] 的形式提供了多种认证协议,主要有:
mysql_native_password:原生身份认证,8.0 之前默认使用;
caching_sha2_password:基于缓存的 SHA-256 身份认证,8.0 之后默认使用;
mysql_clear_password:明文密码认证,适用于一些特定场景;
另外还有一些 MySQL 企业版本提供的认证插件,这里也简要列举:
authentication_windows:基于 Windows 服务的认证;
authentication_ldap_simple:基于 LDAP 的认证。
以上就是 MySQL 的用户认证方式,接下来我们再看 PostgreSQL 和 openGauss 的认证机制,就会很容易理解了:
PostgreSQL
PostgreSQL 常用认证方式[3] :
scram-sha-256:基于 SCRAM(Salted Challenge Response Authentication Mechanism) 的 SHA-256 身份认证;
md5:使用 MD5 加密认证;
password:明文密码认证。
openGauss
openGauss 常用认证方式[4] :
scram-sha-256:基于 SCRAM 的 SHA-256 身份认证;
md5:使用 MD5 加密认证;
sm3:使用 SM3 加密认证;
ShardingSphere-Proxy 认证初探
ShardingSphere-Proxy 作为强大的数据库代理,已经实现了多种数据库协议。其中与客户端认证相关的能力,均由认证引擎(AuthenticationEngine)来提供。
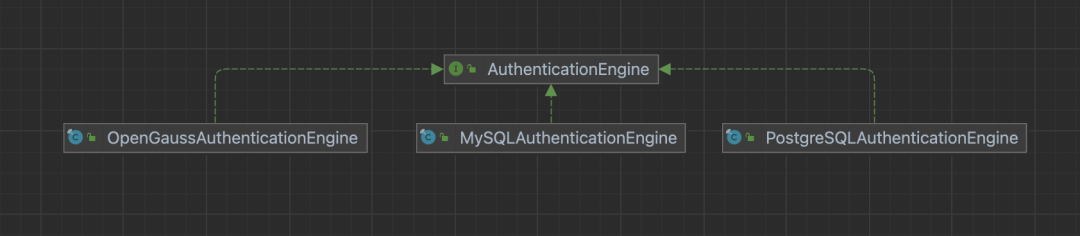
认证引擎的使命很明确:协议握手 和 身份认证。
类似于上一节中介绍的 MySQL 认证流程,Proxy 分别实现了 MySQL、PostgreSQL 和 openGauss 的握手、认证协议,并已经提供了多种认证算法,包括:
MySQL
mysql_native_password
mysql_clear_password
PostgreSQL
md5
password
openGauss
md5
scram-sha-256
值得注意的是,在 Proxy 中,MySQL、PostgreSQL 和 openGauss 的默认认证算法分别为:mysql_native_password、md5 和 scram-sha-256。
ShardingSphere-Proxy 认证配置
为了让用户能够在使用 Proxy 时也能根据需要指定认证算法,ShardingSphere 在 5.3.2 版本中新增了 authenticator 相关配置项,格式如下:
authority:
  users:
    - user: # 用于登录计算节点的用户名和授权主机的组合,格式:<username>@<hostname>,hostname 为 % 或空字符串表示不限制授权主机
      password: # 用户密码
      authenticationMethodName: # 可选项,用于为用户指定密码认证方式
  authenticators: # 可选项,默认不需要配置,Proxy 根据前端协议类型自动选择
    authenticatorName:
      type: # 密码认证类型
  defaultAuthenticator: # 可选项,指定一个 authenticatorName 作为默认的密码认证方式
  privilege:
    type: # 权限提供者类型,缺省值为 ALL_PERMITTED
其中,authenticationMethodName、authenticators 和 defaultAuthenticator 均为可选项,仅在用户需要时进行配置。
需要特别说明的是:Proxy 支持用户级别的认证配置,即每个用户可以使用不同的认证算法,这一点将在之后的示例中展现。下面我们以 openGauss 场景为例,解析如何使用新增的 MD5 认证算法,来适配 psql 客户端登录。
Before
在进行特定配置之前,我们对比 gsql 和 psql 客户端连接 Proxy 的表现。
server.yaml
authority:
  users:
    - user: root@%
      password: root
    - user: sharding
      password: sharding

props:
  proxy-frontend-database-protocol-type: openGauss
说明:
指定前端协议类型为 openGauss;
未指定认证类型,Proxy 采用默认值 scram-sha-256。
config-sharding.yaml
databaseName: sharding_db

dataSources:
  ds_0:
    url: jdbc:opengauss://127.0.0.1:15432/demo_ds
    username: username
    password: password
    connectionTimeoutMilliseconds: 30000
    idleTimeoutMilliseconds: 60000
    maxLifetimeMilliseconds: 1800000
    maxPoolSize: 10
    minPoolSize: 1
gsql 登录
表现:连接成功。

这里使用 opengauss:3.1.0 容器中的 gsql 客户端来访问 ShardingSphere-Proxy。
psql 登录
表现:连接失败。

这里连接失败的原因,其实就是认证协议导致的:
psql 客户端默认需要 md5 协议认证,但由于 Proxy 在 openGauss 协议下要求 scram-sha-256 认证方式,因此协商失败,抛出异常。
After
现在我们在 Proxy 中为 sharding 用户指定认证方式为 MD5,并保留默认采用 scram-sha-256 算法的设定,以支持不同用户不同客户端。
server.yaml
authority:
  users:
    - user: root@%
      password: root
    - user: sharding
      password: sharding
      authenticationMethodName: md5
  authenticators:
    md5:
      type: MD5
    scram_sha256:
      type: SCRAM_SHA256 # SCRAM_SHA256 是 SPI 名称,提供 scram-sha-256 认证算法
  defaultAuthenticator: scram_sha256

props:
  proxy-frontend-database-protocol-type: openGauss
说明:
指定前端协议类型为 openGauss;
为 sharding 用户指定认证算法为 MD5;
指定默认认证方式仍然为 scram-sha-256,即 root 用户需要 scram-sha-256 认证。
config-sharding.yaml
保持不变。
gsql 登录
表现:连接成功。

psql 登录 root 用户
表现:连接失败。

此时 root 用户由于需要 scram-sha-256 算法认证,因此 psql 仍然无法连接,那么 sharding 用户如何呢?
psql 登录 sharding 用户
表现:连接成功。

这次,我们看到 psql 连接 openGauss 协议下的 ShardingSphere-Proxy 已经成功了!

未来规划
目前 ShardingSphere 在 Proxy 中实现了不同数据库协议、不同认证算法的工作框架,并已经分别为几种数据库协议提供了可选择的认证算法。在未来,我们还会为这些数据库协议添加更多的认证算法支持,也希望有更多的同学能够一起参与,让 ShardingSphere 越来越好!
总结
以上就是本次分享的全部内容,关于 ShardingSphere-Proxy 认证和授权的的更多信息,请参考官网文档 [5]。如果读者对 Apache ShardingSphere 有任何疑问或建议,欢迎在 GitHub issue 列表 [6] 提出,或可前往中文社区 [7] 交流讨论。
链接参考
[1] MySQL Native Authentication:https://dev.mysql.com/doc/dev/mysql-server/latest/page_protocol_connection_phase_authentication_methods_native_password_authentication.html
[2] MySQL Pluggable Authentication:https://dev.mysql.com/doc/refman/8.0/en/pluggable-authentication.html
[3] PostgreSQL Password Authentication:https://www.postgresql.org/docs/15/auth-password.html
[4] openGauss Configuration File Reference:https://docs.opengauss.org/en/docs/3.1.1/docs/Developerguide/configuration-file-reference.html
[5] ShardingSphere-Proxy 认证和授权:https://shardingsphere.apache.org/document/5.3.2/cn/user-manual/shardingsphere-proxy/yaml-config/authority/
[6] GitHub issue 列表:https://github.com/apache/shardingsphere/issues
[7] 中文社区:https://community.sphere-ex.com/


 1043
1043

 被折叠的 条评论
为什么被折叠?
被折叠的 条评论
为什么被折叠?
 到【灌水乐园】发言


