


 本文介绍了如何利用ANT工具运行JMeter测试脚本,包括创建登录示例脚本,配置build文件,通过命令行执行ANT命令,以及查看生成的HTML测试报告。此外,还提到了报告样式的自定义方法。
本文简单描述如何使用ant来运行jmeter脚本,并生成报告。
1、创建jmeter脚本,例如一个简单的登录百度的例子。
<?xml version="1.0" encoding="UTF-8"?>
<jmeterTestPlan version="1.2" properties="3.2" jmeter="3.2 r1790748">
  <hashTree>
    <TestPlan guiclass="TestPlanGui" testclass="TestPlan" testname="测试计划" enabled="true">
      <stringProp name="TestPlan.comments"></stringProp>
      <boolProp name="TestPlan.functional_mode">false</boolProp>
      <boolProp name="TestPlan.serialize_threadgroups">false</boolProp>
      <elementProp name="TestPlan.user_defined_variables" elementType="Arguments" guiclass="ArgumentsPanel" testclass="Arguments" testname="用户定义的变量" enabled="true">
        <collectionProp name="Arguments.arguments"/>
      </elementProp>
      <stringProp name="TestPlan.user_define_classpath"></stringProp>
    </TestPlan>
    <hashTree>
      <ThreadGroup guiclass="ThreadGroupGui" testclass="ThreadGroup" testname="线程组" enabled="true">
        <stringProp name="ThreadGroup.on_sample_error">continue</stringProp>
        <elementProp name="ThreadGroup.main_controller" elementType="LoopController" guiclass="LoopControlPanel" testclass="LoopController" testname="循环控制器" enabled="true">
          <boolProp name="LoopController.continue_forever">false</boolProp>
          <stringProp name="LoopController.loops">1</stringProp>
        </elementProp>
        <stringProp name="ThreadGroup.num_threads">1</stringProp>
        <stringProp name="ThreadGroup.ramp_time">1</stringProp>
        <longProp name="ThreadGroup.start_time">1501485203000</longProp>
        <longProp name="ThreadGroup.end_time">1501485203000</longProp>
        <boolProp name="ThreadGroup.scheduler">false</boolProp>
        <stringProp name="ThreadGroup.duration"></stringProp>
        <stringProp name="ThreadGroup.delay"></stringProp>
      </ThreadGroup>
      <hashTree>
        <HTTPSamplerProxy guiclass="HttpTestSampleGui" testclass="HTTPSamplerProxy" testname="HTTP请求" enabled="true">
          <elementProp name="HTTPsampler.Arguments" elementType="Arguments" guiclass="HTTPArgumentsPanel" testclass="Arguments" testname="用户定义的变量" enabled="true">
            <collectionProp name="Arguments.arguments"/>
          </elementProp>
          <stringProp name="HTTPSampler.domain">www.baidu.com</stringProp>
          <stringProp name="HTTPSampler.port"></stringProp>
          <stringProp name="HTTPSampler.protocol">https</stringProp>
          <stringProp name="HTTPSampler.contentEncoding"></stringProp>
          <stringProp name="HTTPSampler.path"></stringProp>
          <stringProp name="HTTPSampler.method">GET</stringProp>
          <boolProp name="HTTPSampler.follow_redirects">true</boolProp>
          <boolProp name="HTTPSampler.auto_redirects">false</boolProp>
          <boolProp name="HTTPSampler.use_keepalive">true</boolProp>
          <boolProp name="HTTPSampler.DO_MULTIPART_POST">false</boolProp>
          <stringProp name="HTTPSampler.embedded_url_re"></stringProp>
          <stringProp name="HTTPSampler.connect_timeout"></stringProp>
          <stringProp name="HTTPSampler.response_timeout"></stringProp>
          <stringProp name="TestPlan.comments">https://test-gyb.smarthrp.com/action/user/toLogin</stringProp>
        </HTTPSamplerProxy>
        <hashTree/>
        <ResultCollector guiclass="ViewResultsFullVisualizer" testclass="ResultCollector" testname="察看结果树" enabled="true">
          <boolProp name="ResultCollector.error_logging">false</boolProp>
          <objProp>
            <name>saveConfig</name>
            <value class="SampleSaveConfiguration">
              <time>true</time>
              <latency>true</latency>
              <timestamp>true</timestamp>
              <success>true</success>
              <label>true</label>
              <code>true</code>
              <message>true</message>
              <threadName>true</threadName>
              <dataType>true</dataType>
              <encoding>false</encoding>
              <assertions>true</assertions>
              <subresults>true</subresults>
              <responseData>false</responseData>
              <samplerData>false</samplerData>
              <xml>true</xml>
              <fieldNames>true</fieldNames>
              <responseHeaders>false</responseHeaders>
              <requestHeaders>false</requestHeaders>
              <responseDataOnError>false</responseDataOnError>
              <saveAssertionResultsFailureMessage>true</saveAssertionResultsFailureMessage>
              <assertionsResultsToSave>0</assertionsResultsToSave>
              <bytes>true</bytes>
              <sentBytes>true</sentBytes>
              <threadCounts>true</threadCounts>
              <idleTime>true</idleTime>
              <connectTime>true</connectTime>
            </value>
          </objProp>
          <stringProp name="filename"></stringProp>
        </ResultCollector>
        <hashTree/>
      </hashTree>
    </hashTree>
    <WorkBench guiclass="WorkBenchGui" testclass="WorkBench" testname="工作台" enabled="true">
      <boolProp name="WorkBench.save">true</boolProp>
    </WorkBench>
    <hashTree/>
  </hashTree>
</jmeterTestPlan>
2、配置build文件,build文件与脚本文件在同一路径(非必须)。
<?xml version="1.0" encoding="UTF-8"?>

<project name="HTTP请求" default="run" basedir=".">
    <tstamp>
        <format property="time" pattern="yyyy-MM-dd_HH-mm" locale="zh" timezone="Asia/Shanghai"/>
    </tstamp>
    <!-- Jmeter 安装目录-->
    <property name="jmeter.home" value="D:\software\apache-jmeter-3.2\apache-jmeter-3.2" />

	<!--脚本存放的路径 -->
	<property name="script.dir" value="D:\software\apache-jmeter-3.2\my_jmeter"/>

	<!--报告存放根目录-->
	<!-- 原始jtl报告存放路径,此处与脚本存在路径相同-->
	<property name="jmeter.report" value="${script.dir}\report"/>
	<property name="jmeter.report.jtl" value="${jmeter.report}/jtl"/>
	<!-- html报告所在Apache服务器根路径,通过浏览器访问-->
	<property name="jmeter.report.html" value="${jmeter.report}/html"/>

	<!-- jmeter生成jtl格式的结果报告的路径-->
    <property name="jmeter.result.jtl.dir" value="${jmeter.report.jtl}\T_BZ_SC_Demo" />
    <!-- jmeter生成html格式的结果报告的路径-->
    <property name="jmeter.result.html.dir" value="${jmeter.report.html}\TE_BZ_SC_Demo" />

    <!-- 生成的HTML报告名称-->
    <property name="ReportName" value="TestReport_TE_BZ_SC_Demo_" />
    <property name="jmeter.result.jtlName" value="${jmeter.result.jtl.dir}/${ReportName}${time}.jtl" />
    <property name="jmeter.result.htmlName" value="${jmeter.result.html.dir}/${ReportName}${time}.html" />
	<property name="report.title" value="${time}_TE_BZ_SC_Demo_Report"/>

	<!--任务列表-->
    <target name="run">
        <antcall target="Test_case" />
		<antcall target="Test_report" />
    </target>

    <!--运行任务-->
    <target name="Test_case">
        <taskdef name="jmeter" classname="org.programmerplanet.ant.taskdefs.jmeter.JMeterTask" />
		<!--指定 jmeter环境,输出jtl结果路径-->
        <jmeter jmeterhome="${jmeter.home}" resultlog="${jmeter.result.jtlName}">
            <!-- 指定脚本路径。"*.jmx"指包含此目录下的所有jmeter脚本-->
            <testplans dir="${script.dir}" includes="HTTP请求.jmx" />
			<property name="jmeter.save.saveservice.output_format" value="xml"/>
        </jmeter>
    </target>

	<path id="xslt.classpath">
        <fileset dir="${jmeter.home}/lib" includes="xalan*.jar"/>
        <fileset dir="${jmeter.home}/lib" includes="serializer*.jar"/>
    </path>

	<!--生成report-->
    <target name="Test_report">
        <tstamp><format property="report.datestamp" pattern="yyyy-MM-dd_HH-mm" locale="zh" timezone="Asia/Shanghai"/></tstamp>
        <!-- in 读取jtl,out 输出html,style 套用模板 -->
		<xslt
            classpathref="xslt.classpath"
            force="true"
            in="${jmeter.result.jtlName}"
            out="${jmeter.result.htmlName}"
            style="${jmeter.home}/extras/jmeter-results-report-loadtest.xsl">
            <param name="showData" expression="${show-data}"/>
            <param name="titleReport" expression="${report.title}"/>
            <param name="dateReport" expression="${report.datestamp}"/>
        </xslt>
		<copy todir="${jmeter.result.html.dir}">
            <fileset dir="${jmeter.home}/extras">
                <include name="collapse.png" />
                <include name="expand.png" />
            </fileset>
        </copy>
    </target>

</project>
3、在build文件路径打开CMD,执行:ant
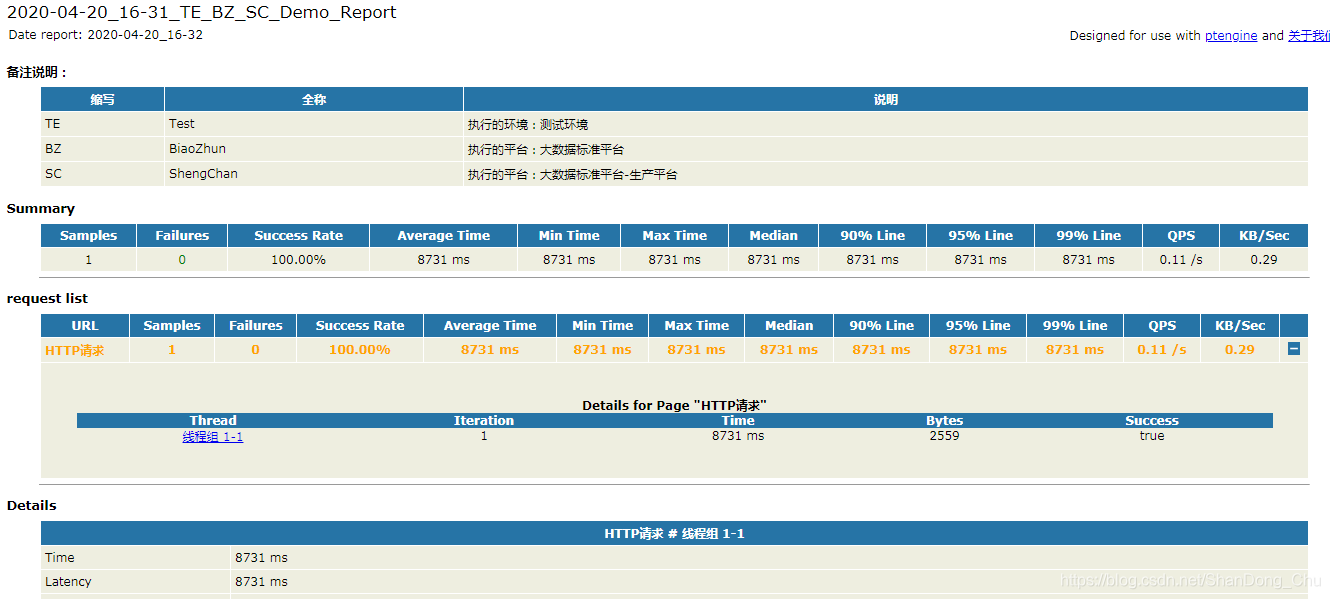
4、然后在report路径下打开“TestReport_TE_BZ_SC_Demo_2020-04-20_16-51.html”,样式如下。
html样式可以在“${jmeter.home}/extras/jmeter-results-report-loadtest.xsl”中进行配置。


 1814
1814

 被折叠的 条评论
为什么被折叠?
被折叠的 条评论
为什么被折叠?
 到【灌水乐园】发言


