


注意:我写的代码是vue2的
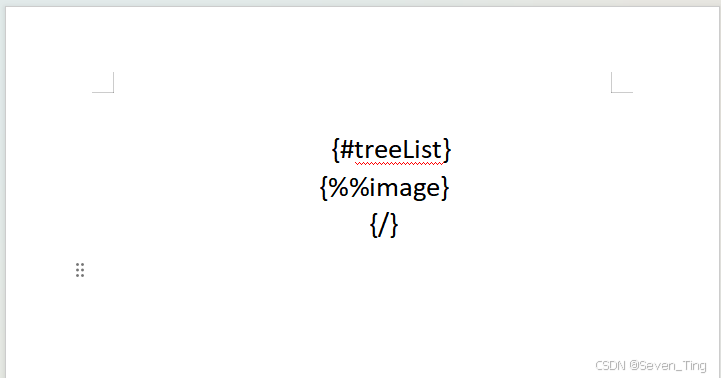
1、配置word文件
注意:配置一个docx文件保存在public文件下。比如:信息模版.docx
2、安装插件
"docxtemplater": "^3.67.5",
"file-saver": "^2.0.5",
"docx-preview": "^0.3.7",
"pizzip": "^3.2.0",
"docxtemplater-image-module-free": "^1.1.1",
"element-ui": "^2.15.14",
"html2canvas": "^1.4.1",
3、引入插件
import { saveAs } from "file-saver";
import { renderAsync } from "docx-preview";
// 导入图片模块(用于插入树组件图片)
import ImageModule from "docxtemplater-image-module-free";
// 导入 html2canvas 用于将 DOM 转换为图片
import html2canvas from "html2canvas";
4、准备渲染的数据
  data() {
    return {
      loading: false,
      wordBlob: null,
      downloadFileName: "",
      treeData: [
        {
          label: '树根',
          children: [
            {
              label: '一级 1',
              children: [{
                label: '二级 1-1',
                children: [{
                  label: '三级 1-1-1'
                }]
              }]
            },
            {
              label: '一级 2',
              children: [{
                label: '二级 2-1',
                children: [{
                  label: '三级 2-1-1'
                }]
              }, {
                label: '二级 2-2',
                children: [{
                  label: '三级 2-2-1'
                }]
              }]
            },
            {
              label: '一级 3',
              children: [{
                label: '二级 3-1',
                children: [{
                  label: '三级 3-1-1'
                }]
              }, {
                label: '二级 3-2',
                children: [{
                  label: '三级 3-2-1'
                }]
              }]
            }
          ]
        }
      ],
    };
  },
5、加载Word模板文件
        const fileName = "info.docx";
        const response = await fetch(`/${fileName}`);

        if (!response.ok) {
          throw new Error(`模板文件不存在,状态码:${response.status}`);
        }

        const arrayBuffer = await response.arrayBuffer();

        // echarts 格式转换方法
        const base64DataURLToArrayBuffer = (dataURL) => {
          const base64Regex = /^data:image\/(png|jpg|svg|svg\+xml);base64,/;
          if (!base64Regex.test(dataURL)) {
            return false;
          }
          const stringBase64 = dataURL.replace(base64Regex, "");
          let binaryString;
          if (typeof window !== "undefined") {
            binaryString = window.atob(stringBase64);
          } else {
            binaryString = new Buffer(stringBase64, "base64").toString(
              "binary"
            );
          }
          const len = binaryString.length;
          const bytes = new Uint8Array(len);
          for (let i = 0; i < len; i++) {
            const ascii = binaryString.charCodeAt(i);
            bytes[i] = ascii;
          }
          return bytes.buffer;
        };
6、初始化docxtemplater
        const PizZip = require("pizzip");
        const Docxtemplater = require("docxtemplater");
        const zip = new PizZip(arrayBuffer);

        // 创建图片模块(用于插入树组件图片)
        const imageModuleOptions = {
          centered: true, // 图片居中
          fileType: "docx",
          getImage: (chartId) => {
            const result = base64DataURLToArrayBuffer(chartId);
            return result;
          },
          getSize: () => {
            return [600, 400]; // 树组件图片尺寸
          },
        };
        const imageModule = new ImageModule(imageModuleOptions);
7、创建 Docxtemplater 实例
        const doc = new Docxtemplater(zip, {
          modules: [imageModule], // 启用图片模块
          nullGetter: () => "",
        });
8、生成树组件图片
        let treeImageBase64 = null;
        try {
          // 等待 DOM 更新,确保树组件已渲染
          await this.$nextTick();

          // 等待树组件完全渲染(Element UI 树组件需要时间渲染)
          await new Promise((resolve) => setTimeout(resolve, 800));

          if (this.$refs.treeContainer) {

            // 临时显示树容器,确保 html2canvas 能正确捕获
            const originalVisibility = this.$refs.treeContainer.style.visibility;
            const originalPosition = this.$refs.treeContainer.style.position;
            const originalLeft = this.$refs.treeContainer.style.left;
            const originalTop = this.$refs.treeContainer.style.top;
            const originalZIndex = this.$refs.treeContainer.style.zIndex;

            // 设置为可见但不在视口中
            this.$refs.treeContainer.style.visibility = 'visible';
            this.$refs.treeContainer.style.position = 'fixed';
            this.$refs.treeContainer.style.left = '0';
            this.$refs.treeContainer.style.top = '0';
            this.$refs.treeContainer.style.zIndex = '-1';

            // 等待样式应用
            await new Promise((resolve) => setTimeout(resolve, 200));

            // 使用 html2canvas 将树组件转换为图片
            const canvas = await html2canvas(this.$refs.treeContainer, {
              backgroundColor: '#ffffff',
              scale: 2, // 提高图片清晰度
              logging: true, // 开启日志以便调试
              useCORS: true,
              allowTaint: false,
            });

            // 恢复原始样式
            this.$refs.treeContainer.style.visibility = originalVisibility;
            this.$refs.treeContainer.style.position = originalPosition;
            this.$refs.treeContainer.style.left = originalLeft;
            this.$refs.treeContainer.style.top = originalTop;
            this.$refs.treeContainer.style.zIndex = originalZIndex;

            treeImageBase64 = canvas.toDataURL('image/png');
          }
        } catch (error) {
          // 生成树组件图片失败,继续执行
        }
9、准备树图片数据(用于插入到 Word 文档)
        const treeList = [];
        if (treeImageBase64) {
          // ImageModule 使用 {%%image} 格式,所以数据中的字段名应该是 image
          treeList.push({
            image: treeImageBase64, // 注意:ImageModule 会查找 image 字段
          });
        }
10、准备模板数据
        const data = {
          // 树组件图片列表(使用 {%%image} 标签)
          // 模板中使用: {#treeList}{%%image}{/treeList}
          treeList: treeList,
        };
11、设置数据并渲染
        try {
          doc.render(data);
        } catch (renderError) {
          throw renderError;
        }
12、生成文档
        const zipData = doc.getZip();
        const docContent = zipData.generate({
          type: "uint8array",
          mimeType:
            "application/vnd.openxmlformats-officedocument.wordprocessingml.document",
        });
13、生成 blob
        const blob = new Blob([docContent], {
          type: "application/vnd.openxmlformats-officedocument.wordprocessingml.document",
        });

        this.wordBlob = blob;
        this.downloadFileName = `信息-${new Date().getTime()}.docx`;
14、转换为 ArrayBuffer 用于预览
        const outputArrayBuffer = await blob.arrayBuffer();
        this.loading = false;
15、等待 DOM 更新后再渲染
await this.$nextTick();
16、使用 docx-preview 在页面上渲染
        if (this.$refs.wordContent) {
          try {
            this.$refs.wordContent.innerHTML = "";
            await renderAsync(
              outputArrayBuffer,
              this.$refs.wordContent,
              null,
              {
                className: "docx-wrapper",
                inWrapper: true,
                ignoreWidth: false,
                ignoreHeight: false,
                ignoreFonts: false,
                breakPages: true,
                ignoreLastRenderedPageBreak: true,
                experimental: false,
                trimXmlDeclaration: true,
                useBase64URL: false,
                useMathMLPolyfill: true,
                showChanges: false,
                showComments: false,
                showInserted: true,
                showDeleted: false,
              }
            );

            this.$message.success("Word 文档生成并显示成功!");
          } catch (renderError) {
            this.$refs.wordContent.innerHTML = `
              <div style="padding: 40px; text-align: center; color: #f56c6c;">
                <p style="font-size: 16px; margin-bottom: 10px;">文档渲染失败</p>
                <p style="font-size: 14px; color: #999;">错误信息: ${
                  renderError.message || "未知错误"
                }</p>
                <p style="font-size: 14px; color: #999; margin-top: 10px;">您可以点击"下载文档"按钮下载 Word 文件查看</p>
              </div>
            `;
            this.$message.warning("文档预览失败,但可以下载查看");
          }
        }
17、下载函数
    downloadWord() {
      if (this.wordBlob && this.downloadFileName) {
        saveAs(this.wordBlob, this.downloadFileName);
        this.$message.success("文档下载成功!");
      } else {
        this.$message.warning("文档尚未生成,请先生成文档");
      }
    },
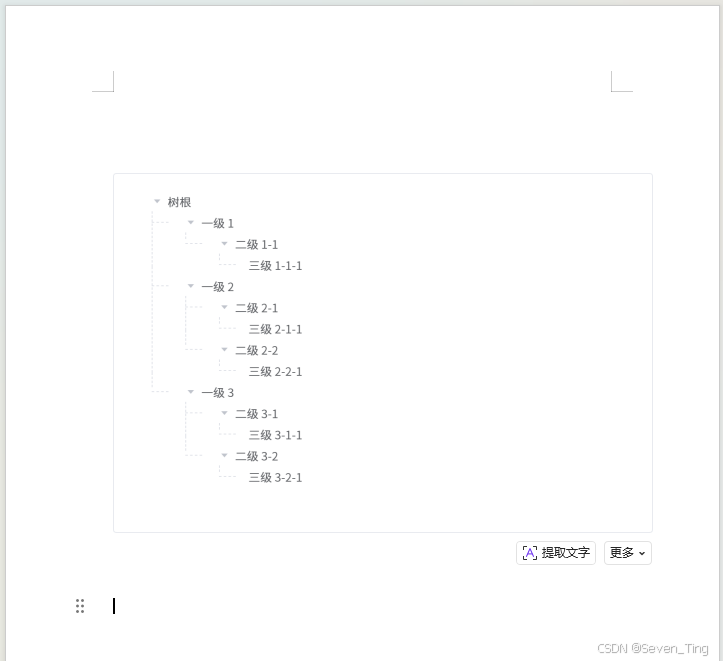
18、el-tree的用线形式来连接显示树结构的样式
.tree-container {
  position: absolute;
  left: -9999px;
  top: 0;
  width: 600px;
  min-height: 400px;
  background: #fff;
  padding: 20px;
  border: 1px solid #e4e7ed;
  border-radius: 4px;
  visibility: hidden; /* 隐藏但保持布局 */

  :deep(.el-tree) {
    font-size: 14px;
    background: #fff;
  }

  :deep(.el-tree-node__content) {
    height: 26px;
    line-height: 26px;
    position: relative;
  }

  // 带线的树结构样式 - 参考提供的代码实现
  :deep(.line-tree) {
    .el-tree-node {
      position: relative;
      padding-left: 20px; // 缩进量

      // 子节点容器也需要缩进
      .el-tree-node__children {
        padding-left: 20px; // 缩进量
      }
    }

    // 只有在 .el-tree-node__children 下的 .el-tree-node 才有竖线和横线
    .el-tree-node__children .el-tree-node {
      // 竖线 - 只在子节点容器内的节点显示
      &::before {
        content: "";
        height: 100%;
        width: 0;
        position: absolute;
        left: -15px; // 调整位置,使其在节点左侧
        top: -10px; // 向上延伸
        border-left: 1px dashed #dcdfe6; // 使用虚线
        z-index: 0;
        pointer-events: none;
      }

      // 当前层最后一个节点的竖线高度固定(只到节点中间)
      &:last-child::before {
        height: 18px; // 固定高度,只到节点中间
      }

      // 横线 - 只在子节点容器内的节点显示
      &::after {
        content: "";
        width: 20px; // 横线宽度
        height: 0;
        position: absolute;
        left: -15px;
        top: 13px; // 节点高度的一半(26px / 2 = 13px)
        border-top: 1px dashed #dcdfe6; // 使用虚线
        z-index: 0;
        pointer-events: none;
      }
    }

    // 最外层节点(直接子节点)不显示竖线和横线
    .el-tree > .el-tree-node {
      &::before {
        display: none !important;
        content: none !important;
      }

      &::after {
        border-top: none !important;
        display: none !important;
        content: none !important;
      }
    }

    // 调整折叠器和内容区域
    .el-tree-node__content {
      position: relative;
      z-index: 1;
      background: #fff;
      margin-left: 0;
      padding-left: 0px !important;

      .el-tree-node__expand-icon {
        position: relative;
        z-index: 2;
        background: #fff;

        // 叶子节点(无子节点)隐藏箭头
        &.is-leaf {
          color: transparent;
          display: none;
        }
      }
    }

    // 确保树节点内容区域有背景
    .el-tree-node__label {
      background: #fff;
      position: relative;
      z-index: 1;
    }
  }
}
18、最终下载显示docx的截图
20、全部的代码:
<template>
  <div class="word-container">
    <div class="word-card">
      <div class="header-actions">
        <el-button type="primary" @click="downloadWord" :disabled="!wordBlob">
          <i class="el-icon-download"></i> 下载文档
        </el-button>
        <el-button @click="generateWord" :loading="loading">
          <i class="el-icon-refresh"></i> 重新生成
        </el-button>
      </div>

      <div v-if="loading" class="loading">
        <i class="el-icon-loading"></i>
        <p>正在生成 Word 文档...</p>
      </div>
      <div v-else-if="!wordBlob" class="error-message">
        <p>文档生成失败,请重试</p>
      </div>
      <div v-else ref="wordContent" class="word-content"></div>

      <!-- 树组件容器,用于转换为图片(隐藏但保持渲染) -->
      <div ref="treeContainer" class="tree-container">
        <el-tree
          ref="tree"
          :data="treeData"
          :props="{ children: 'children', label: 'label' }"
          default-expand-all
          class="line-tree"
        ></el-tree>
      </div>
    </div>
  </div>
</template>

<script>
import { saveAs } from "file-saver";
import { renderAsync } from "docx-preview";
// 导入图片模块(用于插入树组件图片)
import ImageModule from "docxtemplater-image-module-free";
// 导入 html2canvas 用于将 DOM 转换为图片
import html2canvas from "html2canvas";

export default {
  name: "InfoPage",
  data() {
    return {
      loading: false,
      wordBlob: null,
      downloadFileName: "",
      treeData: [
        {
          label: '树根',
          children: [
            {
              label: '一级 1',
              children: [{
                label: '二级 1-1',
                children: [{
                  label: '三级 1-1-1'
                }]
              }]
            },
            {
              label: '一级 2',
              children: [{
                label: '二级 2-1',
                children: [{
                  label: '三级 2-1-1'
                }]
              }, {
                label: '二级 2-2',
                children: [{
                  label: '三级 2-2-1'
                }]
              }]
            },
            {
              label: '一级 3',
              children: [{
                label: '二级 3-1',
                children: [{
                  label: '三级 3-1-1'
                }]
              }, {
                label: '二级 3-2',
                children: [{
                  label: '三级 3-2-1'
                }]
              }]
            }
          ]
        }
      ],
    };
  },
  mounted() {
    // 确保树组件已渲染
    this.$nextTick(() => {
      setTimeout(() => {
        this.generateWord();
      }, 500);
    });
  },
  methods: {
    async generateWord() {
      try {
        this.loading = true;

        // 1. 加载Word模板文件
        const fileName = "info.docx";
        const response = await fetch(`/${fileName}`);

        if (!response.ok) {
          throw new Error(`模板文件不存在,状态码:${response.status}`);
        }

        const arrayBuffer = await response.arrayBuffer();

        // echarts 格式转换方法
        const base64DataURLToArrayBuffer = (dataURL) => {
          const base64Regex = /^data:image\/(png|jpg|svg|svg\+xml);base64,/;
          if (!base64Regex.test(dataURL)) {
            return false;
          }
          const stringBase64 = dataURL.replace(base64Regex, "");
          let binaryString;
          if (typeof window !== "undefined") {
            binaryString = window.atob(stringBase64);
          } else {
            binaryString = new Buffer(stringBase64, "base64").toString(
              "binary"
            );
          }
          const len = binaryString.length;
          const bytes = new Uint8Array(len);
          for (let i = 0; i < len; i++) {
            const ascii = binaryString.charCodeAt(i);
            bytes[i] = ascii;
          }
          return bytes.buffer;
        };

        // 2. 初始化docxtemplater
        const PizZip = require("pizzip");
        const Docxtemplater = require("docxtemplater");
        const zip = new PizZip(arrayBuffer);

        // 创建图片模块(用于插入树组件图片)
        const imageModuleOptions = {
          centered: true, // 图片居中
          fileType: "docx",
          getImage: (chartId) => {
            const result = base64DataURLToArrayBuffer(chartId);
            return result;
          },
          getSize: () => {
            return [600, 400]; // 树组件图片尺寸
          },
        };
        const imageModule = new ImageModule(imageModuleOptions);

        // 3. 创建 Docxtemplater 实例
        const doc = new Docxtemplater(zip, {
          modules: [imageModule], // 启用图片模块
          nullGetter: () => "",
        });

        // 4. 生成树组件图片
        let treeImageBase64 = null;
        try {
          // 等待 DOM 更新,确保树组件已渲染
          await this.$nextTick();

          // 等待树组件完全渲染(Element UI 树组件需要时间渲染)
          await new Promise((resolve) => setTimeout(resolve, 800));

          if (this.$refs.treeContainer) {

            // 临时显示树容器,确保 html2canvas 能正确捕获
            const originalVisibility = this.$refs.treeContainer.style.visibility;
            const originalPosition = this.$refs.treeContainer.style.position;
            const originalLeft = this.$refs.treeContainer.style.left;
            const originalTop = this.$refs.treeContainer.style.top;
            const originalZIndex = this.$refs.treeContainer.style.zIndex;

            // 设置为可见但不在视口中
            this.$refs.treeContainer.style.visibility = 'visible';
            this.$refs.treeContainer.style.position = 'fixed';
            this.$refs.treeContainer.style.left = '0';
            this.$refs.treeContainer.style.top = '0';
            this.$refs.treeContainer.style.zIndex = '-1';

            // 等待样式应用
            await new Promise((resolve) => setTimeout(resolve, 200));

            // 使用 html2canvas 将树组件转换为图片
            const canvas = await html2canvas(this.$refs.treeContainer, {
              backgroundColor: '#ffffff',
              scale: 2, // 提高图片清晰度
              logging: true, // 开启日志以便调试
              useCORS: true,
              allowTaint: false,
            });

            // 恢复原始样式
            this.$refs.treeContainer.style.visibility = originalVisibility;
            this.$refs.treeContainer.style.position = originalPosition;
            this.$refs.treeContainer.style.left = originalLeft;
            this.$refs.treeContainer.style.top = originalTop;
            this.$refs.treeContainer.style.zIndex = originalZIndex;

            treeImageBase64 = canvas.toDataURL('image/png');
          }
        } catch (error) {
          // 生成树组件图片失败,继续执行
        }

        // 5. 准备树图片数据(用于插入到 Word 文档)
        const treeList = [];
        if (treeImageBase64) {
          // ImageModule 使用 {%%image} 格式,所以数据中的字段名应该是 image
          treeList.push({
            image: treeImageBase64, // 注意:ImageModule 会查找 image 字段
          });
        }

        // 6. 准备模板数据
        const data = {
          // 树组件图片列表(使用 {%%image} 标签)
          // 模板中使用: {#treeList}{%%image}{/treeList}
          treeList: treeList,
        };

        // 7. 设置数据并渲染
        try {
          doc.render(data);
        } catch (renderError) {
          throw renderError;
        }

        // 8. 生成文档
        const zipData = doc.getZip();
        const docContent = zipData.generate({
          type: "uint8array",
          mimeType:
            "application/vnd.openxmlformats-officedocument.wordprocessingml.document",
        });

        // 9. 生成 blob
        const blob = new Blob([docContent], {
          type: "application/vnd.openxmlformats-officedocument.wordprocessingml.document",
        });

        this.wordBlob = blob;
        this.downloadFileName = `信息-${new Date().getTime()}.docx`;

        // 10. 转换为 ArrayBuffer 用于预览
        const outputArrayBuffer = await blob.arrayBuffer();
        this.loading = false;

        // 11. 等待 DOM 更新后再渲染
        await this.$nextTick();

        // 12. 使用 docx-preview 在页面上渲染
        if (this.$refs.wordContent) {
          try {
            this.$refs.wordContent.innerHTML = "";
            await renderAsync(
              outputArrayBuffer,
              this.$refs.wordContent,
              null,
              {
                className: "docx-wrapper",
                inWrapper: true,
                ignoreWidth: false,
                ignoreHeight: false,
                ignoreFonts: false,
                breakPages: true,
                ignoreLastRenderedPageBreak: true,
                experimental: false,
                trimXmlDeclaration: true,
                useBase64URL: false,
                useMathMLPolyfill: true,
                showChanges: false,
                showComments: false,
                showInserted: true,
                showDeleted: false,
              }
            );

            this.$message.success("Word 文档生成并显示成功!");
          } catch (renderError) {
            this.$refs.wordContent.innerHTML = `
              <div style="padding: 40px; text-align: center; color: #f56c6c;">
                <p style="font-size: 16px; margin-bottom: 10px;">文档渲染失败</p>
                <p style="font-size: 14px; color: #999;">错误信息: ${
                  renderError.message || "未知错误"
                }</p>
                <p style="font-size: 14px; color: #999; margin-top: 10px;">您可以点击"下载文档"按钮下载 Word 文件查看</p>
              </div>
            `;
            this.$message.warning("文档预览失败,但可以下载查看");
          }
        }
      } catch (error) {
        this.$message.error("生成 Word 文档失败: " + (error.message || "未知错误"));
        this.loading = false;

        // 处理模板错误
        if (error.properties && error.properties.errors) {
          const errors = error.properties.errors;
          this.$message.error(`模板有 ${errors.length} 个错误`);
        }
      }
    },
    downloadWord() {
      if (this.wordBlob && this.downloadFileName) {
        saveAs(this.wordBlob, this.downloadFileName);
        this.$message.success("文档下载成功!");
      } else {
        this.$message.warning("文档尚未生成,请先生成文档");
      }
    },
  },
};
</script>

<style lang="scss" scoped>
.word-container {
  min-height: 100vh;
  display: flex;
  justify-content: center;
  align-items: center;
  background: linear-gradient(135deg, #74b9ff 0%, #0984e3 50%, #005f99 100%);
  padding: 20px;
}

.word-card {
  width: 100%;
  max-width: 1200px;
  background: #ffffff;
  border-radius: 12px;
  box-shadow: 0 10px 40px rgba(0, 0, 0, 0.1);
  padding: 20px;
  animation: fadeInUp 0.5s ease-out;
  min-height: 600px;
  display: flex;
  flex-direction: column;
}

@keyframes fadeInUp {
  from {
    opacity: 0;
    transform: translateY(30px);
  }
  to {
    opacity: 1;
    transform: translateY(0);
  }
}

.loading {
  display: flex;
  flex-direction: column;
  align-items: center;
  justify-content: center;
  min-height: 400px;
  color: #0984e3;

  i {
    font-size: 32px;
    margin-bottom: 20px;
    animation: rotating 2s linear infinite;
  }

  p {
    font-size: 16px;
    color: #666;
  }
}

@keyframes rotating {
  from {
    transform: rotate(0deg);
  }
  to {
    transform: rotate(360deg);
  }
}

.header-actions {
  display: flex;
  justify-content: flex-end;
  gap: 10px;
  margin-bottom: 20px;
  padding-bottom: 20px;
  border-bottom: 1px solid #eee;
}

.word-content {
  width: 100%;
  min-height: 400px;
  max-height: 80vh;
  overflow-y: auto;
  position: relative;

  :deep(.docx-wrapper) {
    background: #fff;
    padding: 40px;
    box-shadow: 0 2px 8px rgba(0, 0, 0, 0.1);
    border-radius: 4px;
    margin: 0 auto;
    max-width: 800px;
    min-height: 400px;
  }
}

.error-message {
  display: flex;
  align-items: center;
  justify-content: center;
  min-height: 400px;
  color: #f56c6c;
  font-size: 16px;
}

.tree-container {
  position: absolute;
  left: -9999px;
  top: 0;
  width: 600px;
  min-height: 400px;
  background: #fff;
  padding: 20px;
  border: 1px solid #e4e7ed;
  border-radius: 4px;
  visibility: hidden; /* 隐藏但保持布局 */

  :deep(.el-tree) {
    font-size: 14px;
    background: #fff;
  }

  :deep(.el-tree-node__content) {
    height: 26px;
    line-height: 26px;
    position: relative;
  }

  // 带线的树结构样式 - 参考提供的代码实现
  :deep(.line-tree) {
    .el-tree-node {
      position: relative;
      padding-left: 20px; // 缩进量

      // 子节点容器也需要缩进
      .el-tree-node__children {
        padding-left: 20px; // 缩进量
      }
    }

    // 只有在 .el-tree-node__children 下的 .el-tree-node 才有竖线和横线
    .el-tree-node__children .el-tree-node {
      // 竖线 - 只在子节点容器内的节点显示
      &::before {
        content: "";
        height: 100%;
        width: 0;
        position: absolute;
        left: -15px; // 调整位置,使其在节点左侧
        top: -10px; // 向上延伸
        border-left: 1px dashed #dcdfe6; // 使用虚线
        z-index: 0;
        pointer-events: none;
      }

      // 当前层最后一个节点的竖线高度固定(只到节点中间)
      &:last-child::before {
        height: 18px; // 固定高度,只到节点中间
      }

      // 横线 - 只在子节点容器内的节点显示
      &::after {
        content: "";
        width: 20px; // 横线宽度
        height: 0;
        position: absolute;
        left: -15px;
        top: 13px; // 节点高度的一半(26px / 2 = 13px)
        border-top: 1px dashed #dcdfe6; // 使用虚线
        z-index: 0;
        pointer-events: none;
      }
    }

    // 最外层节点(直接子节点)不显示竖线和横线
    .el-tree > .el-tree-node {
      &::before {
        display: none !important;
        content: none !important;
      }

      &::after {
        border-top: none !important;
        display: none !important;
        content: none !important;
      }
    }

    // 调整折叠器和内容区域
    .el-tree-node__content {
      position: relative;
      z-index: 1;
      background: #fff;
      margin-left: 0;
      padding-left: 0px !important;

      .el-tree-node__expand-icon {
        position: relative;
        z-index: 2;
        background: #fff;

        // 叶子节点(无子节点)隐藏箭头
        &.is-leaf {
          color: transparent;
          display: none;
        }
      }
    }

    // 确保树节点内容区域有背景
    .el-tree-node__label {
      background: #fff;
      position: relative;
      z-index: 1;
    }
  }
}

@media (max-width: 768px) {
  .word-card {
    padding: 30px 20px;
    max-width: 100%;
  }
}
</style>


 1947
1947


 到【灌水乐园】发言


