


 本文围绕Android自定义View展开,阐述了其概念、学习原因及重要性,介绍了自定义View的四种形式,还讲解了View的构造函数、绘制流程、需实现的方法、自定义属性、生命周期等内容,分析了onMeasure和onLayout执行次数问题,最后提及画笔属性。
Android 自定义View的小总结
为什么需要自定义View?是因为Android原生的View不能满足我们的需求了,所以需要我们自定义自己的View。
一, 自定View的概念, 什么是自定义View??
在Android系统中,使用系统自带的控件重新组合或者自定义类继承View或者ViewGroup实现特定的效果。
二,为什么学习自定义View??
1,整个View控件在不同设备上的风格统一。例如QQ,微信,支付宝。
2,系统自带的View功能过多,或者过少不能满足我们的需求,例如listView没有下拉刷新功能。还有例如我们不希望ViewPager有滑动功能。
3,系统自带View不能满足我们的需求,我们需要自己实现.
三,自定义View的重要性?
1,Android程序员一定离不开自定义View。
2,工作必须用到。
3,看懂别人的代码。
4,面试的时候必须会被问到。
四,重点了解几个方面:
自定义View和ViewGroup的区别。
Android中事件是如何传递的。(后面单元会讲)
View工作原理。
五,自定义View的原则:
如果系统View能够完成的尽量使用系统控件,新的自定义View容易引起BUG。
六,常用Android控件的介绍。
Button、TextView、CheckBox、ListView等.
自定义view的有四种形式:
(一)组合View:
组合控件,顾名思义就是将一些系统控件组合起来形成一个新的控件,形成UI特定的效果。比如很多应用中普遍使用的标题栏控件,其实用的就是组合控件,达到形成自己统一的风格。
(二)自定义View:
自绘控件就是继承View,自定义其中的内容,并在View的onDraw方法中按照规定完成绘制功能。
(三)继承ViewGroup:
就是继承已有的ViewGroup,创建新的ViewGroup。
(四)继承原有的系统控件,例如ListView或者ViewPager。
在保留原有特性的基础上,增加或者减少原有的特性。
View类简介:
View类是Android中各种组件的基类,如View是ViewGroup基类
View表现为显示在屏幕上的各种视图
Android中的UI组件都由View、ViewGroup组成。
其框架如下图所示:
为什么需要自定义View?是因为Android原生的View不能满足我们的需求了,所以需要我们自定义自己的View。
View的构造函数
【第一个问题】
如果我们在继承了View类实现自定义类时,需要重写哪个构造函数?
回答这个问题,首先需要知道,在定义了View时,我们都调用了哪个构造函数。
1public View(Context context)
2public View(Context context, @Nullable AttributeSet attrs)
3public View(Context context, @Nullable AttributeSet attrs, int defStyleAttr)
4public View(Context context, @Nullable AttributeSet attrs, int defStyleAttr, int defStyleRes)
当我们自定义一个View,且在布局文件中引用时,在系统初始化该View时,调用的是第二个构造函数,(演示)
View整个绘制流程??
Measure->Layout->Draw
onMeasure()->onLayout()->onDraw()
需要计算View的大小(measure)、重新安置视图的位置(layout)、绘制视图(draw)。
measure: 计算View的大小,需要的话则计算大小;我们自定义View时实现onMeasure()方法,在该方法确定控件的实际大小。
layout: 计算View的位置,需要的话则计算位置;我们自定义ViewGroup时,实现onLayout()方法,该方法摆放控件的位置。
draw:绘制View,绘制视图。自定义View时,实现onDraw()方法。去实现绘制自己。
我们自定义View,需要实现的几个方法。
onMeasure()方法:
protected void onMeasure(int widthMeasureSpec, int heightMeasureSpec) {
super.onMeasure(widthMeasureSpec, heightMeasureSpec);
int specWidthMode = MeasureSpec.getMode(widthMeasureSpec);
int specHeightMode = MeasureSpec.getMode(heightMeasureSpec);
switch (specHeightMode) {
    case MeasureSpec.EXACTLY:
        break;
    case MeasureSpec.AT_MOST:
        break;
    case MeasureSpec.UNSPECIFIED:
        break;
    default:
        break;
}
/**
 *设置自定义view的尺寸.
 */
setMeasuredDimension(300, 300);
}
该方法就是我们自定义View中实现测量逻辑的方法,该方法的参数是父视图对子视图的 width 和 height 的测量要求。在我们自身的自定义视图中,要做的就是根据该 widthMeasureSpec 和 heightMeasureSpec 计算视图的 width 和 height,不同的模式处理方式不同。
MeasureSpec的使用:
- 获取测量模式(Mode) int specMode = MeasureSpec.getMode(measureSpec) 2. 获取测量大小(Size) int specSize = MeasureSpec.getSize(measureSpec)
Mode:
onLayout()方法:
protected abstract void onLayout(boolean changed,
int l, int t, int r, int b);
@Override
protected void onLayout(boolean changed, int left, int top, int right, int bottom) {
layoutChildren(left, top, right, bottom, false /* no force left gravity */);
}
首先要明确的是,子视图的具体位置都是相对于父视图而言的。View 的 onLayout 方法为空实现,而 ViewGroup 的 onLayout 为 abstract 的,因此,如果自定义的 View 要继承 ViewGroup 时,必须实现 onLayout 函数。
在 layout 过程中,子视图会调用getMeasuredWidth()和getMeasuredHeight()方法获取到 measure 过程得到的 mMeasuredWidth 和 mMeasuredHeight,作为自己的 width 和 height。然后调用每一个子视图的layout(l, t, r, b)函数,来确定每个子视图在父视图中的位置。
protected void onDraw(Canvas canvas)
View 的onDraw(Canvas)默认是空实现,自定义View绘制过程需要复写的方法,绘制自身的内容。
@Override
protected void onDraw(Canvas canvas) {
super.onDraw(canvas);
// 绘制一个填充色为蓝色的矩形
mPaint.setColor(Color.BLUE);
canvas.drawRect(0, 0, getWidth(), getHeight(), mPaint);
mPaint.setColor(Color.YELLOW);
mPaint.setTextSize(50);
String text = String.valueOf(mCount);
// 获取文字的宽和高
mPaint.getTextBounds(text, 0, text.length(), mBounds);
float textWidth  = mBounds.width();
float textHeight = mBounds.height();
// 绘制字符串
canvas.drawText(text, getWidth() / 2 - textWidth / 2, getHeight() / 2
        + textHeight / 2, mPaint);
}
自定义View属性。
自定义View的自定义属性,为了能让自定义View在xml文件中编写时可以设置自己特有的属性值
创建attrs.xml文件
在res/values/中创建一个attrs.xml。
创建declare-styleable节点
在根节点resources内添加declare-styleable节点,declare-styleable节点只有一个name属性且为必填,name可以自由定义。
TypedArray typedArray = context.obtainStyledAttributes(attrs, R.styleable.CustomView);
typedArray.recycle();//回收typedArray
mColor = a.getColor(R.styleable.CircleView_circle_color, Color.RED);
在layout的xml文件中定义:
xmlns:app=“http://schemas.android.com/apk/res-auto”
app:circle_color="@color/colorPrimaryDark"
View 的生命周期
onWindowVisibilityChanged(改变可见性)——》创建(构造方法)——》onFinishInflate(初始化xml【当所有子控件全部完成xml映射是触发】})——》onAttachedToWindow(当view附着一个窗口时触发)——》onMeasure(确定自己的大小)——》onSizeChenged(当view大小变化是触发)——》onLayout(确定所有子控件的大小和位置)——》onDeaw(view绘制)——》onDetackedFromWindow(当View离开附着的窗口时触发,比如在Activity调用onDestroy方法时View就会离开窗口。和一开始的AttachedToWindow相对,都只会被调用一次)
问 view的onMeasure和onLayout问什么会执行两次
api25-24:执行2次onMeasure、2次onLayout、1次onDraw,理论上执行三次测量,但由于测量优化策略,第三次不会执行onMeasure。
api23-21:执行3次onMeasure、2次onLayout、1次onDraw,forceLayout标志位,离奇被置为true,导致无测量优化。
api19-16:执行2次onMeasure、2次onLayout、1次onDraw,原因第一次performTranversals中只会执行measureHierarchy中的performMeasure,forceLayout标志位,离奇被置位true,导致无测量优化。
总之,造成这个现象的根本原因是performTranversal函数在View的测量流程中会执行2次。
遍历Activity的根布局DecorView里(或者其它窗口比如Dialog)的每一个View
链接:https://www.jianshu.com/p/733c7e9fb284
画笔属性:
setARGB(int a,int r,int g,int b);
设置绘制的颜色,a代表透明度,r,g,b代表颜色值。
setAlpha(int a);
设置绘制图形的透明度。
setColor(int color);
设置绘制的颜色,使用颜色值来表示,该颜色值包括透明度和RGB颜色。
setAntiAlias(boolean aa);
设置是否使用抗锯齿功能,会消耗较大资源,绘制图形速度会变慢。
setDither(boolean dither);
设定是否使用图像抖动处理,会使绘制出来的图片颜色更加平滑和饱满,图像更加清晰
setFilterBitmap(boolean filter);
如果该项设置为true,则图像在动画进行中会滤掉对Bitmap图像的优化操作,加快显示 速度, 本设置项依赖于dither和xfermode的设置
setMaskFilter(MaskFilter maskfilter);
设置MaskFilter,可以用不同的MaskFilter实现滤镜的效果,如滤化,立体等 setColorFilter(ColorFilter colorfilter);
设置颜色过滤器,可以在绘制颜色时实现不用颜色的变换效果
setPathEffect(PathEffect effect);
设置绘制路径的效果,如点画线等
setShader(Shader shader); 设置图像效果,使用Shader可以绘制出各种渐变效果
setShadowLayer(float radius ,float dx,float dy,int color); 在图形下面设置阴影层,产生阴影效果,radius为阴影的角度,dx和dy为阴影在x轴和y轴上的距离,color为阴影的颜色
setStyle(Paint.Style style); 设置画笔的样式,为FILL,FILL_OR_STROKE,或STROKE
setStrokeCap(Paint.Cap cap); 当画笔样式为STROKE或FILL_OR_STROKE时,设置笔刷的图形样式,如圆形样式 Cap.ROUND,或方形样式Cap.SQUARE setSrokeJoin(Paint.Join join); 设置绘制时各图形的结合方式,如平滑效果等
setStrokeWidth(float width); 当画笔样式为STROKE或FILL_OR_STROKE时,设置笔刷的粗细度
setXfermode(Xfermode xfermode); 设置图形重叠时的处理方式,如合并,取交集或并集,经常用来制作橡皮的擦除效果
setFakeBoldText(boolean fakeBoldText); 模拟实现粗体文字,设置在小字体上效果会非常差
setSubpixelText(boolean subpixelText); 设置该项为true,将有助于文本在LCD屏幕上的显示效果
setTextAlign(Paint.Align align); 设置绘制文字的对齐方向 setTextScaleX(float scaleX); 设置绘制文字x轴的缩放比例,可以实现文字的拉伸的效果
setTextSize(float textSize); 设置绘制文字的字号大小 setTextSkewX(float skewX); 设置斜体文字,skewX为倾斜弧度 setTypeface(Typeface typeface); 设置Typeface对象,即字体风格,包括粗体,斜体以及衬线体,非衬线体等
setUnderlineText(boolean underlineText); 设置带有下划线的文字效果 setStrikeThruText(boolean strikeThruText); 设置带有删除线的效果
RectF bounds = new RectF();
//computeBounds(RectF bounds,boolean exact):计算path所在区域,并将结果写入bounds
// path.computeBounds(bounds, true);
// Region region = new Region();
// //根据路径的区域与某区域的交集,构造出新区域
// region.setPath(path, new Region((int) bounds.left, (int) bounds.top, (int) bounds.right, (int) bounds.bottom));
// return region.contains(point.x, point.y);
package com.example.view;
import android.content.Context;
import android.graphics.Canvas;
import android.graphics.Color;
import android.graphics.Paint;
import android.graphics.RectF;
import android.util.AttributeSet;
import android.util.Log;
import android.view.View;
import java.util.Calendar;
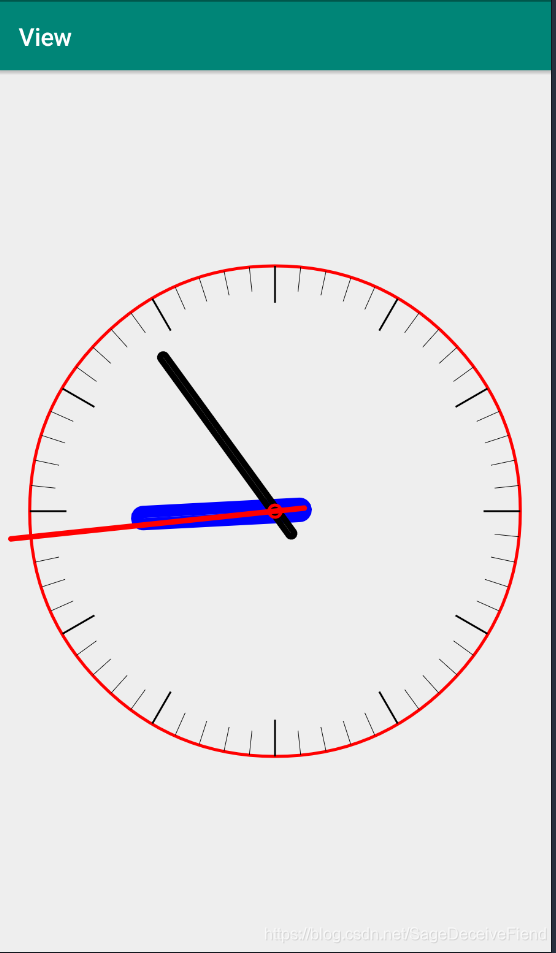
public class Clock_View extends View{
int width;
int height;
Paint paint=new Paint();
Paint painth=new Paint();
Paint paintm=new Paint();
Paint paints=new Paint();
public Clock_View(Context context, AttributeSet attrs) {
super(context, attrs);
initpaint();
}
@Override
protected void onDraw(Canvas canvas) {
super.onDraw(canvas);
canvas.translate(width/2,height/2);
canvas.drawCircle(0,0,400,paint);
prinCircle(canvas);
// printHour(canvas);
Calendar calendar=Calendar.getInstance();
int hour = calendar.get(Calendar.HOUR_OF_DAY);
int minute = calendar.get(Calendar.MINUTE);
int second = calendar.get(Calendar.SECOND);
Log.d("###", hour+":"+minute+":"+second );
float angleHour = (hour % 12) * 360 / 12 + minute * 1 / 2;
float angleMinu = 6 * minute;
int angleSec = 6 * second;
Log.d("###", angleHour+":"+angleMinu+":"+angleSec);
canvas.save();
canvas.rotate(angleHour);
int mHourWidth = 20;
RectF rectF = new RectF(-mHourWidth / 2, -(width/2) * 1 / 2, mHourWidth / 2, 50);
paint.setColor(Color.BLUE);
paint.setStrokeWidth(20);
// mPaint.setStyle(Paint.Style.STROKE);
canvas.drawRoundRect(rectF, 40, 40, paint);
canvas.restore();
//分针
canvas.save();
canvas.rotate(angleMinu);
int mMinuteWidth = 10;
RectF minurectF = new RectF(-mMinuteWidth / 2, -(width/2) * 3.5f / 5, mMinuteWidth / 2, 50);
paint.setColor(Color.BLACK);
paint.setStrokeWidth(10);
canvas.drawRoundRect(minurectF, 40, 40, paint);
canvas.restore();
//秒针
canvas.save();
canvas.rotate(angleSec);
int mSecondWidth = 5;
RectF secondRectf = new RectF(-mSecondWidth / 2, -(width/2) + 15, mSecondWidth / 2, 50);
paint.setColor(Color.RED);
paint.setStrokeWidth(5);
canvas.drawRoundRect(secondRectf, 40, 40, paint);
//旋转圆点
canvas.save();
paint.setColor(Color.RED);
canvas.drawCircle(0, 0, 10, paint);
canvas.restore();
postInvalidateDelayed(1000);
}
@Override
protected void onSizeChanged(int w, int h, int oldw, int oldh) {
super.onSizeChanged(w, h, oldw, oldh);
width=w;
height=h;
}
private void initpaint() {
paint.setStrokeWidth(2);
paint.setAntiAlias(true);
paint.setColor(Color.BLACK);
paint.setStyle(Paint.Style.STROKE);
painth.setStrokeWidth(3);
painth.setAntiAlias(true);
painth.setColor(Color.BLACK);
painth.setStyle(Paint.Style.STROKE);
paintm.setStrokeWidth(2);
paintm.setAntiAlias(true);
paintm.setColor(Color.BLACK);
paintm.setStyle(Paint.Style.STROKE);
paints.setStrokeWidth(1);
paints.setAntiAlias(true);
paints.setColor(Color.BLACK);
paints.setStyle(Paint.Style.STROKE);
}
private void prinCircle(Canvas canvas) {
canvas.save();
int lineWidth = 0;
for (int i = 0; i < 60; i++) {
if (i % 5 == 0) { //整点
paint.setStrokeWidth(3); //设置画笔的宽度
paint.setColor(Color.BLACK);
paint.setTextSize(30);
lineWidth = 60; //设置整点刻度的线宽度
} else { //非整点
lineWidth = 40;
paint.setColor(Color.BLACK);
paint.setStrokeWidth(1);
}
canvas.drawLine(0, -(width/3)-100, 0, -(width/3)-100 + lineWidth, paint);
canvas.rotate(6); //将画布旋转6度,这样就能保证,每一次都是在Y轴上画线
}
canvas.restore();
}
}
package com.example.view;
import android.content.Context;
import android.graphics.Canvas;
import android.graphics.Color;
import android.graphics.Paint;
import android.graphics.RectF;
import android.util.AttributeSet;
import android.view.View;
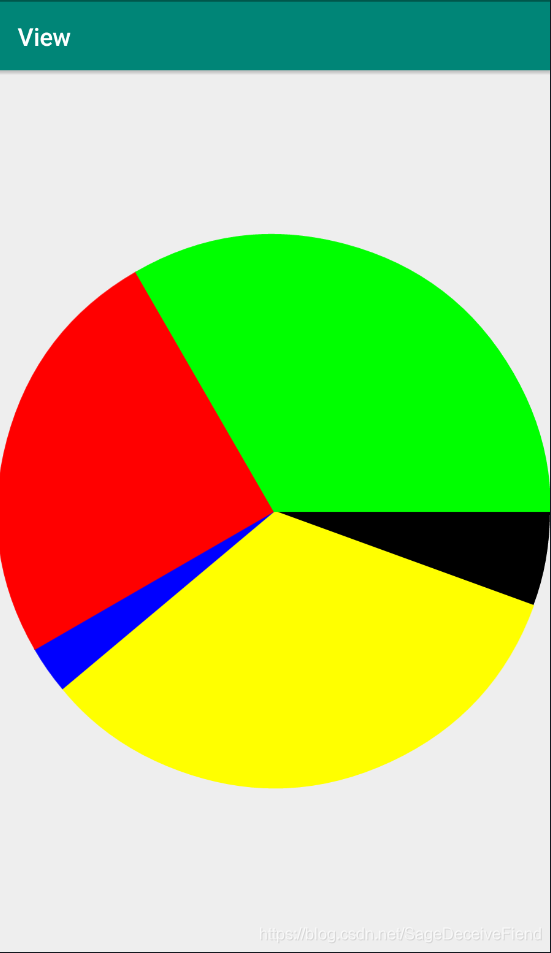
public class Pie_Chart extends View {
int width;
int height;
Paint paint=new Paint();
Paint paint2=new Paint();
Paint paint3=new Paint();
Paint paint4=new Paint();
Paint paint5=new Paint();
public Pie_Chart(Context context, AttributeSet attrs) {
super(context, attrs);
initpaint();
}
@Override
protected void onDraw(Canvas canvas) {
super.onDraw(canvas);
canvas.translate((width/2),(height/2));
RectF rectF=new RectF(-width/2,-width/2,width/2,width/2);
RectF rectF1=new RectF(-width/2,-width/2,width/2,width/2);
RectF rectF2=new RectF(-width/2,-width/2,width/2,width/2);
RectF rectF3=new RectF(-width/2,-width/2,width/2,width/2);
RectF rectF4=new RectF(-width/2,-width/2,width/2,width/2);
canvas.drawArc(rectF,0,20,true,paint);
canvas.drawArc(rectF1,20,120,true,paint2);
canvas.drawArc(rectF2,140,10,true,paint3);
canvas.drawArc(rectF3,150,90,true,paint4);
canvas.drawArc(rectF4,240,120,true,paint5);
}
@Override
protected void onSizeChanged(int w, int h, int oldw, int oldh) {
super.onSizeChanged(w, h, oldw, oldh);
width=w;
height=h;
}
private void initpaint() {
paint.setStrokeWidth(2);
paint.setAntiAlias(true);
paint.setColor(Color.BLACK);
paint.setStyle(Paint.Style.FILL);
paint2.setStrokeWidth(2);
paint2.setAntiAlias(true);
paint2.setColor(Color.YELLOW);
paint2.setStyle(Paint.Style.FILL_AND_STROKE);
paint3.setStrokeWidth(2);
paint3.setAntiAlias(true);
paint3.setColor(Color.BLUE);
paint3.setStyle(Paint.Style.FILL_AND_STROKE);
paint4.setStrokeWidth(2);
paint4.setAntiAlias(true);
paint4.setColor(Color.RED);
paint4.setStyle(Paint.Style.FILL_AND_STROKE);
paint5.setStrokeWidth(2);
paint5.setAntiAlias(true);
paint5.setColor(Color.GREEN);
paint5.setStyle(Paint.Style.FILL_AND_STROKE);
}
}
package com.example.view;
import android.content.Context;
import android.graphics.Canvas;
import android.graphics.Color;
import android.graphics.Paint;
import android.graphics.RectF;
import android.util.AttributeSet;
import android.view.View;
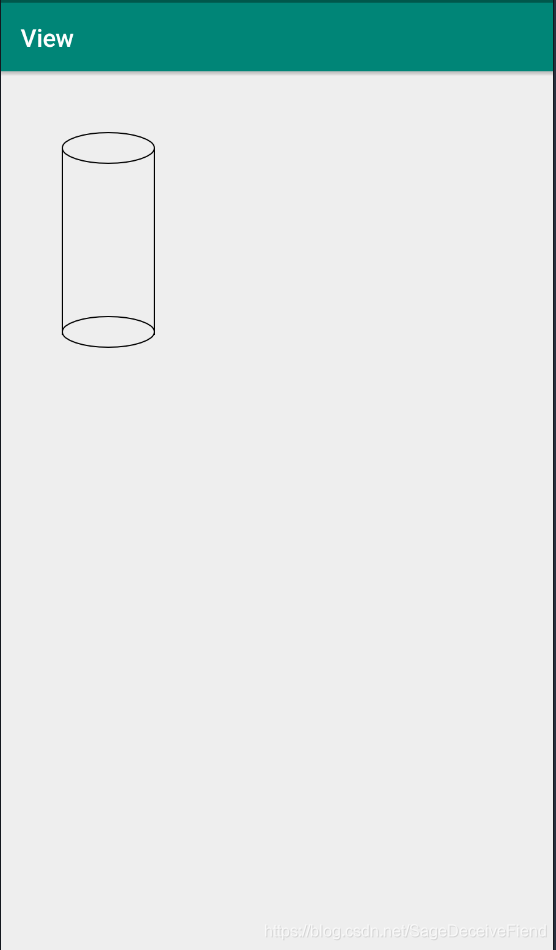
public class Styloid extends View {
Paint paint=new Paint();
public Styloid(Context context, AttributeSet attrs) {
super(context, attrs);
initpaint();
}
private void initpaint() {
paint.setStrokeWidth(2);
paint.setAntiAlias(true);
paint.setColor(Color.BLACK);
paint.setStyle(Paint.Style.STROKE);
}
@Override
protected void onDraw(Canvas canvas) {
super.onDraw(canvas);
RectF rectF=new RectF(100,100,250,150);
canvas.drawOval(rectF,paint);
canvas.drawLine(100,125,100,430,paint);
canvas.drawLine(250,125,250,430,paint);
RectF rectF1=new RectF(100,400,250,450);
canvas.drawOval(rectF1,paint);
}
}


 401
401

 被折叠的 条评论
为什么被折叠?
被折叠的 条评论
为什么被折叠?
 到【灌水乐园】发言


