


 本文详细介绍了针对CIFAR-10预训练模型的几种对抗性攻击方法,包括FGSM、I-FGSM和MI-FGSM,以及如何通过数据增强(如DIM)提高攻击的可转移性。实验比较了不同攻击策略对模型精度的影响,展示了集成多个模型(EnsembleAttack)在增强黑盒攻击效果上的潜力。
机器学习HW10对抗性攻击
一、任务描述
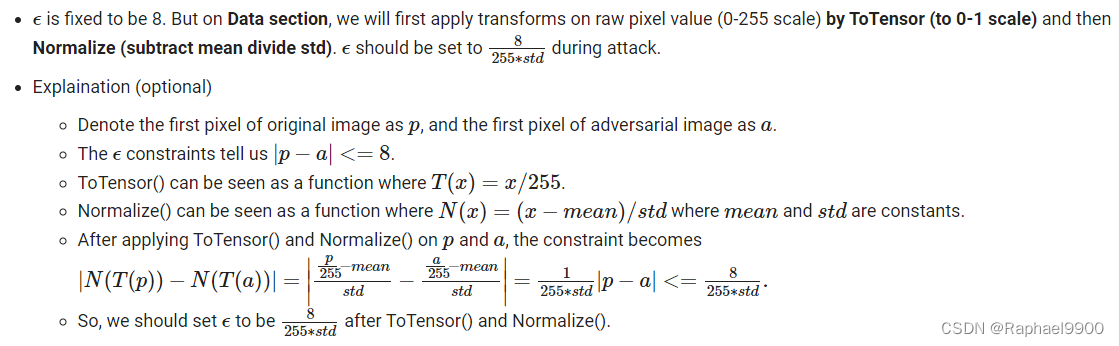
我们使用pytorchcv来获得CIFAR-10预训练模型,所以我们需要首先设置环境。我们还需要下载我们想要攻击的数据(200张图片)。我们将首先通过ToTensor对原始像素值(0-255标度)应用变换(到0-1标度),然后归一化(减去均值除以标准差)。
# the mean and std are the calculated statistics from cifar_10 dataset
cifar_10_mean = (0.491, 0.482, 0.447) # mean for the three channels of cifar_10 images
cifar_10_std = (0.202, 0.199, 0.201) # std for the three channels of cifar_10 images

# convert mean and std to 3-dimensional tensors for future operations
mean = torch.tensor(cifar_10_mean).to(device).view(3, 1, 1)
std = torch.tensor(cifar_10_std).to(device).view(3, 1, 1)

epsilon = 8/255/std
ToTensor()还会将图像从形状(高度、宽度、通道)转换为形状(通道、高度、宽度),所以我们还需要将形状转置回原始形状。
由于我们的数据加载器对一批数据进行采样,所以我们这里需要使用np.transpose将(batch_size,channel,height,width)转置回(batch_size,height,width,channel)。
# perform adversarial attack and generate adversarial examples
def gen_adv_examples(model, loader, attack, loss_fn):
    model.eval()
    adv_names = []
    train_acc, train_loss = 0.0, 0.0
    for i, (x, y) in enumerate(loader):
        x, y = x.to(device), y.to(device)
        x_adv = attack(model, x, y, loss_fn) # obtain adversarial examples
        yp = model(x_adv)
        loss = loss_fn(yp, y)
        train_acc += (yp.argmax(dim=1) == y).sum().item()
        train_loss += loss.item() * x.shape[0]
        # store adversarial examples
        adv_ex = ((x_adv) * std + mean).clamp(0, 1) # to 0-1 scale
        adv_ex = (adv_ex * 255).clamp(0, 255) # 0-255 scale
        adv_ex = adv_ex.detach().cpu().data.numpy().round() # 四舍五入以去除小数部分
        adv_ex = adv_ex.transpose((0, 2, 3, 1)) # transpose (bs, C, H, W) back to (bs, H, W, C)
        adv_examples = adv_ex if i == 0 else np.r_[adv_examples, adv_ex]
    return adv_examples, train_acc / len(loader.dataset), train_loss / len(loader.dataset)
集成多个模型作为您的代理模型,以增加黑盒可移植性
cl 最低0.47元/天 解锁文章


 1259
1259


 被折叠的 条评论
为什么被折叠?
被折叠的 条评论
为什么被折叠?
 到【灌水乐园】发言


