


 本文介绍如何在Spring框架中使用Redis进行数据缓存。通过配置CacheManager及使用@Cacheable等注解,可以有效地提高应用性能。文章还探讨了自定义Key生成器的方法。
Caching is a way for applications to store data so that future requests to the same data are returned faster and do not require repeating computationally expensive operations. The Spring Frameworkprovides a simple way to cache the results of method calls with little to no configuration.
The examples in this post use Spring 4.1.3 and Spring Data Redis 1.4.1, the latest versions at the time of this writing. Full source code for this post can be found here.
Installing Dependencies
You'll need to install the spring-data-redis and jedis plugins. Add the following to your pom.xml file in your Spring project if you're using Maven:
<dependency>
    <groupId>org.springframework.data</groupId>
    <artifactId>spring-data-redis</artifactId>
    <version>1.4.1.RELEASE</version>
</dependency>

<dependency>
    <groupId>redis.clients</groupId>
    <artifactId>jedis</artifactId>
    <version>2.6.1</version>
</dependency>
If you're using Gradle, you can add the following to your build.gradle file:
compile "org.springframework.data:spring-data-redis:1.4.1.RELEASE"
compile "redis.clients:jedis:2.6.1"
Enabling Cache Support in Your Spring Application
To enable support for caching in your application, you'll want to create a new CacheManager bean. There are many different implementations of the CacheManager interface, but for this post we'll be usingRedisCacheManager to allow integration with Redis.
Java-based Configuration
If you're using Java-based configuration, you'll want to annotate one of your configuration classes with the @EnableCaching annotation and expose a CacheManager bean. You'll also need a connection factory and a RedisTemplate bean for Spring to communicate with your Redis database. An exampleCacheConfig class is shown below:
import org.springframework.cache.CacheManager;
import org.springframework.cache.annotation.CachingConfigurerSupport;
import org.springframework.cache.annotation.EnableCaching;
import org.springframework.context.annotation.Bean;
import org.springframework.context.annotation.Configuration;
import org.springframework.data.redis.cache.RedisCacheManager;
import org.springframework.data.redis.connection.RedisConnectionFactory;
import org.springframework.data.redis.connection.jedis.JedisConnectionFactory;
import org.springframework.data.redis.core.RedisTemplate;

@Configuration
@EnableCaching
public class CacheConfig extends CachingConfigurerSupport {

  @Bean
  public JedisConnectionFactory redisConnectionFactory() {
    JedisConnectionFactory redisConnectionFactory = new JedisConnectionFactory();

    // Defaults
    redisConnectionFactory.setHostName("127.0.0.1");
    redisConnectionFactory.setPort(6379);
    return redisConnectionFactory;
  }

  @Bean
  public RedisTemplate<String, String> redisTemplate(RedisConnectionFactory cf) {
    RedisTemplate<String, String> redisTemplate = new RedisTemplate<String, String>();
    redisTemplate.setConnectionFactory(cf);
    return redisTemplate;
  }

  @Bean
  public CacheManager cacheManager(RedisTemplate redisTemplate) {
    RedisCacheManager cacheManager = new RedisCacheManager(redisTemplate);

    // Number of seconds before expiration. Defaults to unlimited (0)
    cacheManager.setDefaultExpiration(300);
    return cacheManager;
  }
}
Caching the Results of a Method
After setting up your caching configuration, you can then begin to start caching method results with the@Cacheable annotation. Putting this annotation on a method will cause it's results to be cached in your Redis database for the length specified in your expiration, or until it is manually expired.
See the following example:
import org.apache.log4j.Logger;
import org.springframework.cache.annotation.Cacheable;
import org.springframework.stereotype.Controller;
import org.springframework.web.bind.annotation.RequestMapping;
import org.springframework.web.bind.annotation.RequestMethod;
import org.springframework.web.bind.annotation.ResponseBody;

@Controller
public class ExampleController {

  private static final Logger log = Logger.getLogger(ExampleController.class);

  @RequestMapping(value = "/", method = RequestMethod.GET)
  @ResponseBody
  @Cacheable("calculateResult")
  public String calculateResult() {
    log.debug("Performing expensive calculation...");
    // perform computationally expensive calculation
    return "result";
  }
}
Executing this method multiple times causes only one log output:
2014-12-18 19:24:30 DEBUG ExampleController:19 - Performing expensive calculation...
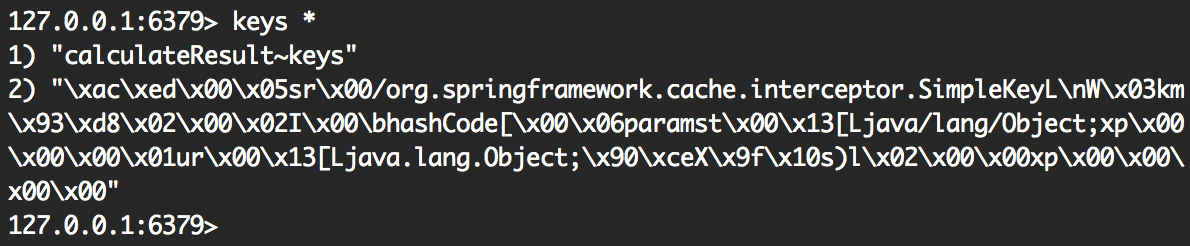
And you can see the cached item in your Redis instance:
Updating and Evicting Cached Data
In addition to the @Cacheable annotation, Spring provides the @CachePut and @CacheEvict annotations for manually managing cached data. The @CachePut annotation allows you to update the cache without interfering with the execution of the method. For example, if you updated a user, you would want to place the result into the cache to be looked up later:
@CachePut(value = 'user', key = "#id")
public User updateUser(Long id, UserDescriptor descriptor)
This method will always be executed and its results stored in your cache.
On the other hand, there will be times where you will want to 'evict' data from your cache, that is, to remove it. For example, when deleting a user:
@CacheEvict(value = 'user', key = "#id")
public void deleteUser(Long id)
Implementing a Custom Key Generator
For basic purposes, the default key generation system for cached data works. The parameters to your method become the key in your cache store. For example, in the following method, the value for the parameter username would become the key in your store:
@Cacheable("users")
public User findByUsername(String username)
But this becomes problematic when you want cache the result of another method that also takes in the same value, for instance:
@Cacheable("users")
public Integer getLoginCountByUsername(String username)
You could easily just specify a different key for each @Cacheable annotation, but that becomes tedious and hard to maintain. The solution is to implement a custom key generator that will generate the key for each method to be unique by default. Adding a keyGenerator bean to your CacheConfig class (shown above) will give you this functionality. Note that for your custom key generator to work by default, this class must implement the CachingConfigurer interface. Extending CachingConfigurerSupport will provide this for you.
// Previous imports omitted
import org.springframework.cache.annotation.CachingConfigurerSupport;
import org.springframework.cache.interceptor.KeyGenerator;

import java.lang.reflect.Method;

@Configuration
@EnableCaching
public class CacheConfig extends CachingConfigurerSupport {

  // Previous methods omitted

  @Bean
  public KeyGenerator keyGenerator() {
    return new KeyGenerator() {
      @Override
      public Object generate(Object o, Method method, Object... objects) {
        // This will generate a unique key of the class name, the method name,
        // and all method parameters appended.
        StringBuilder sb = new StringBuilder();
        sb.append(o.getClass().getName());
        sb.append(method.getName());
        for (Object obj : objects) {
          sb.append(obj.toString());
        }
        return sb.toString();
      }
    };
  }
}
Now when your method results are cached, they will be cached with your custom key generator implementation.
Conclusion
This is a simple example of how to cache application data in your Redis instance. Although this post focuses on caching with Redis, caching with other providers is very straightforward and the caching concepts remain the same. For more information and complete documentation, see Spring's caching reference. Feel free to leave a comment if you have any questions or run into any problems.


 被折叠的 条评论
为什么被折叠?
被折叠的 条评论
为什么被折叠?
 到【灌水乐园】发言


