


 文章介绍了如何在YOLOv5s模型中实现CoordAtt(坐标注意力)层,并提供了在backbone和head部分添加此层的配置。同时提到了可能遇到的RuntimeError关于deterministicalgorithms的问题及解决方法。
1、CA_Attention[CoordAtt]
①common.py
在models/common.py中添加代码如下:
import torch
import torch.nn as nn
import math
import torch.nn.functional as F

# ----------CA_Attention---------- #
class h_sigmoid(nn.Module):
    def __init__(self, inplace=True):
        super(h_sigmoid, self).__init__()
        self.relu = nn.ReLU6(inplace=inplace)

    def forward(self, x):
        return self.relu(x + 3) / 6

class h_swish(nn.Module):
    def __init__(self, inplace=True):
        super(h_swish, self).__init__()
        self.sigmoid = h_sigmoid(inplace=inplace)

    def forward(self, x):
        return x * self.sigmoid(x)

class CoordAtt(nn.Module):
    def __init__(self, inp, oup, reduction=32):
        super(CoordAtt, self).__init__()
        self.pool_h = nn.AdaptiveAvgPool2d((None, 1))
        self.pool_w = nn.AdaptiveAvgPool2d((1, None))

        mip = max(8, inp // reduction)

        self.conv1 = nn.Conv2d(inp, mip, kernel_size=1, stride=1, padding=0)
        self.bn1 = nn.BatchNorm2d(mip)
        self.act = h_swish()

        self.conv_h = nn.Conv2d(mip, oup, kernel_size=1, stride=1, padding=0)
        self.conv_w = nn.Conv2d(mip, oup, kernel_size=1, stride=1, padding=0)


    def forward(self, x):
        identity = x

        n,c,h,w = x.size()
        x_h = self.pool_h(x)
        x_w = self.pool_w(x).permute(0, 1, 3, 2)

        y = torch.cat([x_h, x_w], dim=2)
        y = self.conv1(y)
        y = self.bn1(y)
        y = self.act(y)

        x_h, x_w = torch.split(y, [h, w], dim=2)
        x_w = x_w.permute(0, 1, 3, 2)

        a_h = self.conv_h(x_h).sigmoid()
        a_w = self.conv_w(x_w).sigmoid()

        out = identity * a_w * a_h

        return out
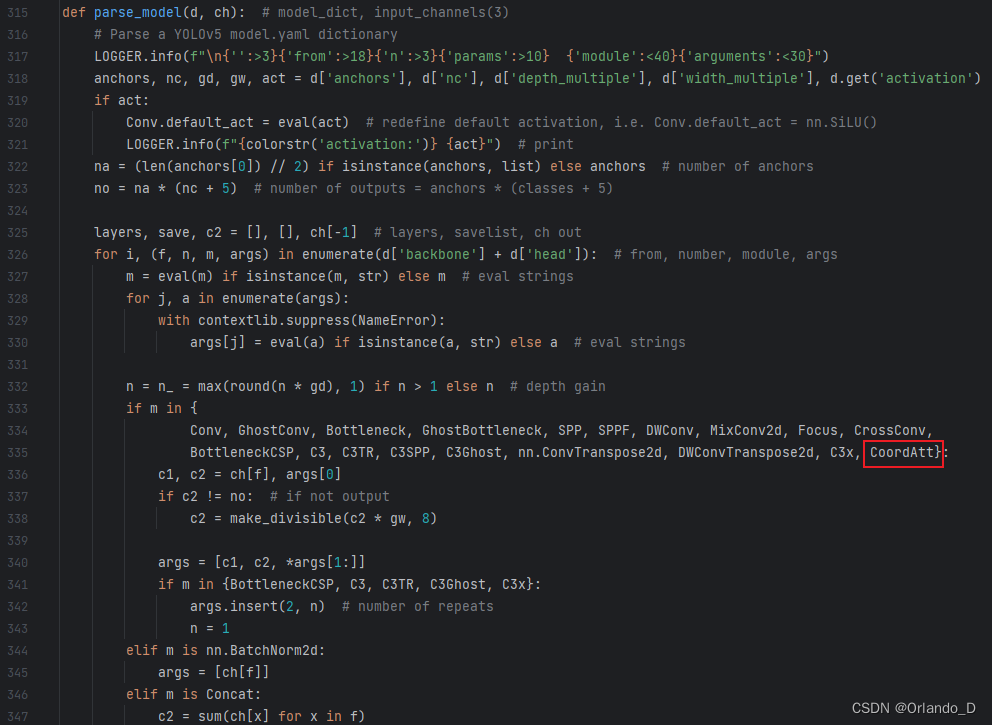
②yolo.py
在models/yolo.py里面parse_model函数内添加红框部分代码。
③yolov5s_Attention_CA.yaml
在models文件夹下创建yolov5s_Attention_CA.yaml文件。
CA层放置位置:
1)放在backbone里的SPPF前,代码如下:
# YOLOv5 🚀 by Ultralytics, AGPL-3.0 license

# Parameters
nc: 20  # number of classes
depth_multiple: 0.33  # model depth multiple 控制模型的深度(BottleneckCSP数)
width_multiple: 0.50  # layer channel multiple 控制Conv通道个数(卷积核个数)

# anchors
anchors:
  - [10,13, 16,30, 33,23]  # P3/8  stride=8,即8倍下采样下的anchor的大小
  - [30,61, 62,45, 59,119]  # P4/16 stride=16,即16倍下采样下的anchor的大小
  - [116,90, 156,198, 373,326]  # P5/32 stride=32,即32倍下采样下的anchor的大小

# YOLOv5 v6.0 backbone
backbone:
  # [from, number, module, args]
  # from列参数:当前模块的输入来自哪一层的输出; -1 代表是从上一层获得的输入
  # number列参数:本模块重复的次数; 1表示只有一个, 3代表有三个相同模块
  [[-1, 1, Conv, [64, 6, 2, 2]],  # 0-P1/2
   [-1, 1, Conv, [128, 3, 2]],  # 1-P2/4; 128代表128个卷积核,3代表卷积核尺寸3*3,2代表步长stride为2
   [-1, 3, C3, [128]],  # C3 = BottleneckCSP
   [-1, 1, Conv, [256, 3, 2]],  # 3-P3/8
   [-1, 6, C3, [256]],
   [-1, 1, Conv, [512, 3, 2]],  # 5-P4/16
   [-1, 9, C3, [512]],
   [-1, 1, Conv, [1024, 3, 2]],  # 7-P5/32
   [-1, 3, C3, [1024]],
   [-1, 1, CoordAtt, [1024]],  # 9 CoordAtt
   [-1, 1, SPPF, [1024, 5]],  # 10
  ]

# YOLOv5 v6.0 head
# 作者没有区分neck模块,所以head部分包含了PANet+Detect部分
head:
  [[-1, 1, Conv, [512, 1, 1]],  #11
   [-1, 1, nn.Upsample, [None, 2, 'nearest']],  #12
   [[-1, 6], 1, Concat, [1]],  # 13  cat backbone P4
   [-1, 3, C3, [512, False]],  # 14

   [-1, 1, Conv, [256, 1, 1]],  # 15
   [-1, 1, nn.Upsample, [None, 2, 'nearest']],  # 16
   [[-1, 4], 1, Concat, [1]],  # 17 cat backbone P3
   [-1, 3, C3, [256, False]],  # 18 (P3/8-small)

   [-1, 1, Conv, [256, 3, 2]],  # 19
   [[-1, 15], 1, Concat, [1]],  # 20 cat head P4
   [-1, 3, C3, [512, False]],  # 21 (P4/16-medium)

   [-1, 1, Conv, [512, 3, 2]],  # 22
   [[-1, 11], 1, Concat, [1]],  # 23 cat head P5
   [-1, 3, C3, [1024, False]],  # 24 (P5/32-large)

   [[18, 21, 24], 1, Detect, [nc, anchors]],  # 25 Detect(P3, P4, P5)
  ]
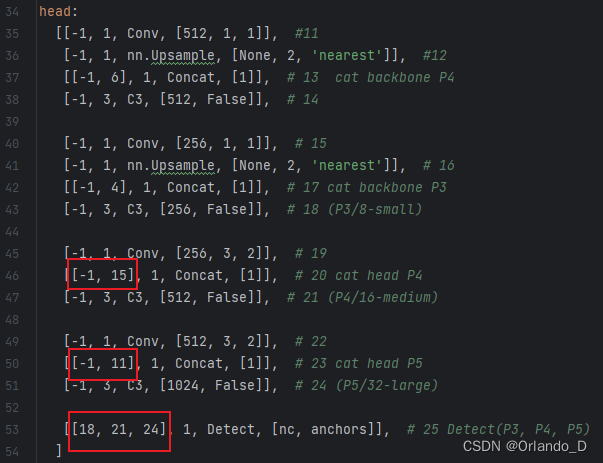
2)放在head里
未完待续......
注:在加入CA层后,各层序号有所变动,注意修改下图红框内的层数。
④ 其他问题
1)报错
如果出现报错RuntimeError: adaptive_avg_pool2d_backward_cuda does not have a deterministic implementation, but you set 'torch.use_deterministic_algorithms(True)'. You can turn off determinism just for this operation, or you can use the 'warn_only=True' option, if that's acceptable for your application. You can also file an issue at https://github.com/pytorch/pytorch/issues to help us prioritize adding deterministic support for this operation.
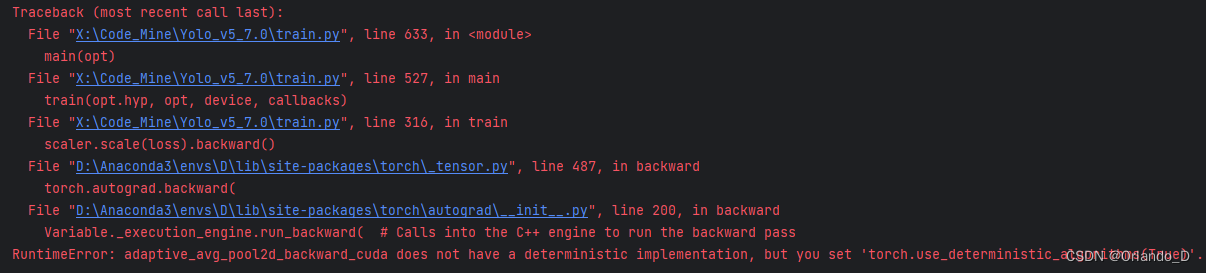
定位到错误位置,在该函数前添加代码:
torch.use_deterministic_algorithms(False)
如图所示:

2、SE_Attention
未完待续......


 2669
2669

 被折叠的 条评论
为什么被折叠?
被折叠的 条评论
为什么被折叠?
 到【灌水乐园】发言


