


前言
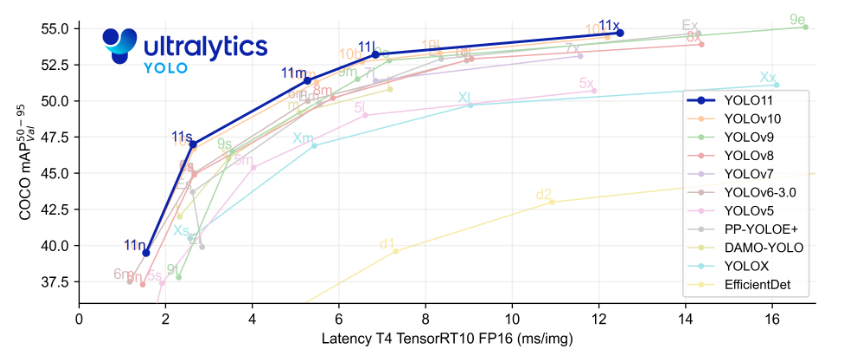
Ultralytics 基于计算机视觉和 AI 的多年基础研究,创建了尖端、最先进的 (SOTA) YOLO 模型。我们的模型不断更新性能和灵活性,快速、准确且易于使用。他们擅长对象检测、跟踪、实例分割、图像分类和姿势估计任务。
一、官方源码下载
github代码地址:https://github.com/ultralytics/ultralytics
可以使用git clone指令下载,也可以下载压缩包解压再打开项目
二、环境配置
创建属于YOLO V11单独的conda环境。
1.创建环境名称并指定Python版本
conda create -n yolov11 python=3.82.激活环境
conda activate yolov113.安装项目所需依赖(在yolov11环境已经已经激活的条件下)
pip install ultralytics三、VSCODE打开项目,并配置python解释器
1.打开项目
在项目根路径外面一层“cmd”
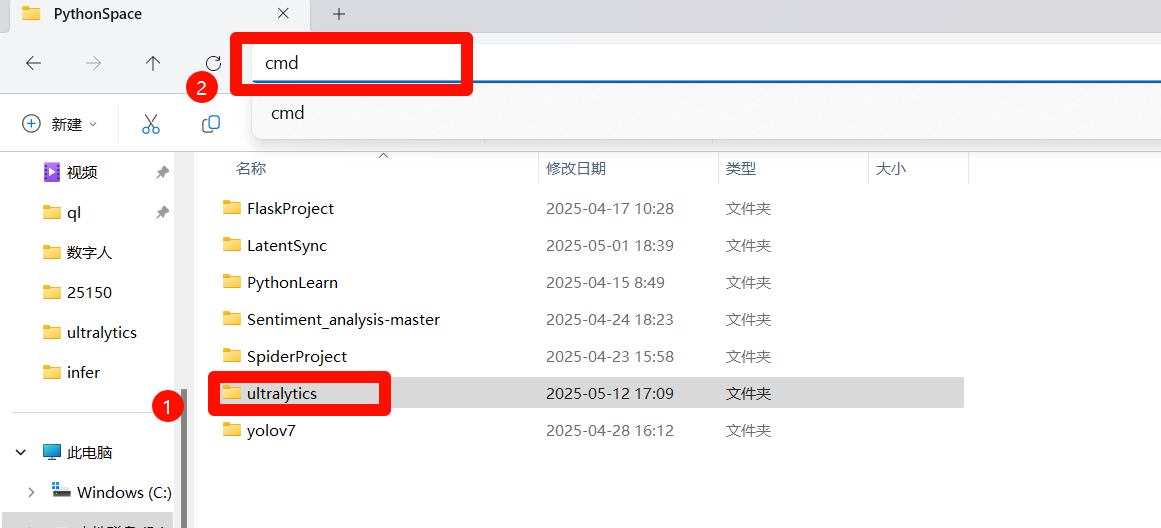
使用指令
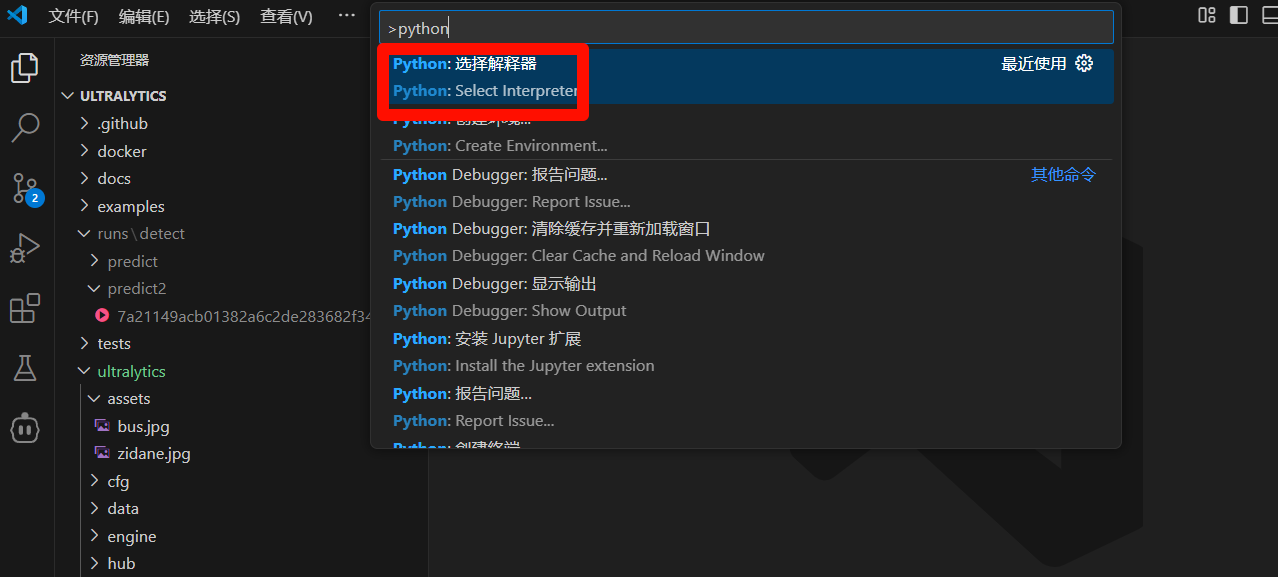
code ultralytics2.配置python解释器
在VSCODE搜索栏输入">python",选择"Select interpreter"
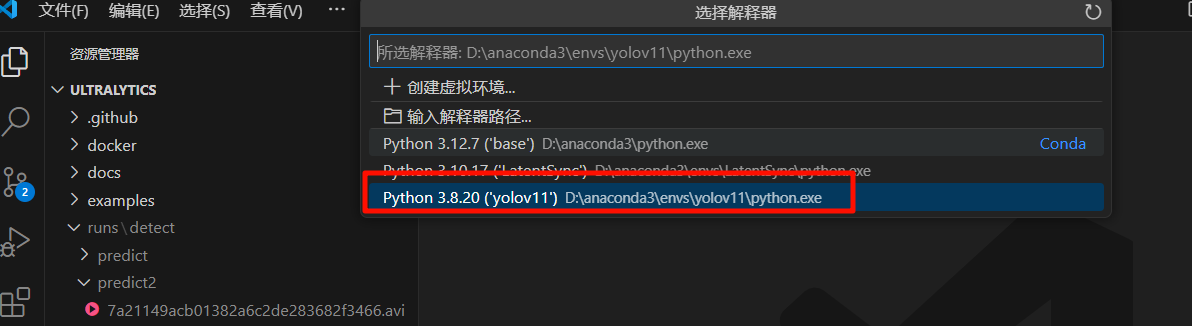
 选择我们刚刚创建的conda环境
四、推理模型下载和编写代码
1.模型下载
模型下载和项目链接一个地址:https://github.com/ultralytics/ultralytics
下拉滚动条
里面有各个模型分类,和不同大小的模型,我选择的是检测模型的第一个模型 YOLO11n,点击蓝色字体就能下载。

建议项目文件夹建立个模型文件夹,把模型下载到里面。
2.编写代码
项目根目录新建detect.py文件
复制下面代码粘贴进文件
# -*- coding: utf-8 -*-

from ultralytics import YOLO

if __name__ == '__main__':

    # Load a model
    model = YOLO(model=r'{替换自己的模型文件的路径}')
    model.predict(source=r'替换自己的视频或图片文件夹的路径',
                  save=True,
                  show=True,
                  )
没有自己的图片可以用ultralytics\ultralytics\assets文件夹里面的图片,路径填到这个文件夹就行
3.程序运行
VSCODE启动程序,不过多赘述.
4.输出路径
控制台打印
Results saved to runs\detect\predict
输出路径在runs\detect\predict
五、训练自己的数据集
1.准备数据集
可以在网上找标注好的,也可以自己标注。
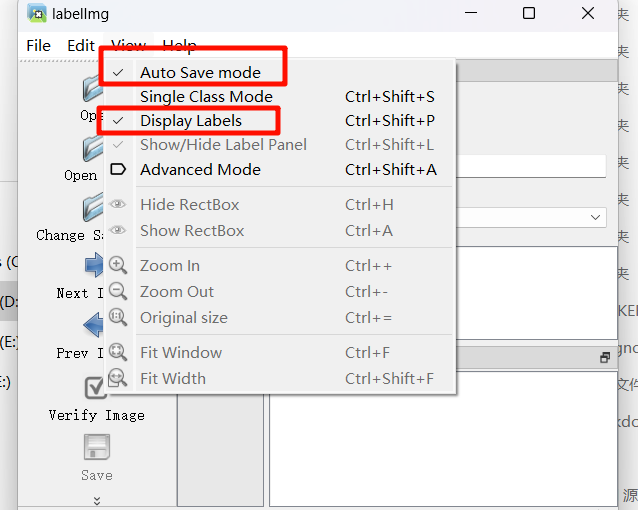
标注软件 labelimg ,在自己的python环境可以使用 pip install labelimg 命令安装。
使用的话需要在conda终端里面的所在环境里启动 ,输入 labelimg回车就可以。
程序启动后在View里勾选这两项,分别是自动保存标注的文件和展示标签。
2.数据集格式
标注选择yolo模式不用转换,如果使用VOC模式要转换,voc格式标注转换yolo格式标注的代码如下:
import xml.etree.ElementTree as ET
import os, cv2
import numpy as np
from os import listdir
from os.path import join

classes = []

def convert(size, box):
    dw = 1. / (size[0])
    dh = 1. / (size[1])
    x = (box[0] + box[1]) / 2.0 - 1
    y = (box[2] + box[3]) / 2.0 - 1
    w = box[1] - box[0]
    h = box[3] - box[2]
    x = x * dw
    w = w * dw
    y = y * dh
    h = h * dh
    return (x, y, w, h)


def convert_annotation(xmlpath, xmlname):
    with open(xmlpath, "r", encoding='utf-8') as in_file:
        txtname = xmlname[:-4] + '.txt'
        txtfile = os.path.join(txtpath, txtname)
        tree = ET.parse(in_file)
        root = tree.getroot()
        filename = root.find('filename')
        img = cv2.imdecode(np.fromfile('{}/{}.{}'.format(imgpath, xmlname[:-4], postfix), np.uint8), cv2.IMREAD_COLOR)
        h, w = img.shape[:2]
        res = []
        for obj in root.iter('object'):
            cls = obj.find('name').text
            if cls not in classes:
                classes.append(cls)
            cls_id = classes.index(cls)
            xmlbox = obj.find('bndbox')
            b = (float(xmlbox.find('xmin').text), float(xmlbox.find('xmax').text), float(xmlbox.find('ymin').text),
                 float(xmlbox.find('ymax').text))
            bb = convert((w, h), b)
            res.append(str(cls_id) + " " + " ".join([str(a) for a in bb]))
        if len(res) != 0:
            with open(txtfile, 'w+') as f:
                f.write('\n'.join(res))


if __name__ == "__main__":
    postfix = 'png'    # 图像格式
    imgpath = r'D:\example\images'    # 替换实际图像文件路径
    xmlpath = r'D:\example\annotations'   # 替换实际xml文件文件路径
    txtpath = r'D:\example\labels'      # 替换生成的txt文件路径

    if not os.path.exists(txtpath):
        os.makedirs(txtpath, exist_ok=True)

    list = os.listdir(xmlpath)
    error_file_list = []
    for i in range(0, len(list)):
        try:
            path = os.path.join(xmlpath, list[i])
            if ('.xml' in path) or ('.XML' in path):
                convert_annotation(path, list[i])
                print(f'file {list[i]} convert success.')
            else:
                print(f'file {list[i]} is not xml format.')
        except Exception as e:
            print(f'file {list[i]} convert error.')
            print(f'error message:\n{e}')
            error_file_list.append(list[i])
    print(f'this file convert failure\n{error_file_list}')
    print(f'Dataset Classes:{classes}')
代码需要修改的地方如下:
1.postfix参数填图片的后缀,需要注意图片格式要统一,是png格式就写png,是jpg格式就写jpg
2.imgpath参数填图片所在的路径
3.xmlpath参数填标注文件的路径
4.txtpath参数填生成的yolo格式的文件
3.数据集划分
划分训练集和验证集代码如下:
import os, shutil
from sklearn.model_selection import train_test_split


val_size = 0.2
#test_size = 0.2
postfix = 'jpg'
imgpath = r'datasets\images'
txtpath =  r'datasets\labels'


output_train_img_folder =r'datasets\dataset_kengwa\images/train'
output_val_img_folder =  r'datasets\dataset_kengwa\images/val'
output_train_txt_folder =  r'datasets\dataset_kengwa\labels/train'
output_val_txt_folder =  r'datasets\dataset_kengwa\labels/val'

os.makedirs(output_train_img_folder, exist_ok=True)
os.makedirs(output_val_img_folder, exist_ok=True)
os.makedirs(output_train_txt_folder, exist_ok=True)
os.makedirs(output_val_txt_folder, exist_ok=True)


listdir = [i for i in os.listdir(txtpath) if 'txt' in i]
train, val = train_test_split(listdir, test_size=val_size, shuffle=True, random_state=0)

#todo:需要test放开

# train, test = train_test_split(listdir, test_size=test_size, shuffle=True, random_state=0)
# train, val = train_test_split(train, test_size=val_size, shuffle=True, random_state=0)

for i in train:
    img_source_path = os.path.join(imgpath, '{}.{}'.format(i[:-4], postfix))
    txt_source_path = os.path.join(txtpath, i)

    img_destination_path = os.path.join(output_train_img_folder, '{}.{}'.format(i[:-4], postfix))
    txt_destination_path = os.path.join(output_train_txt_folder, i)

    shutil.copy(img_source_path, img_destination_path)
    shutil.copy(txt_source_path, txt_destination_path)

for i in val:
    img_source_path = os.path.join(imgpath, '{}.{}'.format(i[:-4], postfix))
    txt_source_path = os.path.join(txtpath, i)

    img_destination_path = os.path.join(output_val_img_folder, '{}.{}'.format(i[:-4], postfix))
    txt_destination_path = os.path.join(output_val_txt_folder, i)

    shutil.copy(img_source_path, img_destination_path)
    shutil.copy(txt_source_path, txt_destination_path)


#
# for i in train:
#     shutil.copy('{}/{}.{}'.format(imgpath, i[:-4], postfix), r'E:\1-cheng\4-yolo-dataset-daizuo\multi-classify\bird-boat-horse-aeroplane-sheep\dataset20231219/images/train/{}.{}'.format(i[:-4], postfix))
#     shutil.copy('{}/{}'.format(txtpath, i), r'E:\1-cheng\4-yolo-dataset-daizuo\multi-classify\bird-boat-horse-aeroplane-sheep\dataset20231219/labels/train/{}'.format(i))
#
# for i in val:
#     shutil.copy('{}/{}.{}'.format(imgpath, i[:-4], postfix), r'E:\1-cheng\4-yolo-dataset-daizuo\multi-classify\bird-boat-horse-aeroplane-sheep\dataset20231219/images/val/{}.{}'.format(i[:-4], postfix))
#     shutil.copy('{}/{}'.format(txtpath, i), r'E:\1-cheng\4-yolo-dataset-daizuo\multi-classify\bird-boat-horse-aeroplane-sheep\dataset20231219/labels/val/{}'.format(i))

#todo:需要test则放开

# for i in test:
#     shutil.copy('{}/{}.{}'.format(imgpath, i[:-4], postfix), 'images/test/{}.{}'.format(i[:-4], postfix))
#     shutil.copy('{}/{}'.format(txtpath, i), 'labels/test/{}'.format(i))
4.创建yolo的训练配置文件
在项目根目录下创建data.yaml文件,里面的训练集测试集填实际的路径
tarin : datasets\dataset_kengwa\images\train
val : datasets\dataset_kengwa\images\val

nc : 2   #代表有几个标签类别

#class names
names : ['person','other']
5.训练数据
在根目录新建train.py文件,将下面代码粘贴到里面。
# -*- coding: utf-8 -*-
import warnings
warnings.filterwarnings('ignore')
from ultralytics import YOLO

if __name__ == '__main__':
    # model.load(r'pts\yolo11n.pt') # 加载预训练权重,改进或者做对比实验时候不建议打开,因为用预训练模型整体精度没有很明显的提升
    model = YOLO(model=r'D:\WorkSpace\Backend\PythonSpace\ultralytics\ultralytics\cfg\models\11\yolo11.yaml')
    model.train(data=r'data.yaml',
                imgsz=640,
                epochs=50, #训练次数
                batch=4,    #训练批次大小,电脑性能好的话可以大一点
                workers=0,
                device='gpu',
                optimizer='SGD',
                close_mosaic=10,
                resume=True,
                project='runs/train',
                name='exp',
                single_cls=False,
                cache=False,
                )
6.解决训练过程中断怎么继续上次训练
# -*- coding: utf-8 -*-
import warnings
warnings.filterwarnings('ignore')
from ultralytics import YOLO

if __name__ == '__main__':

    model = YOLO(model=r'{填上次中断的.pt模型}')
    model.load(r'pts\yolo11n.pt') # 加载预训练权重,改进或者做对比实验时候不建议打开,因为用预训练模型整体精度没有很明显的提升

    model.train(data=r'data.yaml',
                imgsz=640,
                epochs=50,
                batch=4,
                workers=0,
                device='gpu',
                optimizer='SGD',
                close_mosaic=10,
                resume=True,  #此处设置成True
                project='runs/train',
                name='exp',
                single_cls=False,
                cache=False,
)根据大佬挂科边缘整理而来,转载自挂科边缘


 19万+
19万+

 被折叠的 条评论
为什么被折叠?
被折叠的 条评论
为什么被折叠?
 到【灌水乐园】发言


