


 本文通过六个实战案例,深入解析JavaScript在网页交互、时间显示、表单操作、下拉列表管理、级联选择及动态表格生成的应用技巧。案例覆盖了window弹窗、实时时间更新、全选功能、下拉列表双向操作、级联菜单动态加载及根据用户输入动态生成表格等实用场景。
目录
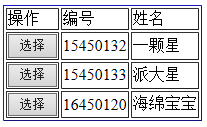
案例一、window 弹窗案例
<html>
	<head>
		<title>oneStar</title>
	</head>
	<body>
		编号:<input type="text" id="numid"/><br/>
		姓名:<input type="text" id="nameid"/><br/>
		<input type="button" id="butid" value="选择" onclick="fun();"/><br/>
		<script type="text/javascript">
			function fun(){
				window.open("F:\HTML_Pro\JavaScript\user.html","","width=300,height=400");
			}
		</script>
	</body>
</html>
<html>
<head>
<title>oneStar</title>
</head>
<body>
<table border="1" bordercolor="blue">
<tr border="1">
<td>操作</td>
<td>编号</td>
<td>姓名</td>
</tr>
<tr>
<td><input type="button" id="sele1id" value="选择" onclick="fun1('15450132','一颗星');"/></td>
<td>15450132</td>
<td>一颗星</td>
</tr>
<tr>
<td><input type="button" id="sele2id" value="选择" onclick="fun2('15450133','派大星');"/></td>
<td>15450133</td>
<td>派大星</td>
</tr>
<tr>
<td><input type="button" id="sele3id" value="选择" onclick="fun3('16450120','海绵宝宝');"/></td>
<td>16450120</td>
<td>海绵宝宝</td>
</table>
<script type="text/javascript">
function fun1(num1,name1){
//得到创建这个页面的窗口
var win = window.opener;
//将数据从该页面显示在创建它的窗口上
win.document.getElementById("numid").value = num1;
win.document.getElementById("nameid").value = name1;
//关闭窗口
window.colse();
}
function fun2(num2,name2){
//得到创建这个页面的窗口
var win = window.opener;
//将数据从该页面显示在创建它的窗口上
win.document.getElementById("numid").value = num2;
win.document.getElementById("nameid").value = name2;
//关闭窗口
window.colse();
}
function fun3(num3,name3){
//得到创建这个页面的窗口
var win = window.opener;
//将数据从该页面显示在创建它的窗口上
win.document.getElementById("numid").value = num3;
win.document.getElementById("nameid").value = name3;
//关闭窗口
window.colse();
}
</script>
</body>
</html> 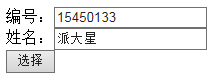
案例二、同步时间
<html>
	<head>
		<title>oneStar</title>
	</head>
	<body>
		<div id="timeid">

		</div>
		<script type="text/javascript">
			function fun(){
				//获取当前时间
				var date = new Date();
				var D = date.toLocaleString();
				//获取div
				var Div = document.getElementById("timeid");
				Div.innerHTML = D;
			}
			//使用定时器更新时间
			setInterval("fun();",1000);
		</script>
	</body>
</html>![]()
案例三、全选
<html>
	<head>
		<title>oneStar</title>
	</head>
	<body>
		<input type="checkbox" id="boxid" onclick="selAllNo();"/>全选/全不选<br/>
		<input type="checkbox" name="love"/>篮球
		<input type="checkbox" name="love"/>排球
		<input type="checkbox" name="love"/>冰球
		<input type="checkbox" name="love"/>混球<br/>
		<input type="button" value="全选" onclick="selAll();"/>
		<input type="button" value="全不选" onclick="selNo();"/>
		<input type="button" value="反选" onclick="selOther();"/>
		<script type="text/javascript">

			//实现全选
			function selAll(){
				/*
				1、获取要操作的复选框
					getElementsByName()
				2、操作返回的数组
					遍历数组
					checked = true表示选中
					checked = false表示不选中
				*/
				var Box = document.getElementsByName("love");
				for(var i=0;i<Box.length;i++){
					var love = Box[i];
					love.checked = true;
				}
			}

			//实现全不选
			function selNo(){
				var Box = document.getElementsByName("love");
				for(var i=0;i<Box.length;i++){
					var love = Box[i];
					love.checked = false;
				}
			}

			//实现反选
			function selOther(){
				var Box = document.getElementsByName("love");
				for(var i=0;i<Box.length;i++){
					var love = Box[i];
					if(love.checked ==true){
						love.checked = false;
					}else
					love.checked = true;
				}
			}

			//实现全选/全不选
			function selAllNo(){
				var Box = document.getElementById("boxid");
				if(Box.checked == true){
					selAll();
				}else{
					selNo();
				}
			}
		</script>
	</body>
</html>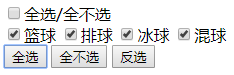
案例四:下拉列表右移
<html>
	<head>
		<title>oneStar</title>
	</head>
	<body>
	<div id="d1" style="float:left">
		<div>
		<select id="sel1" multiple="multiple" style="width:100px;height:100px">
			<option>oneStar</option>
			<option>twoStar</option>
			<option>threeStar</option>
			<option>fourStar</option>
		</select>
		</div>
		<div>
			<input type="button" value="选中添加到右边" onclick="Right();"/><br/>
			<input type="button" value="全部添加到右边" onclick="allRight();"/>
		</div>
	</div>

	<div id="d2">
		<div>
		<select id="sel2" multiple="multiple" style="width:100px;height:100px">
			<option>oneStar</option>
		</select>
		</div>
		<div>
			<input type="button" value="选中添加到左边" onclick="Left();"/><br/>
			<input type="button" value="全部添加到左边" onclick="allLeft();"/>
		</div>
	</div>

		<script type="text/javascript">
			function Right(){
				/*
				1、获取select1的option
					getElementBysByTagName()返回数组
					遍历数组
				2、判断option是否被选中
					select判断
				3、如果选中,添加到右边
					得到select2
					添加选择部分appendChild()方法
				*/
				var Sel = document.getElementById("sel1");
				var opt = Sel.getElementsByTagName("option");
				var Sel2 = document.getElementById("sel2");
				for(var i=0;i<opt.length;i++){
					if(opt[i].selected == true){
						Sel2.appendChild(opt[i]);
						i--;
					}
				}
			}

			function allRight(){
				/*
				1、获取select1的option
					getElementBysByTagName()返回数组
					遍历数组
				2、遍历添加到右边
					得到select2
					appendChild()方法
				*/
				var Sel = document.getElementById("sel1");
				var opt = Sel.getElementsByTagName("option");
				var Sel2 = document.getElementById("sel2");
				for(var i=0;i<opt.length;i++){
					Sel2.appendChild(opt[i]);
					i--;
				}
			}
		</script>
	</body>
</html>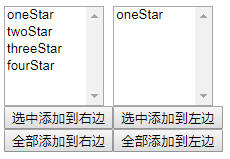
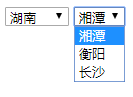
案例五、级联下拉
<html>
	<head>
		<title>oneStar</title>
	</head>
	<body>
		<select id="sheng" onchange="add1(this.value);">
			<option>请选择</option>
			<option>江西</option>
			<option>湖南</option>
		</select>

		<select id="city">
			<option>请选择</option>
		</select>
		<script type="text/javascript">
			//创建二维数组存储省市
			var arr = new Array(2);
			arr[0] = ["江西","宜春","九江","抚州"];
			arr[1] = ["湖南","湘潭","衡阳","长沙"];
			function add1(val){
				//获取第二个下拉框的内容
				var City = document.getElementById("city");
				var option1 = City.getElementsByTagName("option");
				//遍历下拉框,将里面的元素清空
				for(var m=0;m<option1.length;m++){
					City.removeChild(option1[m]);
					m--;
				}
				//遍历二维数组,将省市对应起来
				for(var i=0;i<arr.length;i++){
					if(arr[i][0] == val){
						for(var j=1;j<arr[i].length;j++){
							//创建option
							var Option = document.createElement("option");
							//创建文本
							var Text = document.createTextNode(arr[i][j]);
							//写入文本
							Option.appendChild(Text);
							City.appendChild(Option);
						}
					}
				}
			}
		</script>
	</body>
</html>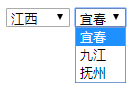
案例六、动态创建表格
<html>
	<head>
		<title>oneStar</title>
	</head>
	<body>
		行:<input type="text" id="h" style="width:30px;height:25px"/>
		列:<input type="text" id="l" style="width:30px;height:25px"/>
		<input type="button" value="创建表格" onclick="createTable();"/>
		<div id="divid">
		</div>

		<script type="text/javascript">
			//动态创建表格
			function createTable(){
				//获取行和列的数值
				var h = document.getElementById("h").value;
				var l = document.getElementById("l").value;
				//把表格代码放到变量里面
				var tab = "<table border='1'>";
				//循环行
				for(var i=0;i<h;i++){
					tab += "<tr>";
					//循环列
					for(var j=0;j<l;j++){
						tab += "<td>STAR</td>";
					}
					tab += "</tr>";
				}
				tab += "</table>";
				//得到div标签
				var Div = document.getElementById("divid");
				//把table代码放到div里面
				Div.innerHTML = tab;
			}
		</script>
	</body>
</html>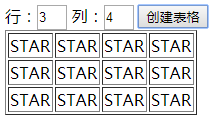


 498
498

 被折叠的 条评论
为什么被折叠?
被折叠的 条评论
为什么被折叠?
 到【灌水乐园】发言


