


 本文介绍了如何在CentOS服务器集群上通过Nginx实现负载均衡,配置子配置文件,并结合Keepalived实现VIP漂移和故障切换,确保网站服务的高可用性。
1. 规划环境:
| 主机名称 |
服务器名称
|
IP
|
用途
|
| centosnode1 |
Nginx_Master
|
192.168.188.223
|
提供负载均衡
|
| centosnode2 |
Nginx_Backup
|
192.168.188.226
|
提供负载均衡
|
|
VIP
|
192.168.188.100
|
网站的VIP地址
| |
| centosnode3 |
Web1服务器
|
192.168.188.227
|
提供Web服务
|
| centosnode4 |
Web2服务器
|
192.168.188.228
|
提供Web服务
|
2. 配置Nginx负载均衡,这里通过子配置文件进行配置:
1>. Nginx_Master服务器Nginx是通过源码安装,配置文件在/usr/local/nginx/conf/nginx.conf
2>. Nginx_Backup服务器Nginx使用过yum源安装,配置文件在/etc/nginx/nginx.conf
##Nginx_Master服务器Nginx配置
[root@centosnode1 ~]# vim /usr/local/nginx/conf.d/lb2.conf

upstream websrvs {
        server 192.168.188.227:80 weight=1;
        server 192.168.188.228:80 weight=1;
}

server {
        location / {
                proxy_pass http://websrvs;
                index index.html;
        }
}
##Nginx_Backup服务器Nginx配置
[root@centosnode2 ~]# vim /etc/nginx/conf.d/lb2.conf

upstream websrvs {
        server 192.168.188.227:80 weight=1;
        server 192.168.188.228:80 weight=1;
}

server {
        location / {
                proxy_pass http://websrvs;
                index index.html;
        }
}
3. 启动Nginx服务,测试负载均衡是否成功:
##启动主,从Nginx服务
[root@centosnode1 ~]# systemctl start nginx.service
[root@centosnode2 ~]# systemctl start nginx.service

##设置Web1服务器的简单web页面
[root@centosnode3 ~]# echo "this is page ip : 192.168.188.227" > /var/www/html/index.html

##启动Web1服务器的httpd服务
[root@centosnode3 ~]# systemctl start httpd

##设置Web2服务器的简单web页面
[root@centosnode4 ~]# echo "this is page ip : 192.168.188.228" > /var/www/html/index.html

##启动Web2服务器的httpd服务
[root@centosnode4 ~]# systemctl start httpd

##测试Nginx服务负载均衡
[root@centosnode5 ~]# curl 192.168.188.223
this is page ip : 192.168.188.227
[root@centosnode5 ~]# curl 192.168.188.223
this is page ip : 192.168.188.228
4. 配置Nginx_Master服务器Keepalived服务:
[root@centosnode1 ~]# vim /etc/keepalived/keepalived.conf

! Configuration File for keepalived

global_defs {
   notification_email {
     acassen@firewall.loc
     failover@firewall.loc
     sysadmin@firewall.loc
   }
   notification_email_from Alexandre.Cassen@firewall.loc
   smtp_server 192.168.200.1
   smtp_connect_timeout 30
   router_id NODE1_MASTER
}

vrrp_script chk_nginx {
        script "killall -0 nginx"  ##判断nginx服务是否运行,若不运行,则返回状态码非0
        interval 2
}

vrrp_instance VI_1 {
    state MASTER
    interface ens33
    virtual_router_id 51
    priority 100
    advert_int 1
    authentication {
        auth_type PASS
        auth_pass 1111
    }

    track_script {  ##调用vrrp_script中定义的脚本
        chk_nginx
    }

    virtual_ipaddress {
        192.168.188.100
    }
}
5. 配置Nginx_Backup服务器Keepalived服务:
[root@centosnode2 ~]# vim /etc/keepalived/keepalived.conf

! Configuration File for keepalived

global_defs {
   notification_email {
     acassen@firewall.loc
     failover@firewall.loc
     sysadmin@firewall.loc
   }
   notification_email_from Alexandre.Cassen@firewall.loc
   smtp_server 192.168.200.1
   smtp_connect_timeout 30
   router_id NODE2_BACKUP
}

vrrp_script chk_nginx {
        script "killall -0 nginx"  ##判断nginx服务是否运行,若不运行,则返回状态码非0
        interval 2
}

vrrp_instance VI_1 {
    state BACKUP
    interface ens33
    virtual_router_id 51
    priority 80
    advert_int 1
    authentication {
        auth_type PASS
        auth_pass 1111
    }

    track_script {  ##调用vrrp_script中定义的脚本
        chk_nginx
    }

    virtual_ipaddress {
        192.168.188.100
    }
}
6. 启动Keepalived服务:
[root@centosnode1 ~]# systemctl start keepalived.service

[root@centosnode2 ~]# systemctl start keepalived.service
7. 测试Nginx负载均衡是否正常,访问VIP:
##测试Nginx服务负载均衡
[root@centosnode5 ~]# curl 192.168.188.100
this is page ip : 192.168.188.227
[root@centosnode5 ~]# curl 192.168.188.100
this is page ip : 192.168.188.228
8. 测试故障检查是否正常,停掉一台web后端的web服务,访问VIP是否可以正常访问:
##停掉centosnode3的httpd服务
[root@centosnode3 ~]# systemctl stop httpd

##访问vip
[root@centosnode5 ~]# for ((i=1;i<=5;i++))
> do
> curl 192.168.188.100
> done
this is page ip : 192.168.188.228
this is page ip : 192.168.188.228
this is page ip : 192.168.188.228
this is page ip : 192.168.188.228
this is page ip : 192.168.188.228
由此可见,当centosnode3节点的httpd故障时,会自动将其从集群中去除;而且访问vip可以正常访问。当centosnode3节点的httpd恢复时,会自动将其加入到集群中。
9. 测试Keepalived故障转换是否正常,是否会发生ip飘移:
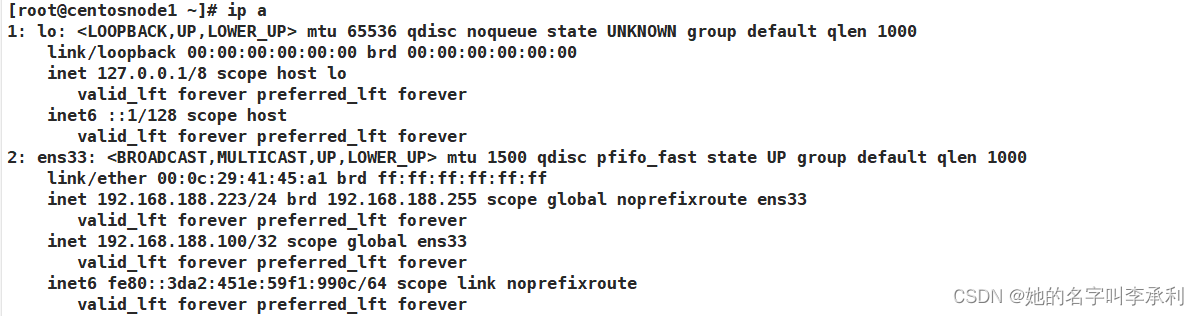
由此可见当前vip地址在centosnode1主机上,然后模拟服务器故障,停掉Nginx服务。
[root@centosnode1 ~]# systemctl stop nginx.service
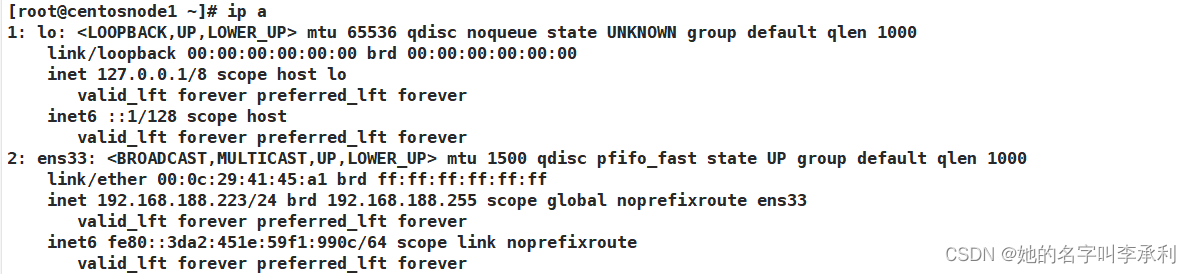
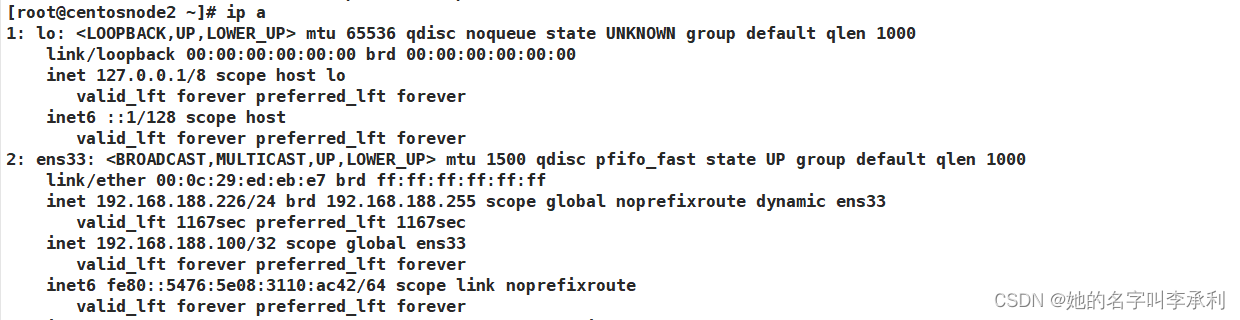
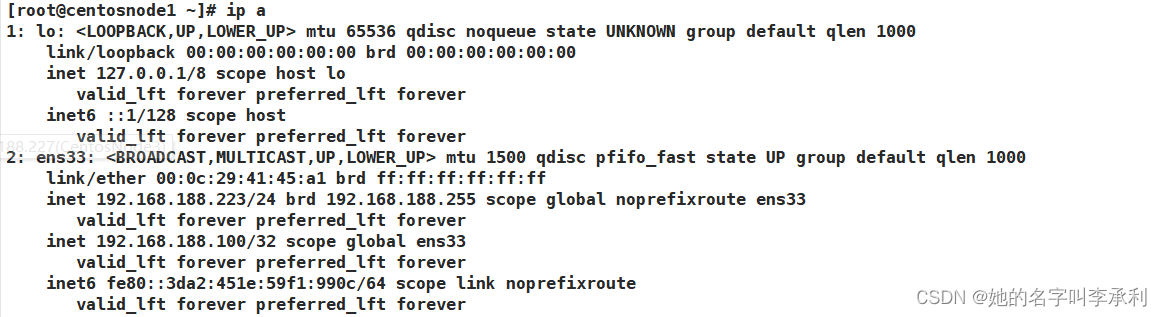
再次查看vip,发现vip飘移到了centosnode2主机上。可以将centosnode1主机的Nginx服务再次开启,会发现vip又会飘移到了centosnode1主机上,因为keepalived默认配置抢占主服务器,优先级高的服务器,将抢占到vip。
[root@centosnode1 ~]# systemctl start nginx.service
##监控日志文件
tail -f 日志文件目录


 1189
1189

 被折叠的 条评论
为什么被折叠?
被折叠的 条评论
为什么被折叠?
 到【灌水乐园】发言


