


 本文详细介绍了如何在Linux环境下搭建Elasticsearch、Kibana、Logstash和Filebeat组成的日志收集分析集群。从下载软件包到配置文件,再到启动服务,每个步骤都提供了详细的配置参数和命令,确保系统能够稳定运行。通过这个集群,可以高效管理和分析服务器的日志数据。
前言:本版本均使用7.17.3,ELKF版本需要一致,且要与jdk适配,7版本自带1.8jdk需要配置相应jdk环境变量;8版本以后需要jdk11以上
一、 搭建Elasticsearch
- 官网下载:https://www.elastic.co/cn/downloads/past-releases#elasticsearch
- 选择版本 7.17.3
- 上传linux服务,进行解压
tar -zxvf elasticsearch-7.17.3-linux-x86_64.tar.gz
- 创建用户,因ES不能使用root用户启动,所以需要重新创建用户,并修改用户组
adduser es
passwd es
chown -R es:es elasticsearch-7.17.3
- 切换es用户对配置文件进行修改
a. 修改config/jvm.options配置文件,调整jvm堆内存大小 ,因es特别吃内存,建议根据自己机器考虑, 但Xmx不要超过机器内存的50%
vim jvm.options
‐Xms4g
‐Xmx4g
b. 修改 config/elasticsearch.yml配置文件
node.name: node-1 #当前节点名称
network.host: 0.0.0.0 #能够访问当前节点的主机ip,配置为0.0.0.0代表任何机器
http.port: 9200
discovery.seed_hosts: ["x.x.x.x"] #集群中所有节点所在的主机列表
cluster.initial_master_nodes: ["node-1"] #须与node.name配置的一致
c. 在root用户下修改 /etc/security/limits.conf 配置完成后将文件添加到es用户下 , 因为ES需要大量的创建索引文件,需要大量的打开系统的文件,所以我们需要解除linux系 统当中打开文件最大数目的限制,不然ES启动就会抛错
vim /etc/security/limits.conf
末尾添加如下配置:
* soft nofile 65536
* hard nofile 65536
* soft nproc 4096
* hard nproc 4096
d. 在root用户下修改 /etc/security/limits.d/20‐nproc.conf ,调整用户最大可创建线程数太小,如没有这个文件,可跳过修改;
vim /etc/security/limits.d/20‐nproc.conf
改为如下配置:
* soft nproc 4096
e. 修改 vim /etc/sysctl.conf 文件,调整最大虚拟内存太小,调大系统的虚拟内存
vim /etc/sysctl.conf
追加以下内容:
vm.max_map_count=262144
保存退出之后执行如下命令:
sysctl ‐p
f. es用户启动服务
# ‐d 后台启动
bin/elasticsearch ‐d
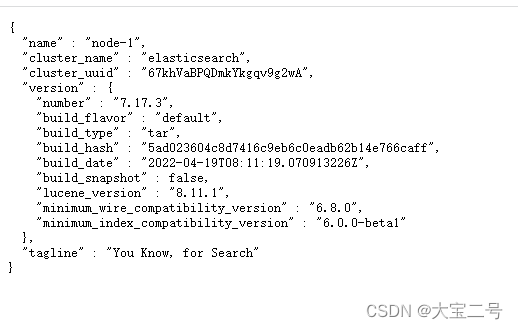
g. 浏览器输入http://x.x.x.x:9200,出现如下信息,则代表ES搭建成功
二、搭建Kibana
- 官网下载:https://www.elastic.co/cn/downloads/past-releases#kibana
- 选择版本7.17.3
- 解压tar包
tar -zxvf kibana-7.17.3-linux-x86_64.tar.gz #解压到当前目录
tar -zxvf kibana-7.17.3-linux-x86_64.tar.gz -C /usr/local #解压到指定目录
- 修改Kibana.yml
vim config/kibana.yml
server.port: 5601
server.host: "localhost" #服务器ip
elasticsearch.hosts: ["http://localhost:9200"] #elasticsearch的访问地址
i18n.locale: "zh‐CN" #Kibana汉化
- 修改文件权限,因kibana也不可以采用root用户启动
chown -R es:es kibana-7.17.3
- 切换es用户启动kibana
#后台启动
nohup bin/kibana &
- 查看kiibana进程是否启动,红圈为进程号
netstat -antp | grep 5601 #查看5601端口是否启动

- 访问kibana地址
http://localhost:5601
三、搭建Logstash
- 官网下载:https://www.elastic.co/cn/downloads/past-releases#logstash
- 采用版本:7.17.3
- 解压文件
tar -zxvf logstash-7.17.3-linux-x86_64.tar.gz #解压到当前目录
tar -zxvf logstash-7.17.3-linux-x86_64.tar.gz -C /usr/local #解压到指定目录
- 修改config/logstash-sample配置文件,或者新增配置文件,本文采用新增配置文件
touch logstash-es.conf
vim logstash-es.conf #进入文件内

	input {
    beats {
      port => 18999 #logstash 定义端口号,用于给filebeat访问推送日志
    }
}

output {
  elasticsearch {
    hosts => ["http://localhost:9200"]
    #user => "elastic"
    #password => "123456"
  }
  stdout{
    codec => rubydebug
  }
}
- 测试logstash配置是否正确,如没有输出error字样信息代表启动
bin/logstash ‐f config/server-logstash.conf ‐‐config.test_and_exit
- 切换到bin目录下,创建server-logstash.sh脚本,方便以后启动,并在脚本内添加启动命令
touch server-logstash.sh
vim server-logstash.sh #进入文件
nohup ./logstash -f /usr/local/logstash-7.17.3/config/server-logstash.conf > /usr/local/logstash-7.17.3/logs/server-logstash.log 2>&1 & #后台启动
sh server-logstash.sh #启动服务
四、搭建Filebeat
- 官网下载:https://www.elastic.co/cn/downloads/past-releases#filebeat
- 版本:7.17.3
- 解压文件
tar -zxvf filebeat-7.17.3-linux-x86_64.tar.gz #解压到当前目录
tar -zxvf filebeat-7.17.3-linux-x86_64.tar.gz -C /usr/local #解压到指定目录
- 修改filebeat.yml配置文件或者创建新文件,写入配置内容,本文采用创建新文件写入配置
touch filebeat-logstash.yml
vim filebeat-logstash.yml #进入文件

filebeat.inputs:
- type: log
  enabled: true
  paths:
    - /home/es/apache-tomcat-8.5.33/logs/*access*.* #日志所在路径
  multiline.pattern: '^\\d+\\.\\d+\\.\\d+\\.\\d+ ' #正则表达式
  multiline.negate: true #true 或 false;默认是false,匹配pattern的行合并到上一行;true,不匹配pattern的行合并到上一行
  multiline.match: after #after 或 before,合并到上一行的末尾或开头

output.logstash:
  enabled: true
  hosts: ["x.x.x.x:18999"]
- 测试启动filebeat,未出现Error则正常
./filebeat -e -c filebeat-logstash.yml -d "Publish"
- 启动filebeat, /dev/null代表不搜集日志,因为filebeat仅仅是抓取推送,所以不写日志,再一个日志量太大,占空间验证;
nohup ./filebeat -e -c filebeat-logstash.yml >/dev/null 2>&1 &


 704
704

 被折叠的 条评论
为什么被折叠?
被折叠的 条评论
为什么被折叠?
 到【灌水乐园】发言


