


 本文详细介绍了Java中的原型模式,并通过具体案例解释了浅拷贝和深拷贝的区别及其实现方法,包括重写clone方法和序列化对象法。
🚀🚀🚀尚硅谷传送门==>B站尚硅谷Java设计模式
❤❤❤感谢尚硅谷❤❤❤
🛴🛴🛴最近开始计划学习一下设计模式了,加油!!!
原型模式
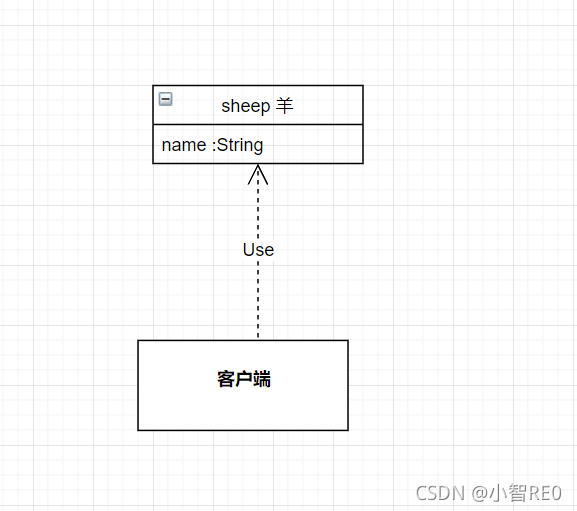
由克隆羊问题分析原型模式
现在有一只羊tom,姓名为: tom, 年龄为:1,颜色为:白色,请编写程序创建和tom
羊 属性完全相同的10只羊。
传统思路;直接new一个羊的对象; 拿过来依赖(使用)即可;
后面向"克隆这只羊",直接把姓名,年龄,属性全部复用.
传统思路代码;
羊Sheep
//羊';
public class Sheep {
    //定义羊的属性;
    private String name;
    private String color;
    private int age;

    //构造方法初始化;
    public Sheep(String name, String color, int age) {
        this.name = name;
        this.color = color;
        this.age = age;
    }

    public String getName() {
        return name;
    }

    public void setName(String name) {
        this.name = name;
    }

    public String getColor() {
        return color;
    }

    public void setColor(String color) {
        this.color = color;
    }

    public int getAge() {
        return age;
    }

    public void setAge(int age) {
        this.age = age;
    }

    @Override
    public String toString() {
        return "Sheep{" +
                "name='" + name + '\'' +
                ", color='" + color + '\'' +
                ", age=" + age +
                '}';
    }
}
客户端Client
public class Client {
    public static void main(String[] args) {

        Sheep sheep = new Sheep("小智", "白色", 21);

        //克隆羊;
        Sheep sheep1=new Sheep(sheep.getName(),sheep.getColor(),sheep.getAge());
        Sheep sheep2=new Sheep(sheep.getName(),sheep.getColor(),sheep.getAge());
        Sheep sheep3=new Sheep(sheep.getName(),sheep.getColor(),sheep.getAge());
        Sheep sheep4=new Sheep(sheep.getName(),sheep.getColor(),sheep.getAge());
        Sheep sheep5=new Sheep(sheep.getName(),sheep.getColor(),sheep.getAge());
        Sheep sheep6=new Sheep(sheep.getName(),sheep.getColor(),sheep.getAge());

        //被克隆的羊;
        System.out.println(sheep);//Sheep{name='小智', color='白色', age=21}
        //克隆羊;
        System.out.println(sheep1);//Sheep{name='小智', color='白色', age=21}
        System.out.println(sheep2);//Sheep{name='小智', color='白色', age=21}
        System.out.println(sheep3);//Sheep{name='小智', color='白色', age=21}
        System.out.println(sheep4);//Sheep{name='小智', color='白色', age=21}
        System.out.println(sheep5);//Sheep{name='小智', color='白色', age=21}
        System.out.println(sheep6);//Sheep{name='小智', color='白色', age=21}
    }
}
这种方式简单明了,可读性很高;
但是创建新的对象之前,就得去重新获取原始对象的属性,要是属性特别多的时候(甚至有其他类作为属性的情况),这样"克隆"的效率就比较低了
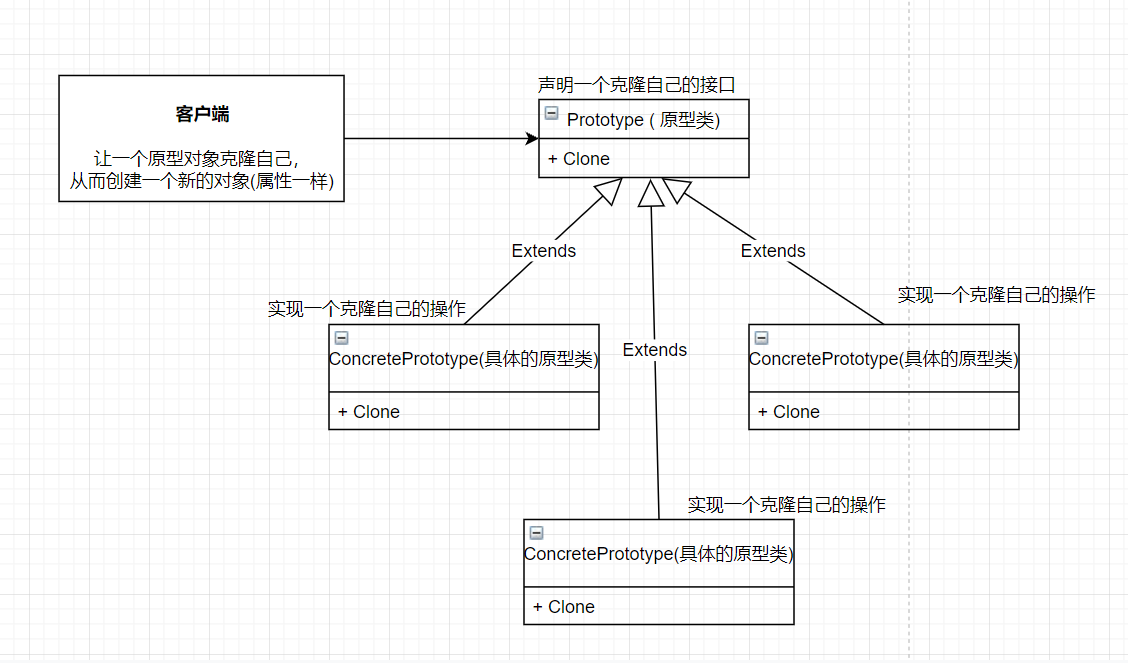
原型模式引入
Object类提供了一个clone()方法,该方法将一个Java对象复制一份,但需要实现clone的Java类必须要实现接口Cloneable(该接口表示该类能够复制且具有复制的能力),
用原型实例指定创建对象的种类,并且通过拷贝这些原型,创建新的对象
用原型模式优化;
羊Sheep
//羊';  实现 Cloneable 接口;==>该接口表示该类能够复制且具有复制的能力;
public class Sheep implements Cloneable{
    //定义羊的属性;
    private String name;
    private String color;
    private int age;

    //构造方法初始化;
    public Sheep(String name, String color, int age) {
        this.name = name;
        this.color = color;
        this.age = age;
    }

    public String getName() {
        return name;
    }

    public void setName(String name) {
        this.name = name;
    }

    public String getColor() {
        return color;
    }

    public void setColor(String color) {
        this.color = color;
    }

    public int getAge() {
        return age;
    }

    public void setAge(int age) {
        this.age = age;
    }

    @Override
    public String toString() {
        return "Sheep{" +
                "name='" + name + '\'' +
                ", color='" + color + '\'' +
                ", age=" + age +
                '}';
    }

    //克隆方法;
    @Override
    protected Object clone(){
        //别忘了此处返回的是 羊

        Sheep sheep=null;
        try {
            sheep=(Sheep)super.clone();
        } catch (CloneNotSupportedException e) {
            e.printStackTrace();
        }
        return sheep;
    }
}
客户端Client
//客户端;
public class Client {
    public static void main(String[] args) {

        Sheep sheep = new Sheep("小智", "白色", 21);
        //克隆羊;
        Sheep sheep1 = (Sheep)sheep.clone();
        Sheep sheep2 = (Sheep)sheep.clone();
        Sheep sheep3 = (Sheep)sheep.clone();
        Sheep sheep4 = (Sheep)sheep.clone();
        Sheep sheep5 = (Sheep)sheep.clone();

        //被克隆的羊;
        System.out.println(sheep);//Sheep{name='小智', color='白色', age=21}
        //克隆羊;
        System.out.println(sheep1);//Sheep{name='小智', color='白色', age=21}
        System.out.println(sheep2);//Sheep{name='小智', color='白色', age=21}
        System.out.println(sheep3);//Sheep{name='小智', color='白色', age=21}
        System.out.println(sheep4);//Sheep{name='小智', color='白色', age=21}
        System.out.println(sheep5);//Sheep{name='小智', color='白色', age=21}
    }
}
原型模式的缺点:由于原型模式需要为每一个类配备一个克隆方法,如果说要对已有的类进行改造时,需要修改其源代码,违背了ocp原则(开闭原则).
在spring工作时,也使用到了原型模式
例如,写个实体类
//用户实体类;
public class User {
    private String name;
    private String password;
    private int age;

    public User() {
    }

    public User(String name, String password, int age) {
        this.name = name;
        this.password = password;
        this.age = age;
    }

    public String getName() {
        return name;
    }

    public void setName(String name) {
        this.name = name;
    }

    public String getPassword() {
        return password;
    }

    public void setPassword(String password) {
        this.password = password;
    }

    public int getAge() {
        return age;
    }

    public void setAge(int age) {
        this.age = age;
    }

    @Override
    public String toString() {
        return "User{" +
                "name='" + name + '\'' +
                ", password='" + password + '\'' +
                ", age=" + age +
                '}';
    }
}
配置,让该类注入使用spring
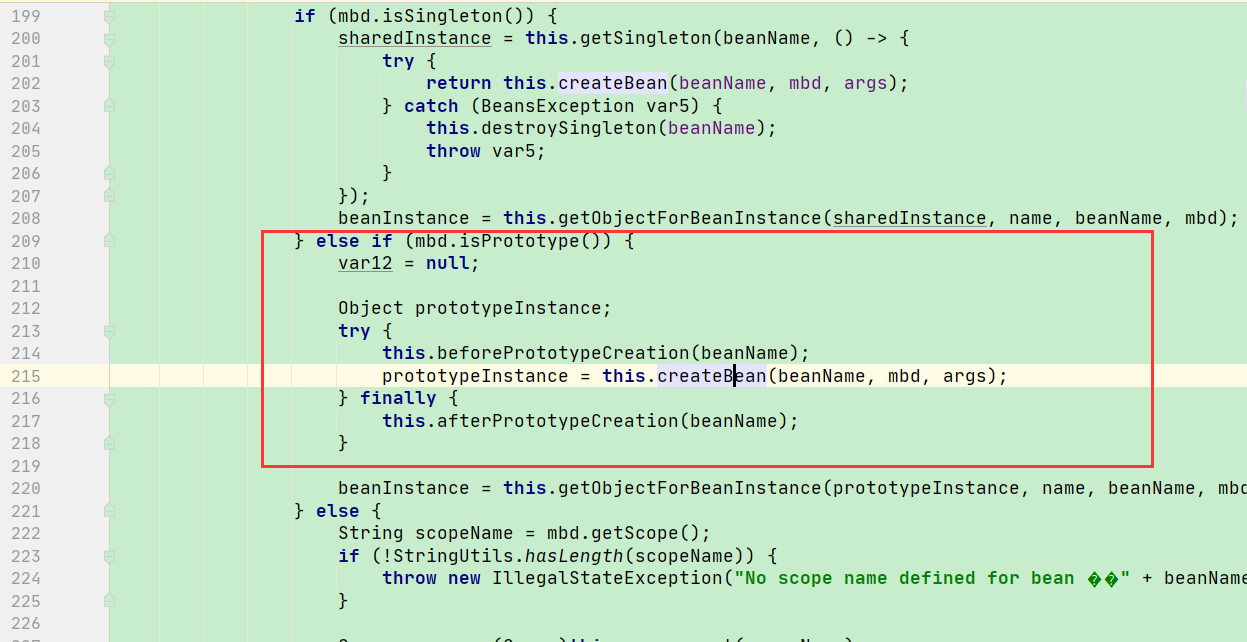
作用类型(影响) 切换为scope=“prototype”;
<?xml version="1.0" encoding="UTF-8"?>
<beans xmlns="http://www.springframework.org/schema/beans"
       xmlns:xsi="http://www.w3.org/2001/XMLSchema-instance"
       xsi:schemaLocation="http://www.springframework.org/schema/beans
    http://www.springframework.org/schema/beans/spring-beans-3.0.xsd">


    <!-- 使用原型模式 ,scope="prototype" -->
    <bean id="user" class="com.lzq.pojo.User" scope="prototype">
        <property name="name" value="小智"/>
        <property name="password" value="123654"/>
        <property name="age" value="21"/>
    </bean>
</beans>
测试
public class PrototypeTest {
public static void main(String[] args) {
ApplicationContext applicationContext = new ClassPathXmlApplicationContext("applicationContext.xml");
//获取bean
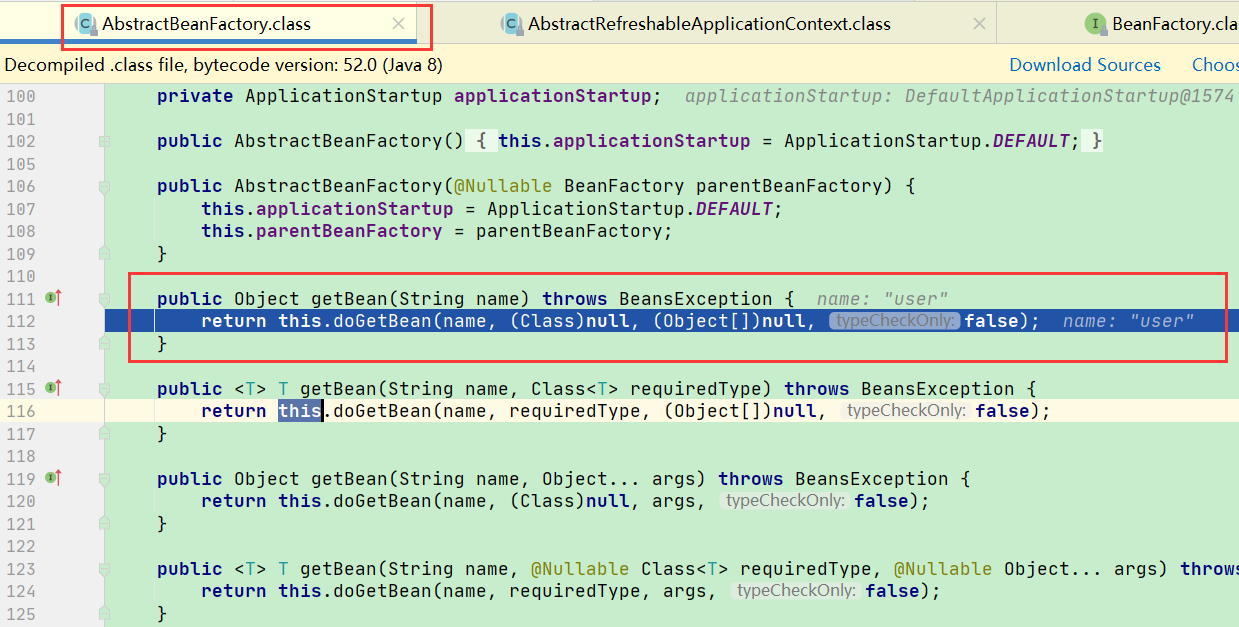
Object user1 = applicationContext.getBean("user");
System.out.println(user1);//User{name='小智', password='123654', age=21}
Object user2 = applicationContext.getBean("user");
System.out.println(user2);//User{name='小智', password='123654', age=21}
//可以注意到,取到的两个对象不一样;
System.out.println(user1 == user2); //user
}
}
debug调试调试
浅拷贝
就用刚才克隆羊案例来看;
这只羊有个好朋友;
在原来的基础上添加一个Sheep类型的属性;
//羊';  实现 Cloneable 接口;==>该接口表示该类能够复制且具有复制的能力;
public class Sheep implements Cloneable{
    //定义羊的属性;
    private String name;
    private String color;
    private int age;

    //这只羊有个好朋友;
    public  Sheep friend;

    //构造方法初始化;
    public Sheep(String name, String color, int age) {
        this.name = name;
        this.color = color;
        this.age = age;
    }


    public String getName() {
        return name;
    }

    public void setName(String name) {
        this.name = name;
    }

    public String getColor() {
        return color;
    }

    public void setColor(String color) {
        this.color = color;
    }

    public int getAge() {
        return age;
    }

    public void setAge(int age) {
        this.age = age;
    }

    @Override
    public String toString() {
        return "Sheep{" +
                "name='" + name + '\'' +
                ", color='" + color + '\'' +
                ", age=" + age +
                '}';
    }

    //克隆方法;
    @Override
    protected Object clone(){
        //别忘了此处返回的是 羊

        Sheep sheep=null;
        try {
            sheep=(Sheep)super.clone();
        } catch (CloneNotSupportedException e) {
            e.printStackTrace();
        }
        return sheep;
    }
}
然后客户再去"克隆"
//客户端;
public class Client {
    public static void main(String[] args) {

        Sheep sheep = new Sheep("小智", "白色", 21);

        //这只羊的好朋友;
        sheep.friend=new Sheep("帕克","白色",12);

        //克隆羊;
        Sheep sheep1 = (Sheep)sheep.clone();
        Sheep sheep2 = (Sheep)sheep.clone();

        //被克隆的羊;
        System.out.println(sheep);//Sheep{name='小智', color='白色', age=21}

        //克隆羊;
        System.out.println(sheep2);//Sheep{name='小智', color='白色', age=21}
        System.out.println(sheep2);//Sheep{name='小智', color='白色', age=21}

        //克隆后的好朋友;
        System.out.println("克隆后的好朋友"+sheep1.friend.hashCode());//克隆后的好朋友1554874502
        System.out.println("克隆后的好朋友"+sheep2.friend.hashCode());//克隆后的好朋友1554874502
    }
}
注意到克隆羊的好朋友也没有变;
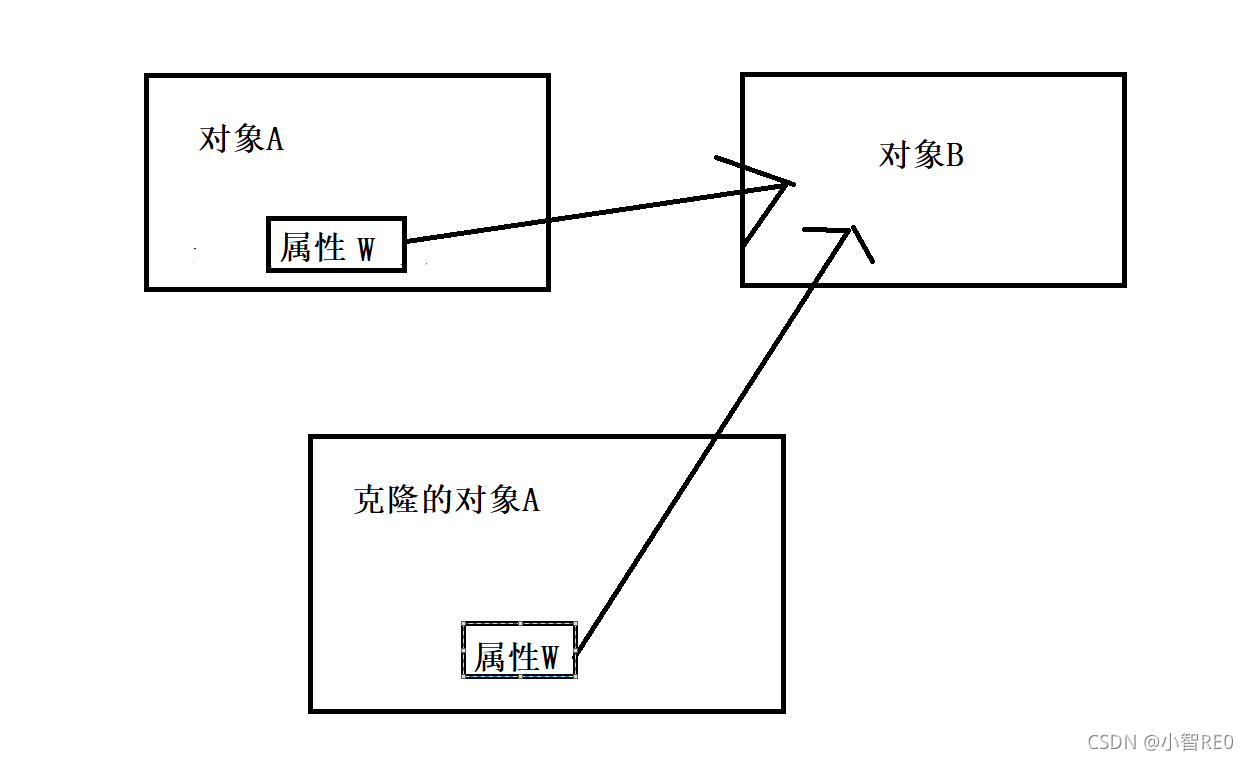
通俗地说浅拷贝;
比如说在对象A中,有个属性W, 这个属性W它是指向 对象B的;
这时 对象 A 被克隆了;但是属性W 还是指向 对象B的;并不是说把对象B克隆一份,然后指向.
浅拷贝默认使用 clone( )方法实现
- 数据类型是基本数据类型的成员变量,浅拷贝会直接进行值传递,也就是将该属性值复制一份给新的对象。
- 对于数据类型是引用数据类型的成员变量,比如说成员变量是某个数组、某个类的对象等,那么浅拷贝会进行引用传递(
注意;Java只有值传递),也就是只是将该成员变量的引用值(内存地址)复制一份给新的对象。因为实际上两个对象的该成员变量都指向同一个实例。注意;在这种情况下,在一个对象中修改该成员变量会影响到另一个对象的该成员变量值;因为他们指向的地址是同一个.
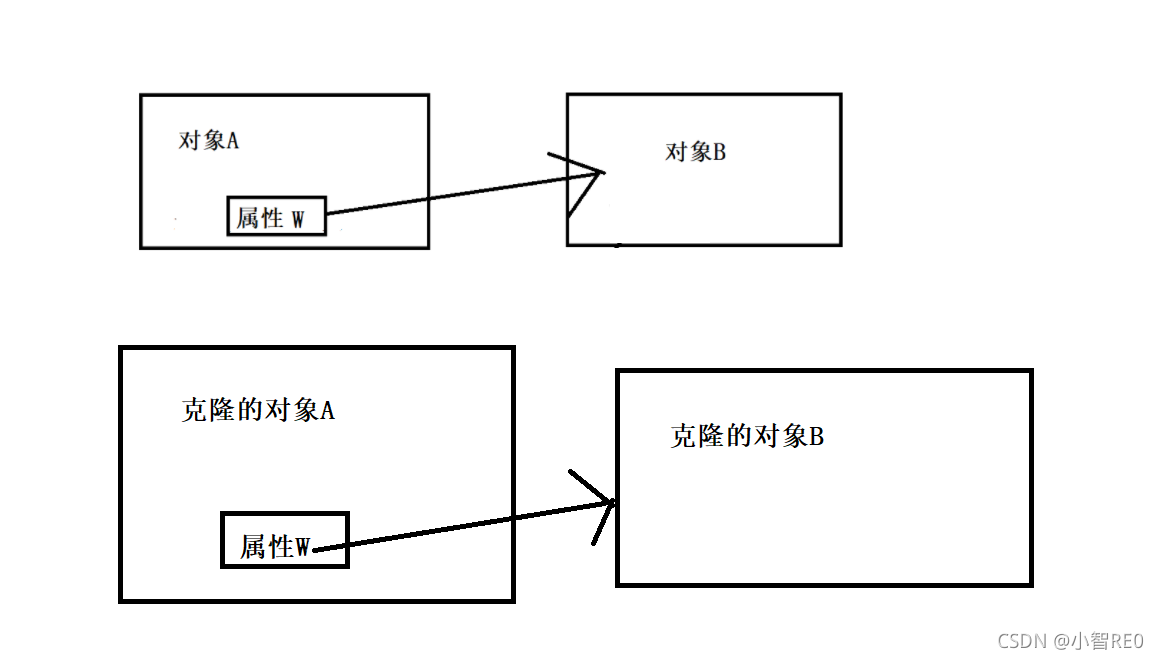
深拷贝
- 复制对象的所有基本数据类型的成员变量值
- 为所有引用数据类型的成员变量申请存储空间,并复制每个引用数据类型成员变量所引用的对象,直到该对象最终指向的的所有对象。也就是说,对象进行深拷贝要对整个对象进行拷贝.
在刚才的例子中,要是用深拷贝,那么对象B的也要复制一份.
深拷贝有两种实现方式
实现深拷贝之 重写clone方法
写个User类
作为另一个类的引用类型属性;
注意user类
public class User implements Cloneable {

    private String name;

    private String address;

    //构造方法;
    public User(String name, String address) {
        this.name = name;
        this.address = address;
    }

    //克隆方法;
    @Override
    protected Object clone() throws CloneNotSupportedException {
        return super.clone();
    }

    @Override
    public String toString() {
        return "User{" +
                "name='" + name + '\'' +
                ", address='" + address + '\'' +
                '}';
    }
}
用来做案例的DeepCloneByOne类;
其中,它使用了User 类作为属性
public class DeepCloneByOne implements Cloneable {

    public String name;
    //引用类型;
    public User user;

    //构造方法

    public DeepCloneByOne() {
        super();
    }

    //深拷贝 ;重写clone方法实现;
    @Override
    protected Object clone() throws CloneNotSupportedException {
        Object deep = null;

        //对String类型 进行处理;
        deep = super.clone();

        //对引用类型处理;
        DeepCloneByOne deepCloneByOne=(DeepCloneByOne) deep;

        deepCloneByOne.user=(User)user.clone();

        return deep;
    }

    @Override
    public String toString() {
        return "DeepCloneByOne{" +
                "name='" + name + '\'' +
                ", user=" + user +
                '}';
    }
}
克隆测试:
public class Client {
    public static void main(String[] args) throws CloneNotSupportedException {

        DeepCloneByOne deepCloneByOne=new DeepCloneByOne();
        deepCloneByOne.name="啊啊啊杰";
        deepCloneByOne.user=new User("啊翔","斜塔");

        //方式一;

        DeepCloneByOne dp1 = (DeepCloneByOne) deepCloneByOne.clone();
        DeepCloneByOne dp2 = (DeepCloneByOne) deepCloneByOne.clone();

        //原来的;
        System.out.println(deepCloneByOne);
        System.out.println("name属性原哈希值"+deepCloneByOne.name.hashCode());
        System.out.println("user属性原哈希值"+deepCloneByOne.user.hashCode());
        //查看克隆后的;
        System.out.println("========克隆后;第一个========");
        System.out.println(dp1);
        System.out.println("name属性 哈希值"+dp1.name.hashCode());
        System.out.println("user属性 哈希值"+dp1.user.hashCode());
        System.out.println("========克隆后;第二个========");
        System.out.println(dp2);
        System.out.println("name属性 哈希值"+dp2.name.hashCode());
        System.out.println("user属性 哈希值"+dp2.user.hashCode());
    }
}
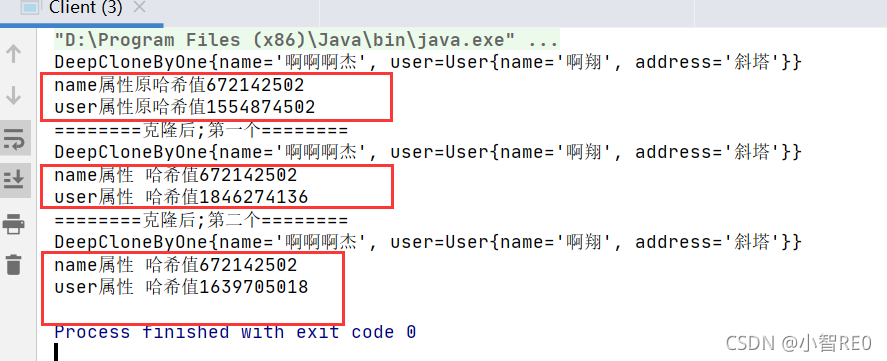
注意到,引用类型的User对象也克隆了.
实现深拷贝之 序列化对象法
User类
public class User implements Serializable,Cloneable {

    private static final long serialVersionUID=1L;

    private String name;

    private String address;

    //构造方法;
    public User(String name, String address) {
        this.name = name;
        this.address = address;
    }

    @Override
    public String toString() {
        return "User{" +
                "name='" + name + '\'' +
                ", address='" + address + '\'' +
                '}';
    }
}
DeepCloneByTwo类,
用到了流的方式去输入输出,序列化反序列化
public class DeepCloneByTwo implements Serializable, Cloneable {

    public String name;
    //引用类型;
    public User user;

    //构造方法

    public DeepCloneByTwo() {
        super();
    }

    //对象的序列化方式处理;

    public Object toSerialize() {

        //创建流对象;
        ObjectOutputStream oos = null;
        ByteArrayOutputStream bos = null;
        ByteArrayInputStream bis = null;
        ObjectInputStream ois = null;

        try {
            bos = new ByteArrayOutputStream();
            oos = new ObjectOutputStream(bos);
            //将当前对象用流输出;
            oos.writeObject(this);

            //反序列化;
            bis = new ByteArrayInputStream(bos.toByteArray());
            ois = new ObjectInputStream(bis);
            DeepCloneByTwo dpbtObj = (DeepCloneByTwo) ois.readObject();
            return dpbtObj;
        } catch (Exception e) {
            e.printStackTrace();
            return null;
        }finally {
            //关闭资源;
            if(ois!=null){
                try {
                    ois.close();
                } catch (IOException e) {
                    e.printStackTrace();
                }
            }else if(bis!=null){
                try {
                    bis.close();
                } catch (IOException e) {
                    e.printStackTrace();
                }
            }else if(oos!=null){
                try {
                    oos.close();
                } catch (IOException e) {
                    e.printStackTrace();
                }
            }else if(bos!=null){
                try {
                    bos.close();
                } catch (IOException e) {
                    e.printStackTrace();
                }
            }
        }
    }

    @Override
    public String toString() {
        return "DeepCloneByOne{" +
                "name='" + name + '\'' +
                ", user=" + user +
                '}';
    }
}
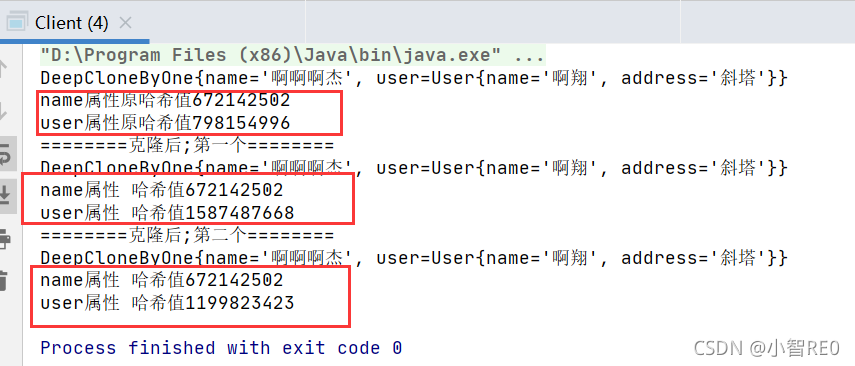
测试
public class Client {
    public static void main(String[] args) throws CloneNotSupportedException {

        DeepCloneByTwo deepCloneByTwo=new DeepCloneByTwo();
        deepCloneByTwo.name="啊啊啊杰";
        deepCloneByTwo.user=new User("啊翔","斜塔");

        //方式二;

        DeepCloneByTwo dp1 = (DeepCloneByTwo) deepCloneByTwo.toSerialize();
        DeepCloneByTwo dp2 = (DeepCloneByTwo) deepCloneByTwo.toSerialize();

        //原来的;
        System.out.println(deepCloneByTwo);
        System.out.println("name属性原哈希值"+deepCloneByTwo.name.hashCode());
        System.out.println("user属性原哈希值"+deepCloneByTwo.user.hashCode());
        //查看克隆后的;
        System.out.println("========克隆后;第一个========");
        System.out.println(dp1);
        System.out.println("name属性 哈希值"+dp1.name.hashCode());
        System.out.println("user属性 哈希值"+dp1.user.hashCode());
        System.out.println("========克隆后;第二个========");
        System.out.println(dp2);
        System.out.println("name属性 哈希值"+dp2.name.hashCode());
        System.out.println("user属性 哈希值"+dp2.user.hashCode());
    }
}


 被折叠的 条评论
为什么被折叠?
被折叠的 条评论
为什么被折叠?
 到【灌水乐园】发言


