


 本文介绍如何在Android上创建从基础到高级的来电通知。涵盖通知渠道创建、显示通知、按钮操作及自定义设计等内容。
您将从本文中学习如何在 Android 上进行从基本布局到高级布局的来电通知。使用我们的示例自定义通知屏幕。
今天,我们将处理来电通知:我们将从最简单和最简约的通知开始,并以采用非系统设计的全屏通知结束。让我们开始吧!
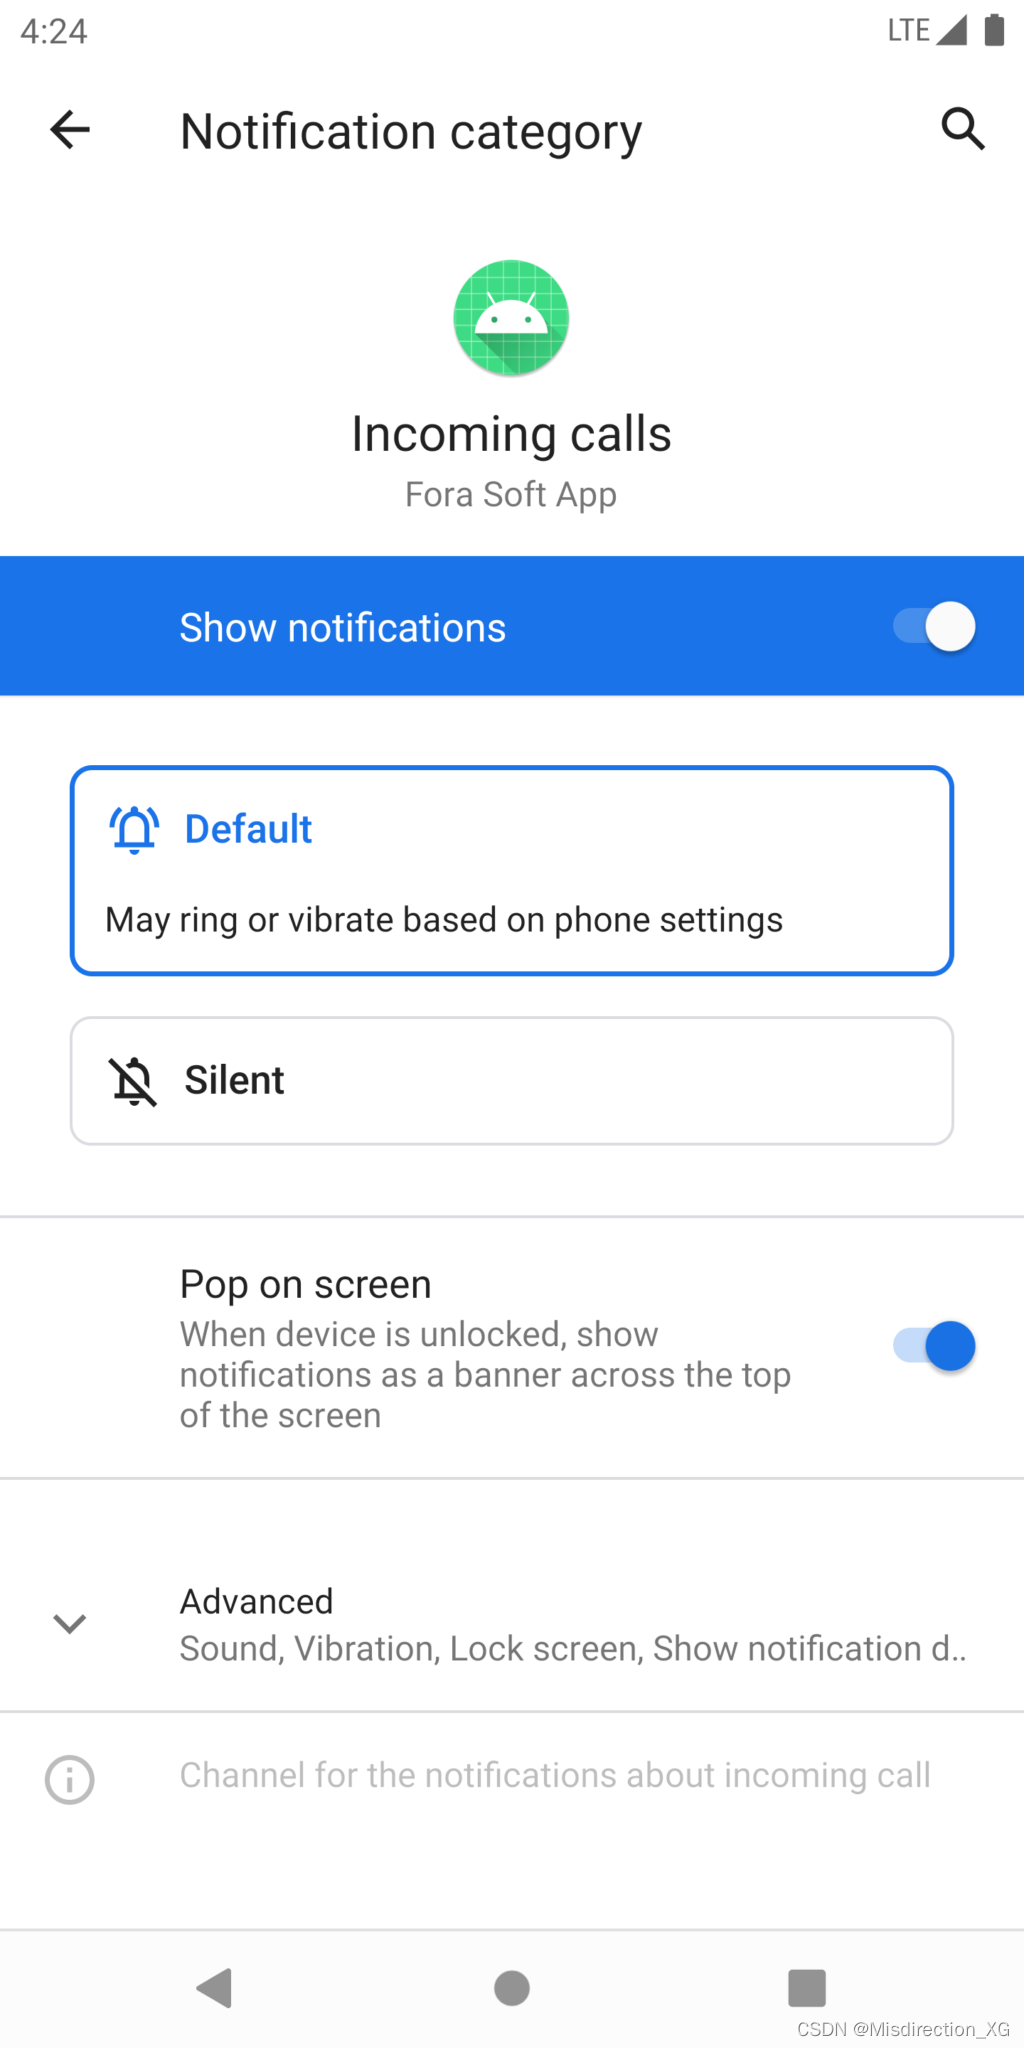
频道创建 (api 26+)
从 Android 8.0 开始,每个通知都必须有一个它所属的通知通道。在这个版本的系统之前,用户可以允许或禁止应用程序显示通知,而不能只关闭某个类别,这不是很方便。另一方面,通过频道,用户可以关闭来自应用程序的烦人通知,例如广告和不必要的提醒,而只留下他需要的通知(新消息、电话等)。
如果我们不指定频道 ID,请使用 Deprecated 构建器。如果我们不创建具有此类 ID 的频道,Android 8 或更高版本将不会显示通知。
我们需要你可能已经连接的 androidx.core 库。我们用 Kotlin 编写,所以我们使用该语言的库版本:
dependencies {
    implementation("androidx.core:core-ktx:1.5.0")
}
通知的所有工作都是通过系统服务 NotificationManager 完成的。为了向后兼容,如果你有 Android 类的 Compat 版本总是更好,所以我们将使用 NotificationManagerCompat。获取实例:
val notificationManager = NotificationManagerCompat.from(context)
让我们创建我们的频道。您可以为频道设置很多参数,例如通知的一般声音和振动模式。
val INCOMING_CALL_CHANNEL_ID = “incoming_call”

// Creating an object with channel data

val channel = NotificationChannelCompat.Builder(

    // channel ID, it must be unique within the package

    INCOMING_CALL_CHANNEL_ID,

    // The importance of the notification affects whether the notification makes a sound, is shown immediately, and so on. We set it to maximum, it’s a call after all.

    NotificationManagerCompat.IMPORTANCE_HIGH

)

    // the name of the channel, which will be displayed in the system notification settings of the application

    .setName(“Incoming calls”)

    // channel description, will be displayed in the same place

    .setDescription(“Incoming audio and video call alerts”)

    .build()

// Creating the channel. If such a channel already exists, nothing happens, so this method can be used before sending each notification to the channel.

notificationManager.createNotificationChannel(channel)
显示通知
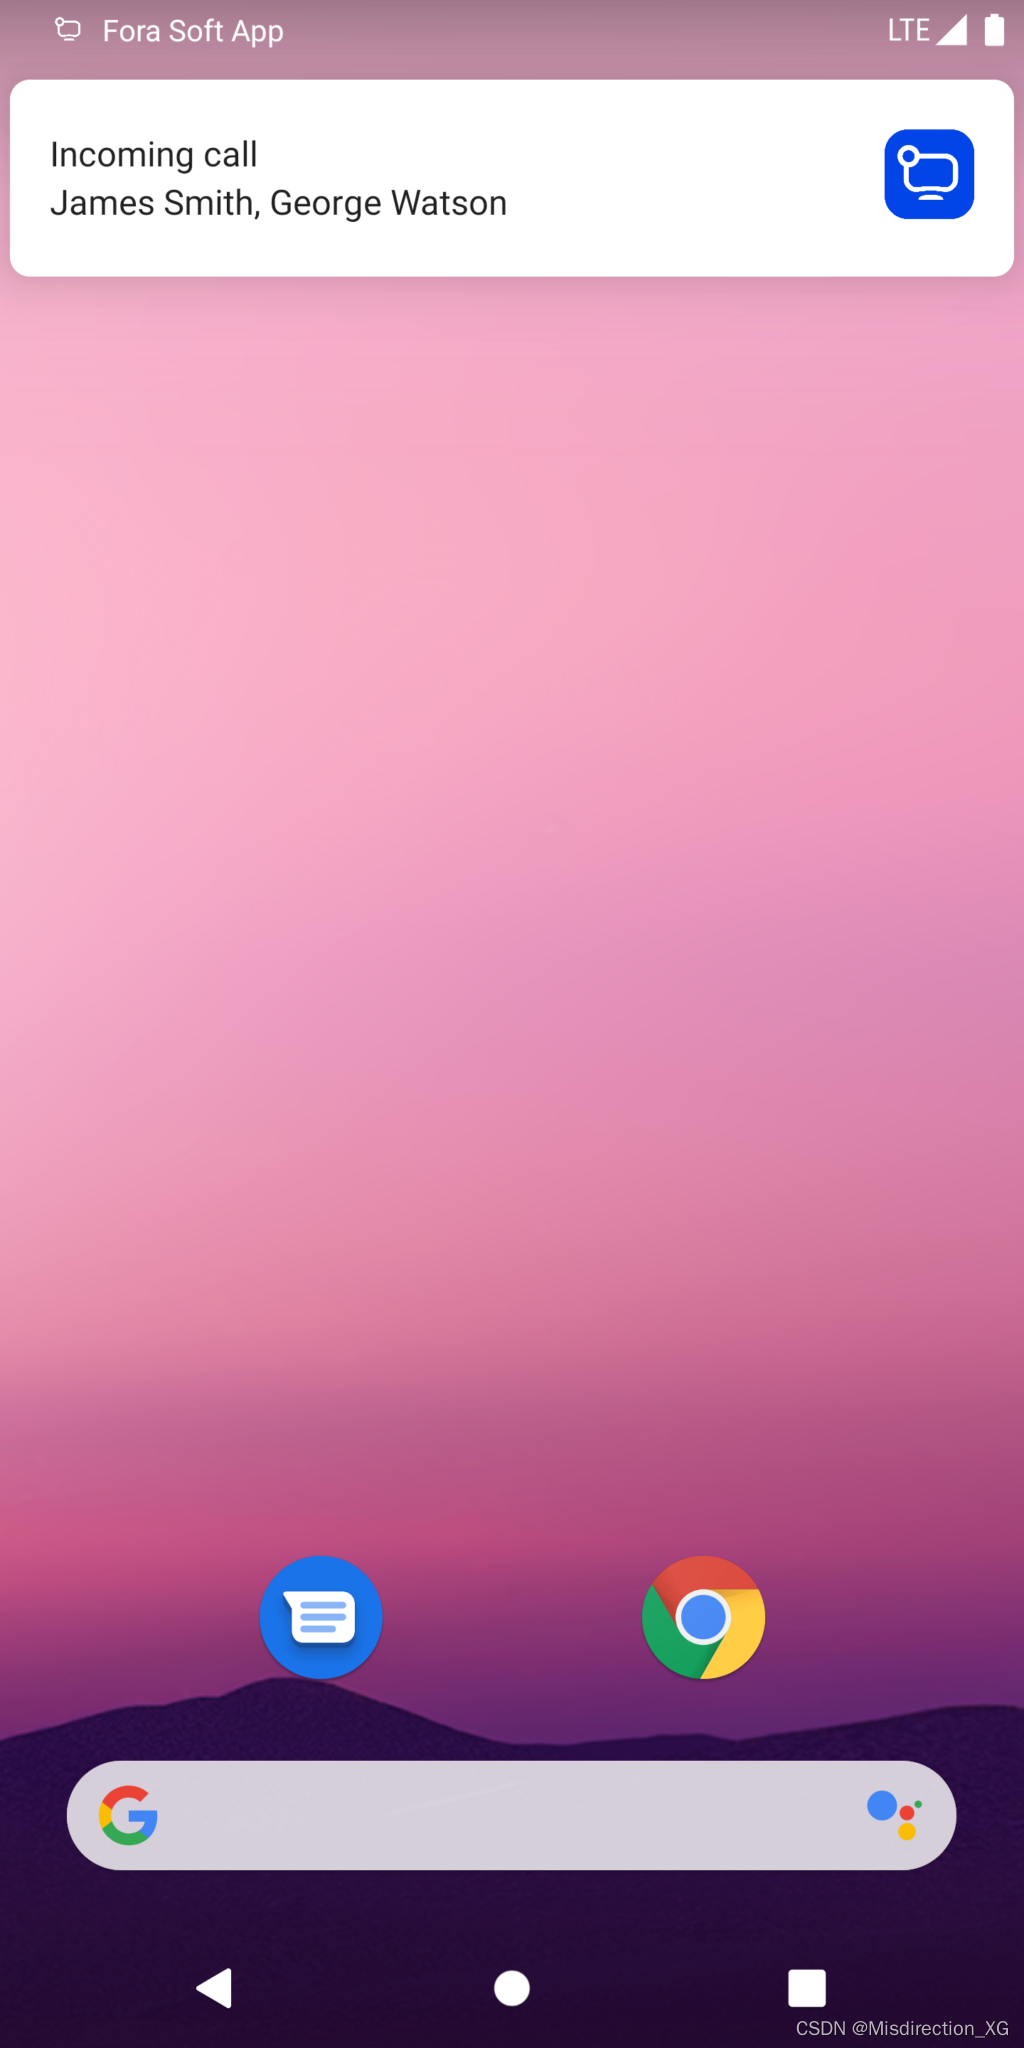
太好了,现在我们可以开始创建通知本身了,让我们从最简单的例子开始:
val notificationBuilder = NotificationCompat.Builder(

this,

    // channel ID again

    INCOMING_CALL_CHANNEL_ID

)

    // A small icon that will be displayed in the status bar

    .setSmallIcon(R.drawable.icon)

    // Notification title

    .setContentTitle(“Incoming call”)

    // Notification text, usually the caller’s name

    .setContentText(“James Smith”)

    // Large image, usually a photo / avatar of the caller

    .setLargeIcon(BitmapFactory.decodeResource(resources, R.drawable.logo))

    // For notification of an incoming call, it’s wise to make it so that it can’t be “swiped”

    .setOngoing(true)

        So far we’ve only created a sort of “description” of the notification, but it’s not yet shown to the user. To display it, let’s turn to the manager again:

// Let’s get to building our notification

val notification = notificationBuilder.build()

// We ask the system to display it

notificationManager.notify(INCOMING_CALL_NOTIFICATION_ID, notification)
INCOMING_CALL_NOTIFICATION_ID 是一个通知标识符,可用于查找已显示的通知并与之交互。
例如,用户长时间没有接听电话,来电者厌倦了等待并取消了通话。然后我们可以取消通知:
notificationManager.cancel(INCOMING_CALL_NOTIFICATION_ID)
或者,在会议应用程序的情况下,如果不止一个人加入了呼叫者,我们可以更新我们的通知。为此,只需创建一个新通知并在通知调用中传递相同的通知 ID——然后旧通知将仅使用数据更新,而不会为新通知的外观设置动画。为此,我们可以通过简单地替换其中更改的部分来重用旧的 notificationBuilder:
notificationBuilder.setContentText(“James Smith, George Watson”)

notificationManager.notify(

    INCOMING_CALL_NOTIFICATION_ID,

    notificationBuilder.build()

)
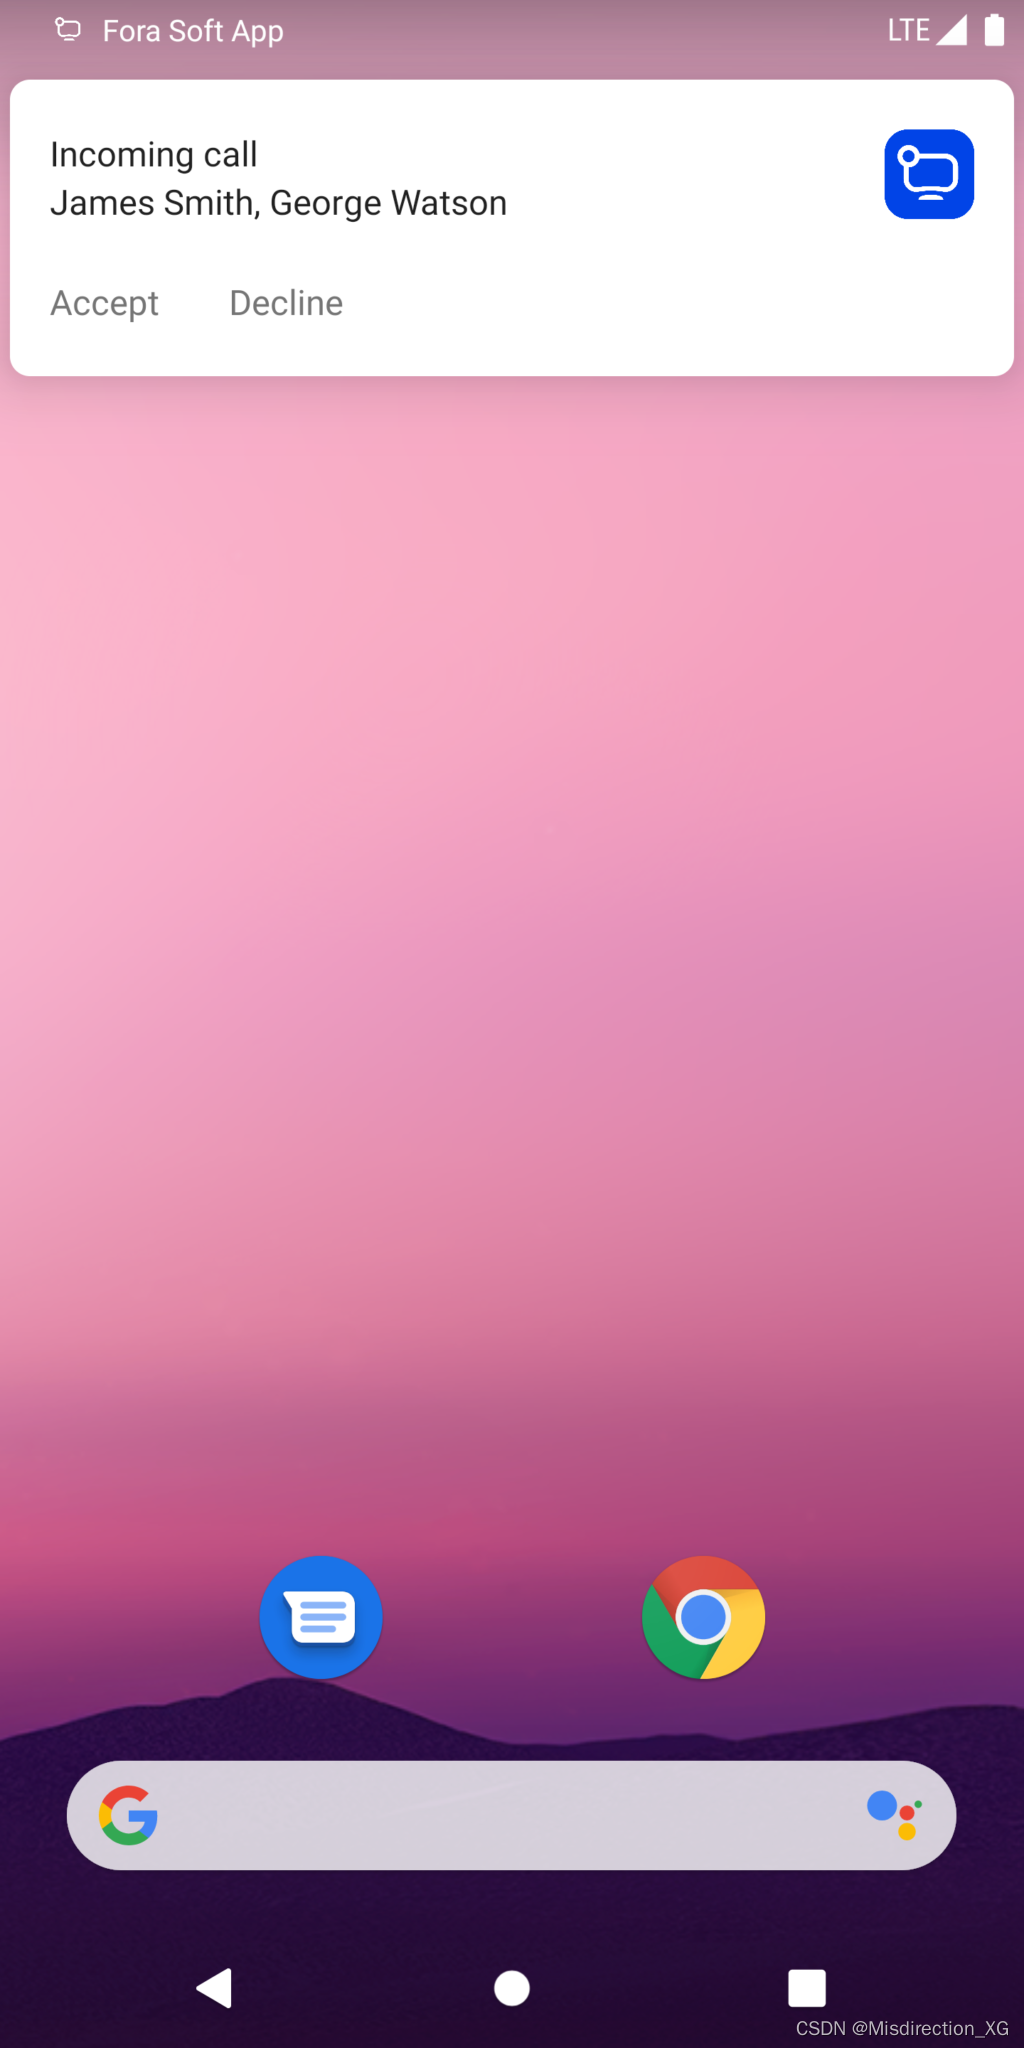
单击时的按钮操作
一个简单的来电通知,之后用户必须自己找到我们的应用程序并接受或拒绝来电,这并不是一件很有用的事情。幸运的是,我们可以在通知中添加操作按钮!
为此,我们在创建通知时添加一个或多个操作。创建它们将如下所示:
val action = NotificationCompat.Action.Builder(

    // The icon that will be displayed on the button (or not, depends on the Android version)

    IconCompat.createWithResource(applicationContext, R.drawable.icon_accept_call),

    // The text on the button

    getString(R.string.accept_call),

    // The action itself, PendingIntent

    acceptCallIntent

).build()
等一下,另一个 PendingIntent 是什么意思?这是一个非常广泛的话题,值得单独写一篇文章,但简单地说,它是对如何运行我们应用程序的元素(例如活动或服务)的描述。最简单的形式是这样的:
const val ACTION_ACCEPT_CALL = 101

// We create a normal intent, just like when we start a new Activity

val intent = Intent(applicationContext, MainActivity::class.java).apply {

    action = ACTION_ACCEPT_CALL

}

// But we don’t run it ourselves, we pass it to PendingIntent, which will be called later when the button is pressed

val acceptCallIntent = PendingIntent.getActivity(applicationContext, REQUEST_CODE_ACCEPT_CALL, intent, PendingIntent.FLAG_UPDATE_CURRENT)
因此,我们需要在活动本身中处理这个动作。为此,在onCreate()(onNewIntent()如果您将标志FLAG_ACTIVITY_SINGLE_TOP用于您的活动),action从intent并采取行动:
override fun onNewIntent(intent: Intent?) {

    super.onNewIntent(intent)

    if (intent?.action == ACTION_ACCEPT_CALL)

        imaginaryCallManager.acceptCall()

}
现在我们已经为我们的行动做好了一切准备,我们可以通过以下方式将其添加到我们的通知中Builder
notificationBuilder.addAction(action)
除了按钮之外,我们还可以通过单击按钮之外的通知本身来分配操作。转到来电屏幕似乎是最好的解决方案——为此,我们重复创建操作的所有步骤,但使用不同的操作 id 而不是ACTION_ACCEPT_CALL,并通过导航MainActivity.onCreate()处理它action
override fun onNewIntent(intent: Intent?) {

    …

    if (intent?.action == ACTION_SHOW_INCOMING_CALL_SCREEN)

        imaginaryNavigator.navigate(IncomingCallScreen())

}
您也可以使用service而不是activity来处理事件。
具有自己设计的通知
通知本身是系统界面的一部分,因此它们将以相同的系统样式显示。但是,如果您想脱颖而出,或者如果按钮和其他通知元素的标准排列不适合您,您可以为通知赋予您自己独特的风格。
免责声明:由于具有不同屏幕尺寸和纵横比的 Android 设备种类繁多,再加上通知中元素的定位有限(相对于常规应用程序屏幕),自定义内容通知更难以支持。
通知仍然会由系统呈现,也就是在我们的应用程序进程之外,所以我们需要使用RemoteViews而不是常规的 View。请注意,此机制不支持所有熟悉的元素,特别ConstraintLayout是 不可用。
一个简单的示例是带有一个用于接听电话的按钮的自定义通知:
<!– notification_custom.xml –>

<RelativeLayout

    …

    android:layout_width=”match_parent”

    android:layout_height=”match_parent”>

    <Button

        android:id=”@+id/button_accept_call”

        android:layout_width=”wrap_content”

        android:layout_height=”wrap_content”

        android:layout_centerHorizontal=”true”

        android:layout_alignParentBottom=”true”

        android:backgroundTint=”@color/green_accept”

        android:text=”@string/accept_call”

        android:textColor=”@color/fora_white” />

</RelativeLayout>.
布局已准备就绪,现在我们需要创建一个实例 RemoteViews 并将其传递给通知构造函数。
val remoteView = RemoteViews(packageName, R.layout.notification_custom)

// Set the PendingIntent that will “shoot” when the button is clicked. A normal onClickListener won’t work here – again, the notification will live outside our process

remoteView.setOnClickPendingIntent(R.id.button_accept_call, pendingIntent)

// Add to our long-suffering builder

notificationBuilder.setCustomContentView(remoteView)
我们的例子尽可能简单,当然,有点不和谐。通常,自定义通知的样式类似于系统通知,但采用品牌配色方案,例如 Skype 中的通知。
除了 .setCustomContentView 是一个普通的通知之外,我们还可以分别指定展开状态的标记 .setCustomBigContentView 和抬头状态的标记 .setCustomHeadsUpContentView
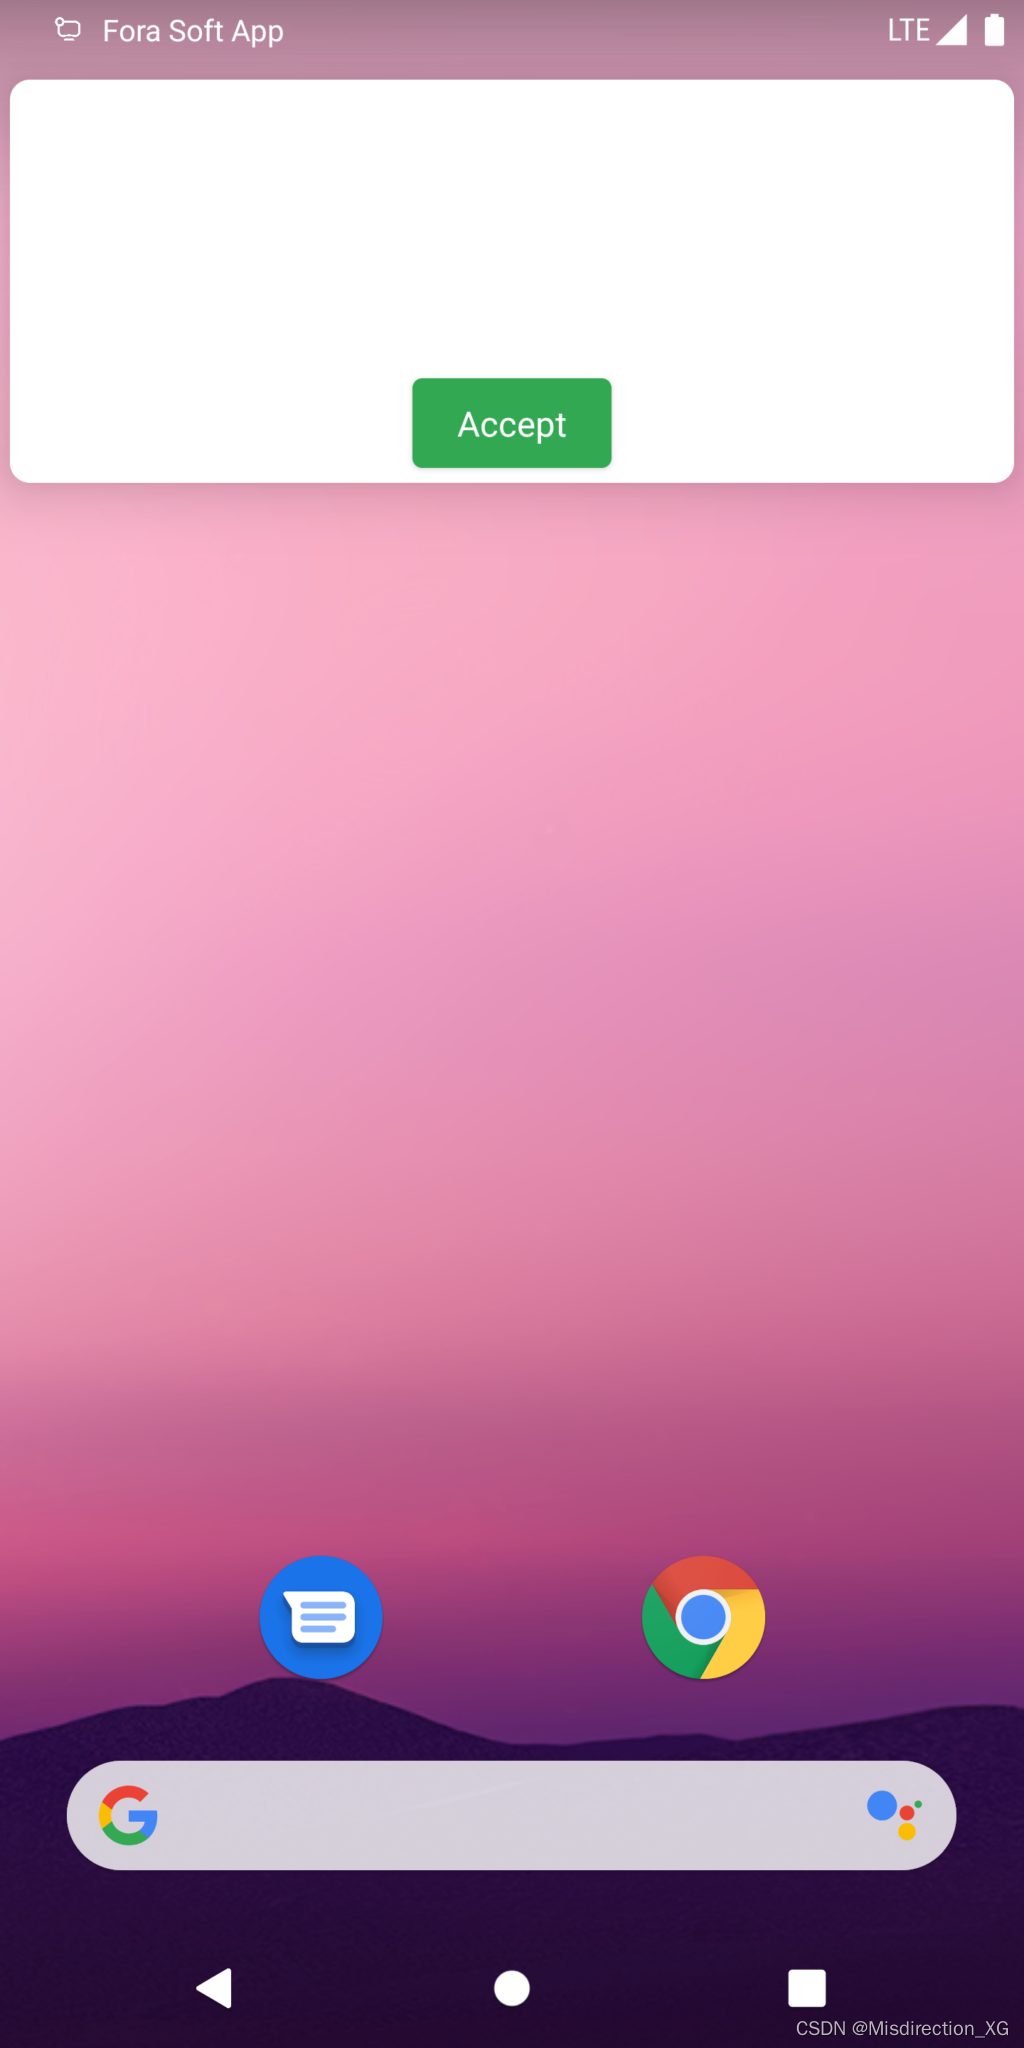
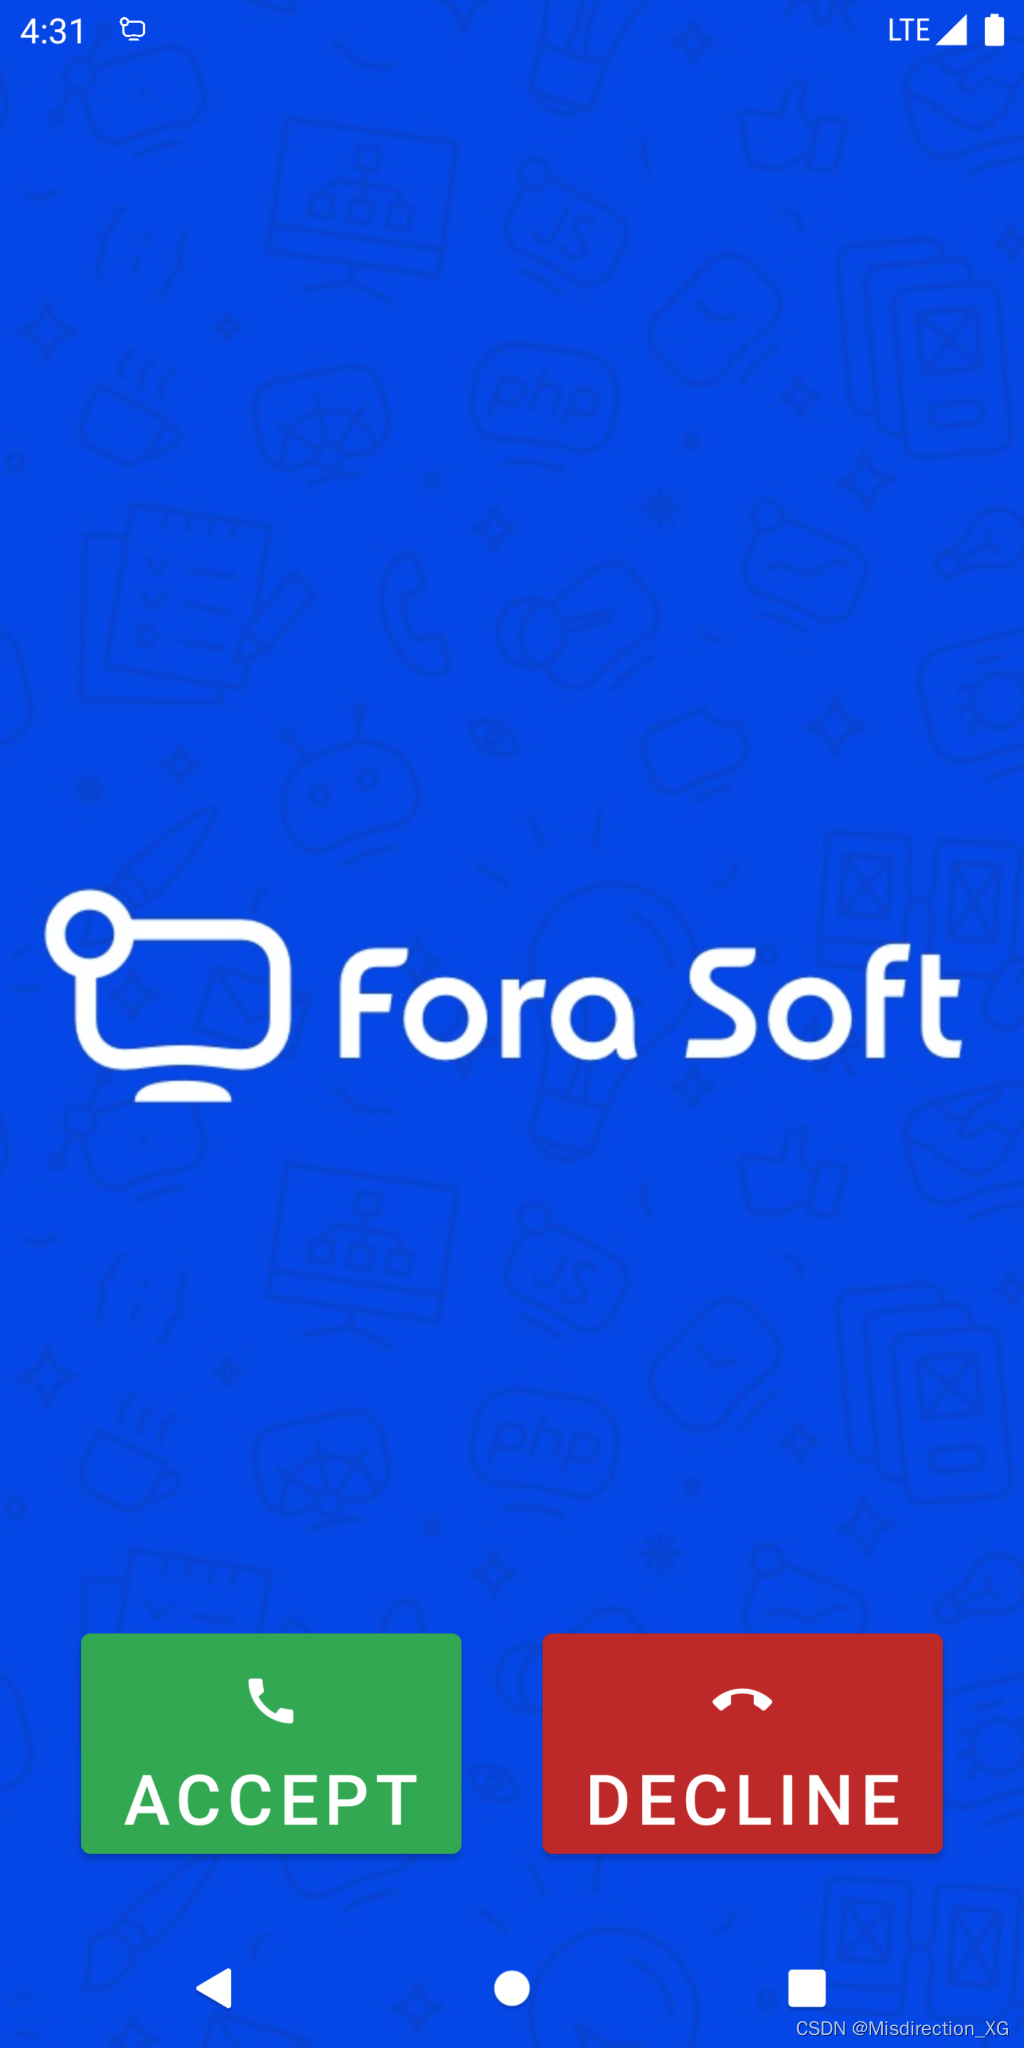
全屏通知
现在我们的自定义通知布局与应用程序内部的设计相匹配,但它们仍然是带有小按钮的小通知。当您接到正常的来电时会发生什么?我们的眼睛呈现在一个漂亮的屏幕上,它占据了所有可用空间。幸运的是,我们可以使用此功能!而且我们不害怕与 RemoteViews 相关的任何限制,因为我们可以显示完整的activity.
首先,我们要添加一个权限AndroidManifest.xml
<uses-permission android:name="android.permission.USE_FULL_SCREEN_INTENT" />
在创建activity具有所需设计和功能的之后,我们初始化 PendingIntent 并将其添加到通知中:
val intent = Intent(this, FullscreenNotificationActivity::class.java)

val pendingIntent = PendingIntent.getActivity(applicationContext, 0, intent, PendingIntent.FLAG_UPDATE_CURRENT)

// At the same time we set highPriority to true, so what is highPriority if not an incoming call?

notificationBuilder.setFullScreenIntent(pendingIntent, highPriority = true)
是的,就是这样!尽管这个功能很容易添加,但由于某种原因,并非所有与呼叫相关的应用程序都使用它。但是,Whatsapp 和 Telegram 等巨头已经通过这种方式实现了来电通知!
底线
Android上的来电通知是应用程序中非常重要的一部分。有很多要求:要及时,醒目,但不烦人。今天,我们了解了可用于实现所有这些目标的工具。让您的通知永远美丽!


 540
540

 被折叠的 条评论
为什么被折叠?
被折叠的 条评论
为什么被折叠?
 到【灌水乐园】发言


