


目录
3.3.3.2AssertionError from torch.cuda.is_available()
3.3.3.3FileNotFoundError: [Errno 2] No such file or directory: 'experiment/data/val.obj'
项目背景与前言
语文老师在我们的假期布置了少量的语文练字作业,突然想到想着能不能用科技改变生活,高打印质量完成作业(配合写字机器人食用效果更佳)
本项目核心算法参考GitHub上的zi2zi-chain项目,遵守Apache 2.0开源协议
叠个甲:作者的字帖其实已经写完了,本项目仅用于学习研究用途,请合理范围内利用本项目,不得将其应用到不合规的地方,并且后果自负
另外,这是我第一次写优快云,有任何写的有问题的地方还望大家指正。
解决方案
1.项目背景
现目前网上有许多类似的案例,比如字体家AI神笔(付费),手迹造字,calligraphr,Handwriting Synthesis,zi2zi,相比传统的需要3500个常用字以上的方法,以上几款都可以使用较少的字符进行训练,对比如下。
1.1.字体家AI神笔:
有免费单字生成和字体融合图功能,每日免费单字生成50字,字体融合图4次机会(约等于仅可体验)
手写8个汉字即可生成包含6000多个汉字的字体库。
能较好模拟手写笔触,生成的字体风格多样,但生成结果还原不算很高(会自动美化笔迹)。
1.2.手迹造字:
- 基本功能免费使用。
- 最少手写100字可生成字体,
- 手机端APP即可使用,操作简单,生成效率也较好,但风格种类受限于手写样本,相对单一,不太适合用于本场景。
1.3.calligraphr
- 免费版可设置最多75个字符。
- 需下载模板手写后上传,生成流程相对复杂一些,且字符数量有限,效果不佳。
1.4.Handwriting Synthesis
- 开源免费。
- 需有一定技术基础来训练模型,操作复杂,生成效率取决于用户对技术的掌握和训练过程,便捷性较差。
- 基于深度学习技术,可生成较为接近手写真实感的字体,若训练得当,能较好模拟特定手写风格。
1. 5.zi2zi(zi2zi-chain)
- 开源免费。
- 通过条件生成对抗网络,能够学习并生成多种字体样式,但是部署比较复杂。
- 可实现很好的风格模拟效果(这个算法可以用来推算书法字体,效果很好),能处理多样、复杂的字体风格。
所以,本项目核心算法采用not-bald-owl大佬的生成对抗网络(GAN)算法(zi2zi-chain项目)进行训练。
新楷体——楷书-方正多宝塔碑 模型推理效果如下

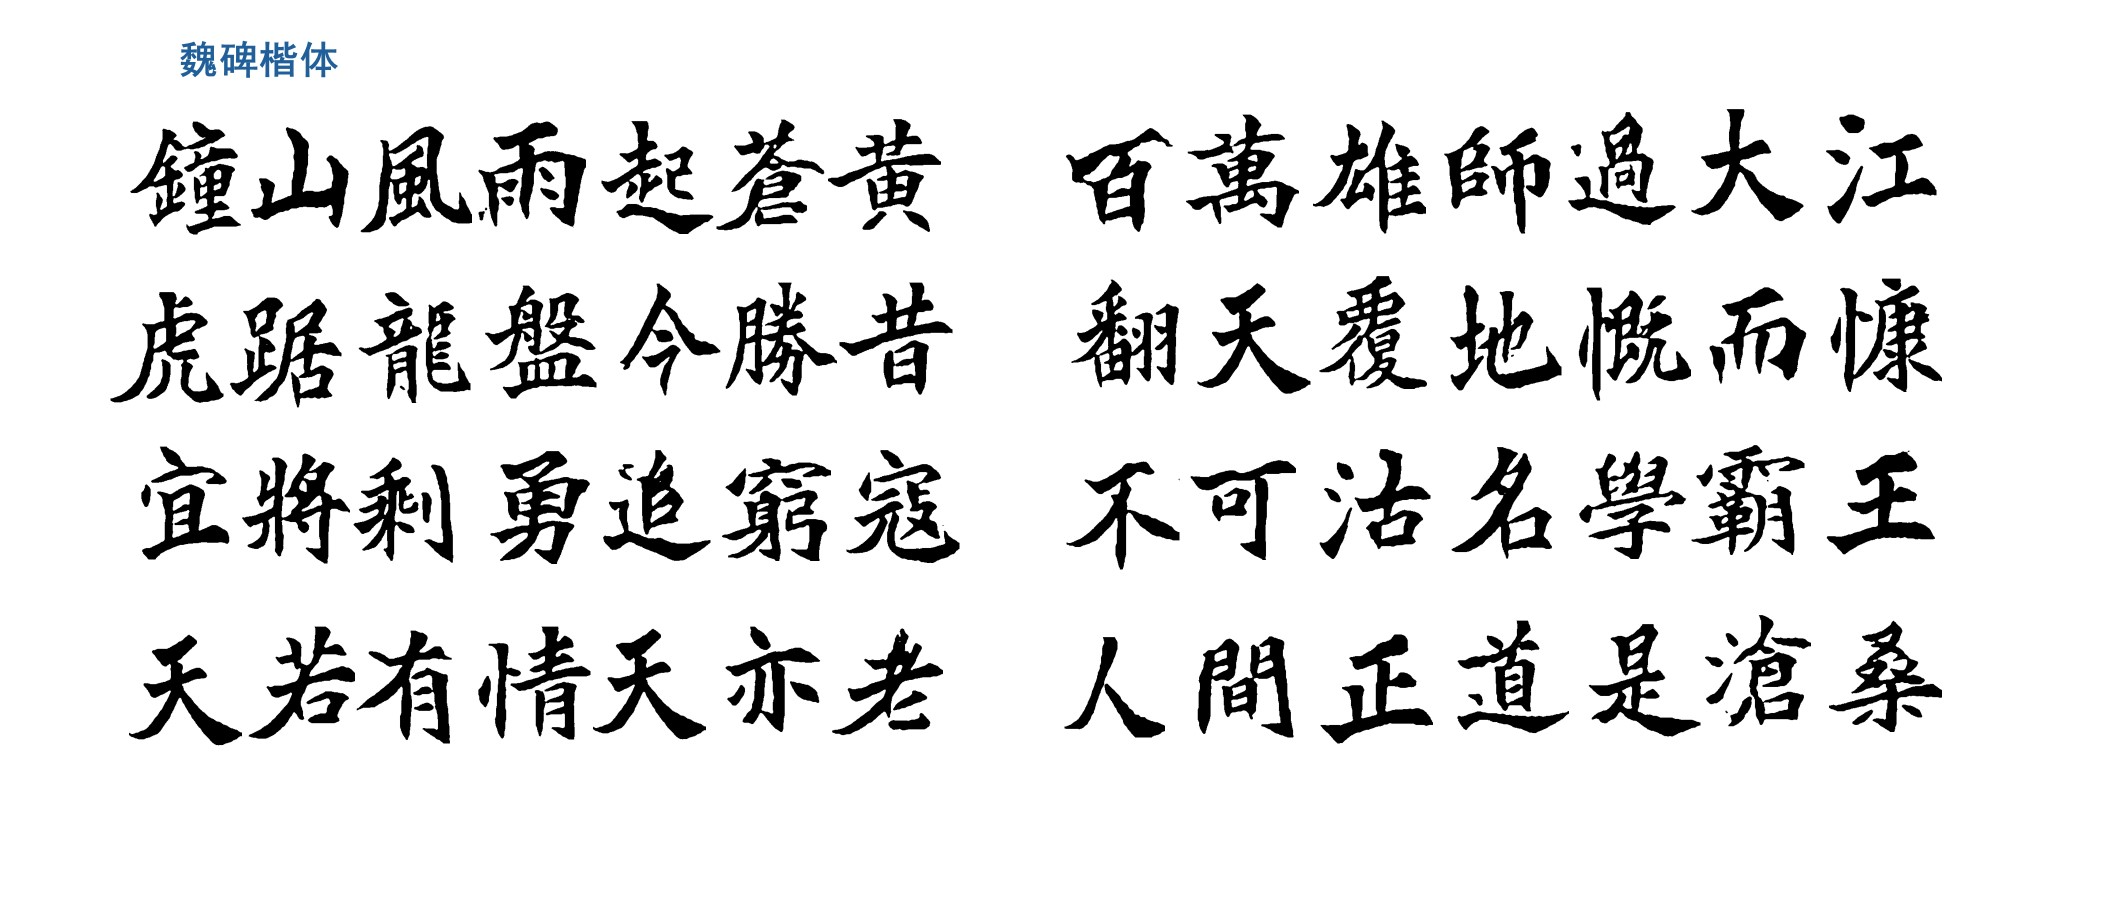
新楷体——楷书-魏碑 模型推理效果如下
新楷体——楷书-赵孟頫三门记 模型推理效果如下
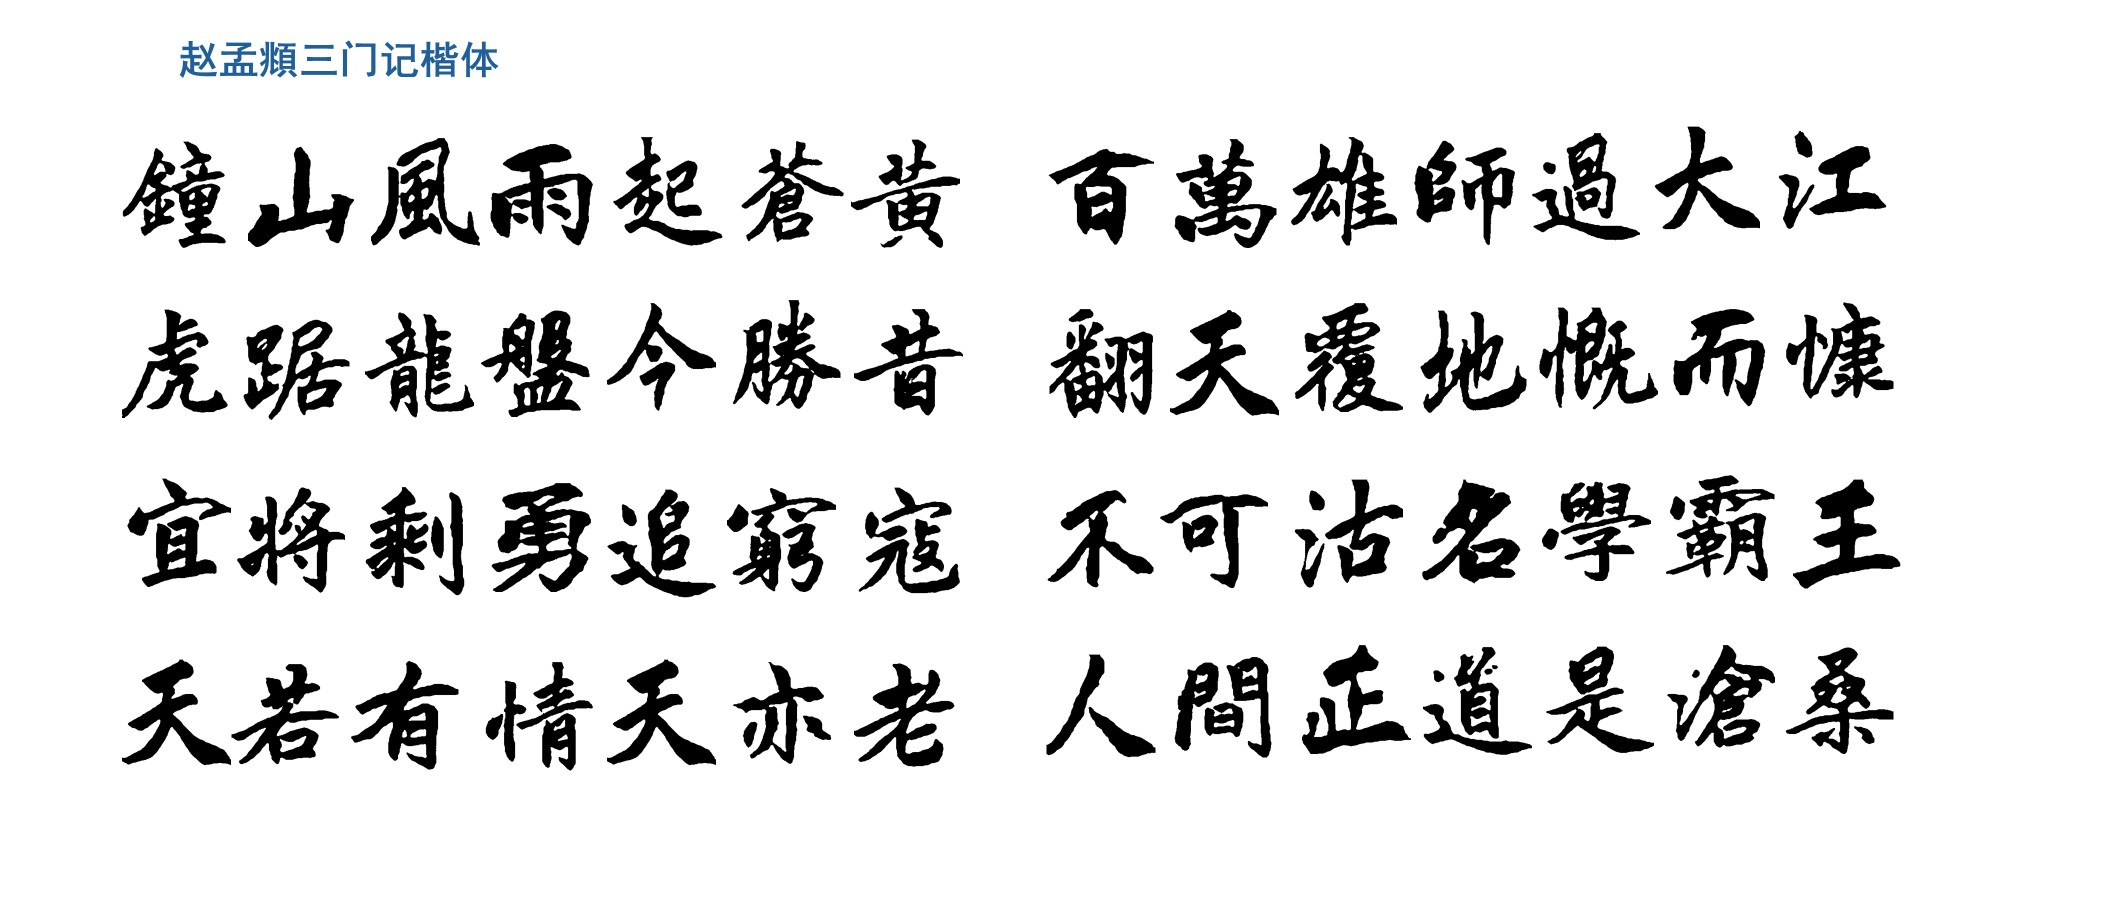
这个都不是像了,还原度太高了,这就是GAN算法在图片风格迁移上的应用
GAN简介
那么还是来简单介绍一下
生成对抗网络(Generative Adversarial Networks,GAN)是深度学习领域创新性无监督学习框架,由Ian Goodfellow等2014年提出。其灵感源于博弈论“零和博弈”,通过构建生成器与判别器两个对抗的神经网络,实现从随机噪声生成逼真数据的目标,改变了传统生成模型设计范式,是近年AI研究最具影响力方向之一。
GAN训练本质是生成器与判别器的动态博弈。生成器将随机噪声(如高斯或均匀分布向量)映射为与真实数据分布相似的合成数据(如图像、文本、音频);判别器是二分类模型,判断输入数据来自真实集还是生成器。两者目标对立:生成器“欺骗”判别器,判别器提升鉴别能力。这种对抗关系用极小极大博弈形式化表达。
训练时两网络交替优化:先固定生成器参数,训练判别器以最大化正确分类真实与生成数据的能力;再固定判别器参数,训练生成器以最小化判别器对生成数据的正确判断概率。理想状态下,训练达纳什均衡时,生成器完美拟合真实数据分布,判别器无法区分数据来源,生成样本与真实数据统计特性高度一致。
2.项目实现思路
由于我的电脑显卡为GeForce MX250,2GB显存,不满足本地推力计算要求中的显存≥8GB,但是支持CUDA10.2,并且有Python3.7和3.13双版本,所以本项目演示实现过程如下
- 本地(无配置与环境要求):扫描软件+Photoshop切片,生成简单处理好的数据
- 本地(Python3.13):使用OCR(这里是Python的easyOCR库)对图片按照{汉字}_[变体ID].png的格式重命名,处理好切片的图片
easyOCR:部署非常简单的Python库,识别准确率比较一般,有很多需要自己修改的,但也能大大加快我们处理的速度,所以选择了这个(我都做完了,后来才知道用百度飞桨会更好,悲)
- 本地(Python3.7):这一步用于处理数据集,但不需要GPU,600张图片只算生成的时间可能一分钟左右,无性能要求
- 云端(百度飞桨AI studio):这一步是在云端使用云上GPU计算,推理生成字体
- 特别注意:
- 云端为Linux环境,部分终端中的代码与Windows的不一样
- 百度飞桨每天使用GPU有4小时限制,不调用的时候请使用CPU,具体方法见3.3.1关于飞桨AI studio
为什么选择百度飞桨:
- 每天上线免费送的算力可以在GPU环境中运行4小时,并且CPU环境不限制时长
- 提供的框架中有Python3.7+CUDA10.1的环境(就找这个环境就花了我两天)
除了百度飞桨还有哪些算力平台?
- 阿里云:阿里云提供的交互式建模(DSW)可以免费试用(貌似是750算力时分为250*3月发放),提供的官方镜像中有cu101(CUDA10.1)的,但是是Python3.6的环境,不知道能不能用conda创建需要的环境,或者能不能降级Python
- Google Colab:很著名的算力平台,但是配置很麻烦(我花了3后来放弃了),没有现成的符合条件的环境,需要降级Python(这个比较简单),但是配置低版本的CUDA和cuDNN就比较麻烦了,使用conda老是出问题,不知道有没有懂的朋友帮忙解释一下,每天有12h的GPU使用额度,并且需要科学上网,网速一般都比较恶心
- 智星云:这个有对应的CUDA版本,但不完全免费
- BML:也是百度的,支持自定义环境(为数不多框架镜像里面有pytorch1.5.1+Python3.7+CUDA10.1),但是付费
3.准备工作
3.1电脑配置要求
- 以下两点二选一
- 有独立显卡,支持CUDA10.1/10.2,cuDNN7.6.5(硬性要求,若有高版本必须降级,或使用conda创建虚拟环境,各版本互不兼容)(支持的架构有Volta架构,Turing架构,Pascal架构等),详见这篇帖子,显存≥4GB(可能报错,建议≥8GB),进行本地推理计算
- 若没有(英伟达)独显/显存不足/架构不支持/内存不足,使用云服务在云端计算(免费/试用的有:阿里云,腾讯云,百度飞桨,Google Colab(需要科学上网,且配置比较复杂))
- Python环境:
- 若使用本地推力计算:Python3.7(必须),Python3.13(高版本,使用easyOCR进行重命名时使用,可以不装,但需要你能根据扫描并切片后的几百张图片逐个重命名),多个版本对于每个不同的项目需要使用虚拟环境进行隔离
- 若使用云服务在云端计算:Python3.7(建议,3.2.3生成数据集(Python3.7)部分需要,在云端比较麻烦),Python3.13(同上)
- Photoshop(建议):用于将处理自己的手写稿样本(比如我的是已经写字帖上,需要抠掉稿纸的线,并且将文字单独切片),否则制作切片比较麻烦
- 平板+触控笔(这个有没有都无所谓,可以提高效率):如果你已经写了一些在字帖上,或者想用之前已经写好的任何笔记内容作为样本,需要干净的纯白背景,可以用这个快速擦除不需要的部分
3.1.1环境说明
训练时需要的库:
- pytorch 1.5.1
- pillow 7.1.2
- numpy 1.18.1
- scipy 1.4.1
- imageio 2.8.0
另外建议
- Git(建议,安装在本地):用于克隆GitHub/Gitee项目,下载链接,网上有教程
- VsCode(强烈建议,本地):全称Visual Studio Code,是著名的集成开发环境(IDE),在里面装上插件codebuddy(强烈推荐:一款对于小型项目能直接帮你写代码,运行代码,修改报错的AI)
3.2处理数据
3.2.1图片处理
样本可以来源于任何地方,但必须扫描之后保证背景为纯白色,不含任何无关线条(允许少量污点),样本数量推荐300(最低,重复的字算作一次)以上,500以上为佳,建议选用风格统一的,不然需要更多样本。所以,建议准备约4页字帖,大概处理成这样
另外,保留所有变体!例如“的”字有很多,全部保留,另外,标点符号可以全部擦除(这里不擦后面图像处理的时候也会擦,毕竟标点容易露馅)
处理流程大概是:(网上有详细教程)
- 扫描手写稿
- 导入后取消背景层锁定-Ctrl+shift+U去色-上方菜单栏:图像-调整-阈值:128
- 在这一层下方新建图层并填充为白色,对原图层不需要的部分框选-删除或使用橡皮擦擦除
- 顶部菜单栏:视图-标尺→打勾,从上和左两侧拉出标尺(类似图中的)
- 左侧切片工具-按参考线切片
- Alt+shift+Ctrl+S导出为旧版所用格式-鼠标拉动全选左侧预览的切片-预设:png-24-储存
- 记住刚才保存的路径(比如C:\zi2zi\pictures),进入,找到里面的image文件夹(C:\zi2zi\pictures\image),其中zi2zi文件夹为图片处理部分的根目录
3.2.2图片重命名(高版本Python)
这里以Python3.13做演示,报错后建议直接复制信息问AI
打开VScode,文件-打开文件夹,选择项目根目录,确定后右下角环境-创建虚拟环境-venv-python3.13
新建rename.py,粘贴以下代码,告诉codebuddy在虚拟环境中安装依赖并运行,以及自己的图片保存位置(或者自己安装,并把最后几行换成实际的路径)
import os
import cv2
import easyocr
from pathlib import Path
import numpy as np
import logging

# 配置日志
logging.basicConfig(level=logging.INFO)
logger = logging.getLogger(__name__)

def save_debug_image(img, filename, output_dir="debug_images"):
    """保存调试图像"""
    debug_dir = Path(output_dir)
    debug_dir.mkdir(exist_ok=True)
    output_path = debug_dir / filename
    cv2.imwrite(str(output_path), img)
    logger.info(f"已保存调试图像: {output_path}")

def show_debug_info(img, results):
    """显示调试信息"""
    logger.info(f"识别到 {len(results)} 个文本区域")
    for i, (bbox, text, prob) in enumerate(results):
        logger.info(f"区域 {i+1}: 文本='{text}' 置信度={prob:.2f}")
        # 绘制识别结果但不显示
        debug_img = img.copy()
        cv2.rectangle(debug_img,
                     tuple(map(int, bbox[0])),
                     tuple(map(int, bbox[2])),
                     (0, 255, 0), 2)
        cv2.putText(debug_img, f"{text} {prob:.2f}",
                   tuple(map(int, bbox[0])),
                   cv2.FONT_HERSHEY_SIMPLEX, 0.5, (0, 0, 255), 1)
        save_debug_image(debug_img, f"debug_{i}.png")

def preprocess_image(img_path):
    """改进的图像预处理"""
    # 读取图像
    img_array = np.fromfile(img_path, dtype=np.uint8)
    img = cv2.imdecode(img_array, cv2.IMREAD_COLOR)
    if img is None:
        raise ValueError(f"无法读取图像: {img_path}")

    # 保存原始图像
    save_debug_image(img, "original.png")

    # 转换为灰度图
    gray = cv2.cvtColor(img, cv2.COLOR_BGR2GRAY)
    save_debug_image(gray, "gray.png")

    # 直方图均衡化
    gray = cv2.equalizeHist(gray)
    save_debug_image(gray, "equalized.png")

    # 自适应阈值
    thresh = cv2.adaptiveThreshold(gray, 255,
                                 cv2.ADAPTIVE_THRESH_GAUSSIAN_C,
                                 cv2.THRESH_BINARY_INV, 21, 5)
    save_debug_image(thresh, "threshold.png")

    # 形态学操作
    kernel = np.ones((3,3), np.uint8)
    thresh = cv2.morphologyEx(thresh, cv2.MORPH_CLOSE, kernel)
    save_debug_image(thresh, "morphology.png")

    return img, thresh

def rename_outputs(input_dir, output_dir):
    # 初始化EasyOCR阅读器
    reader = easyocr.Reader(['ch_sim'],
                          gpu=False,
                          download_enabled=False)

    output_path = Path(output_dir)
    output_path.mkdir(exist_ok=True)

    for filename in os.listdir(input_dir):
        if not filename.lower().endswith('.png'):
            continue

        try:
            variant_num = filename.split('_')[1].split('~')[0]
        except IndexError:
            variant_num = "000"

        input_path = Path(input_dir) / filename

        if not input_path.exists():
            logger.warning(f"文件不存在: {input_path}")
            continue

        try:
            logger.info(f"\n处理文件: {filename}")

            # 读取并预处理图像
            img, processed_img = preprocess_image(str(input_path))

            # 识别文本
            results = reader.readtext(processed_img,
                                   width_ths=0.7,
                                   height_ths=0.7,
                                   text_threshold=0.4,
                                   low_text=0.3)

            # 显示调试信息
            show_debug_info(img.copy(), results)

            # 获取识别结果
            recognized_text = results[0][1] if results else "未识别"

            new_filename = f"{recognized_text}_{variant_num}~用户手写体.png"
            output_path = Path(output_dir) / new_filename
            cv2.imwrite(str(output_path), img)
            logger.info(f"重命名结果: {filename} -> {new_filename}")

        except Exception as e:
            logger.error(f"处理文件 {filename} 时出错: {str(e)}")
            continue

if __name__ == "__main__":
    input_dir = "output_images"    #按照实际情况更改输入路径(相对路径)
    output_dir = "debug_outputs"    #输出路径
rename_outputs(input_dir, output_dir)接下来处理好所有的图片,并把识别不准确的名称改正确,若变体ID出错不用管
如果大面积无法识别,请将预处理-反色部分注释掉,或者保存调试图像以检查问题
若没有安装Python3.13
- 可将所有图片打包到一个文件夹,上传至云端处理(上云方法见后文)
- 手动重命名,命名规则:{汉字}_[变体ID].png
- 例如:假设“的”有5个,则分别为:的_01~用户手写体.png……的_05~用户手写体.png
- 假设“地”只有一个,则为:地_01~用户手写体.png
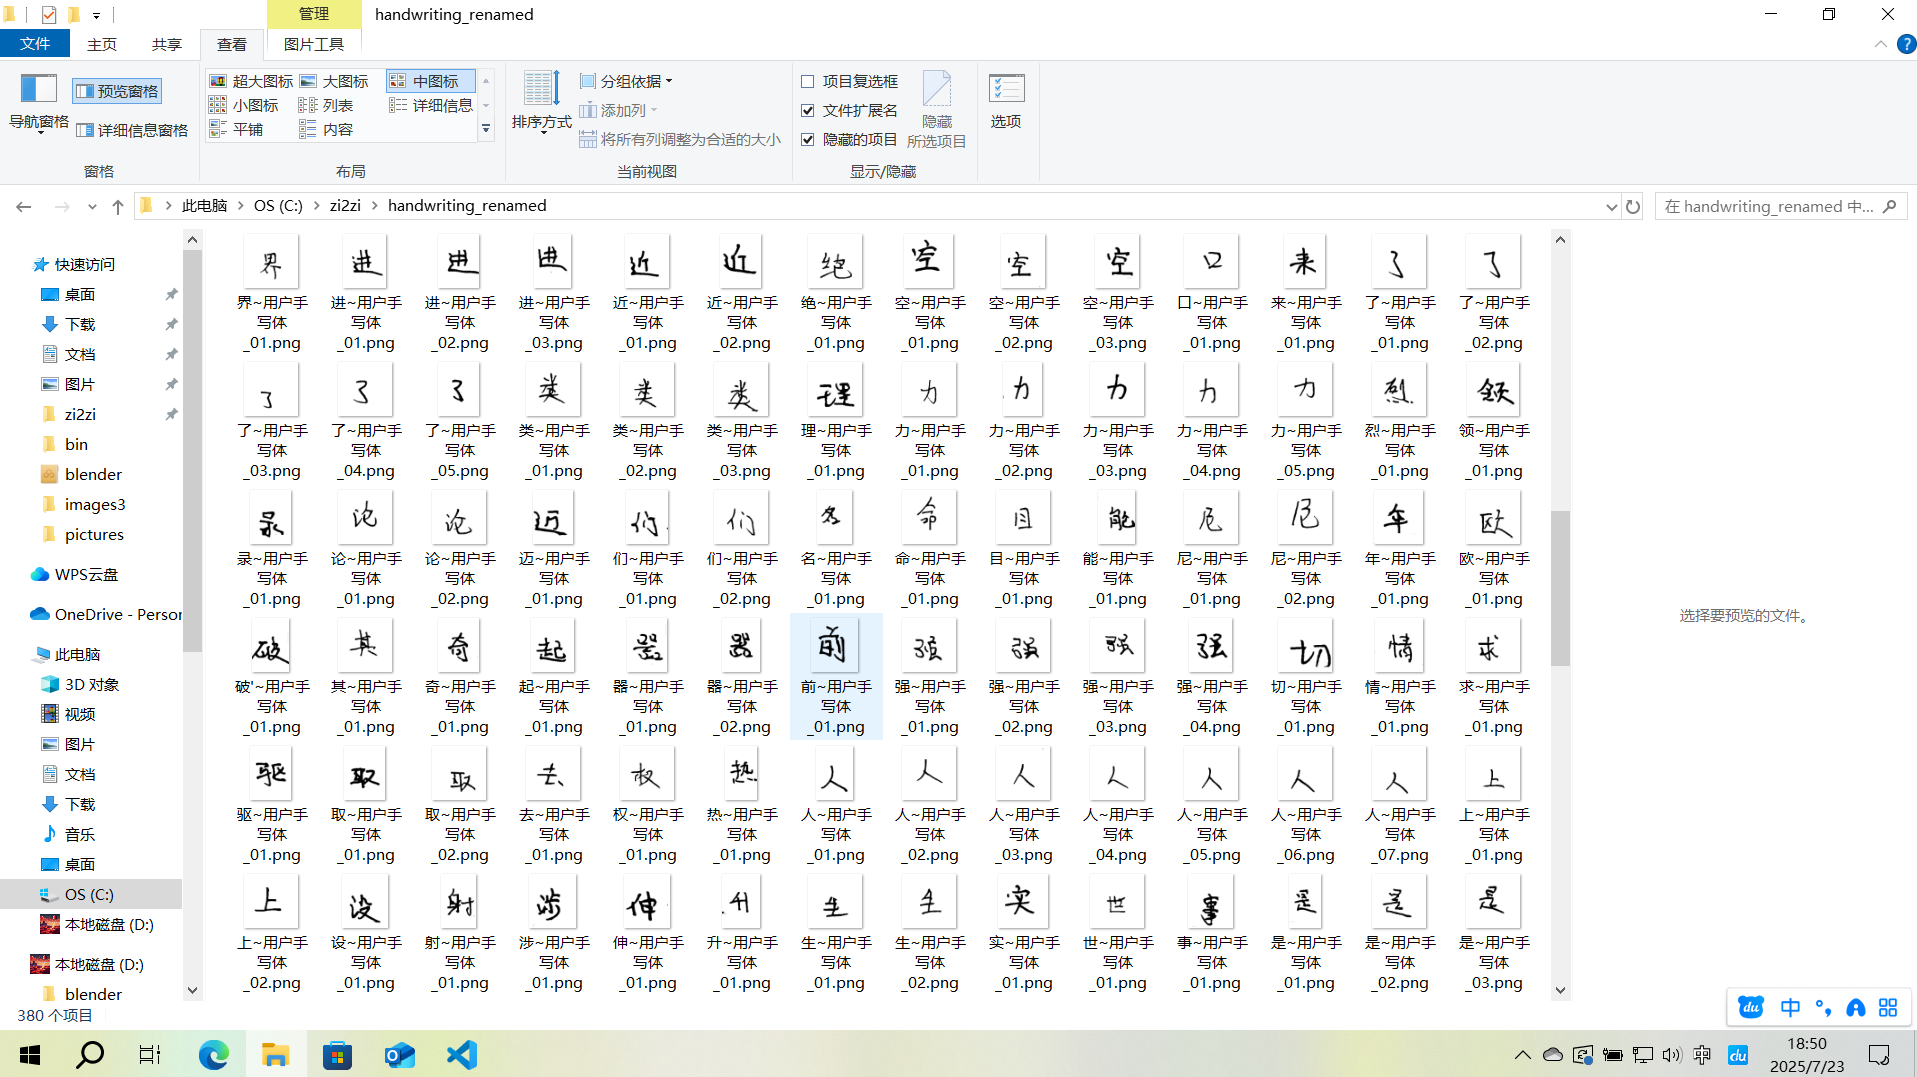
处理好的大概是这样
3.2.3生成数据集(Python3.7)
- 如果你的显卡支持CUDA10.1/10.2,并且已经安装,那么建议在本地生成数据集,此过程不需要GPU性能,但pytorch库需要CUDA环境,(不需要cuDNN)
- 如果不支持,或者电脑没有Python3.7,则将图片数据打包,上云(详见后文3.3上云(Python3.7+CUDA10.1)),但是,大量图片上传在云端可能比较慢(尤其是Google Colab,并且在云端是Linux环境,部分代码与实例的不同,例如where Python和which Python)
在新的根目录中,新建虚拟环境(python3.7),也可以用之前的在VScode中创建并选择虚拟环境
python3.7 -m venv myenv
myenv\Scripts\Activate.ps1
3.2.3.1克隆项目
在项目根目录里打开终端,运行
git clone -b master https://github.com/not-bald-owl/zi2zi-chain.git一定要加 -b master,这个项目的默认分支里面只有一个许可证声明(雾)
如果访问卡顿可以科学上网,但更推荐转到Gitee上,这样国内的云平台访问也更快
运行后如果终端不是在zi2zi-chain中,那么使用
cd zi2zi-chain
再安装依赖库pytorch 1.5.1 pillow 7.1.2 numpy 1.18.1 scipy 1.4.1 imageio 2.8.0
注意,安装时一定要先注意版本,根据我踩坑的经验
先运行一次
pip list然后安装pytorch 1.5.1
pip install pytorch==1.5.1再运行一次
pip list如果此时对比上次好多了 pillow 8.x,那么直接 pip uninstall
最后安装其他的库就好了
3.2.3.2图片数据规范命名
新建reset_naming.py,安装依赖并运行
import os
import re
from pathlib import Path
import logging
from collections import defaultdict
# 配置日志
logging.basicConfig(
level=logging.INFO,
format='%(asctime)s - %(levelname)s - %(message)s',
filename='rename_log.txt'
)
logger = logging.getLogger(__name__)
def extract_pure_text_id(filename):
"""提取纯文字ID(完全忽略现有序号)"""
# 匹配所有可能的格式变体
patterns = [
r"^(.+?)_\d+~用户手写体", # 含数字序号
r"^(.+?)~用户手写体(?:\s\(\d+\))?", # 无序号或带重复标记
r"^(.+?)\.png" # 极简格式
]
for pattern in patterns:
match = re.match(pattern, filename)
if match:
return match.group(1).strip() # 去除前后空格
return None
def reset_all_filenames(input_dir):
"""完全重置所有文件名编号"""
text_files = defaultdict(list)
# 1. 扫描并分类所有文件(按纯文字ID)
for filename in os.listdir(input_dir):
if not filename.lower().endswith('.png'):
continue
text_id = extract_pure_text_id(filename)
if not text_id:
logger.error(f"无法解析文件名: {filename}")
continue
text_files[text_id].append(filename)
# 2. 重命名所有文件(包括当前"规范"的文件)
total_renamed = 0
rename_plan = []
for text_id, files in text_files.items():
# 按文件名排序(可根据需要修改排序逻辑)
sorted_files = sorted(files)
for idx, filename in enumerate(sorted_files, start=1):
new_name = f"{text_id}_{idx:02d}~用户手写体.png"
old_path = Path(input_dir) / filename
new_path = Path(input_dir) / new_name
rename_plan.append((old_path, new_path, filename, new_name))
# 3. 执行重命名(先记录后执行)
logger.info("="*50)
logger.info(f"即将重命名 {len(rename_plan)} 个文件")
for old_path, new_path, old_name, new_name in rename_plan:
try:
# 跳过同名文件(避免重复处理)
if old_path.name == new_path.name:
continue
# 处理冲突(先临时后缀)
temp_path = new_path.with_name(f"temp_{new_path.name}")
if new_path.exists():
os.rename(new_path, temp_path)
os.rename(old_path, new_path)
logger.info(f"重置命名: {old_name} → {new_name}")
total_renamed += 1
# 清理临时文件
if temp_path.exists():
os.remove(temp_path)
except Exception as e:
logger.error(f"重命名失败 {old_name}: {str(e)}")
return total_renamed
if __name__ == "__main__":
input_dir = r"D:\img\renamed_outputs"
print(f"开始完全重置目录: {input_dir}")
print("详细日志请查看: rename_log.txt")
total = reset_all_filenames(input_dir)
print(f"\n操作完成,共重置 {total} 个文件名")
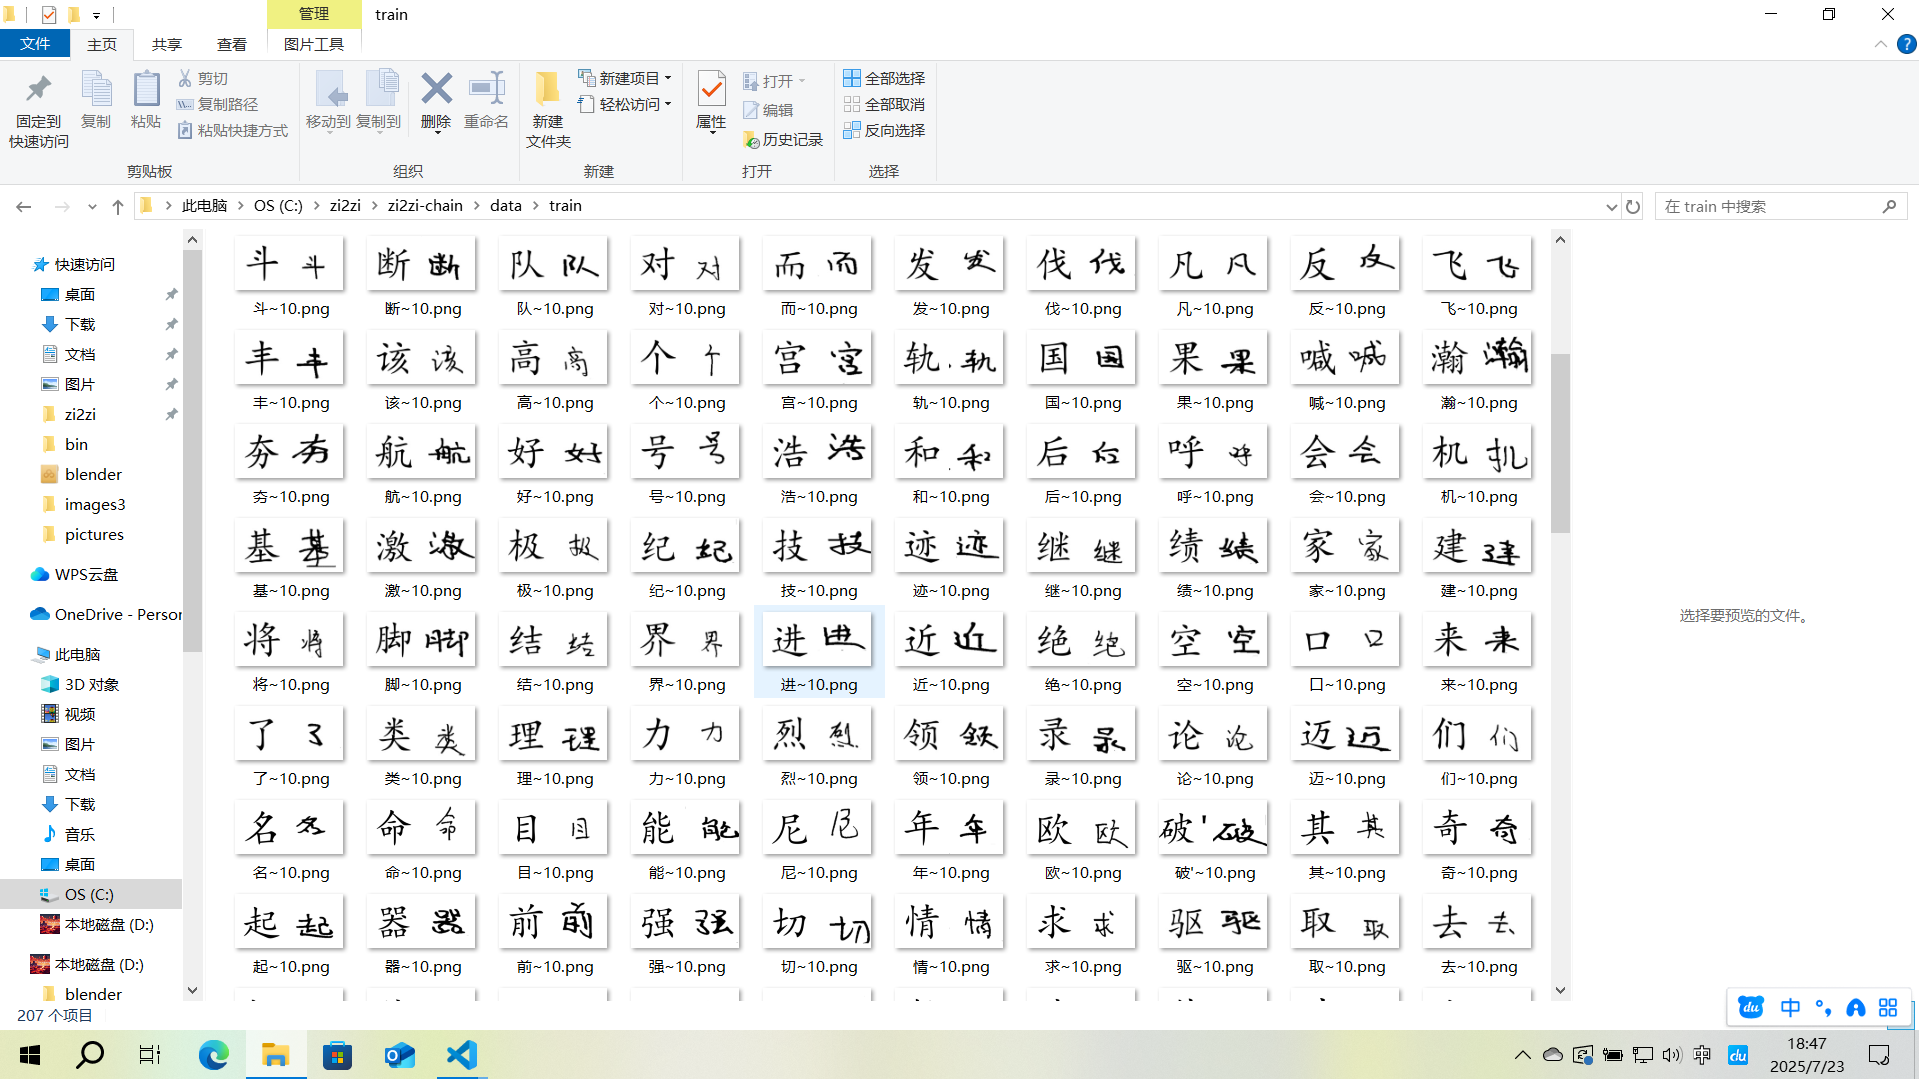
print("注意:所有文件已重新编号,原序号信息已丢弃")效果大概这样
3.2.3.3数据集(图片生成)
在新的文件夹中创建training_images.py,运行要求同上
import os
from PIL import Image, ImageDraw, ImageFont
import numpy as np

# 配置参数
SRC_FONT_PATH = 'zi2zi-chain/charset/cjk/simkai.ttf'
HANDWRITING_DIR = 'img_outputs'
OUTPUT_DIR = 'zi2zi-chain/data/train'
WRITER_ID = 10  # 用户确认的writer_dict值
FONT_SIZE = 185  # 缩小20%(256 * 0.8 ≈ 200)
IMAGE_SIZE = (256, 256)
BG_COLOR = (255, 255, 255)  # 白色背景
TEXT_COLOR = (0, 0, 0)      # 黑色文字

# 创建输出目录
os.makedirs(OUTPUT_DIR, exist_ok=True)

# 加载字体
font = ImageFont.truetype(SRC_FONT_PATH, FONT_SIZE)

def process_character(char, handwriting_path):
    # 生成标准字体图片
    std_img = Image.new('RGB', IMAGE_SIZE, BG_COLOR)
    draw = ImageDraw.Draw(std_img)
    text_width, text_height = draw.textsize(char, font=font)
    position = ((IMAGE_SIZE[0] - text_width) // 2, (IMAGE_SIZE[1] - text_height) // 2)
    draw.text(position, char, font=font, fill=TEXT_COLOR)

    # 加载手写体图片并正确处理透明度
    print(f"Loading handwriting image from: {handwriting_path}")
    try:
        hw_img = Image.open(handwriting_path)
        print(f"Original image size: {hw_img.size}, mode: {hw_img.mode}")

        # 处理RGBA图片:将透明背景转为白色
        if hw_img.mode == 'RGBA':
            background = Image.new('RGB', hw_img.size, (255, 255, 255))
            background.paste(hw_img, mask=hw_img.split()[3])  # 使用alpha通道作为mask
            hw_img = background

        # 确保手写体图片尺寸正确
        if hw_img.size != IMAGE_SIZE:
            print(f"Resizing image to {IMAGE_SIZE}")
            hw_img = hw_img.resize(IMAGE_SIZE, Image.LANCZOS)

        # 验证图片数据
        print(f"Processed image size: {hw_img.size}, mode: {hw_img.mode}")
        print(f"Sample pixel values: {np.array(hw_img)[0,0]}")
    except Exception as e:
        print(f"Error loading image: {e}")
        raise

    # 水平拼接图片
    combined = Image.new('RGB', (IMAGE_SIZE[0]*2, IMAGE_SIZE[1]))
    combined.paste(std_img, (0, 0))
    combined.paste(hw_img, (IMAGE_SIZE[0], 0))

    # 保存结果
    output_path = os.path.join(OUTPUT_DIR, f'{char}~{WRITER_ID}.png')
    combined.save(output_path)
    print(f'Generated: {output_path}')

def main():
    # 遍历手写体图片
    for filename in os.listdir(HANDWRITING_DIR):
        if filename.endswith('.png') and '~' in filename:
            # 提取汉字 (格式: 汉字_变体ID~用户手写体.png)
            char = filename.split('_')[0]
            handwriting_path = os.path.join(HANDWRITING_DIR, filename)

            # 处理所有变体
            process_character(char, handwriting_path)

if __name__ == '__main__':
main()其中,请适当调整FONT_SIZE的值,让左侧的标准字体与右侧的手写字体大小相近
处理好的大概这样
3.2.3.4数据集(打包)
创建package.py,安装依赖并运行
# -*- coding: utf-8 -*-
import argparse
import glob
import json
import os
import pickle
import random
from tqdm import tqdm
import re


def pickle_examples_with_split_ratio(paths, train_path, val_path, train_val_split=0.1):
    """
    Compile a list of examples into pickled format, so during
    the training, all io will happen in memory
    """
    with open(train_path, 'wb') as ft:
        with open(val_path, 'wb') as fv:
            for p, label in tqdm(paths):
                label = int(label)
                with open(p, 'rb') as f:
                    img_bytes = f.read()
                    r = random.random()
                    example = (label, img_bytes)
                    if r < train_val_split:
                        pickle.dump(example, fv)
                    else:
                        pickle.dump(example, ft)


def pickle_examples_with_file_name(paths, obj_path):
    with open(obj_path, 'wb') as fa:
        for p, label in tqdm(paths):
            label = int(label)
            with open(p, 'rb') as f:
                img_bytes = f.read()
                example = (label, img_bytes)
                pickle.dump(example, fa)


parser = argparse.ArgumentParser(description='Compile list of images into a pickled object for training')
parser.add_argument('--dir', required=True, help='path of examples')
parser.add_argument('--save_dir', required=True, help='path to save pickled files')
parser.add_argument('--split_ratio', type=float, default=0.1, dest='split_ratio',
                    help='split ratio between train and val')

parser.add_argument('--dst_json', type=str, default=None)
parser.add_argument('--type_file', type=str, default='type/宋黑类字符集.txt')

parser.add_argument('--save_obj_dir', type=str, default=None)

args = parser.parse_args()


def get_special_type():

    with open(args.type_file, 'r', encoding='utf-8') as fp:
        font_list = [line.strip() for line in fp]
    # print("Font list:", font_list)

    '''
    font_list = os.listdir(args.type_dir)
    font_list = [f[:f.find('.test.jpg')] for f in font_list]
    '''
    font_set = set(font_list)
    font_dict = {v: k for v, k in enumerate(font_list)}
    inv_font_dict = {k: v for v, k in font_dict.items()}
    return font_set, font_dict, inv_font_dict


if __name__ == "__main__":
    if not os.path.isdir(args.save_dir):
        os.mkdir(args.save_dir)

    font_set, font_dict, inv_font_dict = get_special_type()

    # from total label to type label
    label_map = dict()
    ok_fonts = None

    dst_json = args.dst_json
    if not dst_json is None:
        with open(dst_json, 'r', encoding='utf-8') as fp:
            dst_fonts = json.load(fp)

        for idx, dst_font in enumerate(dst_fonts):
            font_name = dst_font['font_name']
            font_name = os.path.splitext(font_name)[0]
            if font_name in font_set:
                label_map[idx] = inv_font_dict[font_name]
            else:
                continue
        ok_fonts = set(label_map.keys())


    train_path = os.path.join(args.save_dir, "train.obj")
    val_path = os.path.join(args.save_dir, "val.obj")

    total_file_list = sorted(
        glob.glob(os.path.join(args.dir, "*.jpg")) +
        glob.glob(os.path.join(args.dir, "*.png")) +
        glob.glob(os.path.join(args.dir, "*.tif"))
    )
    # '%d_%05d.png'
    cur_file_list = []
    for file_name in tqdm(total_file_list):
        label = os.path.basename(file_name).split('_')[0]
        label = int(label)
        if ok_fonts is None:
            cur_file_list.append((file_name, label))
        else:
            if label in ok_fonts:
                cur_file_list.append((file_name, label_map[label]))

    if args.split_ratio == 0 and args.save_obj_dir is not None:
        pickle_examples_with_file_name(cur_file_list, args.save_obj_dir)
    else:
        pickle_examples_with_split_ratio(
            cur_file_list,
            train_path=train_path,
            val_path=val_path,
            train_val_split=args.split_ratio
        )
pkl和obj是可以互相转换的
在根目录下,也可以通过终端运行
python package.py --dir=C:\zi2zi\zi2zi-chain\data\raw_images --save_dir=C:\zi2zi\zi2zi-chain\data\bin --split_ratio=0.1其中:
--dir:包含.jpg/.png/.tif的源图片目录,我们处理的是png--save_dir:输出目录(自动生成train.obj和val.obj)--save_obj_dir:直接指定输出的obj文件路径(待会要用)--split_ratio:验证集比例(0表示不分割,即只生成训练集,不生成验证集)
注意:训练样本过少可能会报错!
3.3上云(Python3.7+CUDA10.1)
3.3.1关于飞桨AI studio
每天上线启动项目时会赠送8算力时,可以运行V100 16GB (完全够用)4h/day,但是每天用完之后就只能使用CPU,且好像不能充值加时
里面的环境是Linux,预装了Python3.7,CUDA10.1,cudnn 7.6.5还有conda
但是在这个封装好的环境中不能使用conda新建虚拟环境,不能使用sudo命令,所以我们隔离环境就只能使用venv,而venv不能隔离CUDA,所以必须选用预装CUDA10.1的飞桨2.2.2框架
conda和venv的区别与联系
- Conda:既是包管理器(支持Python和非Python依赖),也是环境管理器。可安装Python解释器本身,适合科学计算和跨语言项目,可以隔离CUDA
- Venv:仅用于管理Python环境,依赖系统已安装的Python解释器,无法管理非Python包,依赖pip安装包,不能隔离CUDA
详细的上云过程我会放在另一篇文章中来讲(也是百度飞桨AI studio)
3.3.2云端训练
当我们新建好之后,点击启动环境,然后会有如下界面
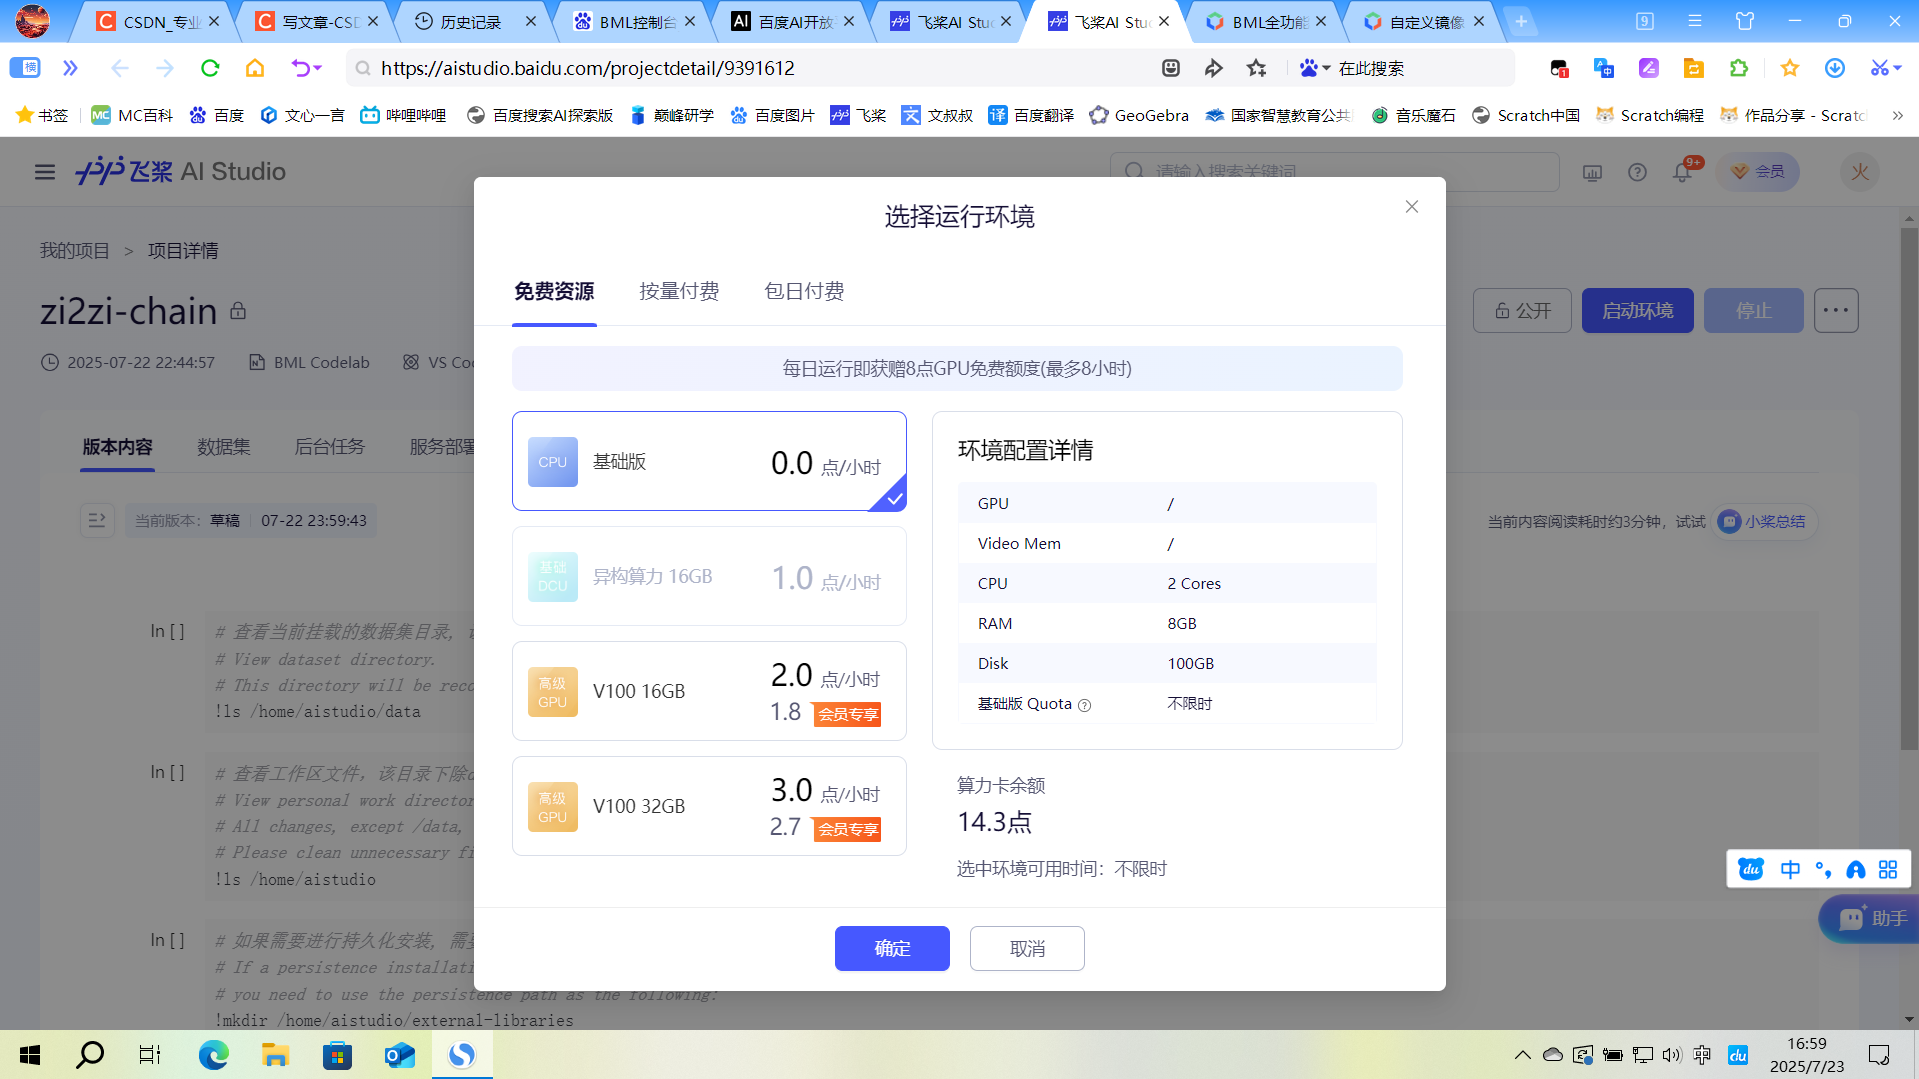
这里我们第一次建议选择CPU,第一次我们要进行环境的配置,详见3.1.1环境说明
3.3.2.1环境配置
如果IDE选择的是VScode,那么在左侧右键work文件夹(work文件夹中内容的每次变更都会被保存,所以虚拟环境放在这里比较方便,下次开机可以直接使用),选择在集成终端中打开,然后下面会出现终端aistudio@jupyter-17752757-9391612:~/work$,在终端中直接右键可以粘贴文本
先来检查环境
python3.7 --version然后和之前一样,克隆GitHub项目
git clone -b master https://github.com/not-bald-owl/zi2zi-chain.git然后配置并激活虚拟环境
python3.7 -m venv myenv
source myenv/bin/activate
如果遇到意外需要退出虚拟环境,则使用
deactivate 每次退出重进后需要使用source myenv/bin/activate重新进入虚拟环境,无需重新创建
然后先安装pytorch 1.5.1
pip install torch==1.5.1然后检查库的内容
pip list这里会有几个库的版本比要求的高,要求见,其他的库不要卸载
需要先卸载,比如
pip uninstall numpy然后再安装指定版本
pip install pillow==7.1.2 numpy==1.18.1 imageio==2.8.0 scipy==1.4.1 matplotlib在检验一下
pip list预期为
(myenv)aistudio@jupyter-17752757-9391612:~/work/zi2zi-chain$ pip list
Package           Version
----------------- -----------
cycler            0.11.0
fonttools         4.38.0
future            1.0.0
imageio           2.8.0
kiwisolver        1.4.5
matplotlib        3.5.3
numpy             1.18.1
packaging         24.0
Pillow            7.1.2
pip               24.0
pyparsing         3.1.4
python-dateutil   2.9.0.post0
scipy             1.4.1
setuptools        40.8.0
six               1.17.0
torch             1.5.1
torchvision       0.6.1
typing_extensions 4.7.1
如果确认无误可以下一步了
3.3.2.2运行模型
在GPU环境中运行
然后要加入我们的数据集,添加到项目根目录(/home/aistudio/work/zi2zi-chain)里面
具体来说,在项目根目录里面新建experiment文件夹,布局为
experiment/
└── data
    ├── train.obj
    └── val.obj
obj和pkl是等效的,但是在train.py里面调用文件作者只写了.obj,所以需要进行转换
python -c "import pickle, os; [pickle.dump(pickle.load(open(f, 'rb')), open(f.replace('.pkl', '.obj'), 'wb')) for f in os.listdir() if f.endswith('.pkl')]"启动虚拟环境之后进入项目根目录
cd zi2zi-chain最后就是运行了
python train.py --experiment_dir=experiment --gpu_ids=cuda:0 --batch_size=32 --epoch=100 --sample_steps=200 --checkpoint_steps=5003.3.3可能的报错
(修改仅供参考,不一定能全部解决)
3.3.3.1unrecognized arguments
如果报错unrecognized arguments,请参考确认参数之间用--链接
3.3.3.2AssertionError from torch.cuda.is_available()
如果报错AssertionError from torch.cuda.is_available(),检查CUDA安装,是否启用GPU
3.3.3.3FileNotFoundError: [Errno 2] No such file or directory: 'experiment/data/val.obj'
如果报错FileNotFoundError: [Errno 2] No such file or directory: 'experiment/data/val.obj'
# 找到这行代码
val_dataset = DatasetFromObj(os.path.join(data_dir, 'val.obj'), input_nc=args.input_nc)

# 修改为
val_dataset = DatasetFromObj(os.path.join(data_dir, 'val.pkl'), input_nc=args.input_nc)  #
也可以直接把路径改为完整路径,不通过参数调用
3.3.3.4KeyError
如果报错KeyError,可以在dataset.py中的__init__中添加
self.image_provider = [(0, x) if not isinstance(x, (list, tuple)) else x
                      for x in PickledImageProvider(obj_path)]
3.3.3.5__getitem__:KeyError
如果dataset.py中的__getitem__报错:KeyError
可以检查数据文件内容
import pickle
with open('/home/aistudio/work/zi2zi-data/data/bin/train.pkl', 'rb') as f:
    data = pickle.load(f)
print(f"数据键: {data.keys()}")
print(f"样本数量: {len(data['train'])}" if 'train' in data else "无'train'键")
3.3.3.6PickledImageProvider相关
如果PickledImageProvider类有问题,可以尝试修改 bytesIO.py
class PickledImageProvider:
    def __init__(self, obj_path):
        self.obj_path = obj_path
        self.examples = self.load_pickled_examples()

    def load_pickled_examples(self):
        with open(self.obj_path, "rb") as f:
            examples = pickle.load(f)

        # 标准化数据格式
        if isinstance(examples, dict):
            if 'train' in examples:
                return examples['train']
            elif 'data' in examples:
                return examples['data']
        return examples

    def __getitem__(self, index):
        return self.examples[index]

    def __len__(self):
        return len(self.examples)
dataset.py中
class DatasetFromObj(data.Dataset):
    def __init__(self, obj_path, input_nc=3):
        super().__init__()
        self.image_provider = PickledImageProvider(obj_path.replace('.obj', '.pkl'))
        self.input_nc = input_nc

    def __getitem__(self, index):
        try:
            item = self.image_provider[index]
            # 处理不同的数据格式
            if isinstance(item, (list, tuple)) and len(item) >= 2:
                return self.process(item[1])
            elif hasattr(item, 'keys') and 'image' in item:
                return self.process(item['image'])
            else:
                return self.process(item)
        except Exception as e:
            print(f"Error processing item {index}: {str(e)}")
            # 返回空数据或重新抛出异常
            raise

    def __len__(self):
        return len(self.image_provider)

    def process(self, img):
        # 确保图像处理逻辑正确
        if isinstance(img, (list, tuple)):
            img = img[0]  # 取第一个元素
        # 添加您的图像处理代码
        return img, img  # 示例返回
3.3.3.7数据集问题
如果数据集有问题可以添加调试信息,如
def __init__(self, obj_path, input_nc=3):
    print(f"Loading data from: {obj_path}")
    self.image_provider = PickledImageProvider(obj_path)
    print(f"Total examples: {len(self.image_provider)}")
如果数据集还是有问题,可以使用这个生成
import os
import shutil
import random
from pathlib import Path
import logging

# 设置日志
logging.basicConfig(
    level=logging.INFO,
    format='%(asctime)s - %(levelname)s - %(message)s',
    handlers=[
        logging.FileHandler("prepare_dataset.log", mode='w'),
        logging.StreamHandler()
    ]
)
logger = logging.getLogger(__name__)

def create_dataset_structure(output_dir="dataset"):
    """创建zi2zi所需的数据集目录结构"""
    dirs = [
        os.path.join(output_dir, "train", "A"),
        os.path.join(output_dir, "train", "B"),
        os.path.join(output_dir, "train", "test_A"),
        os.path.join(output_dir, "train", "test_B"),
        os.path.join(output_dir, "val", "A"),
        os.path.join(output_dir, "val", "B")
    ]

    for dir_path in dirs:
        os.makedirs(dir_path, exist_ok=True)
        logger.info(f"创建目录: {dir_path}")

    return dirs

def get_character_variants(img_dir):
    """获取每个汉字及其变体"""
    char_variants = {}

    for filename in os.listdir(img_dir):
        if filename.endswith(".png"):
            # 提取汉字部分(文件名格式:汉字_序号~用户手写体.png)
            char = filename.split("_")[0]
            if char not in char_variants:
                char_variants[char] = []
            char_variants[char].append(filename)

    logger.info(f"找到 {len(char_variants)} 个不同的汉字")
    return char_variants

def prepare_dataset(source_dir, output_dir="dataset", train_ratio=0.8, test_ratio=0.1):
    """准备zi2zi数据集"""
    # 创建目录结构
    create_dataset_structure(output_dir)

    # 获取所有汉字及其变体
    char_variants = get_character_variants(source_dir)

    # 统计信息
    total_chars = len(char_variants)
    train_count = int(total_chars * train_ratio)
    test_count = int(total_chars * test_ratio)
    val_count = total_chars - train_count - test_count

    logger.info(f"数据集划分: 训练 {train_count} 个汉字, 测试 {test_count} 个, 验证 {val_count} 个")

    # 随机打乱汉字顺序
    chars = list(char_variants.keys())
    random.shuffle(chars)

    # 分配训练、测试和验证集
    train_chars = chars[:train_count]
    test_chars = chars[train_count:train_count+test_count]
    val_chars = chars[train_count+test_count:]

    # 复制文件到相应目录
    for char in train_chars:
        for variant in char_variants[char]:
            # 训练集B(手写字体)
            src = os.path.join(source_dir, variant)
            dst = os.path.join(output_dir, "train", "B", variant)
            shutil.copy2(src, dst)

            # 训练集A(标准字体) - 这里需要您提供标准字体图片
            # 暂时复制手写字体作为占位符
            dst = os.path.join(output_dir, "train", "A", variant)
            shutil.copy2(src, dst)

    for char in test_chars:
        for variant in char_variants[char]:
            # 测试集B
            src = os.path.join(source_dir, variant)
            dst = os.path.join(output_dir, "train", "test_B", variant)
            shutil.copy2(src, dst)

            # 测试集A
            dst = os.path.join(output_dir, "train", "test_A", variant)
            shutil.copy2(src, dst)

    for char in val_chars:
        for variant in char_variants[char]:
            # 验证集B
            src = os.path.join(source_dir, variant)
            dst = os.path.join(output_dir, "val", "B", variant)
            shutil.copy2(src, dst)

            # 验证集A
            dst = os.path.join(output_dir, "val", "A", variant)
            shutil.copy2(src, dst)

    logger.info("数据集准备完成")

if __name__ == "__main__":
    # 配置参数
    source_dir = "img_outputs"  # 手写字体图片目录
    output_dir = "dataset"      # 输出目录

    prepare_dataset(source_dir, output_dir)
结语
因为我已经把字帖写完了,所以最后就没有将训练好的字体文件排版后打印,本项目通过GAN算法,在本地+云端环境下生成一套属于自己的手写体文件,祝大家暑假快乐


 被折叠的 条评论
为什么被折叠?
被折叠的 条评论
为什么被折叠?
 到【灌水乐园】发言


