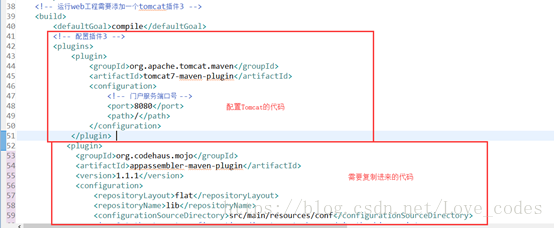
将Maven工程导出war包(导出可执行文件)

本文介绍如何通过修改pom.xml文件配置Tomcat服务器,实现WAR包的自动化部署过程。主要内容包括设置必要的插件配置、指定JVM参数、生成启动脚本等。

1  打开war工程的pom.xml,将如下内容复制到配置Tomcat的代码中

                <plugin>
	             <groupId>org.codehaus.mojo</groupId>
	             <artifactId>appassembler-maven-plugin</artifactId>
	             <version>1.1.1</version>
	             <configuration>
	                 <repositoryLayout>flat</repositoryLayout>
	                 <repositoryName>lib</repositoryName>
	                 <configurationSourceDirectory>src/main/resources/conf</configurationSourceDirectory>
	                 <!-- Set the target configuration directory to be used in the bin scripts -->
	                 <configurationDirectory>conf</configurationDirectory>
	                 <!-- Copy the contents from "/src/main/config" to the target configuration
	                     directory in the assembled application -->
	                 <copyConfigurationDirectory>true</copyConfigurationDirectory>
	                 <!-- Include the target configuration directory in the beginning of
	                     the classpath declaration in the bin scripts -->
	                 <includeConfigurationDirectoryInClasspath>true</includeConfigurationDirectoryInClasspath>
	                 <!-- prefix all bin files with "mycompany" -->
	                 <binPrefix>startup</binPrefix>
	                 <!-- set alternative assemble directory -->
	                 <assembleDirectory>${project.build.directory}/server</assembleDirectory>
	                 <!-- Extra JVM arguments that will be included in the bin scripts -->
	                 <extraJvmArguments>-Xms768m -Xmx768m -XX:PermSize=128m
	                     -XX:MaxPermSize=256m -XX:NewSize=192m -XX:MaxNewSize=384m
	                 </extraJvmArguments>
	                 <!-- Generate bin scripts for windows and unix pr default -->
	                 <platforms>
	                     <platform>windows</platform>
	                     <platform>unix</platform>
	                 </platforms>
	                 <programs>
	                     <program>
	                         <mainClass>com.coderli.onecoder.server.HypervisorServer</mainClass>
	                         <name>startup</name>
	                     </program>
	                 </programs>
	             </configuration>
	         </plugin>

2  右击该项目--> Run As --> Maven install

3  运行完成后会在targer中存放


war包的安装与部署(以两个Tomcat为例,详细)请到:

   https://blog.youkuaiyun.com/Love_codes/article/details/80837625

### 如何在 IntelliJ IDEA 中将 Maven 项目导出WAR 在 IntelliJ IDEA 中,可以通过配置 Maven 和项目的构建设置,将 Maven 项目打WAR 文件。以下是详细的指南: #### 1. 配置 Maven 的 `pom.xml` 文件 为了生成 WAR 文件,需要确保项目的 `pom.xml` 文件中定义了正确的打类型。具体来说,`<packaging>` 元素应设置为 `war`[^1]。 ```xml <project xmlns="http://maven.apache.org/POM/4.0.0" xmlns:xsi="http://www.w3.org/2001/XMLSchema-instance" xsi:schemaLocation="http://maven.apache.org/POM/4.0.0 http://maven.apache.org/xsd/maven-4.0.0.xsd"> <modelVersion>4.0.0</modelVersion> <groupId>com.example</groupId> <artifactId>example-project</artifactId> <version>1.0-SNAPSHOT</version> <packaging>war</packaging> <!-- 设置为 war --> <dependencies> <!-- 添加依赖项 --> </dependencies> <build> <plugins> <plugin> <groupId>org.apache.maven.plugins</groupId> <artifactId>maven-war-plugin</artifactId> <version>3.3.2</version> <!-- 确保使用最新版本 --> <configuration> <failOnMissingWebXml>false</failOnMissingWebXml> <!-- 如果没有 web.xml 文件,则不报错 --> </configuration> </plugin> </plugins> </build> </project> ``` #### 2. 在 IntelliJ IDEA 中导入 Maven 项目 如果尚未导入项目,可以通过以下步骤完成导入: - 打开 IntelliJ IDEA。 - 选择 `File → Open`,然后导航到项目的根目录并选择 `pom.xml` 文件。 - IDEA 将自动识别并导入 Maven 项目。如果需要手动触发导入,可以右键点击 `pom.xml` 文件并选择 `Maven → Reimport`[^1]。 #### 3. 使用 Maven 构建 WAR 文件 在 IntelliJ IDEA 中,可以通过 Maven 工具窗口执行构建任务: - 打开右侧的 `Maven` 工具窗口。 - 展开项目的生命周期(Lifecycle)节点。 - 双击 `package` 目标。这将触发 Maven 使用 `maven-war-plugin` 插件生成 WAR 文件[^1]。 生成的 WAR 文件通常位于项目的 `target` 目录下。 #### 4. 配置第三方类库 如果项目依赖于第三方类库,Maven 会自动从远程仓库下载这些依赖项,并将其含在生成的 WAR 文件中[^2]。需要注意的是,WAR 文件中的类库不会被嵌套在另一个 JAR 文件中。如果需要加载嵌套的 JAR 文件,必须编写自定义代码来处理此类情况[^3]。 #### 5. 验证生成的 WAR 文件 生成的 WAR 文件可以直接部署到支持的 Servlet 容器(如 Tomcat 或 Jetty)中进行测试。可以通过以下命令启动 Tomcat 并部署 WAR 文件: ```bash cp target/example-project-1.0-SNAPSHOT.war /path/to/tomcat/webapps/ cd /path/to/tomcat ./bin/startup.sh ``` --- ###
评论
添加红包

请填写红包祝福语或标题

红包个数最小为10个

红包金额最低5元

当前余额3.43前往充值 >
需支付:10.00
成就一亿技术人!
领取后你会自动成为博主和红包主的粉丝 规则
hope_wisdom
发出的红包
实付
使用余额支付
点击重新获取
扫码支付
钱包余额 0

抵扣说明:

1.余额是钱包充值的虚拟货币,按照1:1的比例进行支付金额的抵扣。
2.余额无法直接购买下载,可以购买VIP、付费专栏及课程。

余额充值