


 本文介绍如何在Spring Boot项目中整合Redis,包括配置连接池、定义RedisTemplate,并提供增删查改等基本缓存操作的方法。
参考Spring官方文档: Spring-Data-reids
https://docs.spring.io/spring-data/data-redis/docs/current/reference/html/#redis:template
使用工具:SpringBoot2.0、InteIIij IDEA
先新建项目,并选择如下依赖
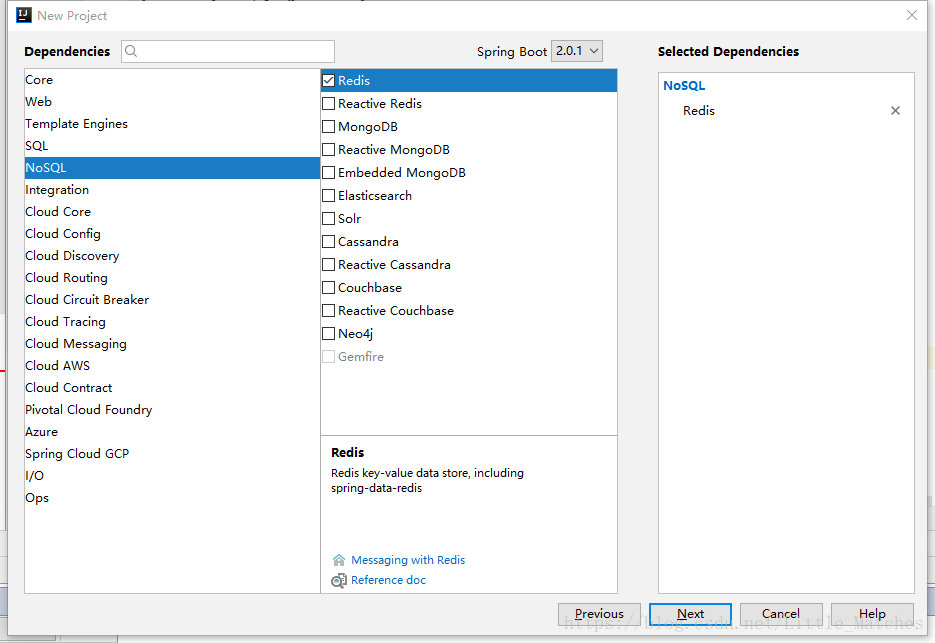
生成项目后,代开pom.xml,可以看到已经包含了redis的依赖
<?xml version="1.0" encoding="UTF-8"?>
<project xmlns="http://maven.apache.org/POM/4.0.0" xmlns:xsi="http://www.w3.org/2001/XMLSchema-instance"
         xsi:schemaLocation="http://maven.apache.org/POM/4.0.0 http://maven.apache.org/xsd/maven-4.0.0.xsd">
    <modelVersion>4.0.0</modelVersion>

    <groupId>com.example</groupId>
    <artifactId>demo</artifactId>
    <version>0.0.1-SNAPSHOT</version>
    <packaging>jar</packaging>

    <name>demo</name>
    <description>Demo project for Spring Boot</description>

    <parent>
        <groupId>org.springframework.boot</groupId>
        <artifactId>spring-boot-starter-parent</artifactId>
        <version>2.0.1.RELEASE</version>
        <relativePath/> <!-- lookup parent from repository -->
    </parent>

    <properties>
        <project.build.sourceEncoding>UTF-8</project.build.sourceEncoding>
        <project.reporting.outputEncoding>UTF-8</project.reporting.outputEncoding>
        <java.version>1.8</java.version>
    </properties>

    <dependencies>
        <dependency>
            <groupId>org.springframework.boot</groupId>
            <artifactId>spring-boot-starter-data-redis</artifactId>
        </dependency>

        <dependency>
            <groupId>org.springframework.boot</groupId>
            <artifactId>spring-boot-starter-test</artifactId>
            <scope>test</scope>
        </dependency>
    </dependencies>

    <build>
        <plugins>
            <plugin>
                <groupId>org.springframework.boot</groupId>
                <artifactId>spring-boot-maven-plugin</artifactId>
            </plugin>
        </plugins>
    </build>


</project>
1.首先在resources里面新建redis.xml
一个bean为jedis链接工厂,第二个为与jdbcTemplate相似的redis的bean,使用方法也类似
<?xml version="1.0" encoding="UTF-8"?>
<beans xmlns="http://www.springframework.org/schema/beans"
       xmlns:xsi="http://www.w3.org/2001/XMLSchema-instance"
       xmlns:p="http://www.springframework.org/schema/p"
       xsi:schemaLocation="http://www.springframework.org/schema/beans http://www.springframework.org/schema/beans/spring-beans.xsd">

    <bean id="jedisConnectionFactory" class="org.springframework.data.redis.connection.jedis.JedisConnectionFactory" p:use-pool="true"/>
    <!-- redis template definition -->
    <bean id="redisTemplate" class="org.springframework.data.redis.core.RedisTemplate" p:connection-factory-ref="jedisConnectionFactory"/>


</beans>
2.新建RedisCache.java,添加几个方法
import org.slf4j.Logger;
import org.slf4j.LoggerFactory;
import org.springframework.beans.factory.annotation.Autowired;
import org.springframework.data.redis.core.RedisTemplate;

import java.util.concurrent.TimeUnit;

public class RedisCache {
	private static Logger logger = LoggerFactory.getLogger(RedisCache.class);

	@Autowired
	private RedisTemplate<String, Object> redisTemplate;

	/**
	 * 设置缓存,默认为一个小时
	 *
	 * @param key   键
	 * @param value 值
	 */
	public void set(String key, String value) {
		this.set(key, value, 1, TimeUnit.HOURS);
	}

	/**
	 * 设置缓存
	 *
	 * @param key      键
	 * @param value    值
	 * @param timeout  时间长度
	 * @param timeUnit 时间单位
	 */
	public void set(String key, Object value, long timeout, TimeUnit timeUnit) {
		if (redisTemplate == null || key == null || value == null)
			return;
		redisTemplate.boundValueOps(key).set(value, timeout, timeUnit);
		logger.debug("更新缓存key={}", key);
	}

	/**
	 * 获取缓存
	 *
	 * @param key 键
	 * @param <T> 类型参数
	 * @return 缓存对象
	 */
	public <T> T get(String key) {
		if (redisTemplate == null || key == null)
			return null;
		T obj = (T) redisTemplate.boundValueOps(key).get();
		logger.debug("命中缓存key={},{}", key, obj != null);
		return obj;
	}

	/**
	 * 获取对象过期时间,单位:秒
	 *
	 * @param key
	 * @return 返回对象还有多少秒过期,-1标识不存在
	 */
	public int expire(String key) {
		if (redisTemplate == null || key == null)
			return -1;
		Long expire = redisTemplate.getExpire(key, TimeUnit.SECONDS);
		return expire == null ? -1 : expire.intValue();
	}

	/**
	 * 根据key删除缓存
	 *
	 * @param key
	 */
	public void delete(String key) {
		if (redisTemplate == null || key == null)
			return;
		redisTemplate.delete(key);
	}
}
3.注册该类到spring.xml上
<?xml version="1.0" encoding="UTF-8"?>
<beans xmlns="http://www.springframework.org/schema/beans"
       xmlns:xsi="http://www.w3.org/2001/XMLSchema-instance"
       xsi:schemaLocation="http://www.springframework.org/schema/beans http://www.springframework.org/schema/beans/spring-beans.xsd">
	<!--自己的类的路径-->
    <bean id="redisCache" class="top.littlematch.base.redis.cache.RedisCache" />
</beans>
4.新建一个类来调用RedisCache,例如新建一个类RedisProvider.java
import org.slf4j.Logger;
import org.slf4j.LoggerFactory;
import org.springframework.stereotype.Component;
import top.littlematch.base.redis.facade.RedisFacade;
import top.littlematch.base.redis.cache.RedisCache;

import javax.annotation.Resource;
import java.util.List;
@Component
public class RedisProvider  {
	private static Logger logger = LoggerFactory.getLogger(RedisProvider.class);
	@Resource
	private RedisCache redisCache;


	public void set(String key, String value) {
		if(redisCache==null)
			return;
		redisCache.set(key,value);
	}


	public <T> T get(String key) {
		if(redisCache==null)
			return null;
		return redisCache.get(key);
	}
}
5.将xml文件引入到springBoot启动器
import org.springframework.boot.SpringApplication;
import org.springframework.boot.autoconfigure.SpringBootApplication;
import org.springframework.context.annotation.ImportResource;

@SpringBootApplication

@ImportResource(locations= { "spring/redis.xml", "spring/spring.xml" })
public class BaseApplication {

	public static void main(String[] args) {
		SpringApplication.run(BaseApplication.class, args);
	}
}
6.写一个测试类来调用即可
@RunWith(SpringRunner.class)
//因为是web项目,所以需要添加web环境启动测试类
@SpringBootTest(classes = BaseApplication.class, webEnvironment = SpringBootTest.WebEnvironment.RANDOM_PORT)
@EnableAutoConfiguration
public class BaseApplicationTests {

	@Resource
	private RedisProvider redisProvider;
	@Test
	public void contextLoads() {
		redisProvider.set("test","finish");
		System.out.println(redisProvider.get("test").toString());
	}

}
如有不懂,请查看官方文档或留言,谢谢哒!


 22万+
22万+

 被折叠的 条评论
为什么被折叠?
被折叠的 条评论
为什么被折叠?
 到【灌水乐园】发言


