


以下为授权转载的一盎司科技公众号文章
一般开发完PC端应用程序后,需要打包为可执行程序exe,方便用户使用。对于Python+Qt程序而言,一般使用PyInstaller来打包(包含依赖文件和exe文件等),然后使用Inno Setup制作安装包。
接下来,简单介绍Windows 10下这两种工具的使用,包括配置文件的编写等。
-
安装PyInstaller
直接使用pip install pyinstaller即可(本地已安装):

-
打包文件
-
采用命令式:可通过参数控制,如下所示:
pyinstaller -c main.py
其中,主要参数如下:
-
-c表示显示命令行窗口
-
-w表示不显示命令行窗口
-
-i表示指定图标
-
-F表示只生成一个exe文件(包含所有依赖)
-
采用脚本
一般是以.spec为后缀的文本文件,按照指定格式编写,可以直接通过执行命令pyinstaller main.py生成:
示例如下:
# -*- mode: python ; coding: utf-8 -*-
block_cipher = None
a = Analysis(
['main.py'],
pathex=[],
binaries=[],
datas=[],
hiddenimports=[],
hookspath=[],
hooksconfig={},
runtime_hooks=[],
excludes=[],
win_no_prefer_redirects=False,
win_private_assemblies=False,
cipher=block_cipher,
noarchive=False,
)
pyz = PYZ(a.pure, a.zipped_data, cipher=block_cipher)
exe = EXE(
pyz,
a.scripts,
[],
exclude_binaries=True,
name='main',
debug=False,
bootloader_ignore_signals=False,
strip=False,
upx=True,
console=True,
disable_windowed_traceback=False,
argv_emulation=False,
target_arch=None,
codesign_identity=None,
entitlements_file=None,
)
coll = COLLECT(
exe,
a.binaries,
a.zipfiles,
a.datas,
strip=False,
upx=True,
upx_exclude=[],
name='main',
)
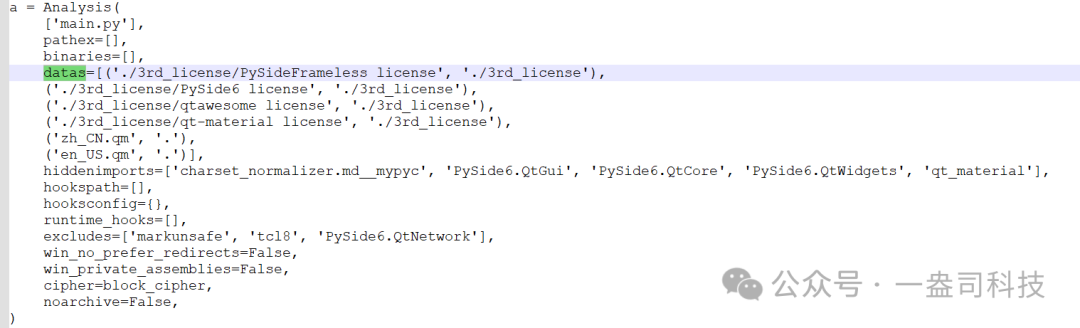
其中Analysis的datas,hiddenimports,excludes可以添加自定义文件或库文件,其他配置可参阅文档。示例如下:
修改完配置文件后可以执行命令重新打包:
pyinstaller main.spec
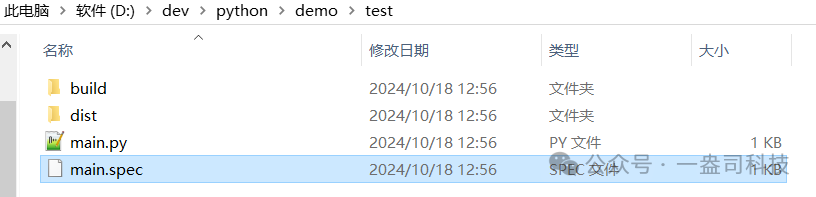
打包完,完整程序和依赖文件都会在dist目录,如下所示:

-
制作安装包
使用开源软件Inno Setup制作安装包需要编写.iss后缀的文件(可根据示例修改),以下以一盎司图片为例:
#define MyAppName "一盎司图片"
#define MySetupName "iounceImage"
#define MyAppVersion "1.0.5"
#define MyAppPublisher "iounce"
#define MyAppExeName "iounceImage.exe"
[Setup]
; NOTE: The value of AppId uniquely identifies this application. Do not use the same AppId value in installers for other applications.
; (To generate a new GUID, click Tools | Generate GUID inside the IDE.)
AppId={{0F1CE36A-17FB-434F-908F-CD1457A8FEEF}}
AppName={#MyAppName}
AppVersion={#MyAppVersion}
VersionInfoVersion={#MyAppVersion}
;AppVerName={#MyAppName} {#MyAppVersion}
AppPublisher={#MyAppPublisher}
DefaultDirName={autopf}\{#MyAppName}
DisableProgramGroupPage=yes
; Uncomment the following line to run in non administrative install mode (install for current user only.)
;PrivilegesRequired=lowest
OutputDir=D:\iounce\src\python\PySideImage\installer
OutputBaseFilename={#MySetupName}_{#MyAppVersion}
Compression=lzma
SolidCompression=yes
WizardStyle=modern
[Languages]
Name: "english"; MessagesFile: "compiler:Default.isl"
Name: "chinesesimplified"; MessagesFile: "compiler:Languages\ChineseSimplified.isl"
[Tasks]
Name: "desktopicon"; Description: "{cm:CreateDesktopIcon}"; GroupDescription: "{cm:AdditionalIcons}";
[Files]
Source: "D:\iounce\src\python\PySideImage\dist\iounceImage\{#MyAppExeName}"; DestDir: "{app}"; Flags: ignoreversion
Source: "D:\iounce\src\python\PySideImage\dist\iounceImage\*"; DestDir: "{app}"; Flags: ignoreversion recursesubdirs createallsubdirs
; NOTE: Don't use "Flags: ignoreversion" on any shared system files
[Icons]
Name: "{autoprograms}\{#MyAppName}"; Filename: "{app}\{#MyAppExeName}"
Name: "{autodesktop}\{#MyAppName}"; Filename: "{app}\{#MyAppExeName}"; Tasks: desktopicon
[Run]
Filename: "{app}\{#MyAppExeName}"; Description: "{cm:LaunchProgram,{#StringChange(MyAppName, '&', '&&')}}"; Flags: nowait postinstall skipifsilent
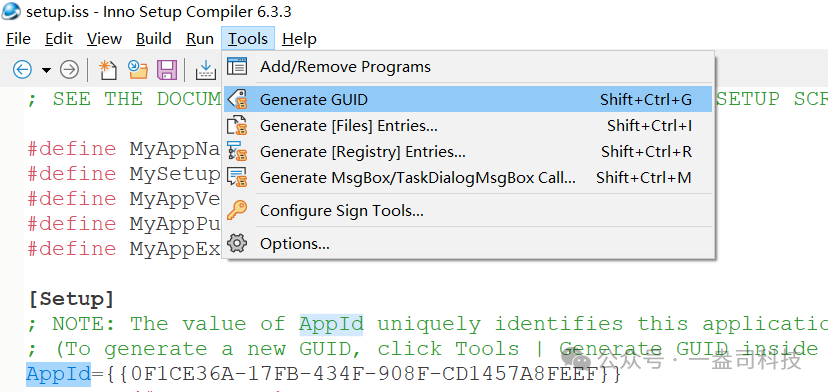
重点在程序名,版本,打包文件路径,图标等,其中AppId也就是GUID非常重要,不同程序要使用不同值,相同的值用于版本覆盖安装。GUID可以在工具自动生成:
编辑完.iss脚本文件后,直接点击工具的编译生成exe,在设置的目录即可找到生成的安装包,然后可以测试安装包效果。

通过PyInstaller打包,然后通过Inno Setup制作安装包,可以非常方便的制作Python桌面程序。


 3万+
3万+

 被折叠的 条评论
为什么被折叠?
被折叠的 条评论
为什么被折叠?
 到【灌水乐园】发言


