


 本文深入解析Spring框架的关键概念,包括IOC、DI、AOP等,探讨其如何简化企业级应用开发,以及如何通过XML配置和注解实现组件管理和依赖注入。
Spring有关单词:
1. Dependency [dɪ'pend(ə)nsɪ] 依赖
2. Injection [ɪn'dʒekʃ(ə)n] 注入
3. Aspect ['æspekt] 方面
4. Oriented ['ɔːrɪentɪd] 面向
5. Inversion [ɪn'vɜːʃ(ə)n] 翻转,倒置
6. placeholder ['plesholdɚ] 占位符
7. calculator ['kælkjʊleɪtə] 计算器
8. execution [,eksɪ'kjuːʃ(ə)n] 执行
9. Template ['templeɪt; -plɪt] 模板
10. propagation [,prɒpə'ɡeɪʃən] 传播
一、Spring概述
1、Spring概述
(1)Spring是一个开源框架。(框架:一个半成品软件)
(2)Spring为简化企业级开发而生。
(3)Spring是一个IOC(DI)和AOP容器框架
(4)Spring的优良特性
① 非侵入式:基于Spring开发的应用中的对象可以不依赖于Spring的API
② 依赖注入:DI——Dependency Injection,反转控制(IOC)最经典的实现。
③ 面向切面编程:Aspect Oriented Programming——AOP
④ 容器:Spring是一个容器,因为它包含并且管理应用对象的生命周期
⑤ 组件化:Spring实现了使用简单的组件配置组合成一个复杂的应用。在 Spring 中可以使用XML和Java注解组合这些对象。
⑥ 一站式:在IOC和AOP的基础上可以整合各种企业应用的开源框架和优秀的第三方类库(实际上Spring 自身也提供了表述层的SpringMVC和持久层的Spring JDBC)。
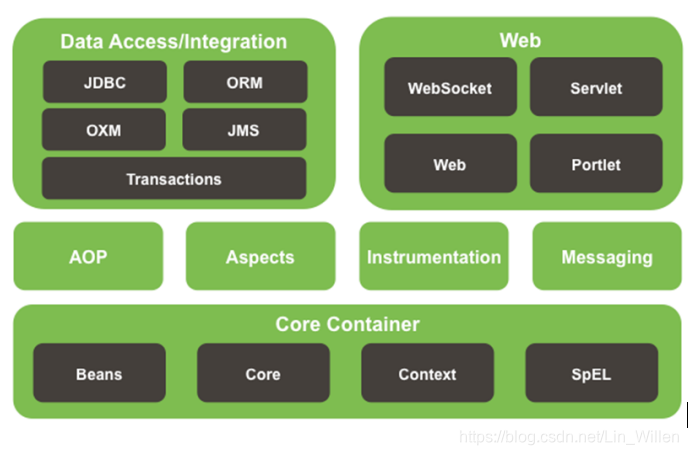
(5)Spring模块
二、IOC&DI
1、IOC(Inversion of Control):控制反转
在应用程序中的组件需要获取资源时,传统的方式是组件主动的从容器中获取所需要的资源,在这样的模式下开发人员往往需要知道在具体容器中特定资源的获取方式,增加了学习成本,同时降低了开发效率。
反转控制的思想完全颠覆了应用程序组件获取资源的传统方式:反转了资源的获取方向——改由容器主动的将资源推送给需要的组件,开发人员不需要知道容器是如何创建资源对象的,只需要提供接收资源的方式即可,极大的降低了学习成本,提高了开发的效率。这种行为也称为查找的被动形式。
2、DI(Dependency Injection):依赖注入
IOC的另一种表述方式:即组件以一些预先定义好的方式(例如:setter 方法)接受来自于容器的资源注入。相对于IOC而言,这种表述更直接。
3、IOC容器在Spring中的实现
(1)通过IOC容器读取bean的实例之前,要先对IOC容器进行实例化。
(2)Spring提供了两种容器的实现方式
① BeanFactory:IOC容器的基本实现,是Spring内部的基础设施,是面向Spring本身的。
② ApplicationContext:BeanFactory的子接口,提供了更多高级特性。面向Spring的使用者,几乎所有场合都使用ApplicationContext
③ ioc容器初始化时就创建bean,并且在容器中只有一份,(默认)是单实例的。也可以通过配置的方式指定创建的Bean是多实例的。
④ ioc容器在创建这个组件对象时,(property标签)会调用setter方法为Javabean的属性赋值。
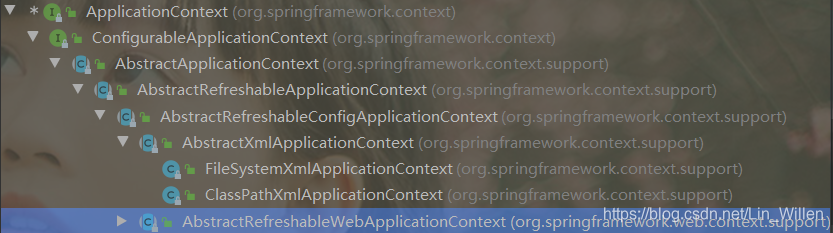
4、ApplicationContext的主要实现类
(1)ClassPathXmlApplicationContext:ioc的配置文件在类路径下
(2)FileSystemXmlApplicationContext:ioc的配置文件路径在本地磁盘路径下
三、案例
Person.java
import java.util.List;
import java.util.Map;
import java.util.Properties;

/**
 * @author linwillen
 * @create 2020-04-09-22:05
 */
public class Person {

    //基本属性的赋值,使用<property name="lastName" value="张三"></property>
    //会自动进行类型转换(XMl里面写的都是纯文本,会自动类型转换成Integer或者String),
    private String lastName;
    private String gender;
    private Integer age;
    private String email;
    private Double salary;

    //复杂属性
    private Car car;
    private List<Book> books;
    private Map<String,Object> map;
    private Properties properties;

//    public Person(String lastName, String gender, Integer age, String email) {
//        this.lastName = lastName;
//        this.gender = gender;
//        this.age = age;
//        this.email = email;
//        System.out.println("调用Person的有参构造器创建对象");
//    }

//    public Person(String lastName, String gender, Integer age) {
//        this.lastName = lastName;
//        this.gender = gender;
//        this.age = age;
//        System.out.println("调用Person的三个有参构造器创建对象");
//    }

    public Person(){
        System.out.println("调用Person的无参构造创建对象");
    }


    public Person(Car car) {
        this.car = car;
        System.out.println("car的有参构造器");
    }

    public Double getSalary() {
        return salary;
    }

    public void setSalary(Double salary) {
        this.salary = salary;
    }

    public String getLastName() {
        return lastName;
    }

    public void setLastName(String lastName) {
        this.lastName = lastName;
    }

    public String getGender() {
        return gender;
    }

    public void setGender(String gender) {
        this.gender = gender;
    }

    public Integer getAge() {
        return age;
    }

    public void setAge(Integer age) {
        this.age = age;
    }

    public String getEmail() {
        return email;
    }

    public void setEmail(String email) {
        this.email = email;
    }

    public Car getCar() {
        return car;
    }

    public void setCar(Car car) {
        this.car = car;
    }

    public List<Book> getBooks() {
        return books;
    }

    public void setBooks(List<Book> books) {
        this.books = books;
    }

    public Map<String, Object> getMap() {
        return map;
    }

    public void setMap(Map<String, Object> map) {
        this.map = map;
    }

    public Properties getProperties() {
        return properties;
    }

    public void setProperties(Properties properties) {
        this.properties = properties;
    }

    @Override
    public String toString() {
        return "Person{" +
                "lastName='" + lastName + '\'' +
                ", gender='" + gender + '\'' +
                ", age=" + age +
                ", email='" + email + '\'' +
                ", salary=" + salary +
                ", car=" + car +
                ", books=" + books +
                ", map=" + map +
                ", properties=" + properties +
                '}';
    }
}
Car.java
package cn.wyu.bean;

/**
 * @author linwillen
 * @create 2020-04-10-14:20
 */
public class Car {
    private String carName;
    private String color;
    private Integer price;

    public Car() {
        System.out.println("调用Car的无参构造创建对象");

    }

    public String getCarName() {
        return carName;
    }

    public void setCarName(String carName) {
        this.carName = carName;
    }

    public String getColor() {
        return color;
    }

    public void setColor(String color) {
        this.color = color;
    }

    public Integer getPrice() {
        return price;
    }

    public void setPrice(Integer price) {
        this.price = price;
    }

    @Override
    public String toString() {
        return "Car{" +
                "carName='" + carName + '\'' +
                ", color='" + color + '\'' +
                ", price=" + price +
                '}';
    }
}
book.java
package cn.wyu.bean;

/**
 * @author linwillen
 * @create 2020-04-10-14:16
 */
public class Book {
    private String bookName;
    private String author;

    @Override
    public String toString() {
        return "Book{" +
                "bookName='" + bookName + '\'' +
                ", author='" + author + '\'' +
                '}';
    }

    public void myInit(){
        System.out.println("这是book的初始化方法。。。");
    }

    public void myDestroy(){
        System.out.println("这是book的销毁方法。。。");
    }

    public Book() {
        System.out.println("调用Book的无参构造创建对象");
    }

    public String getBookName() {
        return bookName;
    }

    public void setBookName(String bookName) {
        this.bookName = bookName;
    }

    public String getAuthor() {
        return author;
    }

    public void setAuthor(String author) {
        this.author = author;
    }
}
ioc.xml
<?xml version="1.0" encoding="UTF-8"?>
<beans xmlns="http://www.springframework.org/schema/beans"
       xmlns:xsi="http://www.w3.org/2001/XMLSchema-instance"
       xmlns:context="http://www.springframework.org/schema/context"
       xmlns:p="http://www.springframework.org/schema/p"
       xsi:schemaLocation="http://www.springframework.org/schema/beans http://www.springframework.org/schema/beans/spring-beans.xsd">

    <!--注册一个Person对象,Spring会自动创建Person对象-->
    <!--
    一个bean标签可以注册一个组件(类、对象)
    class:写组件的全类名
    id:这个对象的唯一标识
    -->
    <bean id="person01" class="cn.wyu.bean.Person">
        <!--使用property为Person属性对象赋值
        name:指定属性名
        value:指定属性的值
        -->
        <!--这里的name属性的值不是由Javabean的属性决定的,是由getter/setter方法去掉set后面的部分首字母小写决定的-->
        <property name="lastName" value="张三"></property>
        <property name="age" value="23"></property>
        <property name="email" value="zhangsan@163.com"></property>
        <property name="gender" value="男"></property>
    </bean>
    <bean id="person02" class="cn.wyu.bean.Person">
        <property name="lastName" value="小花"></property>
    </bean>
    <bean id="person03" class="cn.wyu.bean.Person">
        <!--public Person(String lastName, String gender, Integer age, String email)-->
        <constructor-arg name="age" value="23"></constructor-arg>
        <constructor-arg name="email" value="xiaoming@163.com"></constructor-arg>
        <constructor-arg name="lastName" value="小明"></constructor-arg>
        <constructor-arg name="gender" value="男"></constructor-arg>
    </bean>
    <bean id="person04" class="cn.wyu.bean.Person">
        <!--public Person(String lastName, String gender, Integer age, String email)-->
        <!--可以省略name属性,但是要严格按照构造器顺序进行赋值-->
        <constructor-arg value="男" index="1"></constructor-arg>
        <!--index:参数的索引,数值从0开始-->
        <constructor-arg value="23" index="2"></constructor-arg>
        <constructor-arg value="小花" index="0"></constructor-arg>
        <constructor-arg value="xiaohua@163.com" index="3"></constructor-arg>
    </bean>

    <bean id="person05" class="cn.wyu.bean.Person">
        <!--public Person(String lastName, String gender, Integer age)-->
        <constructor-arg value="男"></constructor-arg>
        <!--index:参数的索引,数值从0开始-->
        <constructor-arg value="小花" index="0"></constructor-arg>
        <!--可以使用type指定参数类型-->
        <constructor-arg value="23" index="2" type="java.lang.Integer"></constructor-arg>
    </bean>

    <!--通过p名称空间为属性赋值-->
    <bean id="person06" class="cn.wyu.bean.Person"
          p:lastName="hh" p:age="22" p:email="hh@163.com" p:gender="男">
    </bean>


</beans>
ioc2.xml
<?xml version="1.0" encoding="UTF-8"?>
<beans xmlns="http://www.springframework.org/schema/beans"
       xmlns:xsi="http://www.w3.org/2001/XMLSchema-instance"
       xmlns:context="http://www.springframework.org/schema/context"
       xmlns:util="http://www.springframework.org/schema/util"
       xsi:schemaLocation="http://www.springframework.org/schema/beans
                           http://www.springframework.org/schema/beans/spring-beans.xsd
                           http://www.springframework.org/schema/util
                           http://www.springframework.org/schema/util/spring-util.xsd">

    <!--实验4:正确的为各种属性赋值
    引用类型赋值(引用其他bean、引用内部bean)
    集合类型赋值(List、Map、Properties)、
    util名称空间创建集合类型的bean
    级联属性赋值-->
    <!--测试使用null值-->
    <bean id="car01" class="cn.wyu.bean.Car">
        <property name="carName" value="宝马"></property>
        <property name="color" value="绿色"></property>
        <property name="price" value="30000"></property>
    </bean>
    <bean id="person01" class="cn.wyu.bean.Person">
        <property name="lastName">
            <!--进行复杂的赋值,将lastName属性赋值为null-->
            <null/>
        </property>
        <!--ref:引用外部的一个bean
                相当于:car = ioc.getBean("car01")-->
        <!--<property name="car" ref="car01"></property>-->
        <!--用bean标签创建,引用内部的bean-->
        <property name="car">
            <!--内部bean写不写id无所谓,因为内部bean无法被getBean获取到-->
            <bean class="cn.wyu.bean.Car">
                <property name="carName" value="摩托车"></property>
            </bean>
        </property>
    </bean>

    <!--外部bean-->
    <bean id="book002" class="cn.wyu.bean.Book">
        <property name="bookName" value="东游记"/>
    </bean>

    <bean id="person02" class="cn.wyu.bean.Person">
        <!--List<Book> books-->
        <property name="books">
            <!--相当于 books = new ArrayList<Book>()-->
            <list>
                <!--声明内部bean -->
                <bean id="book001" class="cn.wyu.bean.Book">
                    <property name="bookName" value="西游记"></property>
                    <property name="author" value="吴承恩"></property>
                </bean>
                <ref bean="book002"/>
            </list>
        </property>
        <!--Map<String,Object> map-->
        <property name="map">
            <!--相当于map = new LinkedHashMap<>();-->
            <map>
                <entry key="key001" value="张三"/>
                <!-- 另外的写法
                <entry key="key001">
                    <value>张三</value>
                </entry>
                -->
                <entry key="key002" value="18"/>
                <entry key="key003" value-ref="car01"/>
                <entry key="key004" value-ref="book002"/>
                <entry key="key005">
                    <bean class="cn.wyu.bean.Car">
                        <property name="carName" value="法拉利"/>
                        <property name="color" value="红色"/>
                    </bean>
                </entry>
               <!-- <entry>
                    <map></map>
                </entry>-->
            </map>
        </property>
        <!--private Properties properties;-->
        <property name="properties">
            <!-- 相当于properties = new Properties();里面存放的都是键值对,但k,v都是String类型的-->
            <props>
                <prop key="username">张三</prop>
                <prop key="password">123456</prop>
            </props>
        </property>
    </bean>

    <!--util名称空间创建集合类型的bean,方便别人引入-->
    <bean id="person03" class="cn.wyu.bean.Person">
        <property name="map" ref="myMap"></property>
    </bean>

    <!--相当于 myMap = new LinkedHashMap();-->
    <util:map id="myMap">
        <entry key="key001" value="张三"/>
        <!-- 另外的写法
        <entry key="key001">
            <value>张三</value>
        </entry>
        -->
        <entry key="key002" value="18"/>
        <entry key="key003" value-ref="car01"/>
        <entry key="key004" value-ref="book002"/>
        <entry key="key005">
            <bean class="cn.wyu.bean.Car">
                <property name="carName" value="法拉利"/>
                <property name="color" value="红色"/>
            </bean>
        </entry>
        <!-- <entry>
             <map></map>
         </entry>-->
    </util:map>

    <!--通用的list集合
    [[],12,{},Person]
    -->
    <util:list id="myList">
        <list></list>
        <value>12</value>
        <ref bean="myMap"></ref>
        <bean class="cn.wyu.bean.Person"></bean>
    </util:list>

    <!--级联属性-->
    <bean id="person04" class="cn.wyu.bean.Person">
        <property name="car" ref="car01"></property>
        <property name="car.price" value="90000"></property>
    </bean>

    <!--
    实验6:通过继承实现bean配置信息的重用
    实验7:通过abstract属性创建一个模板bean
    实验8:bean之间的依赖
    实验9:测试bean的作用域,分别创建单实例和多实例的bean★
    -->
    <!-- abstract="true":表示这个bean是抽象的,只能用来继承,不能用获取它的实例-->
    <bean id="person05" class="cn.wyu.bean.Person" abstract="true">
        <property name="lastName" value="张三"/>
        <property name="gender" value="男"/>
        <property name="age" value="18"/>
        <property name="email" value="zhangsan@163.com"/>
    </bean>
    <!-- parent:指定当前bean的配置信息继承于哪个;class可以删除-->
    <bean id="person06" class="cn.wyu.bean.Person" parent="person05">
        <property name="lastName" value="李四"/>
    </bean>
</beans>
ioc3.xml
<?xml version="1.0" encoding="UTF-8"?>
<beans xmlns="http://www.springframework.org/schema/beans"
       xmlns:xsi="http://www.w3.org/2001/XMLSchema-instance"
       xsi:schemaLocation="http://www.springframework.org/schema/beans http://www.springframework.org/schema/beans/spring-beans.xsd">
    <!--原来是按照配置顺序创建的-->
    <!--使用depends-on,让bean的创建顺序变为book->car->person-->
    <!--实验8:bean之间的依赖(只改变bean的创建顺序)-->
    <bean id="person" class="cn.wyu.bean.Person" depends-on="book,car"/>
    <bean id="car" class="cn.wyu.bean.Car"/>
    <bean id="book" class="cn.wyu.bean.Book"/>

    <!--
    实验9:测试bean的作用域,分别创建单实例和多实例的bean★
    singleton(默认):单例的
        * 在容器启动之前就创建好实例,保存在容器中
        * 任何时候获取实例都是已经创建好的那个,所以引用都是相同的
    prototype:多实例的
        * 容器启动的时候不会去创建实例
        * 在获取的时候再创建实例
        * 每次获取都会创建一个实例
    request:在web环境下,同一次请求创建一个bean实例(没用)
    session:在web环境下,同一次会话创建一个bean实例(没用)
    -->
    <bean id="book2" class="cn.wyu.bean.Book" scope="singleton"></bean>

    <!--实验5:配置通过静态工厂方法创建的bean、实例工厂方法创建的bean、FactoryBean★-->
    <!--bean的创建默认就是框架利用反射new出来的实例-->
    <!--工厂模式:有个专门帮我们创建对象的类,这个类就是工厂
        静态工厂:工厂本身不用创建对象,通过静态方法调用,对象 = 工厂类.工厂方法();
        实例工厂:工厂本身需要创建对象
                    工厂类 工厂对象 = new 工厂类();
                    工厂对象.获取对象实例方法();
    -->
    <!--1、静态工厂(本身不需要创建对象)
    class:指定工厂的全类名
    factory-method="getAirPlane":指定哪个是工厂方法
    constructor-arg:为方法传参
    -->
    <bean id="airPlane01" class="cn.wyu.factory.AirPlaneStaticFactory" factory-method="getAirPlane">
        <!--可以为方法指定参数,只有一个参数时name可以省略-->
        <constructor-arg value="李四"></constructor-arg>
    </bean>

    <!--2、实例工厂

    -->
    <bean id="airPlaneInstanceFactory" class="cn.wyu.factory.AirPlaneInstanceFactory"></bean>

    <!--factory-bean:指定当前对象用哪个工厂创建
        1、先配置出实例工厂对象
        2、配置我们要创建的airPlane使用哪个工厂创建
            1)factory-bean:使用哪个工厂实例
            2)factory-method:使用工厂的哪个方法
    -->
    <bean id="airPlane02" class="cn.wyu.bean.AirPlane" factory-bean="airPlaneInstanceFactory" factory-method="getAirPlane">
        <constructor-arg value="王五"></constructor-arg>
    </bean>

    <!--FactoryBean★是Spring规定的一个接口
        只要是这个接口的实现类,都认为是一个工厂
        1、ioc容器启动的时候不会创建对象
        2、FactoryBean:获取的时候才创建对象
    -->
    <bean id="myFactoryBean" class="cn.wyu.factory.MyFactoryBean"></bean>
</beans>
applicationContext.xml
<?xml version="1.0" encoding="UTF-8"?>
<beans xmlns="http://www.springframework.org/schema/beans"
       xmlns:xsi="http://www.w3.org/2001/XMLSchema-instance"
       xsi:schemaLocation="http://www.springframework.org/schema/beans http://www.springframework.org/schema/beans/spring-beans.xsd">

    <!--实验10:创建带有生命周期方法的bean
        声明周期:bean的创建到销毁
            ioc容器中注册bean:
                1)单例bean,容器启动的时候就会创建对象,关闭容器就会销毁对象
                2)多实例bean,获取对象的时候才会创建
                自定义初始化和销毁方法
    -->

    <bean id="book01" class="cn.wyu.bean.Book"
          init-method="myInit" destroy-method="myDestroy" scope="singleton"></bean>


    <!--实验11:测试bean的后置处理器
    Spring有个后置处理器:可以在bean的初始化前后调用方法BeanPostProcessor
    -->
    <bean id="beanPostProcessor" class="cn.wyu.bean.MyBeanPostProcessor"></bean>
    <bean id="car01" class="cn.wyu.bean.Car"></bean>
</beans>
application2.xml
<?xml version="1.0" encoding="UTF-8"?>
<beans xmlns="http://www.springframework.org/schema/beans"
       xmlns:xsi="http://www.w3.org/2001/XMLSchema-instance"
       xmlns:context="http://www.springframework.org/schema/context"
       xsi:schemaLocation="http://www.springframework.org/schema/beans
                           http://www.springframework.org/schema/beans/spring-beans.xsd
                           http://www.springframework.org/schema/context
                           http://www.springframework.org/schema/context/spring-context.xsd">

    <!--实验12:引用外部属性文件★(Spring管理连接池)-->
    <!--数据库连接池作为单实例最好,一个项目就一个连接池,连接池里面有很多链接-->
    <!--可以让Spring帮我们创建连接池对象(管理连接池)-->
    <context:property-placeholder location="classpath:db.properties"/>
    <bean id="dataSource" class="com.mchange.v2.c3p0.ComboPooledDataSource">
        <!--动态取出配置文件中的信息-->
        <!--username是spring的key中的一个关键字,它代表的是系统的用户名
        为了防止配置文件中的key跟spring中的key起冲突,
        建议改成jdbc.username
        -->
        <property name="user" value="${jdbc.username}"/>
        <property name="password" value="${jdbc.password}"/>
        <property name="jdbcUrl" value="${jdbc.jdbcUrl}"/>
        <property name="driverClass" value="${jdbc.driverClass}"/>
    </bean>
    <bean id="car01" class="cn.wyu.bean.Car">
        <property name="carName" value="${username}"/><!--Administrator-->
    </bean>
</beans>
application3.xml
<?xml version="1.0" encoding="UTF-8"?>
<beans xmlns="http://www.springframework.org/schema/beans"
       xmlns:xsi="http://www.w3.org/2001/XMLSchema-instance"
       xsi:schemaLocation="http://www.springframework.org/schema/beans http://www.springframework.org/schema/beans/spring-beans.xsd">

    <bean id="car" class="cn.wyu.bean.Car">
        <property name="carName" value="宝马"/>
        <property name="color" value="白色"/>
    </bean>
    <!--<bean id="car02" class="cn.wyu.bean.Car">
        <property name="carName" value="宝马"/>
        <property name="color" value="黑色"/>
    </bean>-->
    <!--为Person里面自定义的属性赋值
    property:手动赋值
    autowire:自动装配(自动赋值)
    autowire="default/no":不自动装配

    //按照某种规则自动装配
    autowire="byName":按照名字
        private Car car;以属性名作为id去容器中查找这个组件,给它赋值。如果找不到装配为null
        相当于car = ioc.getBean("car");
    autowire="byType":
        private Car car;以属性的类型作为查找条件去容器中查找这个组件
        相当于car = ioc.getBean(Car.class);
        1)如果容器中有多个这种类型的组件,就会报错
        2)如果没有找到,就装配null
    autowire="constructor":按照构造器
        public Person(Car car) { 。。。}
        按照构造器进行赋值:
        1)先按照有参构造器的参数的类型进行装配(成功就赋值),没有就直接为组件装配null
        2)如果按类型查找到多个,参数名就作为id继续装配,找到就匹配,找不到就null
        3)不会报错
    -->
    <bean id="person" class="cn.wyu.bean.Person" autowire="byType">

    </bean>

    <!-- List<Book> books;容器可以把容器中的所有book封装list赋值给这个属性 -->
    <bean id="book01" class="cn.wyu.bean.Book">
        <property name="bookName" value="book1"></property>
    </bean>
    <bean id="book02" class="cn.wyu.bean.Book">
        <property name="bookName" value="book2"></property>
    </bean>
    <bean id="book03" class="cn.wyu.bean.Book">
        <property name="bookName" value="book3"></property>
    </bean>
    <!--
	实验14:[SpEL测试I](Spring Expression Language)Spring表达式语言
		    在SpEL中使用字面量、
		    引用其他bean、
		    引用其他bean的某个属性值、
		   【 调用非静态方法
		    调用静态方法、】
		    使用运算符;都支持
	 -->
    <bean id="person04" class="cn.wyu.bean.Person">
        <!-- 字面量:${};   #{} -->
        <property name="salary" value="#{12345.67*12}"></property>
        <!--  引用其他bean的某个属性值、 -->
        <property name="lastName" value="#{book01.bookName}"></property>
        <!--  引用其他bean、 -->
        <property name="car" value="#{car}"></property>
        <!--
             调用静态方法: UUID.randomUUID().toString();
             #{T(全类名).静态方法名(1,2)}
            -->
        <property name="email" value="#{T(java.util.UUID).randomUUID().toString().substring(0,5)}"></property>
        <!--   调用非静态方法;  对象.方法名  -->
        <property name="gender" value="#{book01.getBookName()}"></property>
    </bean>
</beans>
application4.xml
<?xml version="1.0" encoding="UTF-8"?>
<beans xmlns="http://www.springframework.org/schema/beans"
xmlns:xsi="http://www.w3.org/2001/XMLSchema-instance"
xmlns:context="http://www.springframework.org/schema/context"
xsi:schemaLocation="http://www.springframework.org/schema/beans
http://www.springframework.org/schema/beans/spring-beans.xsd
http://www.springframework.org/schema/context
http://www.springframework.org/schema/context/spring-context.xsd">
<!--实验15:通过注解分别创建Dao、Service、Controller★
通过给bean上添加某些注解,可以快速的将bean加入到ioc容器
Spring有四个注解:
@Controller:添加在控制器层
@Service:在业务层
@Repository:持久化层
@Component:给不属于上面几层的组件添加注解
注解可以随便加,Spring底层不会验证你的组件
使用注解将组件快速添加到容器中需要几步:
1、在要添加的组件上面添加上面的四个注解
2、告诉Spring,添加自动扫描的标签<context:component-scan base-package=""/>
3、添加aop包,支持添加注解模式的
-->
<!--
base-package:扫描指定的的基础包,把基础包以及它下面的所有加了注解的类,加入ioc容器
-->
<!--<context:component-scan base-package="cn.wyu"/>-->
<!--实验16:使用context:include-filter指定扫描包时要包含的类-->
<!-- <context:component-scan base-package="cn.wyu">
<!–
扫描的时候排除一些不要的组件
type="annotation":指定排除规则,按照注解排除,标注了的注解不要扫描进容器
expression="":注解的全类名
type="assignable":指定排除某个具体的类,按照类来排除
expression="":类的全类名
–>
<context:exclude-filter type="annotation" expression="org.springframework.stereotype.Controller"/>
</context:component-scan>-->
<!--实验17:使用context:exclude-filter指定扫描包时不包含的类
use-default-filters="false":禁用掉默认将全部扫描进来-->
<!--<context:component-scan base-package="cn.wyu" use-default-filters="false">
<!–默认是全部扫描进来的
用context:include-filter,指定只扫描哪些–>
<context:include-filter type="annotation" expression="org.springframework.stereotype.Controller"/>
</context:component-scan>-->
<!--实验18:使用@Autowired注解实现根据类型实现自动装配★ (DI依赖注入)
@Autowired原理:
@Autowired
private BookService bookService;
1)先按类型去容器中找到对应的组件:bookService = ioc.getBean(BookService.class);
1、找到一个就赋值
2、没找到:抛异常
3、找到多个:
1)按照变量名作为id继续装配:BookService(BookService)、BookServiceExt(bookServiceExt)
2)没找到:抛异常
@Autowired
private BookService bookServiceExt2;
1、找到多个,但都没有匹配上,使用@Qualifier:指定一个名作为id,让spring别用变量名作为id
-->
<!--实验19:如果资源类型的bean不止一个,
默认根据@Autowired注解标记的成员变量名作为id查找bean,进行装配★
实验20:如果根据成员变量名作为id还是找不到bean,
可以使用@Qualifier注解明确指定目标bean的id★
实验21:在方法的形参位置使用@Qualifier注解
@Autowired
public void haha(BookDao bookDao,@Qualifier("bookServiceExt") BookService bookService){
System.out.println("Spring运行了这个方法。。。"+bookDao+"==>"+bookService+"");
}
@Autowired、@Resource、@Inject:都是自动装配的意思
@Autowired:最强大,Spring的注解
@Resource:J2EE,java的标准。扩展性强@Resource在其它的框架中,而@Autowired只能用在Spring框架中
实验22:@Autowired注解的required属性指定某个属性允许不被设置
@Autowired(required = false)-->
<context:component-scan base-package="cn.wyu"/>
</beans>
四、AOP
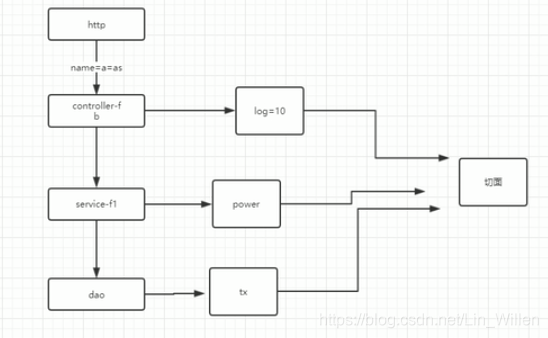
1、AOP:(Aspect Oriented programming)面向切面编程
在传统的面向对象过程中,业务逻辑是自上而下的,而在我们自上而下执行的业务逻辑中,会产生一些横切性的问题,比如说我们的日志记录,我们的异常处理,我们的权限控制,我们的事务,这些横切性的问题跟我们的主业务逻辑没有直接的关系,而我们面向切面编程就是把这些横切性问题,模块化成一个切面,对于程序员来讲只要关注这个切面的执行时机,还有执行的顺序。


 7728
7728

 被折叠的 条评论
为什么被折叠?
被折叠的 条评论
为什么被折叠?
 到【灌水乐园】发言


