Node.js 切近实战(六) 之Excel在线(文件列表)

本文详细介绍了使用Mongoose实现文件管理系统的模型设计过程,包括文件、文件组和文件子组的Schema定义,并展示了如何通过前端页面展示文件列表,以及相关的搜索和分页功能。


wKioL1d4rXzww-FCAAEXnz2js-A748.png

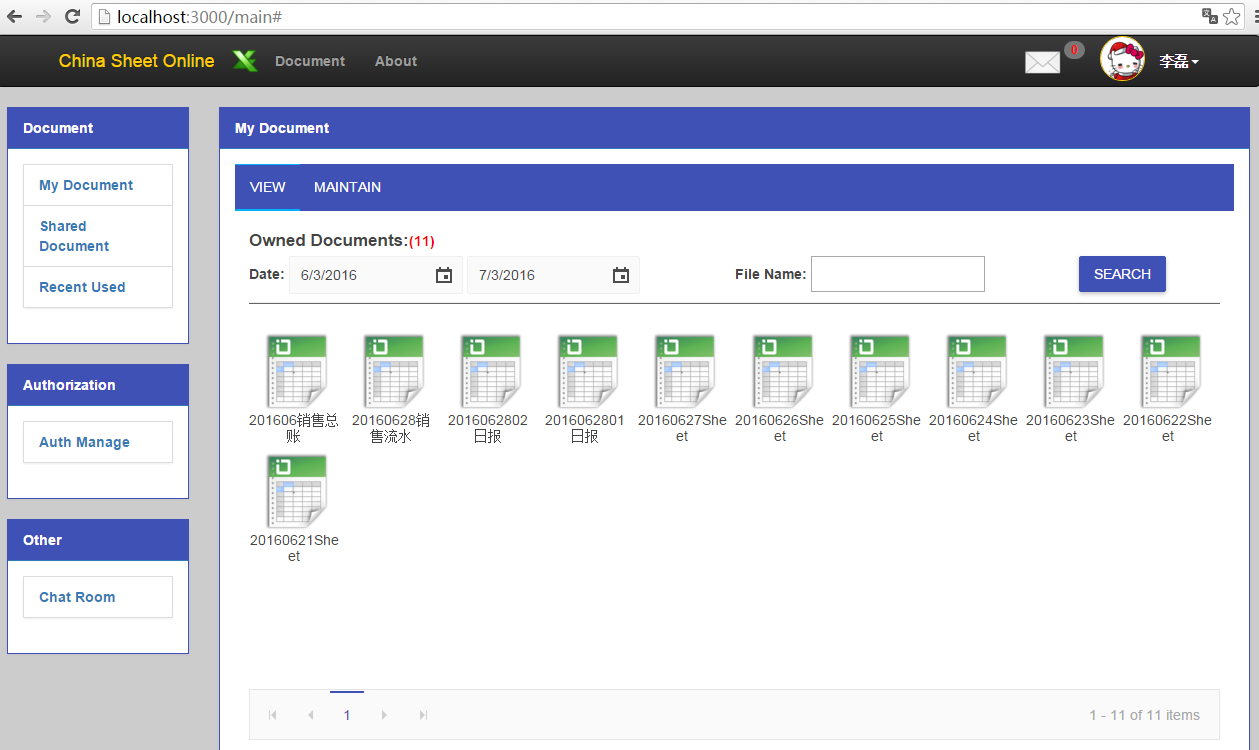
看到了吧,这就是主界面,首先我们来看一下My Document的View部分。在看View之前,我们先看一下Mode的设计。

1

2

3

4

5

6

7

8

9

10

11

12

13

14

15

16

17

18

19

20

21

22

23

24

25

26

27

28

29

30

31

32

33

34

35

36

37

38

39

40

41

42

43

44

45

46

47

48

49

50

51

52

53

54

55

56

57

58

59

60

61

62

var mongoose = require('mongoose');

var Schema = mongoose.Schema;

var authSchema = require('./fileauth.js');


require('string.prototype.endswith');


var fileSchema = new Schema({

    _id: Schema.Types.ObjectId,

    name: { type: String , trim: true, index: true },

    isshared: { type: Boolean, defaultfalse },

    content: { type: String , trim: true, select: false },

    createuserid: { type: String, index: { sparse: true } },

    createuser: { type: String},

    createdate: { type: Date, default: Date.now, index: { sparse: true } },

    lasteditdate: { type: Date, default: Date.now },

    lastedituserid: String,

    lastedituser: String,

    auth:[{ type: Schema.ObjectId, ref: 'fileauth' }]

}, {

    strict: true ,

    toObject: {

        virtuals: true

    },

    toJSON: {

        virtuals: true

    }

});


fileSchema.pre('update'function (next) {

    this.update({}, { $set: { lasteditdate: Date.now() } });

    next();

});


var fileSubGroupSchema = new Schema({

    _id: Schema.Types.ObjectId,

    name: { type: String, trim: true , required: true },

    userid: { type: String, required: true , index: true },

    file: [{ type: Schema.ObjectId, ref: 'file' }]

}, {

    strict: true

    toObject: {

        virtuals: true

    },

    toJSON: {

        virtuals: true

    }

});


var fileGroupSchema = new Schema({

    userid: { type: String, required: true , index: true },

    name: { type: String, trim: true , required: true },

    file: [{ type: Schema.ObjectId, ref: 'file' }],

    subgroup: [fileSubGroupSchema]

}, {

    strict: true

    toObject: {

        virtuals: true

    },

    toJSON: {

        virtuals: true

    }

});

我们设计了文件Schema,fileSchema,注意这里的sparse:true,意思是发散索引,即非聚集索引。

1

2

3

4

fileSchema.pre('update'function (next) {

    this.update({}, { $set: { lasteditdate: Date.now() } });

    next();

});

还有这里,我们预定义一个方法,当更新fileModel的时候,会先更新lasteditdate,再更新其他字段,因为我们更新的话,最后修改日期肯定是当前时间,也不需要用户每次都去传,所以这里预定义还是很有用处的。

接下来就是文件组和文件子组,总共两级,文件组和包含文件和子组,子组只能包含文件,所以这里设置及的时候,fileGroup中有个subgroup的定义,注意这里的subgroup它不是一个引用ref,而是嵌入的文档,是一个整体,但是它对file是只是一个主键的引用。

最后我们将这些定义好的model模块化公开出去。

1

2

3

4

5

6

7

8

9

fileGroupSchema.set('collection''filegroups');

fileSchema.set('collection''files');


var fileGroupModel = mongoose.model("fileGroup", fileGroupSchema);

var fileModel = mongoose.model("file", fileSchema);


exports.fileGroupModel = fileGroupModel;

exports.fileModel = fileModel;


接下来我们先看一下View页面的定义。

1

2

3

4

5

6

7

8

9

#file_tab

  ul

   li View

   li Maintain

  include partial/docview.jade

  include partial/docedit.jade


block scripts

  script(type='text/javascript' src='/javascripts/local/doc/docself.js')

在我的文档我们包含了两个页面,dicview.jade和docedit.jade,看一下docview。

1

2

3

4

5

6

7

8

9

10

11

12

13

14

15

16

17

18

19

20

21

22

23

24

25

26

27

28

29

30

31

32

33

34

35

36

37

38

39

40

41

42

43

44

45

#view

  .row-margin-large

  label(style='font-size:17px') Owned Documents:

  span#div_ownTotal

  .line-height-30(style='width:100%')

    div(style='width:50%;float:left')   

      label Date:   

      input#dp_ownStart(onkeydown='return false;')   

      input#dp_ownEnd(onkeydown='return false;')   

    div(style='width:30%;float:left')   

      label File Name:   

      input#txt_ownFileName(type='text')   

    div(style='width:20%;float:left;text-align:center')   

      button#btn_searchOwn.k-button.k-primary Search

  .clear-float

  .row-margin 

  hr.panel-line  

  #div_own(style='min-height:350px')  

    div#div_retriveOwn(style='top:10%;left:45%;position:relative;display:none')  

      img(src='/stylesheets/images/loading-large.gif')  

      label(style='color:#666666') retriving......  

  .row-margin-large.clear-float

  #own_pager

  br   

  .row-margin-large

   label(style='font-size:17px') Shared Documents:

   span#div_sharedTotal

   .line-height-30(style='width:100%')

     div(style='width:50%;float:left')   

      label Date:  

      input#dp_shareStart(onkeydown='return false;')  

      input#dp_shareEnd(onkeydown='return false;')  

     div(style='width:30%;float:left')   

      label File Name: 

      input#txt_sharedFileName(type='text') 

     div(style='width:20%;float:left;text-align:center')   

      button#btn_searchShared.k-button.k-primary Search

   .clear-float

   .row-margin 

   hr.panel-line 

   #div_share(style='min-height:350px;margin-bottom:10px') 

     div#div_retriveShared(style='top:10%;left:45%;position:relative;display:none') 

       img(src='/stylesheets/images/loading-large.gif') 

       label(style='color:#666666') retriving......

   #shared_pager

这个页面包含一个Owned Document和Shared Document,我们看一下js部分。

1

2

3

4

5

6

7

8

9

10

11

 $("#txt_ownFileName").keydown(function (e) {

        if (e.keyCode == 13) {

            $("#btn_searchOwn").click();

        }

    });


    $("#btn_searchOwn").click(function () {

        getOwnedFileList();

    });


    $("#btn_searchOwn").click();

页面load完成后,直接查询。

1

2

3

4

5

6

7

8

9

10

11

12

13

14

15

16

17

18

19

20

21

22

23

24

25

26

27

28

29

30

31

32

33

34

35

36

37

38

39

40

41

42

43

44

45

46

47

48

49

50

51

52

53

54

55

56

57

function getOwnedFileList() {

        var fileName = $.trim($("#txt_ownFileName").val());

        var startDate = $("#dp_ownStart").data("kendoDatePicker").value();

        var endDate = $("#dp_ownEnd").data("kendoDatePicker").value();


        var postData = {

            fileName: fileName,

            startDate: startDate,

            endDate: endDate,

            pageIndex: $("#own_pager").data('kendoPager').page() - 1 < 0? 0:$("#own_pager").data('kendoPager').page() - 1,

            pageSize: $("#own_pager").data('kendoPager').pageSize(),

            userId: userObj.UserID

        };


        isOwnSearch = true;

        $("#div_retriveOwn").show();

        $.post('/file/owned/retrieve', { data: JSON.stringify(postData) } , function (data) {

            $("#div_retriveOwn").hide();


            var tempSource = [];

            for (var i = 0; i < data.totalCount; i++) {

                tempSource.push(i);

            }


            var dataSource = new kendo.data.DataSource({

                data: tempSource,

                pageSize: $("#own_pager").data('kendoPager').pageSize()

            });


            $("#own_pager").data('kendoPager').setDataSource(dataSource);

            $("#own_pager").data('kendoPager').page(postData.pageIndex + 1);


            $("#div_own").html('');

            $("#div_ownTotal").css('color''red').html('(0)');

            if (data.totalCount && data.totalCount > 0) {

                $("#div_ownTotal").css({ 'color''red' 'font-weight''bold' }).html("(" + data.totalCount + ")");

                for (var i = 0; i < data.files.length; i++) {

                    if (i % 10 == 0) {

                        $("#div_own").append('<div class="clear-float"/>');

                    }

                    $("#div_own").append('<div style="width:10%;float:left">' 

                    '<div class="row-margin center-align-text">' 

                    '<a href="javascript:void(0)" style="text-decoration: none;color:#666666">' 

                    '<img id="' + data.files[i]._id + '" class="excel-img" src="/images/excel.png"/></a>' 

                    '<div style="word-break: break-word; width:90px">' + data.files[i].name + '</div>' 

                    '</div></div>');

                }


                $("#div_own img").each(function () {

                    $(this).dblclick(function () {

                        window.location.href = '/index?file_id=' + $(this).attr('id');

                    });

                });

            }

        });

    }

拼好查询json对象后,post到api去查询,然后根据返回的数据去构造kendoPager,最后我们去构造文件列表,每个文件在双击的时候,都会跳转到index界面读取文件的内容展示在kendospread sheet上。我们看一下效果。

wKioL1d4tOLiAYAPAACOsn1Oj7g429.png

分页,点击2到第二页

wKiom1d4tZvgUw6BAABRm97Ogr0127.png

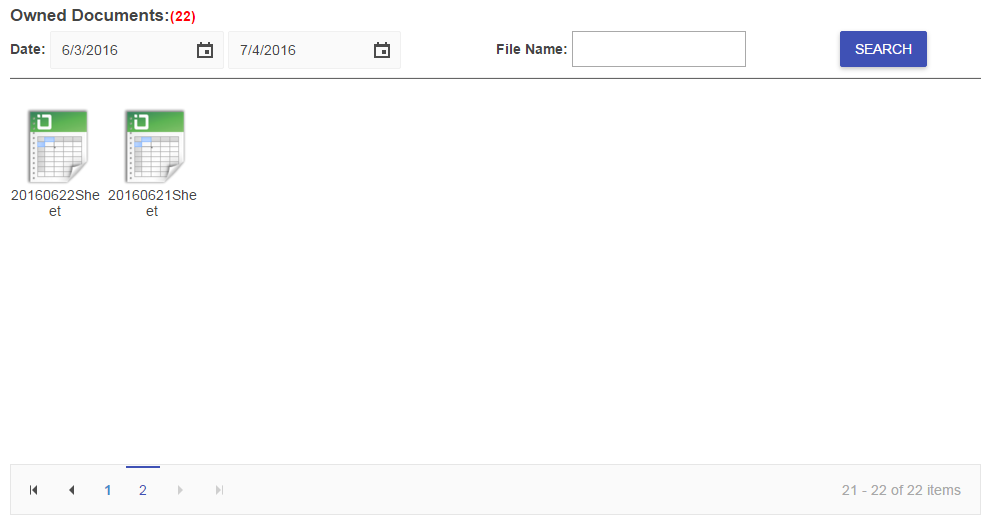
分页是没有问题的,美观大方。OK,对于Shared Document的js代码,和上面的基本一样。

wKiom1d4tzKy-U-HAABZ-kqq4Do613.png

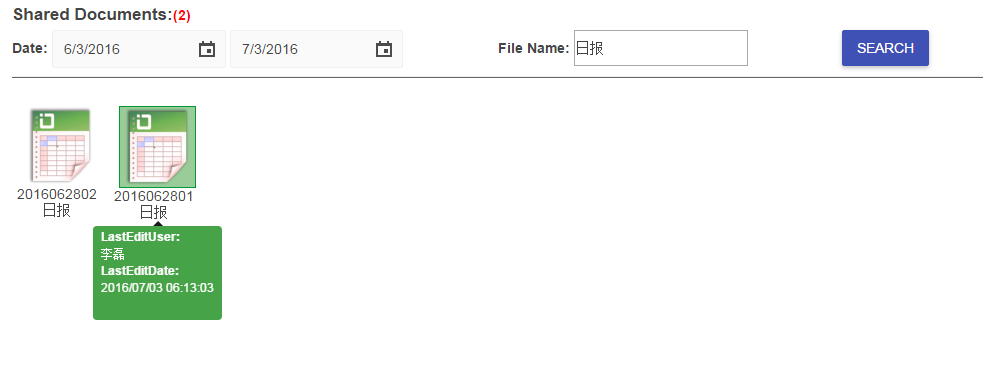
看上去只是多了个tooltip的说明,其实这个效果是bootstrap提供的,我们只需要写如下的代码即可。

1

2

3

4

5

6

7

8

 $("#div_share").append('<div style="width:10%;float:left">' 

                     '<div class="row-margin center-align-text tooltip-options" data-toggle="tooltip" data-placement="bottom" title="' + tooltipTemplate + '">' 

                     '<a href="javascript:void(0)" style="text-decoration: none;color:#666666">' 

                     '<img id="' + data.files[i]._id + '" class="excel-img" src="/images/excel_share.png"/></a>' 

                     '<div style="word-break: break-word;width:90px">' + data.files[i].name + '</div>' 

                     '</div></div>');


$("#div_share .tooltip-options").tooltip({ html : true });

OK最后我们看一下rest api。

1

2

3

var fileRoutes = require('../controller/filemng.js');

router.post('/file/owned/retrieve', fileRoutes.getOwnedFileList);

router.post('/file/shared/retrieve', fileRoutes.getSharedFileList);

根据url我们知道方法在filemng.js中。

1

2

3

4

5

6

7

8

9

10

11

12

13

14

15

16

17

18

19

20

21

22

23

24

25

26

27

28

exports.getOwnedFileList = function (req, res) {

    var data = JSON.parse(req.body.data);

    var fileName = data.fileName;

    var startDate = data.startDate;

    var endDate = data.endDate;

    var pageIndex = data.pageIndex;

    var pageSize = data.pageSize;

    var userId = data.userId;


    var query = fileModel.find({});

    query = query.where('createuserid', userId);


    if (fileName) {

        var regex = new RegExp(fileName, 'i');

        query = query.where('name', regex);

    }


    if (startDate && endDate) {

        query = query.where('createdate').gte(startDate).lte(endDate);

    }


    query.count().exec(function (error, count) {

        query.limit(pageSize).skip(pageIndex * pageSize).sort('-createdate')

        .exec("find"function (error, docs) {

            res.json({ files: docs, totalCount: count });

        });

    });

}

注意这里的查询,对于filename的模糊查询,用正则表达式。对于日期的查询,我们用gte和lte,大于和小于。最后我们先算出总数,再拿到分页的数据,将数据拼成json对象输出到客户端。

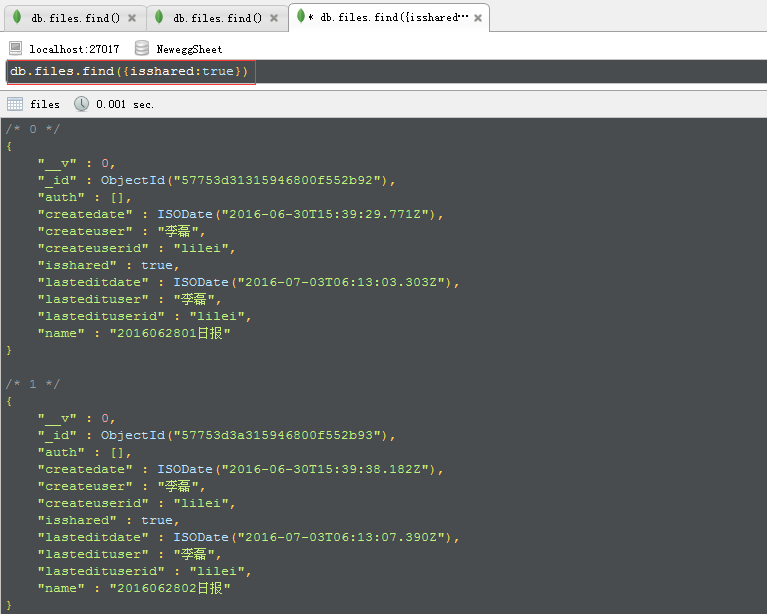
用robomongo查了一下,确实也是22条数据

wKioL1d4uGDw_RgoAAFE11Sp7Pc490.png

共享的文件也只有2个

wKioL1d4uPnxBi_AAACYMwvjVdw149.png

OK,今天就到这里,如果大家想要源码,估计要到实战15以后了,慢慢等吧。

原文转自:乐搏学院http://www.learnbo.com/front/article/cmsIndex

评论
添加红包

请填写红包祝福语或标题

红包个数最小为10个

红包金额最低5元

当前余额3.43前往充值 >
需支付:10.00
成就一亿技术人!
领取后你会自动成为博主和红包主的粉丝 规则
hope_wisdom
发出的红包
实付
使用余额支付
点击重新获取
扫码支付
钱包余额 0

抵扣说明:

1.余额是钱包充值的虚拟货币,按照1:1的比例进行支付金额的抵扣。
2.余额无法直接购买下载,可以购买VIP、付费专栏及课程。

余额充值