


技术使用
敏感词过滤
权限控制
登陆功能
前端界面是使用Bootstrap制作的
环境配置
服务端程序如何处理浏览器的请求:Spring MVC
服务端程序如何访问数据库:MyBatis
权限验证:Spring Security
系统监控:Spring Actuator
开发环境:
构建工具:Apache Maven
数据库:MySQL、Redis
应用服务器:Apache Tomcat(Web要部署到应用服务器才能运行)
版本控制工具:Git
Meavn
Meavn 构建项目、管理项目中jar包
下载包
在https://mvnrepository.com中找到包
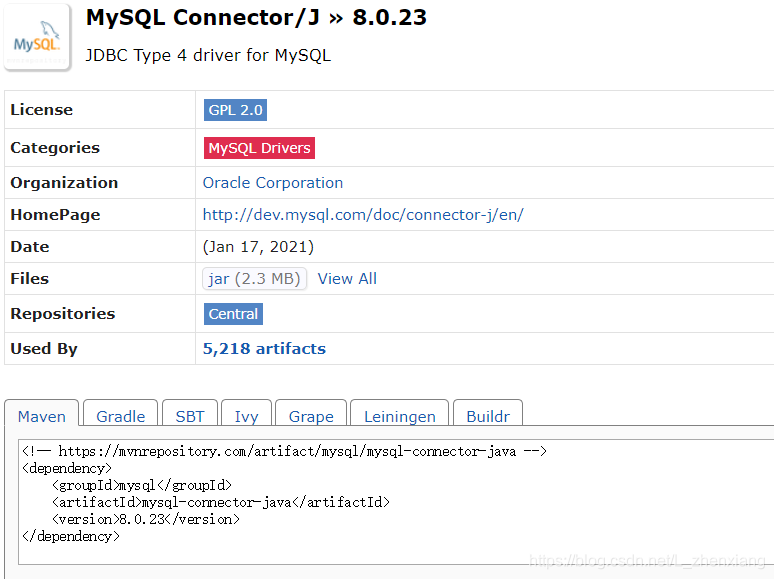
把代码copy到pom.xml的之下,保存后会自动下载
Spring Initializer
用Spring Initializer创建一个Spring Boot项目
在**https://start.spring.io/**中下载相应的包,然后利用其创建项目
直接在IDEA中open然后选中下载的文件即可创建一个Spring Boot项目
Spring Boot:起步依赖,自动配置,端点监控
改Tomcat的端口:在resource下的application.properties输入下面代码后重新启动(也可以run主函数)
server.port=8080
server.servlet.context-path=/community  //给项目取的访问路径
Spring
Spring Framework:框架
Spring Boot
Spring Cloud:微服务,把Spring差分成若干子部分,再集成
Spring Cloud Data Flow:做数据集成
Spring
Spring Core:IOC AOP 管理bean的
IOC :控制反转,面向对象编程的设计思想
Dependency Injection:依赖注入,IOC实现方式
IOC Container:‘实现依赖注入的关键,本质上是一个工厂
通过配置文件去关联不同的bean
@ComponentScan注解会自动扫描,配置类所在的包和子包里被下面四种注解注释的bean,4种注解(@Controller(处理请求的组件),@Service(业务组件),@Repository(数据库访问的组件),@Component(通用的))底层是@component ,可以被容器自动扫描
Spring MVC 入门
模板引擎(Thymeleaf):生成动态的HTML (www.thymeleaf.org)
查询Spring Boot的相应常用配置:https://docs.spring.io/spring-boot/docs/current/reference/html/appendix-application-properties.html#common-application-properties
去掉模板的缓存,在配置文件appliProperties里,加上
# ThymeleafProperties
spring.thymeleaf.cache=false
相关代码
@Controller
@RequestMapping("/alpha")
public class AlphaController {

    @Autowired
    private AlphaService alphaService;

    @RequestMapping("/hello")
    @ResponseBody
    public String sayHello() {
        return "Hello Spring Boot.";
    }

    @RequestMapping("/data")
    @ResponseBody
    public String getData() {
        return alphaService.find();
    }

    @RequestMapping("/http")
    public void http(HttpServletRequest request, HttpServletResponse response) {
        // 获取请求数据
        System.out.println(request.getMethod());
        System.out.println(request.getServletPath());
        Enumeration<String> enumeration = request.getHeaderNames();
        while (enumeration.hasMoreElements()) {
            String name = enumeration.nextElement();
            String value = request.getHeader(name);
            System.out.println(name + ": " + value);
        }
        System.out.println(request.getParameter("code"));

        // 返回响应数据
        response.setContentType("text/html;charset=utf-8");
        try (
                PrintWriter writer = response.getWriter();
        ) {
            writer.write("<h1>牛客网</h1>");
        } catch (IOException e) {
            e.printStackTrace();
        }
    }

    // GET请求,向服务器获取数据(也可以向服务器提交请求)
	//两种传参方式,和相应获取参数的方式
    // 1. /students?current=1&limit=20
    @RequestMapping(path = "/students", method = RequestMethod.GET)//path 声明访问路径,method声明请求的方式
    @ResponseBody
    //@RequestParam:将请求参数绑定到你控制器的方法参数上(是springmvc中接收普通参数的注解
    //required:是否包含该参数,默认为true,表示该请求路径中必须包含该参数,如果不包含就报错。
    //defaultValue:默认参数值,如果设置了该值,required=true将失效,自动为false,如果没有传该参数,就使用默认值
    public String getStudents(
            @RequestParam(name = "current", required = false, defaultValue = "1") int current,
            @RequestParam(name = "limit", required = false, defaultValue = "10") int limit) {
        System.out.println(current);
        System.out.println(limit);
        return "some students";
    }

    // 2./student/123
    @RequestMapping(path = "/student/{id}", method = RequestMethod.GET)
    @ResponseBody
    //@PathVariable{""},从请求中传递的信息
    public String getStudent(@PathVariable("id") int id) {
        System.out.println(id);
        return "a student";
    }

    // POST请求,浏览器向服务器提交数据
	//带有表单的网页,填写数据后才能传给服务器
    @RequestMapping(path = "/student", method = RequestMethod.POST)
    @ResponseBody
    public String saveStudent(String name, int age) {
        System.out.println(name);
        System.out.println(age);
        return "success";
    }

    // 响应HTML数据

    @RequestMapping(path = "/teacher", method = RequestMethod.GET)
    public ModelAndView getTeacher() {
        ModelAndView mav = new ModelAndView();
        mav.addObject("name", "张三");//模板里有多少变量就add多少
        mav.addObject("age", 30);
		//设置模板的路径和名字,templates目录(可省略)的demo路径下,模板名字是view
        mav.setViewName("/demo/view");
        return mav;
    }

    @RequestMapping(path = "/school", method = RequestMethod.GET)
	//String 表示返回的路径,前端控制器调用这个方法是把model实例化传给这个方法
	//这个方法内部中往model中存数据,前端控制器有这个model的引用也可以得到model,同时这个方法还返回view的路径,前端控制器就和上面方法一样有model还有view,传给模板引擎生成动态的HTML
    public String getSchool(Model model) {
        model.addAttribute("name", "北京大学");
        model.addAttribute("age", 80);
        return "/demo/view";   //返回view的路径
    }

    // 响应JSON数据(异步请求)
    // Java对象 -> JSON字符串 -> JS对象

    @RequestMapping(path = "/emp", method = RequestMethod.GET)
    @ResponseBody
    public Map<String, Object> getEmp() {
        Map<String, Object> emp = new HashMap<>();
        emp.put("name", "张三");
        emp.put("age", 23);
        emp.put("salary", 8000.00);
        return emp;
    }

    @RequestMapping(path = "/emps", method = RequestMethod.GET)
    @ResponseBody
    public List<Map<String, Object>> getEmps() {
        List<Map<String, Object>> list = new ArrayList<>();

        Map<String, Object> emp = new HashMap<>();
        emp.put("name", "张三");
        emp.put("age", 23);
        emp.put("salary", 8000.00);
        list.add(emp);

        emp = new HashMap<>();
        emp.put("name", "李四");
        emp.put("age", 24);
        emp.put("salary", 9000.00);
        list.add(emp);

        emp = new HashMap<>();
        emp.put("name", "王五");
        emp.put("age", 25);
        emp.put("salary", 10000.00);
        list.add(emp);

        return list;
    }

}
从前端控制器传过来的controller中得到的model,模板引擎获取model的变量,然后生成动态的网页
MyBatis 入门
www.mybatis.org/mybatis-3
www.mybatis.org/spring
MyBatis核心组件
- SqlSessionFactory: 用于创建SqlSession的工厂类
- SqlSession: MyBatis的核心组件,用于向数据库执行SQL
- 主配置文件:XML配置文件,可以对MyBatis的底层行为做出详细的配置
- Mapper接口:就是DAO接口,在MyBatis中习惯性的称之为Mapper
- Mapper映射器:用于编写SQL,并将SQL和实体类映射的组件,采用XML、注解均可实现
前三个核心组件,在Spring Boot框架中不用编写,会自动的初始化SqlSessionFactory,自动的创建SqlSession,自动的整合配置文件,可以把主配置文件中的内容配置到Properties文件中。
使用MyBatis去访问数据库只需要写出接口(包含要实现的方法),不用写出实现类,底层自动实现接口,前提把每个增删改查的方法所依赖的sql通过映射器告诉它。
mapper映射器中的id对应mapper接口中同名的方法,例如: 下面的映射器方法 对应接口中 User selectById(int id);方法
# MybatisProperties
# 映射文件的存放位置(写sql文件的地方);classpath(类路径)指编译后target中的class文件夹
mybatis.mapper-locations=classpath:mapper/*.xml
# 实体类去封装数据,声明实体类所在的包的包名(entity文件夹)
mybatis.type-aliases-package=com.nowcoder.community.entity
# 启用自动生成组件
mybatis.configuration.useGeneratedKeys=true
# 表里的属性和类中的字段(不同的有规律的命名方式)去自动匹配, header_url(表里的属性)  headerUrl(类中的字段)
mybatis.configuration.mapUnderscoreToCamelCase=true
<select id="selectById" resultType="User">
        select <include refid="selectFields"></include>
        from user
        where id = #{id}
    </select>
Mapper映射器要体现SQL和实体类映射关系,例如查到一个user表中数据返回时要用一个user类去封装,类中的字段对应其属性。.xml配置文件放在resource文件夹的mapper中。
entity包中,实体类用来封装数据库查找到的数据,实体类要有相应的字段与表中的属性进行对应。
可以在Mapper映射器(.xml)中写sql访问方法,也可以使用注解,直接在Mapper中写sql访问方法。
Properties配置文件添加
#Properties文件配置 mysql 连接池 mybatis
#连接池(数据源):统一管理连接的工厂,能统一的初始化一部分连接去反复使用,管理连接的上限

# DataSourceProperties
#mysql 驱动
spring.datasource.driver-class-name=com.mysql.cj.jdbc.Driver
#mysql访问路径和相关设置
spring.datasource.url=jdbc:mysql://localhost:3306/community?characterEncoding=utf-8&useSSL=false&serverTimezone=Hongkong
#用户名和密码
spring.datasource.username=root
spring.datasource.password=123456
#连接池的配置
# 连接池的类
spring.datasource.type=com.zaxxer.hikari.HikariDataSource
# 最大连接数
spring.datasource.hikari.maximum-pool-size=15
#最小空闲连接
spring.datasource.hikari.minimum-idle=5
# 超时时间
spring.datasource.hikari.idle-timeout=30000


# MybatisProperties
# 映射文件的存放位置(写sql文件的地方);classpath(类路径)指编译后target中的class文件夹
mybatis.mapper-locations=classpath:mapper/*.xml
# 实体类去封装数据,声明实体类所在的包的包名(entity文件夹)
mybatis.type-aliases-package=com.nowcoder.community.entity
# 启用自动生成组件
mybatis.configuration.useGeneratedKeys=true
# 表里的属性和类中的字段(不同的有规律的命名方式)去自动匹配, header_url(表里的属性)  headerUrl(类中的字段)
mybatis.configuration.mapUnderscoreToCamelCase=true

# logger
# 设置日志文件
logging.level.com.nowcoder.community=debug
<?xml version="1.0" encoding="UTF-8" ?>
<!DOCTYPE mapper
        PUBLIC "-//mybatis.org//DTD Mapper 3.0//EN"
        "http://mybatis.org/dtd/mybatis-3-mapper.dtd">
<!--namespace为要服务配置的Mapper接口的名-->
<mapper namespace="com.nowcoder.community.dao.UserMapper">

    <sql id="insertFields">
        username, password, salt, email, type, status, activation_code, header_url, create_time
    </sql>

    <sql id="selectFields">
        id, username, password, salt, email, type, status, activation_code, header_url, create_time
    </sql>

	<!--id和方法名对应,resultType声明返回类型-->
    <select id="selectById" resultType="User">
        select <include refid="selectFields"></include>
        from user
        where id = #{id}
    </select>

    <select id="selectByName" resultType="User">
        select <include refid="selectFields"></include>
        from user
        where username = #{username}
    </select>

    <select id="selectByEmail" resultType="User">
        select <include refid="selectFields"></include>
        from user
        where email = #{email}
    </select>

	<!--id和方法名对应,parameterType增加的参数声明参数类型(java自带不用声明),keyProperty:id组件对应的属性 -->
    <insert id="insertUser" parameterType="User" keyProperty="id">
		<!--id是自动生成的-->
        insert into user (<include refid="insertFields"></include>)
		<!--#{}引入参数(方法中的参数),填入user对应的属性名-->
        values(#{username}, #{password}, #{salt}, #{email}, #{type}, #{status}, #{activationCode}, #{headerUrl}, #{createTime})
    </insert>

    <update id="updateStatus">
        update user set status = #{status} where id = #{id}
    </update>

    <update id="updateHeader">
        update user set header_url = #{headerUrl} where id = #{id}
    </update>

    <update id="updatePassword">
        update user set password = #{password} where id = #{id}
    </update>

</mapper>
社区首页
写完mapper.xml的内容,最好去测试一下,有可能出错
- 先把相应的mapper注入
- 然后调用相应的方法并打印结果
- 比对打印的sql是否正确
调试技巧
1.状态码
-
200 ok
-
302 Found :重定向,
例如:浏览器使用服务器的删除功能,返回重定向网址,比如去显示服务器的查询功能 -
404 Not Found: 功能不存在,往往路径错了
-
500 :服务器出问题了
2.服务器断点调试技巧
快捷键:
F8 向下执行一行
F7 进入当前行的方法内
F9 程序向下执行,直到下一个断点位置
可以在下方看到variables的具体内部的值
管理断点的功能可以批量管理设置的断点
3.客户端断点调试
1.在浏览器处,右键检查打开调试工具
2.在sources中找到前端的代码,例如js文件,打断点,然后点页面上对应的功能
快捷键:
F8执行到下一个断点处,或者执行到底
F10向下一步
F11进入代码内部
Breakpoints:管理断点
想要看某一个变量的值:选中后右键->add selected text to watches
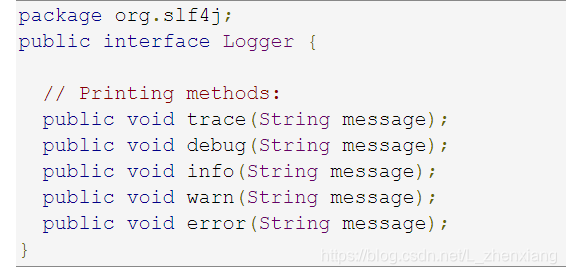
4.设置日志级别,并将日志输出到不同的终端
https://logback.qos.ch
版本控制
Git常用命令
git config --list :当前已有配置
git config --gloabl user.name “xxx”: 配置名字
git config --global user.email “xxx.com”:配置邮箱
代码传到本地仓库:
- cd 到代码所在的目录
- git init 先初始化一下
- git add * :把内容都到加到git中, (git add *.java 把java文件都加进去)
- git status 查看一下
- git commit (-m ‘Test1’): 提交到仓库,括号里代码加进去为显示备注
- ssh-keygen -t rsa -C “git账号邮箱” :创建密钥,后面都回车.
git remote add origin https://xxx.git :给远程仓库起个名字origin
git push -u origin master :把代码传到远程仓库origin的分块master中
git clone xxx.git :把远程仓库下载到本地
IDEA操作git
1.创建初始化本地仓库
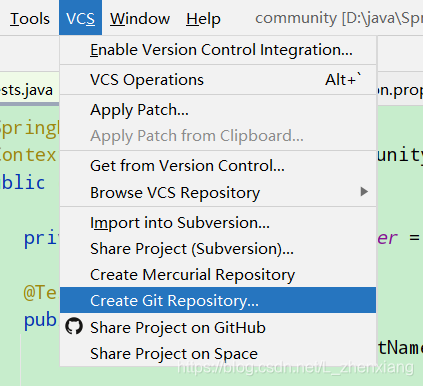
2.选中目录,然后就已经添加到本地仓库中了
3.把代码提交到本地仓库
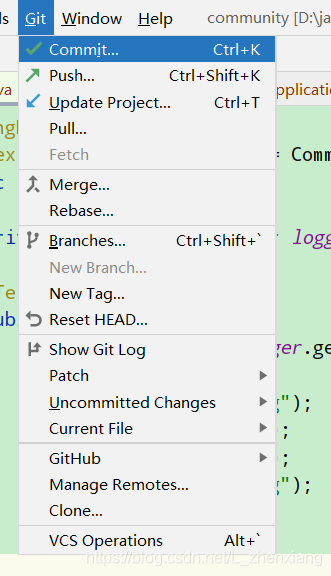
4.然后选择要提交的代码:如java文件 resource 文件 test文件 pom.xml


 5万+
5万+

 被折叠的 条评论
为什么被折叠?
被折叠的 条评论
为什么被折叠?
 到【灌水乐园】发言


