


 本文详细分析了Java并发容器LinkedBlockingQueue的实现原理,包括其基于单向链表的数据结构、类的继承关系、内部类Node、属性、构造函数以及核心操作如put、offer和take的源码解读。此外,还对比了LinkedBlockingQueue与ArrayBlockingQueue的差异,并给出了使用示例,展示了其在多线程环境下的工作流程。
目录
2. LinkedBlockingQueue(int)型构造函数
3. LinkedBlockingQueue(Collection)型构造函数
LinkedBlockingQueue和ArrayBlockingQueue的差异:
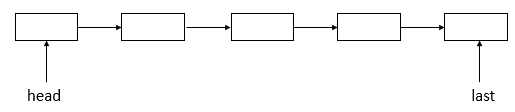
1、LinkedBlockingQueue数据结构
LinkedBlockingQueue是一种基于单向链表的阻塞队列。其数据结构如下,包含了头结点和尾节点。
2、LinkedBlockingQueue源码分析
类的继承关系
public class LinkedBlockingQueue<E> extends AbstractQueue<E>
        implements BlockingQueue<E>, java.io.Serializable {}
说明:LinkedBlockingQueue继承了AbstractQueue抽象类,AbstractQueue定义了对队列的基本操作;同时实现了BlockingQueue接口,BlockingQueue表示阻塞型的队列,其对队列的操作可能会抛出异常;同时也实现了Searializable接口,表示可以被序列化。
类的内部类
LinkedBlockingQueue内部有一个Node类,表示结点,用于存放元素,其源码如下。
static class Node<E> {

        // 元素
        E item;

        /**
         * One of:
         * - the real successor Node
         * - this Node, meaning the successor is head.next
         * - null, meaning there is no successor (this is the last node)
         */
        // next域
        Node<E> next;
        // 构造函数
        Node(E x) {
            item = x;
         }
    }
说明:Node类非常简单,包含了两个域,分别用于存放元素和指示下一个结点
类的属性
因为队头和队尾是2个指针分开操作的,所以用了2把锁+2个条件,同时有1个AtomicInteger的原子变量记录count数。
public class LinkedBlockingQueue<E> extends AbstractQueue<E>
        implements BlockingQueue<E>, java.io.Serializable {
    // 版本序列号
    private static final long serialVersionUID = -6903933977591709194L;
    // 容量
    private final int capacity;
    // 元素的个数,原子变量
    private final AtomicInteger count = new AtomicInteger();
     /**
     * Head of linked list.
     * Invariant: head.item == null
     */
    // 头结点 ,单向链表的头部,队列的头元素 值为null
    transient Node<E> head;
    // 尾结点 ,单向链表的尾部
    private transient Node<E> last;

// 两把锁,两个条件
    // 取元素锁
    private final ReentrantLock takeLock = new ReentrantLock();
    // 非空条件
    private final Condition notEmpty = takeLock.newCondition();
    // 存元素锁
    private final ReentrantLock putLock = new ReentrantLock();
    // 非满条件
    private final Condition notFull = putLock.newCondition();
}
说明:可以看到LinkedBlockingQueue包含了读、写重入锁(与ArrayBlockingQueue不同,ArrayBlockingQueue只包含了一把重入锁),读写操作进行了分离,并且不同的锁有不同的Condition条件(与ArrayBlockingQueue不同,ArrayBlockingQueue是一把重入锁的两个条件)。
类的构造函数
1. LinkedBlockingQueue()型构造函数
public LinkedBlockingQueue() {
        this(Integer.MAX_VALUE);
    }
在其构造方法中,如果不指定队列的总容量,默认为Integer.MAX_VALUE。
2. LinkedBlockingQueue(int)型构造函数
public LinkedBlockingQueue(int capacity) {
        // 初始化容量必须大于0
        if (capacity <= 0) throw new IllegalArgumentException();
        // 初始化容量
        this.capacity = capacity;
        // 初始化头结点和尾结点
        last = head = new Node<E>(null);
    }
说明:该构造函数用于创建一个具有给定(固定)容量的 LinkedBlockingQueue。
3. LinkedBlockingQueue(Collection<? extends E>)型构造函数
public LinkedBlockingQueue(Collection<? extends E> c) {
        // 调用重载构造函数
        this(Integer.MAX_VALUE);
        // 存锁
        final ReentrantLock putLock = this.putLock;
        // 获取锁
        putLock.lock(); // Never contended, but necessary for visibility
        try {
            int n = 0;
            for (E e : c) { // 遍历c集合
                if (e == null) // 元素为null,抛出异常
                    throw new NullPointerException();
                if (n == capacity) //
                    throw new IllegalStateException("Queue full");
                enqueue(new Node<E>(e));
                ++n;
            }
            count.set(n);
        } finally {
            putLock.unlock();
        }
    }
说明:该构造函数用于创建一个容量是 Integer.MAX_VALUE 的 LinkedBlockingQueue,最初包含给定 collection 的元素,元素按该 collection 迭代器的遍历顺序添加。
核心函数分析
1. put函数
该方法没有返回值,当队列已满时,会阻塞当前线程
public void put(E e) throws InterruptedException {
        // 值不为空
        if (e == null) throw new NullPointerException();
        // Note: convention in all put/take/etc is to preset local var
        // holding count negative to indicate failure unless set.
        //
        int c ;
        // 新生结点
        Node<E> node = new Node<E>(e);
        // 存元素锁
        final ReentrantLock putLock = this.putLock;
        // 元素个数
        final AtomicInteger count = this.count;
        // 如果当前线程未被中断,则获取锁
        putLock.lockInterruptibly();
        try {
            /*
             * Note that count is used in wait guard even though it is
             * not protected by lock. This works because count can
             * only decrease at this point (all other puts are shut
             * out by lock), and we (or some other waiting put) are
             * signalled if it ever changes from capacity. Similarly
             * for all other uses of count in other wait guards.
             */
            while (count.get() == capacity) { // 元素个数到达指定容量
                // 在notFull条件上进行等待
                notFull.await();
            }
            // 入队列
            enqueue(node);
            // 更新元素个数,返回的是以前的元素个数
            c = count.getAndIncrement();
            if (c + 1 < capacity) // 元素个数是否小于容量
                // 唤醒在notFull条件上等待的某个线程
                // 如果队列还有剩余空间,则通知其他put线程
                notFull.signal();
        } finally {
            // 释放锁
            putLock.unlock();
        }
        if (c == 0) //c是放入元素之前的元素个数, 元素个数为0,表示已有take线程在notEmpty条件上进入了等待,则需要唤醒在notEmpty条件上等待的take线程
            signalNotEmpty();
    }
put会通知put,也会通知take
说明:put函数用于存放元素,其流程如下。
① 判断元素是否为null,若是,则抛出异常,否则,进入步骤②
② 获取存元素锁,并上锁,如果当前线程被中断,则抛出异常,否则,进入步骤③
③ 判断当前队列中的元素个数是否已经达到指定容量,若是,则在notFull条件上进行等待,否则,进入步骤④
④ 将新生结点入队列,更新队列元素个数,若元素个数小于指定容量,则唤醒在notFull条件上等待的线程,表示可以继续存放元素。进入步骤⑤
⑤ 释放锁,判断结点入队列之前的元素个数是否为0,若是,则唤醒在notEmpty条件上等待的线程(表示队列中没有元素,取元素线程被阻塞了)。
put函数中会调用到enqueue函数和signalNotEmpty函数,
enqueue函数
源码如下
private void enqueue(Node<E> node) {
        // assert putLock.isHeldByCurrentThread();
        // assert last.next == null;
        // 更新尾结点域
        last = last.next = node;
    }
说明:可以看到,enqueue函数只是更新了尾节点。
signalNotEmpty函数
通知 take线程,源码如下,
private void signalNotEmpty() {
        // 取元素锁
        final ReentrantLock takeLock = this.takeLock;
        // 获取锁
        takeLock.lock();
        try {
            // 唤醒在notEmpty条件上等待的某个take线程
            notEmpty.signal();
        } finally {
            // 释放锁
            takeLock.unlock();
        }
    }
说明:signalNotEmpty函数用于唤醒在notEmpty条件上等待的线程,其首先获取取元素锁,然后上锁,然后唤醒在notEmpty条件上等待的take线程,最后释放取元素锁。
2、offer函数
该方法返回true或false,不会阻塞,直接返回
public boolean offer(E e) {
        // 确保元素不为null
        if (e == null) throw new NullPointerException();
        // 获取计数器
        final AtomicInteger count = this.count;
        if (count.get() == capacity) // 元素个数到达指定容量
            // 返回
            return false;
        //
        int c = -1;
        // 新生结点
        Node<E> node = new Node<E>(e);
        // 存元素锁
        final ReentrantLock putLock = this.putLock;
        // 获取锁
        putLock.lock();
        try {
            if (count.get() < capacity) { // 元素个数小于指定容量
                // 入队列
                enqueue(node);
                // 更新元素个数,返回的是以前的元素个数
                c = count.getAndIncrement();
                if (c + 1 < capacity) // 元素个数是否小于容量
                    // 唤醒在notFull条件上等待的某个线程
                    notFull.signal();
            }
        } finally {
            // 释放锁
            putLock.unlock();
        }
        if (c == 0) // 元素个数为0,则唤醒在notEmpty条件上等待的某个线程
            signalNotEmpty();
        return c >= 0;
}说明:offer函数也用于存放元素,offer函数添加元素不会抛出异常(其他的域put函数类似)。
3、take函数
public E take() throws InterruptedException {
        E x;
        int c = -1;
        // 获取计数器
        final AtomicInteger count = this.count;
        // 获取取元素锁
        final ReentrantLock takeLock = this.takeLock;
        // 如果当前线程未被中断,则获取锁
        takeLock.lockInterruptibly();
        try {
            while (count.get() == 0) { // 元素个数为0
                // 在notEmpty条件上等待
                notEmpty.await();
            }
            // 出队列
            x = dequeue();
            // 更新元素个数,返回的是以前的元素个数
            c = count.getAndDecrement();
            if (c > 1) // 元素个数大于1,则唤醒在notEmpty上等待的某个线程,唤醒其他 take线程
                notEmpty.signal();
        } finally {
            // 释放锁
            takeLock.unlock();
        }
        if (c == capacity) // 元素个数到达指定容量
            // 唤醒在notFull条件上等待的某个put线程
            signalNotFull();
        // 返回
        return x;
    }
说明:take函数用于获取一个元素,其与put函数相对应,其流程如下。
① 获取取元素锁,并上锁,如果当前线程被中断,则抛出异常,否则,进入步骤②
② 判断当前队列中的元素个数是否为0,若是,则在notEmpty条件上进行等待,否则,进入步骤③
③ 出队列,更新队列元素个数,若元素个数大于1,则唤醒在notEmpty条件上等待的线程,表示可以继续取元素。进入步骤④
④ 释放锁,判断结点出队列之前的元素个数是否为指定容量,若是,则唤醒在notFull条件上等待的线程(表示队列已满,存元素线程被阻塞了)。
take函数调用到了dequeue函数和signalNotFull函数,d
equeue函数
源码如下
private E dequeue() {
        // assert takeLock.isHeldByCurrentThread();
        // assert head.item == null;
        // 头结点
        Node<E> h = head;
        // 第一个结点
        Node<E> first = h.next;
        // 头结点的next域为自身
        h.next = h; // help GC
        // 更新头结点
        head = first;
        // 返回头结点的元素
        E x = first.item;
        // 头结点的item域赋值为null
        first.item = null;
        // 返回结点元素
        return x;
    }
说明:dequeue函数的作用是将头结点更新为之前头结点的下一个结点,并且将更新后的头结点的item域设置为null。
signalNotFull函数
的源码如下
private void signalNotFull() {
        // 存元素锁
        final ReentrantLock putLock = this.putLock;
        // 获取锁
        putLock.lock();
        try {
            // 唤醒在notFull条件上等待的某个put线程
            notFull.signal();
        } finally {
            // 释放锁
            putLock.unlock();
        }
    }
说明:signalNotFull函数用于唤醒在notFull条件上等待的某个线程,其首先获取存元素锁,然后上锁,然后唤醒在notFull条件上等待的put线程,最后释放存元素锁。
LinkedBlockingQueue和ArrayBlockingQueue的差异:
1. 为了提高并发度,用2把锁,分别控制队头、队尾的操作。意味着在put(...)和put(...)之间、take()与take()之间是互斥的,put(...)和take()之间并不互斥。但对于count变量,双方都需要
操作,所以必须是原子类型。
2. 因为各自拿了一把锁,所以当需要调用对方的condition的signal时,还必须再加上对方的锁,就是signalNotEmpty()和signalNotFull()方法。
LinkedBlockingQueue的使用
下面通过一个示例来了解LinkedBlockingQueue的使用。
public class PutThread extends Thread {

    private LinkedBlockingQueue<Integer> linkedBlockingQueue;


    @Override
    public void run() {

        for (int i = 0; i <10 ; i++) {

            try {
                System.out.println("put "+ i);
                linkedBlockingQueue.put(i);
                Thread.sleep(100);
            } catch (InterruptedException e) {
                e.printStackTrace();
            }
        }
    }

    public PutThread(LinkedBlockingQueue<Integer> linkedBlockingQueue){
        this.linkedBlockingQueue=linkedBlockingQueue;
    }
}
public class GetThread extends Thread {
    private LinkedBlockingQueue<Integer> linkedBlockingQueue;

    @Override
    public void run() {
        for (int i = 0; i <10 ; i++) {
            try{
                Integer take = linkedBlockingQueue.take();
                System.out.println("get "+take);
                Thread.sleep(100);
            }catch (InterruptedException e){
                e.printStackTrace();
            }
        }
    }

    public GetThread(LinkedBlockingQueue<Integer> linkedBlockingQueue){
        this.linkedBlockingQueue=linkedBlockingQueue;
    }
}
public class LinkedBlockingQueueDemo {

    public static void main(String[] args) {

        LinkedBlockingQueue<Integer> linkedBlockingQueue = new LinkedBlockingQueue<Integer>();

        PutThread putThread = new PutThread(linkedBlockingQueue);
        GetThread getThread = new GetThread(linkedBlockingQueue);
        putThread.start();
        getThread.start();

    }


}
打印结果:
put 0
get 0
put 1
get 1
put 2
get 2
put 3
get 3
put 4
get 4
put 5
get 5
put 6
get 6
put 7
get 7
put 8
get 8
put 9
get 9
说明:示例中使用了两个线程,一个用于存元素,一个用于读元素,存和读各10次,每个线程存一个元素或者读一个元素后都会休眠100ms,可以看到结果是交替打 印,并且首先打印的肯定是put线程语句(因为若取线程先取元素,此时队列并没有元素,其会阻塞,等待存线程存入元素),并且最终程序可以正常结束。
① 若修改取元素线程,将取的元素的次数修改为15次(for循环的结束条件改为15即可),
class GetThread2 extends Thread {
    private LinkedBlockingQueue<Integer> lbq;

    public GetThread2(LinkedBlockingQueue<Integer> lbq) {
        this.lbq = lbq;
    }

    public void run() {
        for (int i = 0; i < 15; i++) {
            try {
                System.out.println("take " + lbq.take());
                Thread.sleep(100);
            } catch (InterruptedException e) {
                e.printStackTrace();
            }
        }
    }
}
运行结果如下:
put 0
take 0
put 1
take 1
put 2
take 2
put 3
take 3
put 4
take 4
put 5
take 5
put 6
take 6
put 7
take 7
put 8
take 8
put 9
take 9
说明:运行结果与上面的运行结果相同,但是,此时程序无法正常结束,因为take方法被阻塞了,等待被唤醒。
LinkedBlockingQueue的源码相对比较简单,其也是通过ReentrantLock和Condition条件来保证多线程的正确访问的,并且取元素(出队列)和存元素(入队列)是采用不同的锁,进行了读写分离,有利于提高并发度。
https://www.cnblogs.com/leesf456/p/5539071.html
https://blog.youkuaiyun.com/sinat_36553913/article/details/79533606


 54
54

 被折叠的 条评论
为什么被折叠?
被折叠的 条评论
为什么被折叠?
 到【灌水乐园】发言


